background image

54

US

Using Various Additional 
Functions

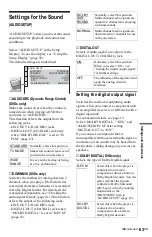
Locking Discs 

(CUSTOM 

PARENTAL CONTROL, PARENTAL 

CONTROL)

You can set two kinds of playback restrictions 
for a disc.
• Custom Parental Control

You can set playback restrictions so that the 
player will not play inappropriate discs.

• Parental Control

Playback of some DVD VIDEOs can be 
limited according to a predetermined level 
such as the age of the users. Scenes may be 
blocked or replaced with different scenes.

The same password is used for both Parental 
Control and Custom Parental Control.

Custom Parental Control


You can set the same Custom Parental 
Control password for up to 40 discs. When 
you set the 41st-disc, the first disc is canceled.

1

Insert the disc you want to lock.

If the disc is playing, press 

x

 to stop 

playback.

2

Press DISPLAY while the player is in 
stop mode.

The Control Menu appears.

3

Press 

X

/

x

 to select 


(PARENTAL CONTROL), then press 
ENTER.

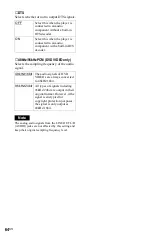
The options for “PARENTAL 
CONTROL” appear.

4

Press 

X

/

x

 to select “ON 

t

,” then 

press ENTER.

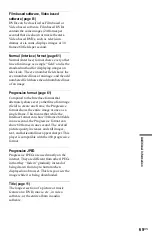
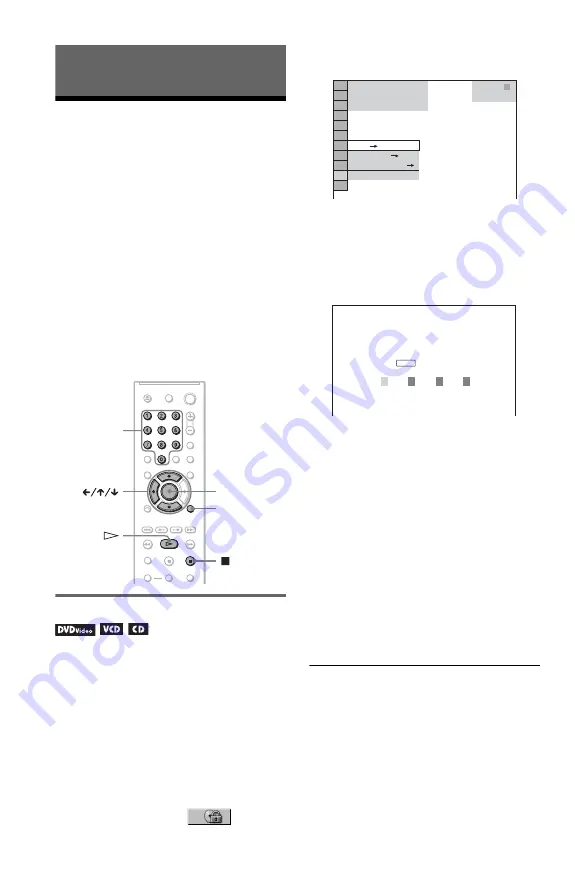
If you have not entered a password

The display for registering a new 
password appears.

Enter a 4-digit password using the 
number buttons, then press ENTER.
The display for confirming the password 
appears.

When you have already registered a 

password

The display for entering the password 
appears.

5

Enter or re-enter your 4-digit password 
using the number buttons, then press 
ENTER.

“Custom parental control is set.” appears 
and then the screen returns to the Control 
Menu.

To turn off the Custom Parental Control 
function

1

Follow steps 1 to 3 of “Custom Parental 
Control
.”

2

Press 

X

/

x

 to select “OFF 

t

,” then press 

ENTER.

3

Enter your 4-digit password using the 
number buttons, then press ENTER.

ENTER

DISPLAY

Number 
buttons

STOP

1 8 ( 3 4 )

1 2 ( 2 7 )

T       1 : 3 2 : 5 5

DVD VIDEO

PASSWORD

ON
PLAYER

OFF

PARENTAL CONTROL

Enter a new 4-digit password, 

then press

         .

ENTER

Summary of Contents for DVP-NS47P - Cd/dvd Player

Page 1: ...2 895 890 31 1 2007 Sony Corporation DVP NS47P Operating Instructions Operating Instructions Manual de instrucciones ES US CD DVD Player ...

Page 2: ...ce pursuant to Part 15 of the FCC Rules These limits are designed to provide reasonable protection against harmful interference in a residential installation This equipment generates uses and can radiate radio frequency energy and if not installed and used in accordance with the instructions may cause harmful interference to radio communications However there is no guarantee that interference will...

Page 3: ...onvenience receptacles beyond their capacity since this can result in fire or electric shock Object and Liquid Entry Never push objects of any kind into the set through openings as they may touch dangerous voltage points or short out parts that could result in a fire or electric shock Never spill liquid of any kind on the set Attachments Do not use attachments not recommended by the manufacturer a...

Page 4: ...nna Lead in Wire Ground Clamp Antenna Discharge unit NEC Section 810 20 Grounding Conductors NEC Section 810 21 Ground Clamps Power Service Grounding Electrode System NEC Art 250 Part H Electric Service Equipment NEC NATIONAL ELECTRICAL CODE Damage Requiring Service Unplug the set from the wall outlet and refer servicing to qualified service personnel under the following conditions When the power ...

Page 5: ...ondense on the lenses inside the player Should this occur the player may not operate properly In this case remove the disc and leave the player turned on for about half an hour until the moisture evaporates When you move the player take out any discs If you don t the disc may be damaged For the model supplied with the AC plug adaptor If the AC plug of your unit does not fit into the wall outlet at...

Page 6: ...26 Selecting ORIGINAL or PLAY LIST in DVD VR Mode 26 Playing VIDEO CDs With PBC Functions PBC Playback 27 Various Play Mode Functions Program Play Shuffle Play Repeat Play A B Repeat Play 28 Searching for a Scene 33 Searching for a Particular Point on a Disc Scan Slow motion Play Freeze Frame 33 Searching for a Title Chapter Track Scene etc 34 Searching by Scene PICTURE NAVIGATION 36 Viewing Infor...

Page 7: ... those on the remote DVD may be used as a general term for commercial DVDs DVD RWs DVD Rs DVD Rs DL VR mode and DVD RWs DVD Rs DVD Rs DL VR mode video mode The meaning of the icons used in this manual is described below Icons Meaning Functions available for commercial DVDs and DVD RWs DVD Rs DVD Rs DL in VR mode or DVD RWs DVD Rs DVD Rs DL in video mode Functions available for DVD RWs DVD Rs DVD R...

Page 8: ... Data part of CD Extras DVD Audio discs HD layer on Super Audio CDs Also the player cannot play the following discs A commercial DVD with a different region code A disc recorded in a color system other than NTSC such as PAL or SECAM this player conforms to the NTSC color system A disc that has a non standard shape e g card heart A disc with paper or stickers on it A disc that has the adhesive of c...

Page 9: ...be playable by this product Images in DVD VR mode with CPRM protection may not be played if they contain a copy protection signal Copyright lock appears on the screen CPRM Content Protection for Recordable Media is a coding technology that protects the copyright of images Note on DualDiscs A DualDisc is a two sided disc product which mates DVD recorded material on one side with digital audio mater...

Page 10: ...n 23 B Disc tray 23 C Front panel display 11 D A open close button 23 E H play button 23 F x stop button 24 G remote sensor 16 Rear panel A DIGITAL OUT COAXIAL jack 19 B LINE OUT L R AUDIO jacks 19 C LINE OUT VIDEO jack 17 D COMPONENT VIDEO OUT jacks 17 COMPONENT VIDEO OUT PR Y PB R AUDIO L DIGITAL OUT LINE OUT COAXIAL VIDEO ...

Page 11: ... DATA DVD MP3 audio or VIDEO CD without PBC Current title chapter or playing time 37 Lights up when you can change the angle 43 Lights up during Repeat Play 31 Playing status Current scene or playing time 37 Playing status Lights up during A B Repeat Play 32 Playing time 37 Current track 37 Lights up during Repeat Play 31 Playing status continued ...

Page 12: ...K ZOOM button 24 50 L SLOW PLAY FAST PLAY buttons 24 M AUDIO button 40 N SUBTITLE button 43 50 O 1 on standby button 23 P VOL volume buttons 57 The button has a tactile dot Q TV VIDEO button 57 R PICTURE NAVI picture navigation button 36 50 S TIME TEXT button 37 T MENU button 26 U ENTER button 21 V DISPLAY button 13 W H PLAY button 23 The H button has a tactile dot X x STOP button 24 Y X PAUSE but...

Page 13: ... Displays the index number for VIDEO CDs MP3 audio track number or JPEG image file number for DATA CDs DATA DVDs 3 Displays Super VCD as SVCD 4 Displays the date for JPEG files To turn off the display Press DISPLAY Control Menu display 1 m Control Menu display 2 DATA CDs DATA DVDs only m Control Menu display off OFF OFF SET ON PLAY 1 8 3 4 1 2 2 7 T 1 3 2 5 5 DVD VIDEO Quit PROGRAM ENTER DISPLAY C...

Page 14: ...e 32 Specifies the parts you want to play repeatedly CUSTOM PICTURE MODE page 44 Adjusts the video signal from the player You can select the picture quality that best suits the program you are watching SHARPNESS page 46 Exaggerates the outline of the image to produce a sharper picture PARENTAL CONTROL page 54 Set to prohibit playback on this player SETUP page 58 QUICK Setup page 21 Use Quick Setup...

Page 15: ...y The ORIGINAL PLAY LIST indicator lights up in green when you select PLAY LIST default setting The CUSTOM PICTURE MODE indicator lights up in green when any setting other than STANDARD is selected MODE MP3 JPEG page 52 Selects the data type MP3 audio track AUDIO JPEG image file IMAGE or both AUTO to be played when playing a DATA CD or DATA DVD t ...

Page 16: ...ug adaptor is included with some models Step 2 Inserting Batteries Into the Remote You can control the player using the supplied remote Insert two Size AA R6 batteries by matching the 3 and ends on the batteries to the markings inside the compartment When using the remote point it at the remote sensor on the player Notes Do not leave the remote in an extremely hot or humid place Do not drop any fo...

Page 17: ...re connecting to a video input jack Connect the yellow plug of an audio video cord supplied to the yellow video jack You will enjoy standard quality images A VIDEO AUDIO INPUT L R PR PB Y COMPONENT VIDEO IN B COMPONENT VIDEO OUT PR Y PB R AUDIO L DIGITAL OUT COAXIAL LINE OUT VIDEO Audio video cord supplied l Signal flow yellow CD DVD player TV projector or AV amplifier receiver green Component vid...

Page 18: ...sive 480p format signals use this connection and set PROGRESSIVE COMPONENT OUT in SCREEN SETUP to ON page 61 to output progressive signals When connecting to a wide screen TV Depending on the disc the image may not fit your TV screen To change the aspect ratio see page 60 Note Do not connect a VCR etc between your TV and the player If you pass the player signals via the VCR you may not receive a c...

Page 19: ...AUDIO INPUT L R B A COMPONENT VIDEO OUT PR Y PB R AUDIO L DIGITAL OUT LINE OUT COAXIAL VIDEO R AUDIO L LINE OUT VIDEO DIGITAL OUT COAXIAL AV amplifier receiver with a decoder red TV projector or AV amplifier receiver Audio video cord supplied Signal flow Coaxial digital cord not supplied to DIGITAL OUT COAXIAL to LINE OUT L R AUDIO Rear L CD DVD player white yellow yellow white red Speakers Front ...

Page 20: ...t Dolby Digital 5 1ch DTS 5 1ch 1 Manufactured under license from Dolby Laboratories Dolby Pro Logic and the double D symbol are trademarks of Dolby Laboratories 2 DTS and DTS Digital Out are trademarks of Digital Theater Systems Inc Notes After you have completed the connection make the appropriate settings in Quick Setup page 21 Otherwise no sound or a loud noise will come from your speakers The...

Page 21: ... appear select QUICK under SETUP in the Control Menu to run Quick Setup page 59 4 Press ENTER without inserting a disc The Setup Display for selecting the language used in the on screen display appears 5 Press X x to select a language The player displays the menu and subtitles in the selected language 6 Press ENTER The Setup Display for selecting the aspect ratio of the TV to be connected appears ...

Page 22: ...al cord select YES DIGITAL OUTPUT 10Press X x to select the type of Dolby Digital signal you wish to send to your amplifier receiver If your AV amplifier receiver has a Dolby Digital decoder select DOLBY DIGITAL Otherwise select D PCM 11Press ENTER DTS is selected 12Press X x to select whether or not you wish to send a DTS signal to your amplifier receiver If your AV amplifier receiver has a DTS d...

Page 23: ...r VIDEO CDs see page 27 To turn off the player Press 1 The player enters standby mode z Hint You can have the player turn off automatically whenever you leave it in stop mode for more than 30 minutes To turn this function on or off set AUTO POWER OFF in CUSTOM SETUP to ON or OFF page 62 Note Discs created on DVD recorders must be correctly finalized before they can be played For more information a...

Page 24: ...d Slow Play functions do not work when playing DTS sound tracks You cannot use Fast Play or Slow Play function when playing a still picture in DVD VR mode Locking the disc tray Child Lock You can lock the disc tray to prevent children from opening it When the player is in standby mode press O RETURN ENTER and then 1 on the remote The player turns on and LOCKED appears on the front panel display Th...

Page 25: ...s x twice then press H Notes MULTI DISC RESUME in CUSTOM SETUP must be set to ON default for this function to work page 62 The point where you stopped playing is cleared when you change the play mode you change the settings on the Setup Display For DVD VR mode CDs DATA CDs and DATA DVDs the player remembers the resume playback point for the current disc The resume point is cleared when you opened ...

Page 26: ...t the item you want to play or change If you press the number buttons the following display appears Press the number buttons to select the item you want 3 Press ENTER Selecting ORIGINAL or PLAY LIST in DVD VR Mode Some DVD VR Video Recording mode have two types of titles for playback originally recorded titles ORIGINAL and titles that can be created on recordable DVD players for editing PLAY LIST ...

Page 27: ... CDs interactively by following the menu on the TV screen 1 Start playing a VIDEO CD with PBC functions The menu for your selection appears 2 Press the number buttons to select the item number you want 3 Press ENTER 4 Follow the instructions in the menu for interactive operations Refer to the instructions supplied with the disc as the operating procedure may differ depending on the VIDEO CD To ret...

Page 28: ...e Functions Program Play Shuffle Play Repeat Play A B Repeat Play You can set the following play modes Program Play page 28 Shuffle Play page 30 Repeat Play page 31 A B Repeat Play page 32 Note The play mode is canceled when you open the disc tray the player enters standby mode by pressing 1 Creating your own program Program Play You can play the contents of a disc in the order you want by arrangi...

Page 29: ... To change or cancel a program 1 Follow steps 1 to 3 of Creating your own program Program Play 2 Select the program number of the title chapter or track you want to change or cancel using X x and press c If you want to delete the title chapter or track from the program press CLEAR OFF OFF SET ON PLAY 1 8 3 4 1 2 2 7 T 1 3 2 5 5 DVD VIDEO PROGRAM 1 TITLE ALL CLEAR 2 TITLE 3 TITLE 4 TITLE 5 TITLE 6 ...

Page 30: ...tles chapters or tracks Subsequent shuffling may produce a different playing order 1 Press DISPLAY during playback The Control Menu appears 2 Press X x to select SHUFFLE then press ENTER The options for SHUFFLE appear 3 Press X x to select the item to be shuffled When playing a DVD VIDEO TITLE CHAPTER When playing a VIDEO CD or CD TRACK When Program Play is activated ON shuffles titles chapters or...

Page 31: ...ISC repeats all of the tracks TRACK repeats the current track When playing a DATA CD or DATA DVD DISC repeats all of the albums ALBUM repeats the current album TRACK MP3 audio tracks only repeats the current track When Program Play or Shuffle Play is activated ON repeats Program Play or Shuffle Play 4 Press ENTER Repeat Play starts To return to normal play Press CLEAR or select OFF in step 3 z Hin...

Page 32: ... point point A of the portion to be played repeatedly press ENTER The starting point point A is set 5 When you reach the ending point point B press ENTER again The set points are displayed and the player starts repeating this specific portion To return to normal play Press CLEAR or select OFF in step 3 Notes When you set A B Repeat Play the settings for Shuffle Play Repeat Play and Program Play ar...

Page 33: ...laying a disc in fast forward or fast reverse Scan Press m or M while playing a disc When you find the point you want press H to return to normal speed Each time you press m or M during scan the scan speed changes With each press the indication changes as shown below Actual speeds may differ between discs Playback direction Opposite direction The 2B 2b playback speed is about twice the normal spee...

Page 34: ...DVD only To return to normal playback press H Note You cannot search for a still picture in DVD VR mode Searching for a Title Chapter Track Scene etc You can search a DVD by title or chapter and you can search a VIDEO CD CD DATA CD DATA DVD by track index file or scene As titles and tracks are assigned unique numbers on the disc you can select the desired one by entering its number You can also se...

Page 35: ...he time code DVD only 1 In step 2 select TIME TEXT T playing time of the current title is selected 2 Press ENTER T changes to T 3 Input the time code using the number buttons then press ENTER For example to find the scene at 2 hours 10 minutes and 20 seconds after the beginning just enter 2 10 20 z Hints When the Control Menu display is turned off you can search for a chapter DVD or track CD DATA ...

Page 36: ...3 Press ENTER The first scene of each chapter title or track appears as follows 4 Press C X x c to select a chapter title or track and press ENTER Playback starts from the selected scene To return to normal play during setting Press O RETURN or DISPLAY z Hint If there are more than 9 chapters titles or tracks V is displayed at the bottom right of the screen To display the additional chapters title...

Page 37: ...econds Playing time of the current title T Remaining time of the current title C Playing time of the current chapter C Remaining time of the current chapter When playing a VIDEO CD or Super VCD with PBC functions minutes seconds Playing time of the current scene When playing a VIDEO CD without PBC functions or CD T minutes seconds Playing time of the current track T Remaining time of the current t...

Page 38: ...d the audio bit rate the amount of data per second of the current audio track on your TV screen Checking the information on the front panel display You can view the time information and text displayed on the TV screen also on the front panel display The information on the front panel display changes as follows when you change the time information on your TV screen When playing a DVD BRAHMS SYMPHON...

Page 39: ...l Menu page 13 Notes Depending on the type of disc being played the DVD CD text or track name may not be displayed The player can only display the first level of the DVD CD text such as the disc name or title Playing time of MP3 audio tracks may not be displayed correctly If you play a disc containing JPEG image files only NO AUDIO DATA appears when MODE MP3 JPEG is set to AUTO JPEG appears when M...

Page 40: ...EO is recorded in multiple audio formats When playing in DVD VR mode The types of sound tracks recorded on a disc are displayed The default setting is underlined Example 1 MAIN main sound 1 SUB sub sound 1 MAIN SUB main and sub sound When playing a VIDEO CD CD DATA CD MP3 audio or DATA DVD MP3 audio The default setting is underlined STEREO the standard stereo sound 1 L the sound of the left channe...

Page 41: ...ngs TVS When you connect a stereo TV or 2 front speakers TVS TV Virtual Surround lets you enjoy surround sound effects by using sound imaging to create virtual rear speakers from the sound of the front speakers L left R right without using actual rear speakers TVS was developed by Sony to produce surround sound for home use using just a stereo TV This only works when playing a multichannel Dolby a...

Page 42: ...eakers on a stereo TV TVS NIGHT Large sounds such as explosions are suppressed but the quieter sounds are unaffected This feature is useful when you want to hear the dialog and enjoy the surround sound effects of TVS WIDE at low volume TVS STANDARD Creates three sets of virtual rear speakers from the sound of the front speakers L R without using actual rear speakers shown below Use this setting wh...

Page 43: ...ulti angles are recorded on the DVD VIDEO Displaying the Subtitles If subtitles are recorded on the discs you can change the subtitles or turn them on and off whenever you want while playing a DVD 1 Press SUBTITLE during playback The following display appears 2 Press SUBTITLE repeatedly to select a setting When playing a DVD VIDEO Select the language Depending on the DVD VIDEO the choice of langua...

Page 44: ...O CD or DATA CD DATA DVD in JPEG format from the player to obtain the picture quality you want Choose the setting that best suits the program you are watching When you select MEMORY you can make further adjustments to each element of the picture color brightness etc 1 Press DISPLAY during playback When playing a DATA CD or DATA DVD with JPEG image files press twice The Control Menu appears 2 Press...

Page 45: ...ress ENTER The selected setting takes effect z Hint When you watch a movie CINEMA 1 or CINEMA 2 is recommended Adjusting the picture items in MEMORY You can adjust each element of the picture individually PICTURE changes the contrast BRIGHTNESS changes the overall brightness COLOR makes the colors deeper or lighter HUE changes the color balance 1 In step 3 of Adjusting the Playback Picture select ...

Page 46: ... image files press twice The Control Menu appears 2 Press X x to select SHARPNESS then press ENTER The options for SHARPNESS appear 3 Press X x to select a level 1 enhances the outline 2 enhances the outline more than 1 4 Press ENTER The selected setting takes effect To cancel the SHARPNESS setting Select OFF in step 3 ENTER DISPLAY DVD VIDEO 1 8 3 4 1 2 2 7 T 1 3 2 5 5 2 1 OFF OFF ...

Page 47: ...able to play some DATA CDs DATA DVDs created in the Packet Write format MP3 audio track or JPEG image file that the player can play The player can play the following tracks and files MP3 audio tracks with the extension MP3 JPEG image files with the extension JPEG or JPG JPEG image files that conform to the DCF image file format Design rule for Camera File system Image standards for digital cameras...

Page 48: ...than two trees Notes Depending on the software you use to create the DATA CD DATA DVD the playback order may differ from the above illustration The playback order above may not be applicable if there are more than 200 albums and 300 tracks files in each album The player can recognize up to 200 albums the player will count just albums including albums that do not contain MP3 audio tracks and JPEG i...

Page 49: ...g an album press ENTER The list of tracks in the album appears 2 Press X x to select a track and press ENTER Playback starts from the selected track To stop playback Press x To go to the next or previous page Press c or C To return to the previous display Press O RETURN To go to the next or previous MP3 audio track Press or during playback You can select the first track of the next album by pressi...

Page 50: ... To return to normal view press CLEAR Note that the view also returns to normal if you press C c to go to the next or previous image Example when X is pressed once To magnify a JPEG image ZOOM Press ZOOM while viewing the image You can enlarge the image up to four times the original size and scroll using C X x c To return to normal view press CLEAR When pressed once x2 The image enlarges twice the...

Page 51: ...is selected in MODE MP3 JPEG page 52 Enjoying JPEG Images as a Slide Show You can play JPEG image files on a DATA CD or DATA DVD successively as a slide show 1 Press MENU The list of albums on the DATA CD DATA DVD appears 2 Press X x to select an album 3 Press H The JPEG images in the selected album start playing as a slide show To stop playback Press x Notes The slide show stops when X x or ZOOM ...

Page 52: ...JPEG image files when AUTO is selected 600 MP3 audio tracks when AUDIO MP3 is selected 600 JPEG image files when IMAGE JPEG is selected Notes This function does not work if the MP3 audio tracks and JPEG image files are not placed in the same album If playing time of JPEG image or MP3 audio is longer than the other the longer one continues without sound or image If you play large MP3 track data and...

Page 53: ... during a slide show 1 Press DISPLAY twice while viewing a JPEG image or when the player is in stop mode 2 Press X x to select EFFECT then press ENTER The options for EFFECT appear 3 Press X x to select a setting The default setting is underlined MODE 1 the image sweeps in from top to bottom MODE 2 the image sweeps in from left to right MODE 3 the image stretches out from the center of the screen ...

Page 54: ...mode The Control Menu appears 3 Press X x to select PARENTAL CONTROL then press ENTER The options for PARENTAL CONTROL appear 4 Press X x to select ON t then press ENTER If you have not entered a password The display for registering a new password appears Enter a 4 digit password using the number buttons then press ENTER The display for confirming the password appears When you have already registe...

Page 55: ... appears 2 Press X x to select PARENTAL CONTROL then press ENTER The options for PARENTAL CONTROL appear 3 Press X x to select PLAYER t then press ENTER If you have not entered a password The display for registering a new password appears Enter a 4 digit password using the number buttons then press ENTER The display for confirming the password appears When you have already registered a password Th...

Page 56: ...er you enter a new 4 digit password replace the disc in the player and press H When the display for entering your password appears enter your new password Notes When you play discs which do not have the Parental Control function playback cannot be limited on this player Depending on the disc you may be asked to change the parental control level while playing the disc In this case enter your passwo...

Page 57: ...lied remote You can control your TV using the buttons below Note Depending on the connected unit you may not be able to control your TV using all or some of the buttons on the supplied remote By pressing You can TV 1 Turn the TV on or off VOL Adjust the volume of the TV TV VIDEO Switch the TV s input source between the TV and other input sources TV VOL TV VIDEO Number buttons ...

Page 58: ... Press X x to select the setup item from the displayed list LANGUAGE SETUP SCREEN SETUP CUSTOM SETUP or AUDIO SETUP Then press ENTER The Setup item is selected Example SCREEN SETUP 5 Press X x to select an item then press ENTER The options for the selected item appear Example TV TYPE ENTER DISPLAY Number buttons STOP 47 QUICK CUSTOM RESET DVD VIDEO QUICK LANGUAGE SETUP OSD MENU AUDIO SUBTITLE ENGL...

Page 59: ...e 58 OSD On Screen Display Switches the display language on the screen MENU DVD VIDEO only You can select the desired language for the disc s menu AUDIO DVD VIDEO only Switches the language of the sound track When you select ORIGINAL the language given priority in the disc is selected SUBTITLE DVD VIDEO only Switches the language of the subtitle recorded on the DVD VIDEO When you select AUDIO FOLL...

Page 60: ...other than COMPONENT VIDEO OUT 4 3 LETTER BOX Select this when you connect a 4 3 screen TV Displays a wide picture with bands on the upper and lower portions of the screen 4 3 PAN SCAN Select this when you connect a 4 3 screen TV Automatically displays the wide picture on the entire screen and cuts off the portions that do not fit 16 9 Select this when you connect a wide screen TV or a TV with a w...

Page 61: ...the progressive video signal needs to be converted to match the type of DVD software that you are watching This setting is effective only when you set PROGRESSIVE COMPONENT OUT in SCREEN SETUP to ON 4 3 OUTPUT This setting is effective only when you set TV TYPE in SCREEN SETUP to 16 9 Adjust this to watch 4 3 aspect ratio progressive signals If you can change the aspect ratio on your progressive f...

Page 62: ...have the same number of channels the player selects PCM DTS and Dolby Digital sound tracks in this order MULTI DISC RESUME DVD VIDEO VIDEO CD only Switches the Multi disc Resume setting on or off Resume playback can be stored in memory for up to 6 different DVD VIDEOs VIDEO CDs page 25 Note If you run Quick Setup Multi disc Resume setting stored in memory may return to the default settings OFF Swi...

Page 63: ... input jack For connection details see page 19 Select DOLBY DIGITAL DTS and 48kHz 96kHz PCM after setting DIGITAL OUT to ON If you connect a component that is incompatible with the selected audio signal a loud noise or no sound may be heard from the speakers risking damage to your ears or speakers DOLBY DIGITAL DVDs only Selects the type of Dolby Digital signal STANDARD Normally select this positi...

Page 64: ...level OFF Select this when the player is connected to an audio component without a built in DTS decoder ON Select this when the player is connected to an audio component with a built in DTS decoder 48kHz 16bit The audio signals of DVD VIDEOs are always converted to 48kHz 16bit 96kHz 24bit All types of signals including 96kHz 24bit are output in their original format However if the signal is encryp...

Page 65: ...layer is set to normal interlace format page 61 The picture does not fill the screen even though the aspect ratio is set in TV TYPE under SCREEN SETUP The aspect ratio of the disc is fixed on your DVD Sound There is no sound Re connect the connecting cord securely The connecting cord is damaged The player is connected to the wrong input jack on the amplifier receiver page 19 The amplifier receiver...

Page 66: ...re displayed as The disc does not start playing from the beginning Program Play Shuffle Play Repeat Play or A B Repeat Play is selected page 28 Resume play has taken effect page 25 The player starts playing the disc automatically The disc features an auto playback function AUTO PLAY in CUSTOM SETUP is set to ON page 62 Copyright lock appears and the screen turns blue when playing in DVD VR mode Im...

Page 67: ... error appears on the TV screen when playing a DATA CD DATA DVD The MP3 audio track JPEG image file you want to play is broken The data is not MPEG 1 Audio Layer III data The JPEG image file format does not conform to DCF page 47 The JPEG image file has the extension JPG or JPEG but is not in JPEG format Self diagnosis Function When letters numbers appear in the display When the self diagnosis fun...

Page 68: ...s digital DVD VIDEO page 7 A disc that contains up to 8 hours of moving pictures even though its diameter is the same as a CD The data capacity of a single layer and single sided DVD is 4 7 GB Giga Byte which is 7 times that of a CD The data capacity of a double layer and single sided DVD is 8 5 GB a single layer and double sided DVD is 9 4 GB and double layer and double sided DVD is 17 GB The pic...

Page 69: ...red to the Interlace format that alternately shows every other line of an image field to create one frame the Progressive format shows the entire image at once as a single frame This means that while the Interlace format can show 30 frames 60 fields in one second the Progressive format can show 60 frames in one second The overall picture quality increases and still images text and horizontal lines...

Page 70: ...ONENT VIDEO OUT Y PB PR Phono jack Y 1 0 Vp p PB PR interlace 1 0 648 Vp p progressive or interlace 2 0 7 Vp p 75 ohms 1 BLACK LEVEL COMPONENT OUT is ON 2 BLACK LEVEL COMPONENT OUT is OFF LINE OUT VIDEO Phono jack 1 0 Vp p 75 ohms General Power requirements U S models 120 V AC 60 Hz Models for other areas 110 240 V AC 50 60 Hz See page 5 for further information Power consumption 9 W Dimensions app...

Page 71: ...vian Lettish 1345 Malagasy 1347 Maori 1349 Macedonian 1350 Malayalam 1352 Mongolian 1353 Moldavian 1356 Marathi 1357 Malay 1358 Maltese 1363 Burmese 1365 Nauru 1369 Nepali 1376 Dutch 1379 Norwegian 1393 Occitan 1403 Afan Oromo 1408 Oriya 1417 Punjabi 1428 Polish 1435 Pashto Pushto 1436 Portuguese 1463 Quechua 1481 Rhaeto Romance 1482 Kirundi 1483 Romanian 1489 Russian 1491 Kinyarwanda 1495 Sanskri...

Page 72: ...ont panel display 11 H Handling discs 2 Hooking up 16 I INDEX 35 Interlace format 69 INTERVAL 52 J JPEG 7 47 L LANGUAGE SETUP 59 Locating a specific point by watching the TV screen 33 M MEMORY 45 MENU 59 MODE MP3 JPEG 52 MODE PROGRESSIVE 61 MP3 7 47 MULTI DISC RESUME 25 62 N Normal Interlace format 69 O On screen display Control Menu Display 13 Setup Display 58 ORIGINAL 26 ORIGINAL PLAY LIST 26 OS...

Page 73: ... Desembalaje 2 Paso 2 Inserción de las pilas en el control remoto 2 Paso 3 Conexión de los cables del video 3 Paso 4 Conexión de los cables de audio 5 Paso 5 Conexión del cable de alimentación 7 Paso 6 Ajuste rápido 7 Reproducción de discos 9 Reproducción de discos 9 ES ...

Page 74: ...lgunos modelos incluyen un adaptador de enchufe Paso 2 Inserción de las pilas en el control remoto Se puede controlar el reproductor con el control remoto suministrado Inserte dos pilas R6 tamaño AA de forma que coincidan sus extremos 3 y con las marcas del interior del compartimiento Al utilizar el control remoto oriéntelo hacia el sensor remoto del reproductor Notas No deje el control remoto en ...

Page 75: ... de audio vídeo suministrado a la toma amarilla vídeo Disfrutará de imágenes de calidad estándar A VIDEO AUDIO INPUT L R PR PB Y COMPONENT VIDEO IN B COMPONENT VIDEO OUT PR Y PB R AUDIO L DIGITAL OUT COAXIAL LINE OUT VIDEO Cable de audio vídeo suministrado Cable de conexión de vídeo componente no suministrado amarillo Televisor proyector o amplificador de AV receptor verde Televisor proyector o am...

Page 76: ... progresivo salida componente del SCREEN SETUP en ON para emitir señales progresivas Si lo conecta a un televisor de pantalla 4 3 estándar Según el disco es posible que la imagen no quepa en la pantalla del televisor Para cambiar la relación de aspecto consulte la versión en inglés del Manual de instrucciones Nota No conecte una videograbadora etc entre el televisor y el reproductor Si pasa las se...

Page 77: ...LINE OUT VIDEO DIGITAL OUT COAXIAL Televisor proyector o amplificador de AV receptor La clavija amarilla se utiliza para señales de vídeo página 3 Reproductor de CD DVD reproductor de discos compactos y videodiscos digitales Cable de audio video suministrado a LINE OUT L R AUDIO salida línea izquierda derecha blanco rojo amarillo blanco rojo amarillo Frontal izquierdo Frontal derecho Altavoces a l...

Page 78: ...volvente Dolby Digital de 5 1 canales DTS 5 1 canales 1 Fabricado bajo licencia de Dolby Laboratories Dolby Pro Logic y el símbolo de la doble D son marcas comerciales de Dolby Laboratories 2 DTS y DTS Digital Out son marcas comerciales de Digital Theater Systems Inc Notas Tras completar la conexión realice los ajustes apropiados en Ajuste rápido página 7 De lo contrario los altavoces no emitirán ...

Page 79: ...pantalla del televisor En la parte inferior de la pantalla aparecerá Press ENTER to run QUICK SETUP Si este mensaje no aparece seleccione QUICK en SETUP del menú de control para ejecutar el ajuste rápido para obtener información detallada consulte la versión en inglés del Manual de instrucciones 4 Presione ENTER ingresar sin insertar ningún disco Aparece la pantalla de ajustes que le permitirá sel...

Page 80: ...ficador receptor de AV mediante un cable digital coaxial seleccione YES DIGITAL OUTPUT 10Presione X x para seleccionar el tipo de señal Dolby Digital que desee enviar al amplificador receptor Si el amplificador de AV receptor dispone de decodificador Dolby Digital seleccione DOLBY DIGITAL De lo contrario seleccione D PCM 11Presione ENTER ingresar Se selecciona DTS sistema digital de sala de cine 1...

Page 81: ...la bandeja de discos 5 Presione H La bandeja de discos se cierra y el reproductor inicia la reproducción continua Ajuste el volumen en el televisor o en el amplificador receptor De acuerdo con el disco puede aparecer un menú en la pantalla del televisor Para obtener información detallada consulte la versión en inglés del Manual de instrucciones Para apagar el reproductor Presione 1 El reproductor ...

Page 82: ...grabable DVD R DL videodisco digital más grabable de doble capa 2 Sólo para discos DVD videodisco digital 3 Sólo para imágenes de video y JPEG grupo conjunto de expertos en fotografía salvo imágenes FONDO Puede mover la imagen ampliada mediante C X x c Según el contenido del disco es posible que se cancele en forma automática la función de zoom ampliación cuando se mueva la imagen Nota Tal vez no ...

Page 83: ......

Page 84: ...Sony Corporation Printed in Malaysia Printed on 70 or more recycled paper using VOC Volatile Organic Compound free vegetable oil based ink ...

Reviews: