background image

41

Vi

e

w

ing 
In

fo

rm
at

io

n

 Ab
out
 t

h

e

 D

is

c

To check DATA CD (MP3 audio) text

By pressing TIME/TEXT while playing MP3 
audio tracks on a DATA CD, the track name 
and album name appear. You can also display 
the audio bit rate (the amount of data per 
second of the current audio) on your TV 
screen.

Checking the information on the 
front panel display

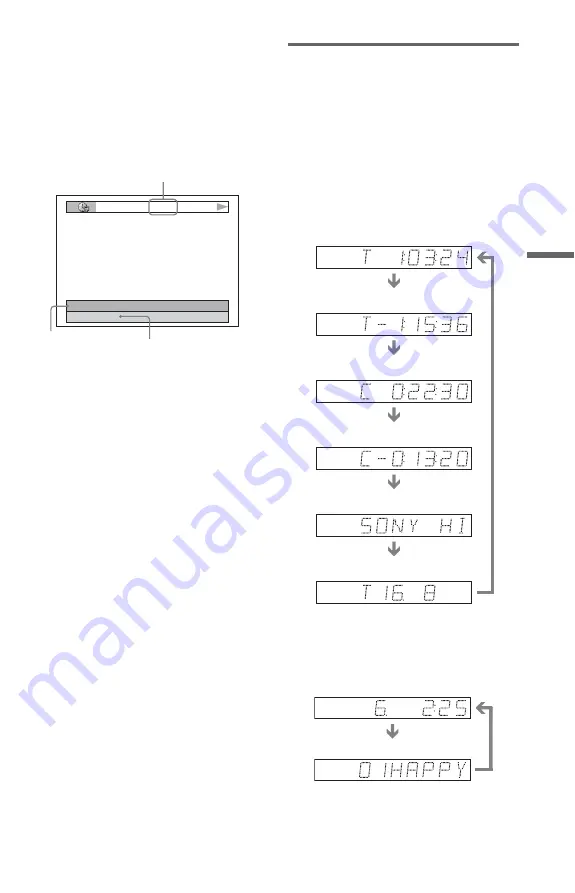
You can view the time information and text 
displayed on the TV screen also on the front 
panel display. The information on the front 
panel display changes as follows when you 
change the time information on your TV 
screen.

When playing a DVD

When playing a DATA CD (MP3 audio)

T

17:30

128k

JAZZ
RIVER SIDE

Bit rate

Album name

Track name

Playing time of the current title

Remaining time of the current title

Playing time of the current chapter

Remaining time of the current 
chapter

Text

Current title and chapter number

(returns to top automatically)

Playing time and number of the 
current track

Track name

,

continued

Summary of Contents for DVP-NS425P

Page 1: ...3 085 050 11 1 2003 Sony Corporation DVP NS425P Operating Instructions CD DVD Player ...

Page 2: ... are cautioned that any change or modifications not expressly approved in this manual could void your authority to operate this equipment Note This equipment has been tested and found to comply with the limits for a Class B digital device pursuant to Part 15 of the FCC Rules These limits are designed to provide reasonable protection against harmful interference in a residential installation This e...

Page 3: ...ets such as microwave ovens or large loudspeakers Do not place heavy objects on the player On operation If the player is brought directly from a cold to a warm location or is placed in a very damp room moisture may condense on the lenses inside the player Should this occur the player may not operate properly In this case remove the disc and leave the player turned on for about half an hour until t...

Page 4: ...ulti disc Resume 27 Using the DVD s Menu 28 Playing VIDEO CDs with PBC Functions PBC Playback 28 Playing an MP3 Audio Track 29 Various Play Mode Functions Program Play Shuffle Play Repeat Play A B Repeat Play 31 Searching for a Scene 36 Searching for a Particular Point on a Disc Search Scan Slow motion Play Freeze Frame 36 Searching for a Title Chapter Track Scene etc 37 Searching by Scene PICTURE...

Page 5: ...tup Display 53 Setting the Display or Sound Track Language LANGUAGE SETUP 54 Settings for the Display SCREEN SETUP 55 Custom Settings CUSTOM SETUP 56 Settings for the Sound AUDIO SETUP 57 Additional Information 59 Troubleshooting 59 Self diagnosis Function When letters numbers appear in the display 61 Glossary 62 Specifications 64 Language Code List 65 Index 66 ...

Page 6: ...s All CD ROMs including PHOTO CDs CD Rs CD RWs other than those recorded in the following formats music CD format video CD format MP3 format that conforms to ISO9660 Level 1 Level 2 or its extended format Joliet Data part of CD Extras DVD RWs in VR mode DVD ROMs DVD Audio discs HD layer on Super Audio CDs A logical format of files and folders on CD ROMs defined by ISO International Standard Organi...

Page 7: ...Ds and VIDEO CDs may be intentionally set by software producers Since this player plays DVDs and VIDEO CDs according to the disc contents the software producers designed some playback features may not be available Also refer to the instructions supplied with the DVDs or VIDEO CDs Copyrights This product incorporates copyright protection technology that is protected by U S patents and other intelle...

Page 8: ...remote sensor 14 E A open close button 25 F H Playback Dial 25 36 G X pause button 26 H x stop button 26 I PROGRESSIVE button indicator 17 Lights up when the player outputs progressive signals J SURROUND button 44 Only press the PROGRESSIVE button if you have connected a progressive signal compatible TV to the COMPONENT VIDEO OUT jacks using a component video cord page 17 ...

Page 9: ...hapter or playing time 41 Disc type Current audio signal 44 Lights up when you can change the angle 46 Lights up during Repeat Play 34 Playing status Disc type Current scene or playing time 41 Playing status Lights up during A B Repeat Play 34 Playing time 41 Disc type Current track 41 Lights up during Repeat Play 34 Lights up when playing MP3 audio tracks 29 Playing status continued ...

Page 10: ...jacks 15 Do not press the PROGRESSIVE button on the front panel if you have connected the TV to these jacks page 17 Only press the PROGRESSIVE button on the front panel if you have connected a progressive signal compatible TV to the player page 17 PCM DTS DOLBY DIGITAL COAXIAL DIGITAL OUT LINE OUT S VIDEO OUT R AUDIO L VIDEO PR Y COMPONENT VIDEO OUT PB ...

Page 11: ... x c buttons 28 L DISPLAY button 12 M TOP MENU button 28 N 1 on standby button 25 O VOL volume buttons 52 The button has a tactile dot P TV VIDEO button 52 Q TIME TEXT button 40 R PICTURE MODE button 47 S ANGLE button 46 T SUR surround button 44 U PICTURE NAVI picture navigation button 39 V REPEAT button 34 W INSTANT SEARCH STEP button 26 36 X INSTANT REPLAY STEP button 26 36 Y x STOP button 26 Z ...

Page 12: ...on track number for VIDEO CDs CDs album number for DATA CDs Displays the index number for VIDEO CDs CDs MP3 audio track number for DATA CDs Displays Super VCD as SVCD To turn off the display Press DISPLAY OFF OFF SET ON PLAY 1 8 3 4 1 2 2 7 T 1 3 2 5 5 DVD VIDEO Quit PROGRAM ENTER DISPLAY Currently playing chapter number Playing time Total number of chapters Options Current setting Total number of...

Page 13: ...he DATA CD s track name PROGRAM page 31 Selects the title chapter or track to play in the order you want SHUFFLE page 33 Plays the title chapter or track in random order REPEAT page 34 Plays the entire disc all titles all tracks all albums repeatedly or one title chapter track album repeatedly A B REPEAT page 34 Specifies the parts you want to play repeatedly SHARPNESS page 48 Exaggerates the outl...

Page 14: ...AA R6 batteries 2 Step 2 Inserting Batteries into the Remote You can control the player using the supplied remote Insert two Size AA R6 batteries by matching the 3 and ends on the batteries to the markings inside the compartment When using the remote point it at the remote sensor on the player Notes Do not leave the remote in an extremely hot or humid place Do not drop any foreign object into the ...

Page 15: ...RESSIVE button on the front panel if you have connected the TV to this jack page 17 Use the red and white plugs to connect to the audio input jacks page 19 Do this if you are connecting to a TV only A C PR PB Y COMPONENT VIDEO IN VIDEO AUDIO INPUT L R PCM DTS DOLBY DIGITAL COAXIAL DIGITAL OUT LINE OUT R AUDIO L VIDEO PR Y COMPONENT VIDEO OUT PB S VIDEO OUT B INPUT S VIDEO Audio video cord supplied...

Page 16: ...ESSIVE indicator lights up when the player outputs progressive signals See Using the PROGRESSIVE button on the next page for more information When connecting to a wide screen TV Depending on the disc the image may not fit your TV screen If you want to change the aspect ratio please refer to page 55 Notes Connect the player directly to the TV If you pass the player signals via the VCR etc you may n...

Page 17: ...UT VIDEO jack or the S VIDEO OUT jack will cause the TV picture to become unclear or go blank when you press the PROGRESSIVE button In this case press the PROGRESSIVE button so that the PROGRESSIVE indicator turns off Press PROGRESSIVE repeatedly to turn the displays as follows Appears as NORMAL or PROGRESSIVE on the front panel display NORMAL INTERLACE Select this when you are connected to a stan...

Page 18: ...onnection Manufactured under license from Dolby Laboratories Dolby Pro Logic and the double D symbol are trademarks of Dolby Laboratories DTS and DTS Digital Out are trademarks of Digital Theater Systems Inc Components to be connected Connection Your setup example TV page 19 Stereo amplifier receiver and two speakers or MD deck DAT deck page 20 AV amplifier receiver having a Dolby Surround Pro Log...

Page 19: ...a stereo mono conversion cord not supplied Connect the LINE OUT L R AUDIO jacks to the TV s audio input jack A PCM DTS DOLBY DIGITAL COAXIAL DIGITAL OUT LINE OUT S VIDEO OUT R AUDIO L VIDEO PR Y COMPONENT VIDEO OUT PB A LINE OUT R AUDIO L VIDEO TV l Signal flow white red Audio video cord supplied to audio input yellow white red yellow to LINE OUT L R AUDIO CD DVD player continued ...

Page 20: ...he MD deck or DAT deck without using your stereo amplifier receiver B B 1 B 2 PCM DTS DOLBY DIGITAL COAXIAL DIGITAL OUT S VIDEO OUT PR Y COMPONENT VIDEO OUT PB LINE OUT VIDEO R AUDIO L B 1 B 2 PCM DTS DOLBY DIGITAL COAXIAL DIGITAL OUT LINE OUT R AUDIO L VIDEO CD DVD player or Stereo amplifier receiver MD deck DAT deck Front L Front R Speakers white red red white Coaxial digital cord not supplied S...

Page 21: ... monaural rear speaker with a center speaker 2 rear speakers and a subwoofer C C 1 C 2 PCM DTS DOLBY DIGITAL COAXIAL DIGITAL OUT S VIDEO OUT PR Y COMPONENT VIDEO OUT PB LINE OUT VIDEO R AUDIO L PCM DTS DOLBY DIGITAL COAXIAL DIGITAL OUT LINE OUT R AUDIO L VIDEO C 2 C 1 CD DVD player or Front R Front L Rear R Subwoofer l Signal flow Rear L Amplifier receiver with Dolby Surround decoder Center Rear m...

Page 22: ... tracks you must use this connection DTS sound tracks are not output through the LINE OUT L R AUDIO jacks even if you set DTS to ON in Quick Setup page 23 When you connect an amplifier receiver that conforms to the 96 kHz sampling frequency set 48kHz 96kHz PCM in AUDIO SETUP to 96kHz 24bit page 58 D PCM DTS DOLBY DIGITAL COAXIAL DIGITAL OUT S VIDEO OUT PR Y COMPONENT VIDEO OUT PB LINE OUT VIDEO R ...

Page 23: ...or selecting the language used in the on screen display appears 5 Press X x to select a language The player uses the language selected here to display the menu and subtitles as well 6 Press ENTER The Setup Display for selecting the aspect ratio of the TV to be connected appears 7 Press X x to select the setting that matches your TV type If you have a 4 3 standard TV 4 3 LETTER BOX or 4 3 PAN SCAN ...

Page 24: ...ecoder page 58 13Press ENTER Quick Setup is finished All connections and setup operations are complete Enjoying the surround sound effects To enjoy the surround sound effects of this player or your amplifier receiver set the following items as described below for the audio connection you selected on pages 20 to 22 through Each of these is the default setting and does not need to be adjusted when y...

Page 25: ...hat you can hear sound from the player 4 Press A on the player and place a disc on the disc tray 5 Press H The disc tray closes and the player starts playback continuous play Adjust the volume on the TV or the amplifier receiver Depending on the disc a menu may appear on the TV screen For DVDs see page 28 For VIDEO CDs see page 28 To turn off the player Press 1 The player enters standby mode z Hin...

Page 26: ...the front panel display The Z button on the player or the remote does not work while the Child Lock is set To unlock the disc tray When the player is in standby mode press O RETURN ENTER and then 1 again Note Even if you select RESET under SETUP in the Control Menu page 54 the disc tray remains locked To Operation Stop Press x Pause Press X Resume play after pause Press X or H Go to the next chapt...

Page 27: ...ss x twice then press H For CDs and DATA CDs the player remembers the resume playback point for the current disc unless the disc tray is opened the power cord is disconnected or the player enters standby mode Notes MULTI DISC RESUME in CUSTOM SETUP must be set to ON default for this function to work page 57 The resume playback point for the current disc is cleared when you change the play mode you...

Page 28: ... you want to play or change If you press the number buttons the following display appears Press the number buttons to select the item you want 3 Press ENTER Playing VIDEO CDs with PBCFunctions PBCPlayback PBC Playback Control allows you to play VIDEO CDs interactively by following the menu on the TV screen 1 Start playing a VIDEO CD with PBC functions The menu for your selection appears 2 Select t...

Page 29: ...n the instructions supplied with the disc In this case press H Playing an MP3 Audio Track You can play DATA CDs CD ROMs CD Rs CD RWs recorded in MP3 MPEG1 Audio Layer 3 format 1 Press Z and place a DATA CD on the disc tray 2 Press H The disc tray closes and the player starts to play the first MP3 audio track in the first album on the disc Selecting an album and track 1 Press MENU The list of MP3 a...

Page 30: ...ecording software not supplied for details on the recording format To play a Multi Session CD This player can play Multi Session CDs when an MP3 audio track is located in the first session Any subsequent MP3 audio tracks recorded in the later sessions can also be played back When audio tracks and images in music CD format or video CD format are recorded in the first session only the first session ...

Page 31: ...t be applicable if there are more than a total of 200 albums and tracks in the DATA CD The player can recognize up to 100 albums the player will count just albums including albums that do not contain MP3 audio tracks The player will not play any albums beyond the first 100 albums Of the first 100 albums the player will play no more than a combined total of 200 albums and tracks Various Play Mode F...

Page 32: ...cancel a program 1 Follow Steps 1 through 3 of Creating your own program Program Play 2 Select the program number of the title chapter or track you want to change or cancel using X x and press c 3 Follow Step 5 for new programming To cancel a program select under T then press ENTER OFF OFF SET ON PLAY 1 8 3 4 1 2 2 7 T 1 3 2 5 5 DVD VIDEO PROGRAM 1 TITLE ALL CLEAR 2 TITLE 3 TITLE 4 TITLE 5 TITLE 6...

Page 33: ... order 1 Press DISPLAY during playback The Control Menu appears 2 Press X x to select SHUFFLE then press ENTER The options for SHUFFLE appear 3 Press X x to select the item to be shuffled When playing a DVD TITLE CHAPTER When playing a VIDEO CD or CD TRACK When Program Play is activated ON shuffles titles chapters or tracks selected in Program Play 4 Press ENTER Shuffle Play starts To return to no...

Page 34: ...CK repeats the current track When Program Play or Shuffle Play is activated ON repeats Program Play or Shuffle Play To return to normal play Press CLEAR or select OFF in Step 2 z Hints You can set Repeat Play while the player is stopped After selecting the REPEAT option press H Repeat Play starts You can also select REPEAT from the Control Menu page 12 Note You cannot use this function with VIDEO ...

Page 35: ...he starting point point A is set 5 When you reach the ending point point B press ENTER again The set points are displayed and the player starts repeating this specific portion To return to normal play Press CLEAR or select OFF in Step 3 Note When you set A B Repeat Play the settings for Shuffle Play Repeat Play and Program Play are canceled A 18 1 32 30 B A 18 1 32 55 B 18 1 33 05 A 18 1 32 55 B 1...

Page 36: ...ormal speed The 3M 3m playback speed is faster than 2M 2m and the 2M 2m playback speed is faster than 1M 1m Watching frame by frame Slow motion play Press m or M when the player is in pause mode To return to the normal speed press H Each time you press m or M during Slow motion play the playback speed changes Two speeds are available With each press the indication changes as follows Playback direc...

Page 37: ...ly To return to normal playback press H Searching for a Title Chapter Track Scene etc You can search a DVD by title or chapter and you can search a VIDEO CD CD DATA CD by track index or scene As titles and tracks are assigned unique numbers on the disc you can select the desired one by entering its number Or you can search for a scene using the time code 1 Press DISPLAY The Control Menu appears 2 ...

Page 38: ...me of the current title is selected 2 Press ENTER T changes to T 3 Input the time code using the number buttons then press ENTER For example to find the scene at 2 hours 10 minutes and 20 seconds after the beginning just enter 2 10 20 z Hints When the Control Menu display is turned off you can search for a chapter DVD or track CD by pressing the number buttons and ENTER You can display the first s...

Page 39: ...TER The following display appears 4 Press C X x c to select a title chapter or track and press ENTER Playback starts z Hint If there are more than 9 titles chapters or tracks V is displayed at the bottom right of the screen To display the additional titles chapters or tracks select the bottom scene and press x To return to the previous scene select the top scene and press X Notes Depending on the ...

Page 40: ...t chapter C Remaining time of the current chapter When playing a VIDEO CD or Super VCD with PBC functions minutes seconds Playing time of the current scene When playing a VIDEO CD Super VCD without PBC functions or CD T minutes seconds Playing time of the current track T Remaining time of the current track D Playing time of the current disc D Remaining time of the current disc When playing a DATA ...

Page 41: ...d text displayed on the TV screen also on the front panel display The information on the front panel display changes as follows when you change the time information on your TV screen When playing a DVD When playing a DATA CD MP3 audio T 17 30 128k JAZZ RIVER SIDE Bit rate Album name Track name Playing time of the current title Remaining time of the current title Playing time of the current chapter...

Page 42: ...ss the front panel display You can also check the time information and text using the Control Menu page 12 Notes Depending on the type of disc being played the DVD CD text or track name may not be displayed The player can only display the first level of the DVD CD text such as the disc name or title Playing time of MP3 audio tracks may not be displayed correctly Playing time and number of the curr...

Page 43: ...are displayed they indicate a language code Refer to Language Code List on page 65 to see which language the code represents When the same language is displayed two or more times the DVD is recorded in multiple audio formats When playing a VIDEO CD CD or DATA CD MP3 audio The default setting is underlined STEREO The standard stereo sound 1 L The sound of the left channel monaural 2 R The sound of ...

Page 44: ... appear on the screen even if the disc contains DTS tracks Surround Mode Settings When you connect a stereo TV or 2 front speakers you can enjoy surround sound effects by using sound imaging to create virtual rear speakers from the sound of the front speakers L left R right without using actual rear speakers If the player is set up to output the signal from the DIGITAL OUT COAXIAL jack the surroun...

Page 45: ...ogue and enjoy the surround sound effects of WIDE at low volume STANDARD Creates virtual rear speakers from the sound of the front speakers L R without using actual rear speakers The virtual speakers are reproduced as shown in the illustration below Use this setting when you want to use surround sound with 2 separate speakers z Hint You can select surround sound modes by pressing the SURROUND butt...

Page 46: ...btitles are recorded on the discs you can change the subtitles or turn them on and off whenever you want while playing a DVD 1 Press SUBTITLE during playback The following display appears 2 Press SUBTITLE repeatedly to select the setting When playing a DVD Select the language Depending on the DVD the choice of language varies When 4 digits are displayed they indicate a language code Refer to Langu...

Page 47: ...want The default setting is underlined STANDARD displays a standard picture DYNAMIC 1 produces a bold dynamic picture by increasing the picture contrast and the color intensity DYNAMIC 2 produces a more dynamic picture than DYNAMIC 1 by further increasing the picture contrast and the color intensity CINEMA 1 enhances details in dark areas by increasing the black level CINEMA 2 White colors become ...

Page 48: ...ol Menu appears 2 Press X x to select SHARPNESS then press ENTER The options for SHARPNESS appear 3 Press X x to select a level 1 enhances the outline 2 enhances the outline more than 1 4 Press ENTER The disc plays with the setting you selected To cancel the SHARPNESS setting Select OFF in Step 3 ENTER DISPLAY DVD VIDEO 1 8 3 4 1 2 2 7 T 1 3 2 5 5 2 1 OFF OFF ...

Page 49: ...ew password appears Enter a 4 digit password using the number buttons then press ENTER The display for confirming the password appears When you have already registered a password The display for entering the password appears 4 Enter or re enter your 4 digit password using the number buttons then press ENTER The display for setting the playback limitation level appears 5 Press X x to select STANDAR...

Page 50: ...n press ENTER The player starts playback z Hint If you forget your password remove the disc and repeat Steps 1 to 3 of Locking Discs PARENTAL CONTROL When you are asked to enter your password enter 199703 using the number buttons then press ENTER The display will ask you to enter a new 4 digit password After you enter a new 4 digit password replace the disc in the player and press H When the displ...

Page 51: ...ttons then press ENTER 6 To confirm your password re enter it using the number buttons then press ENTER If you make a mistake entering your password Press C before you press ENTER and input the correct number Standard Code number Argentina 2044 Australia 2047 Austria 2046 Belgium 2057 Brazil 2070 Canada 2079 Chile 2090 China 2092 Denmark 2115 Finland 2165 France 2174 Germany 2109 India 2248 Indone...

Page 52: ...ode 1 While holding down TV 1 press the number buttons to select your TV s manufacturer s code see the table below 2 Release TV 1 Code numbers of controllable TVs Notes If you enter a new code number the code number previously entered will be erased When you replace the remote s batteries the code number you have set may be reset to the default setting Set the appropriate code number again By pres...

Page 53: ...ETUP appear 3 Press X x to select CUSTOM then press ENTER The Setup Display appears 4 Press X x to select the setup item from the displayed list LANGUAGE SETUP SCREEN SETUP CUSTOM SETUP or AUDIO SETUP Then press ENTER The Setup item is selected Example SCREEN SETUP 5 Select an item using X x then press ENTER The options for the selected item appear Example TV TYPE ENTER DISPLAY STOP 47 QUICK CUSTO...

Page 54: ...y see Using the Setup Display page 53 OSD On Screen Display Switches the display language on the screen MENU DVD only You can select the desired language for the disc s menu AUDIO DVD only Switches the language of the sound track When you select ORIGINAL the language given priority in the disc is selected SUBTITLE DVD only Switches the language of the subtitle recorded on the DVD When you select A...

Page 55: ...from the jacks other than COMPONENT VIDEO OUT 4 3 LETTER BOX Select this when you connect a 4 3 screen TV Displays a wide picture with bands on the upper and lower portions of the screen 4 3 PAN SCAN Select this when you connect a 4 3 screen TV Automatically displays the wide picture on the entire screen and cuts off the portions that do not fit 16 9 Select this when you connect a wide screen TV o...

Page 56: ...n or off AUTO PLAY Switches the Auto Play setting on or off This function is useful when the player is connected to a timer not supplied DIMMER Adjusts the lighting of the front panel display ON Sets the black level of the output signal to the standard level OFF Lowers the standard black level Use this when the picture becomes too white OFF Switches this function off ON The player enters standby m...

Page 57: ...UDIO ATT attenuation If the playback sound is distorted set this item to ON The player reduces the audio output level This function affects the output of the LINE OUT L R AUDIO jacks AUDIO DRC Dynamic Range Control DVD only Makes the sound clear when the volume is turned down when playing a DVD that conforms to AUDIO DRC This affects the output from the following jacks LINE OUT L R AUDIO jacks DIG...

Page 58: ...eir original sampling frequency level DOLBY SUR ROUND Normally select this position Multi channel audio signals are output to two channels for enjoying surround sounds NORMAL Multi channel audio signals are downmixed to two channels for use with your stereo ON Normally select this position When you select ON see Setting the digital output signal for further settings OFF The influence of the digita...

Page 59: ...ont panel the PROGRESSIVE indicator lights up but did not connect your TV to the player s COMPONENT VIDEO OUT jacks using a COMPONENT VIDEO cord Press the PROGRESSIVE button only when you connect your TV to the player s COMPONENT VIDEO OUT jacks using a component video cord page 17 Even if your TV is compatible with progressive format 480p signals the image may be affected when you set the player ...

Page 60: ...ay or A B Repeat Play has been selected page 31 Resume play has taken effect page 27 The player starts playing the disc automatically The disc features an auto playback function AUTO PLAY in CUSTOM SETUP is set to ON page 56 Playback stops automatically While playing discs with an auto pause signal the player stops playback at the auto pause signal You cannot perform some functions such as Stop Se...

Page 61: ...play is broken The data is not MPEG1 Audio Layer 3 data Self diagnosis Function When letters numbers appear in the display When the self diagnosis function is activated to prevent the player from malfunctioning a five character service number e g C 13 50 with a combination of a letter and four digits appears on the screen and the front panel display In this case check the following table First thr...

Page 62: ... same as a CD The data capacity of a single layer and single sided DVD is 4 7 GB Giga Byte which is 7 times that of a CD The data capacity of a double layer and single sided DVD is 8 5 GB a single layer and double sided DVD is 9 4 GB and double layer and double sided DVD is 17GB The picture data uses the MPEG 2 format one of the worldwide standards of digital compression technology The picture dat...

Page 63: ...ames in one second The overall picture quality increases and still images text and horizontal lines appear sharper This player is compatible with the 480 progressive format Scene page 9 On a VIDEO CD with PBC playback control functions the menu screens moving pictures and still pictures are divided into sections called scenes Title page 9 The longest section of a picture or music feature on a DVD ...

Page 64: ... 5 Vp p 75 ohms COMPONENT VIDEO OUT Y PB PR Phono jack Y 1 0 Vp p PB PR 0 65 Vp p 75 ohms LINE OUT VIDEO Phono jack 1 0 Vp p 75 ohms S VIDEO OUT 4 pin mini DIN Y 1 0 Vp p C 0 286 Vp p 75 ohms General Power requirements 120 V AC 60 Hz Power consumption 12 W Dimensions approx 430 55 5 244 mm 17 2 3 16 9 1 2 in width height depth incl projecting parts Mass approx 2 15 kg 4 3 4 lb Operating temperatur...

Page 65: ...iddish 1283 Javanese 1287 Georgian 1297 Kazakh 1298 Greenlandic 1299 Cambodian 1300 Kannada 1301 Korean 1305 Kashmiri 1307 Kurdish 1311 Kirghiz 1313 Latin 1326 Lingala 1327 Laothian 1332 Lithuanian 1334 Latvian Lettish 1345 Malagasy 1347 Maori 1349 Macedonian 1350 Malayalam 1352 Mongolian 1353 Moldavian 1356 Marathi 1357 Malay 1358 Maltese 1363 Burmese 1365 Nauru 1369 Nepali 1376 Dutch 1379 Norweg...

Page 66: ...g discs 7 Hooking up 14 I INDEX 37 Index 62 Instant Replay 26 Instant Search 26 Interlace format 17 62 L LANGUAGE SETUP 54 Locating a specific point by watching the TV screen 27 M MENU 54 MP3 6 29 MULTI DISC RESUME 27 57 N NORMAL INTERLACE 17 O On screen display Control Menu display 12 Setup Display 53 OSD 54 P PARENTAL CONTROL 49 PAUSE MODE 57 PBC Playback 28 PICTURE MODE 47 PICTURE NAVIGATION 39...

Page 67: ......

Page 68: ...Sony Corporation Printed in Malaysia Printed on 100 recycled paper using VOC Volatile Organic Compound free vegetable oil based ink ...

Reviews: