background image

6

ES

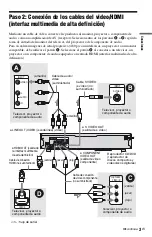
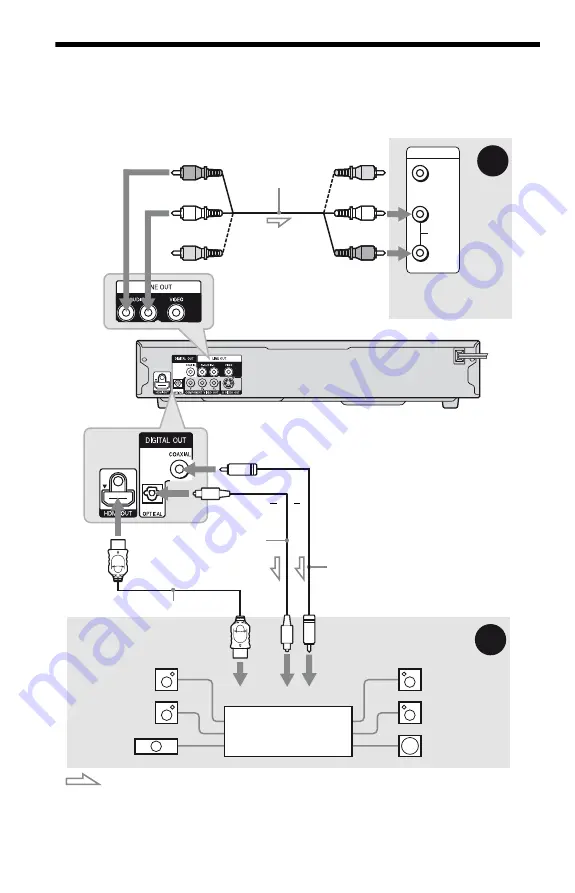
Paso 3: Conexión de los cables de audio

Seleccione uno de los siguientes patrones, 

A

 o 

B

, según la toma de entrada del monitor del 

televisor, del proyector o del componente de audio, como un amplificador de AV (receptor).
De este modo podrá escuchar el sonido.

z

Sugerencia

Para la colocación correcta de los altavoces, consulte el manual de instrucciones suministrado con los 
componentes conectados.

VIDEO

AUDIO

INPUT

L

R

B

A

TV (televisor), proyector
o componente de audio

* La clavija amarilla se utiliza para señales de vídeo (página 3).

Reproductor de CD/
DVD (reproductor de 
discos compactos y 
videodiscos digitales)

Cable de
audio/video 
(suministrado)

a LINE OUT L/R (AUDIO)
(salida línea izquierda/derecha)

(blanco)

(rojo)

(amarillo)

*

(blanco)

(rojo)

(amarillo)

*

Frontal
(izquierdo)

Frontal
(derecho)

[Altavoces]

a la entrada digital coaxial o óptica/
HDMI (salida de la interfaz 
multimedia de alta definición

Cable de conexión digital 
coaxial (no suministrado)

: Flujo de señal

[Altavoces]

Posterior 
(derecho)

Altavoz 
potenciador de 
graves

Posterior 
(izquierdo)

Central

Componente de audio 
que dispone de un 
codificador

a DIGITAL OUT (COAXIAL o OPTICAL) 
(salida digital coaxial o óptica)/HDMI OUT 
(salida de la interfaz multimedia de alta 
definición)

Cable de conexión HDMI (no suministrado)

Cable de conexión digital 
óptica (no suministrado)
Quite la tapa de la toma 
antes de conectar.

o

o

Summary of Contents for DVP-NC800H/B - 1080p Upscaling Dvd Changer

Page 1: ...to them whenever you call upon your Sony dealer regarding this product Model No DVP NC800H Serial No ______________ For Customers in Canada If this product is not working properly please call 1 877 602 2008 for Peace of Mind Warranty Replacement service For other product related questions please contact our Customer Information Service Centre at 1 877 899 7669 or write to us at Customer Informatio...

Page 2: ...nable protection against harmful interference in a residential installation This equipment generates uses and can radiate radio frequency energy and if not installed and used in accordance with the instructions may cause harmful interference to radio communications However there is no guarantee that interference will not occur in a particular installation If this equipment does cause harmful inter...

Page 3: ...the player on a soft surface such as a rug Do not place the player in a location near heat sources or in a place subject to direct sunlight excessive dust or mechanical shock Do not install the player in an inclined position It is designed to be operated in a horizontal position only Keep the player and the discs away from equipment with strong magnets such as microwave ovens or large loudspeakers...

Page 4: ... 21 Step 6 Quick Setup 22 Playback 24 Playing Discs 24 Various Play Mode Functions Program Play Shuffle Play Repeat Play A B Repeat Play 30 Adjusting the Playback Picture CUSTOM PICTURE MODE 34 Sharpening the Picture SHARPNESS 35 Adjusting the Delay Between the Picture and Sound AV SYNC 36 Locking Discs CUSTOM PARENTAL CONTROL PARENTAL CONTROL 37 Searching for a Scene 40 Searching for a Particular...

Page 5: ...and DVD RWs DVD Rs DVD Rs DL VR mode video mode The meaning of the icons used in this manual is described below Icons Meaning Functions available for commercial DVDs and DVD RWs DVD Rs DVD Rs DL in VR mode or DVD RWs DVD Rs DVD Rs DL in video mode Functions available for DVD RWs DVD Rs DVD Rs DL in VR Video Recording mode Functions available for VIDEO CDs including Super VCDs or CD Rs CD RWs in vi...

Page 6: ...iscs HD layer on Super Audio CDs BDs HD DVDs Disc recorded with an AVCHD compatible DVD video camera Also the player cannot play the following discs A commercial DVD with a different region code A disc recorded in a color system other than NTSC such as PAL or SECAM this player conforms to the NTSC color system A disc that has a non standard shape e g card heart A disc with paper or stickers on it ...

Page 7: ...er that cannot play images that contain a copy protection only Images in DVD VR mode with CPRM protection may not be played if they contain a copy protection signal Copyright lock appears on the screen CPRM Content Protection for Recordable Media is a coding technology that protects the copyright of images Note on DualDiscs A DualDisc is a two sided disc product which mates DVD recorded material o...

Page 8: ... stop button 25 F previous next buttons 40 G Z open close button 24 H DISC SKIP button 26 I remote sensor 20 J EXCHANGE button 26 K Disc tray 24 L Front panel display 9 This DVD player incorporates High Definition Multimedia Interface HDMI technology HDMI the HDMI logo and High Definition Multimedia Interface are trademarks or registered trademarks of HDMI Licensing LLC Rear panel A HDMI OUT High ...

Page 9: ...hting of the front panel display by setting DIMMER in CUSTOM SETUP page 58 Playing time of the current title 29 Lights up when you can change the angle 25 Lights up during Repeat Play 32 Playing status All Disc Repeat mode 32 Current disc Disc type Disc numbers 25 Current playing time 28 Playing status Lights up during A B Repeat Play 33 Current disc Disc type Disc numbers 25 Current track 28 Ligh...

Page 10: ... K ZOOM button 25 50 L SLOW PLAY FAST PLAY buttons 25 M AUDIO button 44 N SUBTITLE button 25 50 O 1 on standby button 24 P VOL volume buttons 21 The button has a tactile dot Q TV VIDEO button 21 R PICTURE NAVI picture navigation button 43 49 S TIME TEXT button 28 T MENU button 27 U ENTER button 22 V DISPLAY button 11 W H PLAY button 24 The H button has a tactile dot X x STOP button 25 Y X PAUSE bu...

Page 11: ...track number or JPEG image file number for DATA CDs DATA DVDs 3 Displays Super VCD as SVCD 4 Displays the date for JPEG files To turn off the display Press DISPLAY repeatedly Control Menu display 1 m Control Menu display 2 appears for certain discs only m Control Menu display off OFF 1 8 3 4 1 2 2 7 T 1 3 2 5 5 1 DVD VIDEO Quit PROGRAM ENTER DISPLAY SET ON OFF Currently playing title number 1 Play...

Page 12: ...tedly or one title chapter track album repeatedly A B REPEAT Specifies the parts you want to play repeatedly CUSTOM PICTURE MODE Adjusts the video signal from the player You can select the picture quality that best suits the program you are watching SHARPNESS Exaggerates the outline of the image to produce a sharper picture TVS TV Virtual Surround Selects the surround functions AV SYNC Adjust the ...

Page 13: ...er VCD without PBC Displays DISC SKIP and track number When playing a VIDEO CD or Super VCD with PBC page 27 Displays DISC SKIP and scene number When the disc s menu appears you can select an item by pressing X x When playing a DATA CD or DATA DVD Displays MENU PICTURE NAVI and DISC SKIP To turn off the display Press RETURN or SYNC MENU button on the TV s remote z Hint You can also control these f...

Page 14: ... the instructions supplied with the components to be connected You cannot connect this player to a TV that does not have a video input jack Be sure to disconnect the power cord of each component before connecting Step 1 Unpacking Check that you have the following items Audio Video cord phono plug 3 y phono plug 3 1 Remote commander remote 1 R6 size AA batteries 2 ...

Page 15: ...r you must use pattern C Select pattern D when connecting to a TV projector or audio component equipped with HDMI input A VIDEO AUDIO INPUT L R C PR PB Y COMPONENT VIDEO IN B INPUT S VIDEO D HDMI IN Audio video cord supplied l Signal flow S VIDEO cord not supplied yellow TV projector or audio component CD DVD player TV projector or audio component green Component video cord not supplied TV project...

Page 16: ...nector To connect to a TV with DVI input Use an HDMI DVI converter cord not supplied The DVI jack will not accept any audio signals so you have to use another audio connection in addition to this connection page 18 Furthermore you cannot connect the HDMI OUT jack to DVI jacks that are not HDCP compliant e g DVI jacks on PC displays When connecting to a standard 4 3 screen TV Depending on the disc ...

Page 17: ...m Power Off When you turn the TV off by using the 1 button on the TV s remote the components compatible with CONTROL FOR HDMI function turn off automatically To prepare for the BRAVIA Sync features Set CONTROL FOR HDMI to ON in HDMI SETUP page 62 For details on TV setting refer to the operating instructions supplied with the TV Note Depending on the connected component the CONTROL FOR HDMI functio...

Page 18: ...onents VIDEO AUDIO INPUT L R B A Audio component with a decoder red TV projector or audio component Audio video cord supplied Signal flow Coaxial digital cord not supplied to LINE OUT L R AUDIO Rear L CD DVD player white yellow yellow white red Speakers Front L Speakers to coaxial or optical HDMI digital input Rear R Front R Subwoofer Center The yellow plug is used for video signals page 15 or Opt...

Page 19: ...pending DTS and DTS Digital Out are registered trademarks and the DTS logos and Symbol are trademarks of DTS Inc 1996 2007 DTS Inc All Rights Reserved Notes After you have completed the connection be sure to set DOLBY DIGITAL to DOLBY DIGITAL and DTS to ON in Quick Setup page 22 When you connect an audio component that conforms to the 96 kHz sampling frequency set 48kHz 96kHz PCM in AUDIO SETUP to...

Page 20: ...t When using the remote point it at the remote sensor on the player Notes Do not leave the remote in an extremely hot or humid place Do not drop any foreign object into the remote casing particularly when replacing the batteries Do not expose the remote sensor to direct light from the sun or a lighting apparatus Doing so may cause a malfunction If you do not use the remote for an extended period o...

Page 21: ... see the table below 2 Release TV 1 Code numbers of controllable TVs If more than one code number is listed try entering them one at a time until you find the one that works with your TV Notes When you replace the batteries of the remote the code number you have set may be reset to the default setting Set the appropriate code number again Depending on the connected unit you may not be able to cont...

Page 22: ...up Display for selecting the language used in the on screen display appears 5 Press X x to select a language The player displays the menu and subtitles in the selected language 6 Press ENTER The Setup Display for selecting the aspect ratio of the TV to be connected appears 7 Press X x to select the setting that matches your TV type If you have a wide screen TV or a 4 3 standard TV with a wide scre...

Page 23: ...ent If your audio component has a Dolby Digital decoder select DOLBY DIGITAL Otherwise select D PCM 11Press ENTER DTS is selected 12Press X x to select whether or not you wish to send a DTS signal to your audio component If your audio component has a DTS decoder select ON Otherwise select OFF 13Press ENTER Quick Setup is finished All connections and setup operations are complete Note When PhotoTV ...

Page 24: ...the audio component Depending on the disc a menu may appear on the TV screen For DVD VIDEOs see page 27 For VIDEO CDs see page 27 To turn off the player Press 1 The player enters standby mode One Touch Play for HDMI connections only With one touch of the H button on the remote the player and your TV automatically turn on and the TV s input is switched to the player Playback starts automatically Th...

Page 25: ...cene quickly or slowly During playback press FAST PLAY or SLOW PLAY The speed changes when you press either FAST PLAY or SLOW PLAY To return to normal playback Press H Notes You can only use this function with DVDs VIDEO CDs or Super VCDs only Operation not possible will appear when maximum or minimum speed is reached During Fast Play or Slow Play mode you cannot change the angle page 25 subtitle ...

Page 26: ... disc tray to close in step 5 as you may damage the player Locking the disc tray Child Lock You can lock the disc tray to prevent children from opening it When the player is in standby mode press O RETURN ENTER and then 1 on the remote The player turns on and LOCKED appears on the front panel display The Z button on the player or the remote does not work while the Child Lock is set To unlock the d...

Page 27: ...for playback originally recorded titles ORIGINAL and titles that can be created on recordable DVD players for editing PLAY LIST You can select the type of title to be played 1 Press DISPLAY when the player is in stop mode The Control Menu appears 2 Press X x to select ORIGINAL PLAY LIST then press ENTER The options for ORIGINAL PLAY LIST appear 3 Press X x to select a setting PLAY LIST plays the t...

Page 28: ...the disc does not contain text NO TEXT appears To check DATA CD DATA DVD album name etc By pressing TIME TEXT while playing MP3 audio tracks on a DATA CD DATA DVD you can display the name of the album track and the audio bit rate the amount of data per second of the current audio track on your TV screen If an MP3 audio track has an ID3 tag the player will display the album name track title from th...

Page 29: ... the Control Menu page 11 Notes Depending on the type of disc being played the DVD CD text or track name may not be displayed The player can only display the first level of the DVD CD text such as the disc name or title Playing time of MP3 audio tracks may not be displayed correctly If you play a disc containing JPEG image files only BGM appears when MODE MP3 JPEG is set to AUTO or AUTO BGM and JP...

Page 30: ...ns for PROGRAM appear 3 Press X x to select SET t then press ENTER 4 Press c The cursor moves to the title or track row T in this case 01 5 Select the title chapter or track you want to program When playing a DVD VIDEO For example select chapter 03 of title 02 Press X x to select 02 under T then press ENTER Next press X x to select 03 under C then press ENTER OFF OFF SET ON PLAY 1 8 3 4 1 2 2 7 1 ...

Page 31: ...TER z Hint You can perform Repeat Play or Shuffle Play of programmed titles chapters or tracks During Program Play follow the steps of Repeat Play page 32 or Shuffle Play page 31 Notes All Discs Repeat is automatically changed into One Disc Repeat when you set to program play mode page 32 You can only program the contents of the current disc When you program tracks on a Super VCD the total playing...

Page 32: ... repeats the current title on a disc CHAPTER repeats the current chapter When playing in DVD VR mode ALL DISCS repeats all of the discs ONE DISC repeats all of the titles of the selected type TITLE repeats the current title on a disc CHAPTER repeats the current chapter When playing a VIDEO CD or CD ALL DISCS repeats all of the discs ONE DISC repeats all of the tracks on the current disc TRACK repe...

Page 33: ...ting point point A of the portion to be played repeatedly press ENTER The starting point point A is set 5 When you reach the ending point point B press ENTER again The set points are displayed and the player starts repeating this specific portion To return to normal play Press CLEAR or select OFF in step 3 Notes When you set A B Repeat Play the settings for Shuffle Play Repeat Play and Program Pla...

Page 34: ...t and color intensity CINEMA 1 enhances details in dark areas by increasing the black level CINEMA 2 white colors become brighter and black colors become richer and the color contrast is increased MEMORY adjusts the picture in greater detail 4 Press ENTER The selected setting takes effect z Hint When you watch a movie CINEMA 1 or CINEMA 2 is recommended Adjusting the picture items in MEMORY You ca...

Page 35: ...cture 1 Press DISPLAY twice during playback The Control Menu appears 2 Press X x to select SHARPNESS then press ENTER The options for SHARPNESS appear 3 Press X x to select a level 1 enhances the outline 2 enhances the outline more than 1 4 Press ENTER The selected setting takes effect To cancel the SHARPNESS setting Select OFF in step 3 Notes Thisfunctiondoesnot workwhen PhotoTVHD mode is activat...

Page 36: ... repeatedly to adjust the delay Each time you press C c the delay is adjusted by 10 milliseconds 5 Press ENTER The selected setting takes effect To reset the AV SYNC setting Press CLEAR in step 4 Notes This function is not effective if you use the DIGITAL OUT OPTICAL or COAXIAL jack and set DOLBY DIGITAL or DTS in AUDIO SETUP to DOLBY DIGITAL or ON respectively page 59 This function is not effecti...

Page 37: ...de The Control Menu appears 3 Press X x to select PARENTAL CONTROL then press ENTER The options for PARENTAL CONTROL appear 4 Press X x to select ON t then press ENTER If you have not entered a password The display for registering a new password appears Enter a 4 digit password using the number buttons then press ENTER The display for confirming the password appears When you have already registere...

Page 38: ...ou have not entered a password The display for registering a new password appears Enter a 4 digit password using the number buttons then press ENTER The display for confirming the password appears When you have already registered a password The display for entering the password appears 4 Enter or re enter your 4 digit password using the number buttons then press ENTER The display for setting the p...

Page 39: ...play discs which do not have the Parental Control function playback cannot be limited on this player Depending on the disc you may be asked to change the parental control level while playing the disc In this case enter your password then change the level If the Resume Play mode is canceled the level returns to the previous level Changing the password 1 Press DISPLAY while the player is in stop mod...

Page 40: ... playing a disc in fast forward or fast reverse Scan Press m or M while playing a disc When you find the point you want press H to return to normal speed Each time you press m or M during scan the scan speed changes With each press the indication changes as shown below Actual speeds may differ between discs Playback direction Opposite direction The 2B 2b playback speed is about twice the normal sp...

Page 41: ...pter and you can search a VIDEO CD CD DATA CD DATA DVD by track index file or scene As titles and tracks are assigned unique numbers on the disc you can select the desired one by entering its number You can also search for a scene using the time code 1 Press DISPLAY When playing a DATA CD or DATA DVD with JPEG image files press twice The Control Menu appears 2 Press X x to select the search method...

Page 42: ...e using the time code DVD only 1 In step 2 select TIME TEXT Playing time of the current title is selected Then press ENTER 2 Input the time code using the number buttons then press ENTER For example to find the scene at 2 hours 10 minutes and 20 seconds after the beginning just enter 2 10 20 z Hints When the Control Menu display is turned off you can search for a chapter DVD or track CD DATA CD DA...

Page 43: ...each track 3 Press ENTER The first scene of each chapter title or track appears as follows 4 Press C X x c to select a chapter title or track and press ENTER Playback starts from the selected scene To return to normal play during setting Press O RETURN or DISPLAY z Hint If there are more than 9 chapters titles or tracks V is displayed at the bottom right of the screen To display the additional cha...

Page 44: ... see which language the code represents When the same language is displayed two or more times the DVD VIDEO is recorded in multiple audio formats When playing in DVD VR mode The types of sound tracks recorded on a disc are displayed The default setting is underlined Example 1 MAIN main sound 1 SUB sub sound 1 MAIN SUB main and sub sound When playing a VIDEO CD or CD The default setting is underlin...

Page 45: ... signal format by pressing AUDIO repeatedly during playback The format of the current audio signal Dolby Digital DTS PCM etc appears as shown below Example Dolby Digital 5 1 ch About audio signals Audio signals recorded in a disc contain the sound elements channels shown below Each channel is output from a separate speaker Front L Front R Center Rear L Rear R Rear Monaural This signal can be eithe...

Page 46: ...IC THEATER TVS DYNAMIC TVS WIDE This mode is effective when the distance between the front L and R speakers is short such as with built in speakers on a stereo TV TVS NIGHT This feature is useful when you want to hear the dialog and enjoy the surround sound effects of TVS WIDE at low volume TVS STANDARD Use this setting when you want to use TVS with 2 separate speakers Notes When the playing signa...

Page 47: ...an play the following tracks and files MP3 audio tracks with the extension MP3 JPEG image files with the extension JPEG or JPG JPEG image files that conform to the DCF image file format Design rule for Camera File system Image standards for digital cameras regulated by JEITA Japan Electronics and Information Technology Industries Association Notes The player will play any data with the extension M...

Page 48: ...playback order above may not be applicable if there are more than 200 albums and 300 tracks files in each album The player can recognize up to 200 albums the player will count just albums including albums that do not contain MP3 audio tracks and JPEG image files The player will not play any albums beyond the 200th album Proceeding to the next or another album may take some time Playing MP3 Audio T...

Page 49: ...an select the first track of the next album by pressing during playback of the last track of the current album Note that you cannot return to the previous album by using and that you need to select the previous album from the album list Selecting a JPEG image file 1 After step 2 of Selecting an album press PICTURE NAVI The image files in the album appear in 16 subscreens A scroll box is displayed ...

Page 50: ...nding on the digital camera To stop viewing the JPEG image Press x z Hints While viewing JPEG image files you can set options such as INTERVAL page 52 EFFECT page 52 and SHARPNESS page 35 You can view JPEG images files without MP3 audio by setting MODE MP3 JPEG to IMAGE JPEG page 51 The date the picture was taken is displayed beside DATE in the Control Menu page 11 Note that no date may appear dep...

Page 51: ...maximum of 200 albums regardless of the selected mode Of each album the player recognizes up to 300 MP3 audio tracks and 300 JPEG image files when AUTO or AUTO BGM is selected 600 MP3 audio tracks when AUDIO MP3 is selected 600 JPEG image files when IMAGE JPEG is selected Notes If you play a disc containing MP3 audio tracks only and MODE MP3 JPEG is set to AUTO or AUTO BGM you can listen to MP3 au...

Page 52: ...oTV HD mode is activated If you set PhotoTV HD mode the wipe rotation zoom and effect functions are not available When PhotoTV HD mode is activated the selection for TV TYPE is skipped during Quick Setup page 22 Setting the pace for a slide show INTERVAL You can set the time the slides are displayed on the screen 1 Press DISPLAY twice while viewing a JPEG image or when the player is in stop mode T...

Page 53: ...des over the previous image MODE 3 the image sweeps in from top to bottom MODE 4 the image sweeps in from left to right MODE 5 the image stretches out from the center of the screen OFF turns off this function 4 Press ENTER Notes Note that this setting does not work if the JPEG file has rotation information Depending on the JPEG RESOLUTION setting page 61 some effect may not function ...

Page 54: ...Press X x to select the setup item from the displayed list LANGUAGE SETUP SCREEN SETUP CUSTOM SETUP AUDIO SETUP or HDMI SETUP Then press ENTER The Setup item is selected Example SCREEN SETUP 5 Press X x to select an item then press ENTER The options for the selected item appear Example TV TYPE ENTER DISPLAY Number buttons STOP 1 5 QUICK CUSTOM RESET DVD VIDEO QUICK LANGUAGE SETUP OSD MENU AUDIO SU...

Page 55: ...4 OSD On Screen Display Switches the display language on the screen MENU DVD VIDEO only You can select the desired language for the disc s menu AUDIO DVD VIDEO only Switches the language of the sound track When you select ORIGINAL the language given priority in the disc is selected SUBTITLE DVD VIDEO only Switches the language of the subtitle recorded on the DVD VIDEO When you select AUDIO FOLLOW ...

Page 56: ... signals output from the jacks other than COMPONENT VIDEO OUT HDMI OUT 16 9 Select this when you connect a wide screen TV or a TV with a wide mode function 4 3 LETTER BOX Select this when you connect a 4 3 screen TV Displays a wide picture with bands on the upper and lower portions of the screen 4 3 PAN SCAN Select this when you connect a 4 3 screen TV Automatically displays the wide picture on th...

Page 57: ...these images to appear natural on your screen when output in progressive mode the progressive video signal needs to be converted to match the type of DVD software that you are watching This setting is effective only when you set PROGRESSIVE COMPONENT OUT ONLY in SCREEN SETUP to ON 4 3 OUTPUT This setting is effective only when you set TV TYPE in SCREEN SETUP to 16 9 Adjust this to watch 4 3 aspect...

Page 58: ...ects PCM DTS and Dolby Digital sound tracks in this order MULTI DISC RESUME DVD VIDEO VIDEO CD only Switches the Multi disc Resume setting on or off Resume playback can be stored in memory for up to 6 different DVD VIDEOs VIDEO CDs page 26 Note If you run Quick Setup Multi disc Resume settings stored in memory may return to the default settings OFF Switches this function off ON The player enters s...

Page 59: ...ee page 18 Select DOLBY DIGITAL DTS and 48kHz 96kHz PCM after setting DIGITAL OUT to ON If you connect a component that is incompatible with the selected audio signal a loud noise or no sound may be heard from the speakers risking damage to your ears or speakers Notes The AV SYNC function page 36 is not effective if you use the DIGITAL OUT OPTICAL or COAXIAL jack and set DOLBY DIGITAL or DTS to DO...

Page 60: ... kHz 24 bit signals 48 kHz 16 bit PCM will be automatically output even when you select 96kHz 24bit D PCM Select this when the player is connected to an audio component without a built in Dolby Digital decoder You can select whether the signals conform to Dolby Surround Pro Logic or not by making adjustments to the DOWNMIX item in AUDIO SETUP page 59 DOLBY DIGITAL Select this when the player is co...

Page 61: ...80i HD and 1920 1080i HD are effective only when you set HDMI RESOLUTION to 1920x1080i and TV TYPE to 16 9 If you set this setting to PhotoTV HD 1920 1080i HD or 1920 1080i HD wipe rotation and zoom function are not available If you want to use wipe rotation and zoom function sets this setting to SD HD or HD If you set this setting to PhotoTV HD 1920 1080i HD or 1920 1080i HD next image appears af...

Page 62: ...nction from OFF to ON on a Sony TV that is compatible with the CONTROL FOR HDMI function all compatible devices will change to ON automatically or vice versa For more details refer to the operation instructions supplied with the TV LANGUAGE FOLLOW Switches the languages of the DVD player to the same as the current TV OSD language You cannot select this when CONTROL FOR HDMI is set to OFF Notes Tur...

Page 63: ... in SCREEN SETUP to OFF so that the player is set to normal interlace format page 57 The player is connected to an input device that is not HDCP compliant the HDMI indicator on the front panel does not light up See page 16 If the HDMI OUT jack is used for video output changing the HDMI RESOLUTION setting in HDMI SETUP may solve the problem page 61 Connect the TV and the player using a video jack o...

Page 64: ...ayer page 3 The player cannot play a recorded disc that is not correctly finalized page 7 The MP3 audio track cannot be played page 47 The DATA CD is not recorded in MP3 format that conforms to ISO 9660 Level 1 Level 2 or Joliet The DATA DVD is not recorded in MP3 format that conforms to UDF Universal Disk Format The MP3 audio track does not have the extension MP3 The data is not formatted in MP3 ...

Page 65: ... be able to do some of the operations above Refer to the operating manual that comes with the disc The language for the sound track cannot be changed Try using the DVD s menu instead of the direct selection button on the remote page 27 Multilingual tracks are not recorded on the DVD being played The DVD prohibits the changing of the language for the sound track The subtitle language cannot be chan...

Page 66: ...en try again Display language on the screen switches automatically When LANGUAGE FOLLOW is set to ON in the HDMI SETUP page 62 the displaylanguage onthe screenautomatically switches according to the language setting of the connected TV if you change the language settings on your TV etc The DVD player turns on automatically HDMI input is selected using TV Interface Some TV has this function for CON...

Page 67: ...B PR interlace 1 0 648 Vp p progressive or interlace 2 0 7 Vp p 75 ohms 1 BLACK LEVEL COMPONENT OUT is ON 2 BLACK LEVEL COMPONENT OUT is OFF LINE OUT VIDEO Phono jack 1 0 Vp p 75 ohms S VIDEO OUT 4 pin mini DIN Y 1 0 Vp p C 0 286 Vp p 75 ohms General Power requirements 120 V AC 60 Hz Power consumption 11 W Dimensions approx 430 83 410 mm 17 31 4 161 8 in width height depth incl projecting parts Ma...

Page 68: ...1345 Malagasy 1347 Maori 1349 Macedonian 1350 Malayalam 1352 Mongolian 1353 Moldavian 1356 Marathi 1357 Malay 1358 Maltese 1363 Burmese 1365 Nauru 1369 Nepali 1376 Dutch 1379 Norwegian 1393 Occitan 1403 Afan Oromo 1408 Oriya 1417 Punjabi 1428 Polish 1435 Pashto Pushto 1436 Portuguese 1463 Quechua 1481 Rhaeto Romance 1482 Kirundi 1483 Romanian 1489 Russian 1491 Kinyarwanda 1495 Sanskrit 1498 Sindhi...

Page 69: ...2 Film based software 57 Freeze Frame 41 Front panel display 9 H Handling discs 2 HDMI AUDIO HDMI 62 CONTROL FOR HDMI 17 62 HDMI RESOLUTION 61 LANGUAGE FOLLOW 62 HDMI SETUP 61 Hooking up 14 I ID3 Tag 28 INDEX 42 INTERVAL 52 J JPEG 5 47 JPEG RESOLUTION 61 L LANGUAGE SETUP 55 Locating a specific point by watching the TV screen 40 M MEMORY 34 MENU 55 MODE MP3 JPEG 51 MODE PROGRESSIVE 57 MP3 5 47 MULT...

Page 70: ...70US TRACK SELECTION 58 TRACK VIEWER 43 Troubleshooting 63 TV TYPE 56 TVS TV Virtual Surround 46 U Usable discs 6 V Video based software 57 VIDEO CD 5 24 Z ZOOM 25 50 ...

Page 71: ...a de alta definición 3 Acerca de las funciones CONTROL PARA HDMI para BRAVIA Sync sólo para conexiones HDMI 5 Paso 3 Conexión de los cables de audio 6 Paso 4 Conexión del cable de alimentación 8 Paso 5 Preparación del control remoto 8 Control del televisor mediante el control remoto 9 Paso 6 Ajuste rápido 10 Reproducción 12 Reproducción de discos 12 ...

Page 72: ...suministrado con los componentes que va a conectar No es posible conectar este reproductor a un televisor que no tenga una toma de entrada de video Asegúrese de desconectar el cable de corriente de cada componente antes de realizar las conexiones Paso 1 Desembalaje Compruebe que tiene los siguientes elementos Cable de audio video clavija fonográfica 3 y clavija fonográfica 3 1 Control remoto 1 Pil...

Page 73: ...trada HDMI interfaz multimedia de alta definición A VIDEO AUDIO INPUT L R C PR PB Y COMPONENT VIDEO IN B INPUT S VIDEO D HDMI IN Cable de audio vídeo suministrado Televisor proyector o componente de audio amarillo a S VIDEO OUT salida de s vídeo Televisor proyector o componente de audio verde Cable S VIDEO s vídeo no suministrado Televisor proyector o componente de audio rojo azul verde azul rojo ...

Page 74: ...reproductor y el conector HDMI mediante la comprobación de su forma Asegúrese de que la conector no esté al revés ni inclinada 2 Inserte el conectorHDMIdirectamente en la toma HDMI OUT No doble ni fuerce el conector HDMI interfaz multimedia de alta definición Para conectarlo a un televisor con entrada DVI interfaz visual digital Utilice un cable adaptador HDMI DVI no suministrado La toma DVI inter...

Page 75: ...le HDMI no suministrado podrá disfrutar de las siguientes funciones Reproducción mediante una pulsación página 13 Desconexión del sistema Cuando apague el televisor mediante el botón 1 del control remoto del televisor los componentes compatibles con la función CONTROL PARA HDMI se apagarán automáticamente Preparación para las funciones de BRAVIA Sync Ajuste CONTROL FOR HDMI en ON en el HDMI SETUP ...

Page 76: ...iscos compactos y videodiscos digitales Cable de audio video suministrado a LINE OUT L R AUDIO salida línea izquierda derecha blanco rojo amarillo blanco rojo amarillo Frontal izquierdo Frontal derecho Altavoces a la entrada digital coaxial o óptica HDMI salida de la interfaz multimedia de alta definición Cable de conexión digital coaxial no suministrado Flujo de señal Altavoces Posterior derecho ...

Page 77: ... Reservados todos los derechos Notas Después de establecer la conexión asegúrese de ajustar DOLBY DIGITAL en DOLBY DIGITAL y DTS sistema digital de sala de cine en ON en Ajuste rápido página 10 Al conectar un componente de audio que admita la frecuencia de muestreo de 96 kHz ajuste 48kHz 96kHz PCM de AUDIO SETUP en 96kHz 24bits página 74 Los efectos TVS sonido envolvente virtual de televisor de es...

Page 78: ...to Al utilizar el control remoto oriéntelo hacia el sensor remoto del reproductor Notas No deje el control remoto en lugares extremadamente cálidos o húmedos No permita que caigan objetos extraños sobre el control remoto especialmente cuando sustituya las pilas No exponga el sensor del control remoto a la luz directa del sol ni a dispositivos de iluminación Si lo hace pueden producirse fallas en e...

Page 79: ...tones numéricos para seleccionar el código del fabricante del televisor consulte la tabla que se proporciona a continuación 2 Suelte TV televisor 1 Códigos de televisores controlables Si aparece más de un código ingréselos uno tras otro hasta encontrar el que funciona con su televisor Notas Al sustituir las pilas del control remoto es posible que el código recupere el valor de fábrica Vuelva a aju...

Page 80: ...zado en la pantalla 5 Presione X x para seleccionar un idioma El reproductor muestra el menú y los subtítulos en el idioma seleccionado 6 Presione ENTER ingresar Aparece la pantalla de ajustes que le permitirá seleccionar la relación de aspecto del televisor que vaya a conectar 7 Presione X x para seleccionar el ajuste que coincida con el tipo de televisor Si tiene un televisor con pantalla panorá...

Page 81: ...ente de audio dispone de decodificador Dolby Digital seleccione DOLBY DIGITAL De lo contrario seleccione D PCM 11Presione ENTER ingresar Se selecciona DTS sistema digital de sala de cine 12Presione X x para seleccionar si desea o no enviar una señal DTS sistema digital de sala de cine al componente de audio Si el componente de audio dispone de decodificador DTS seleccione ON De lo contrario selecc...

Page 82: ...tor 4 Presione Z en el reproductor y coloque un disco en la bandeja de discos Para colocar otros discos en la bandeja presione DISC SKIP omitir disco y coloque los discos en el orden en que desea reproducirlos Cada vez que presione DISC SKIP omitir disco la bandeja de discos girará para que pueda colocar discos en los compartimientos vacíos El reproductor empieza a reproducir el último disco coloc...

Page 83: ...l con pistas de sonido DTS sistema digital de sala de cine ajuste DTS sistema digital de sala de cine en ON en AUDIO SETUP página 74 Si conecta el reproductor al equipo de audio sin utilizar un decodificador DTS sistema digital de sala de cine no ajuste DTS sistema digital de sala de cine de AUDIO SETUP en ON página 74 Es posible que los altavoces emitan un ruido fuerte que podría afectar los oído...

Page 84: ...n ampliada mediante C X x c Según el contenido del disco es posible que se cancele en forma automática la función de zoom ampliación cuando se mueva la imagen Nota Tal vez no pueda utilizar la función de repetición o avance en ciertas escenas Volver a reproducir la escena anterior 1 Presione REPLAY reproducción durante la reproducción Avanzar rápidamente una pequeña parte de la escena actual 2 Pre...

Page 85: ......

Page 86: ......

Page 87: ......

Page 88: ...Sony Corporation Printed in Malaysia Printed on 70 or more recycled paper using VOC Volatile Organic Compound free vegetable oil based ink ...

Reviews: