background image

32

Using V

arious Functions with the Contr

ol Menu

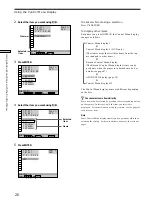
Changing the Sound

1: ENGLISH

PCM 48kHz 24bit

PROGRAM FORMAT

AUDIO
Select:               

ENTER

1: ENGLISH

AUDIO
Select:               

ENTER

DOLBY SURROUND

DOLBY DIGITAL  2/0

L

R

C

S

PROGRAM FORMAT

1: ENGLISH

AUDIO
Select:               

ENTER

L

R

C

DOLBY DIGITAL 3/2.1

PROGRAM FORMAT

LFE

LS

RS

1: ENGLISH

AUDIO
Select:               

ENTER

L

R

MPEG 2/2

PROGRAM FORMAT

LS

RS

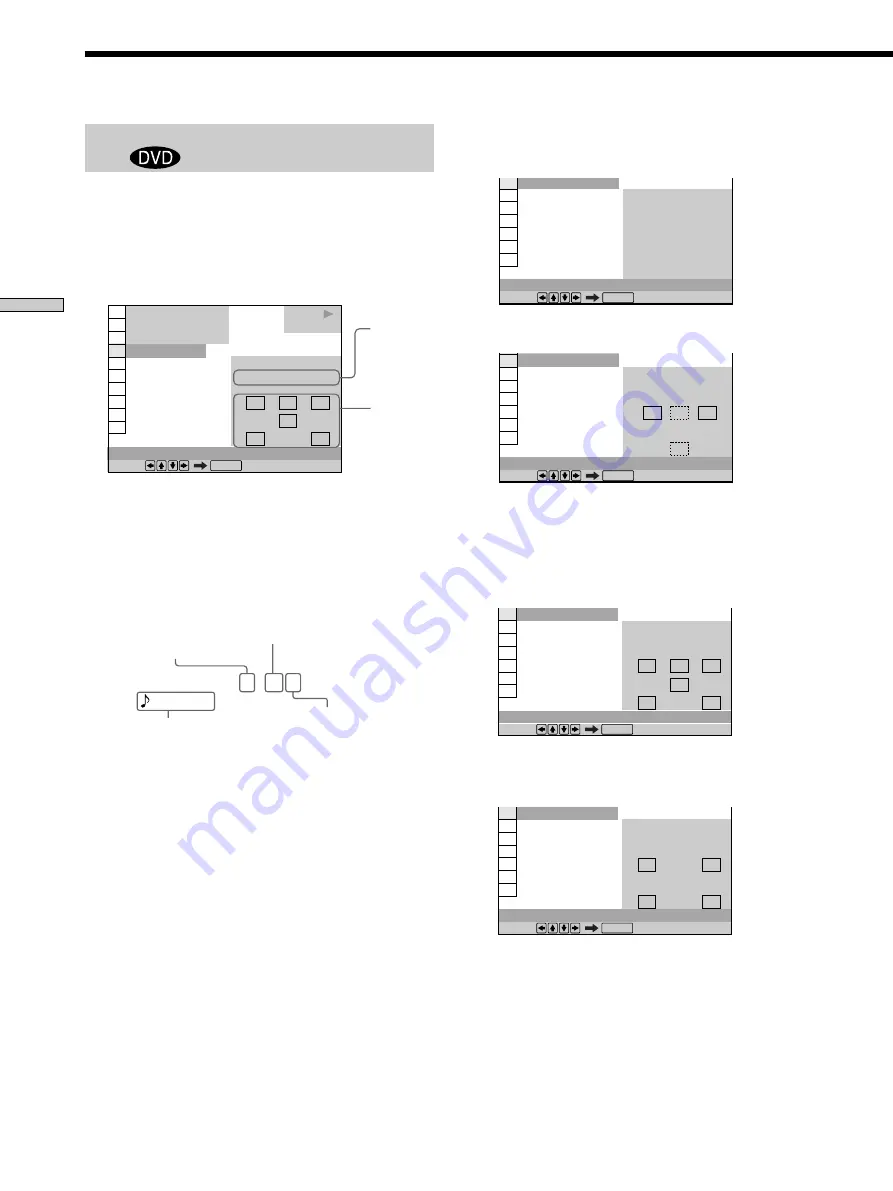
Displaying the audio information of the

disc 

When you select “AUDIO,” the channels being played are
displayed on the screen.
In Dolby Digital format, multiple signals ranging from
monaural to 5.1 channel signals can be recorded on a
DVD.  Depending on the DVD, the number of the
recorded channels may be different.

 * “PCM,” “DTS,” “DOLBY DIGITAL” or “MPEG” is

displayed.  In case of “DOLBY DIGITAL,” the channels
in the playing track are displayed by numbers as
follows:

For Dolby Digital 5.1 ch:

**  The letters in the program format display mean the

following:

L:

Front (left)

R:

Front (right)

C:

Center (monaural)

LS:

Rear (left)

RS:

Rear (right)

S:

Rear (monaural) – the rear component of the
Dolby Surround processed stereo signal and the
Dolby Digital signal.

LFE: – LFE (Low Frequency Effect)

Front component 2
+ Center component 1

Rear component 2

LFE (Low
Frequency Effect)
component 1

Current
audio
format*

Current
playing
program
format**

DVD        

AUDIO

1: ENGLISH

1 8 ( 3 4 )

1 2 ( 2 7 )

C    0 1 : 3 2 : 5 5

L

R

C

DOLBY DIGITAL 3/2.1

PROGRAM FORMAT

LFE

LS

RS

Select:               

ENTER

PLAY      

The display examples are as follows:
•PCM (stereo)

•Dolby Surround

•Dolby Digital 5.1ch

“LFE” appears only when a disc contains an LFE signal
component. “LFE” remains on the “PROGRAM
FORMAT” display even if the LFE signal component is
not being output.

•MPEG

Dolby Digital
Karaoke format
(see page 46)

   KARAOKE

DOLBY DIGITAL  3 / 2. 1

Summary of Contents for DVP-K350

Page 1: ...CD DVD Player CD DVD Player 2000 Sony Corporation DVP K350 3 063 038 11 2 Operating Instructions ...

Page 2: ...even if the unit itself has been turned off Unplug the unit from the wall outlet if you do not intend to use it for an extended period of time To disconnect the cord pull it out by the plug never by the cord AC 00V 00Hz MODEL NO CD DVD PLAYER 00W NO SONY CORPORATION MADE IN JAPAN X 0 000 000 00 DVP XXXX Installing Allow adequate air circulation to prevent internal heat buildup Do not place the uni...

Page 3: ...ur Own Program Program Play 39 Playing in Random Order Shuffle Play 41 Playing Repeatedly Repeat Play 42 Repeating a Specific Portion A B Repeat 43 Enjoying Karaoke 45 Using Karaoke 45 Using the Karaoke Control Menu Display 47 Changing the Key Key Control 48 Applying the Surround Effect Karaoke Surround 48 Additing Richness to Your Voice Karaoke Star 49 Playing Karaoke with Any Stereo Disc Karaoke...

Page 4: ...JAPAN 0 000 000 00 X This Player Can Play the Following Discs Disc logo Contents Disc size Play time The DVD VIDEO logo is a trademark This player switches the color system PAL or NTSC according to the connected TV For details see page 9 Region code of DVDs you can play on this unit Your DVD player has a region code printed on the back of the unit and will only play DVDs that are labeled with iden...

Page 5: ...tputs To avoid possible damage to the audio system the consumer should take proper precautions when the analog stereo outputs of the DVD player are connected to an amplification system To enjoy DTS Digital Surround playback an external 5 1 channel DTS Digital Surround decoder system must be connected to the digital output of the DVD player This product incorporates copyright protection technology ...

Page 6: ... volume Do not turn up the volume while listening to a section with very low level inputs or no audio signals If you do the speakers may be damaged when a peak level section is played On cleaning Clean the cabinet panel and controls with a soft cloth slightly moistened with a mild detergent solution Do not use any type of abrasive pad scouring powder or solvent such as alcohol or benzine If you ha...

Page 7: ...ely hot or humid place Do not drop any foreign object into the remote casing particularly when replacing the batteries Do not expose the remote sensor to direct sunlight or lighting apparatuses Doing so may cause a malfunction If you do not use the remote for an extended period of time remove the batteries to avoid possible damage from battery leakage and corrosion Getting Started This section des...

Page 8: ... match the color coded cord to the appropriate jacks on the components Yellow video to Yellow Red right to Red and White left to White Be sure to make connections firmly to avoid hum and noise If your TV has an S video input connector connect the component via the S VIDEO OUT connector using an S video cord not supplied You will get a better picture Refer to the instructions supplied with the TV t...

Page 9: ...he player Some setup adjustments are necessary for the player depending on the TV or other components to be connected Use the setup display to change the various settings For details on using the setup display see page 56 To connect the player to a wide screen TV In the setup display set TV TYPE in SCREEN SETUP to 16 9 default setting For details see page 60 To connect the player to a normal TV In...

Page 10: ...ngs see page 13 Note You cannot use the karaoke function with the DIGITAL OUT connectors Manufactured under license from Dolby Laboratories Dolby Pro Logic and the double D symbol are trademarks of Dolby Laboratories Confidential unpublished works 1992 1997 Dolby Laboratories All rights reserved Required cords Audio connecting cord not supplied 1 S video cord not supplied 1 When connecting the cor...

Page 11: ... to ON If you do a loud noise will suddenly come out from the speakers affecting your ears or causing the speakers to be damaged Setups for the player Some setup adjustments are necessary for the player depending on the components to be connected Use the setup display to change the various settings For details on using the setup display see page 56 To listen to the sound through speakers connected...

Page 12: ...ns supplied with the component to be connected Set SUBWOOFER in SPEAKER SETUP to YES in the setup display page 67 Then set FRONT SPEAKER SIZE to TV when you use the TV s speakers or to LARGE MIDDLE or SMALL when you use the speakers connected to the receiver zYou can enjoy surround sounds even if you connect front speakers only You can use 3D sound imaging to create virtual rear speakers from the ...

Page 13: ...eting all connections Refer to the instructions supplied with the component to be connected The cord connectors should be fully inserted into the jacks A loose connection may cause hum and noise Setups for the player Some setup adjustments are necessary for the player depending on the components to be connected Use the setup display to change the various settings For details on using the setup dis...

Page 14: ... DAT IN TUNER IN PHONO DVD IN OPT DVD IN COAX TV LDIN AC 3RF SIGNAL GND DIGITAL TV LD IN OPT CD IN OPT MD DAT OUT OPT MD DAT IN OPT CTRL A1 AC OUTLET L R WOOFER FRONT B REAR A FRONT REAR 5 1 INPUT CENTER TV LD S VIDEO IN VIDEO AUDIO IN S LINK SPEAKERS INPUT Front speaker L Front speaker R Rear speaker R Rear speaker L Center speaker Subwoofer Active type AV Receiver Amplifier with a built in DTS d...

Page 15: ...ed 5 Select the desired language using M m then press ENTER 6 Press DISPLAY The setup display disappears 7 Press DISPLAY repeatedly to turn off the on screen menu To return to the previous screen Press ORETURN To quit while making a selection Press DISPLAY Note The languages you can select are the ones displayed in step 4 For details see page 59 LANGUAGE SETUP OSD DVD MENU AUDIO SUBTITLE To set pr...

Page 16: ...ARAOKE STAR VOCAL VOCAL SUPPORT KEY CONTROL Two beeps at the maximum Three beeps at the minimum Three beeps VOCAL SELECT for DVDs 1 2 Two beeps 1 One beep 2 One beep VOCAL SELECT for CDs VIDEO CDs Super VCDs L R Two beeps STEREO One beep RESERVE When the player waits for the next disc Two beeps after one long beep stop When all reserved titles or tracks are finished One long beep stop EFECT MODE O...

Page 17: ...s A on the player and place a disc on the disc tray The player automatically turns on and the power indicator lights up in green 4 Press H The disc tray closes and the player starts playback continuous play Adjust the volume on the TV or the receiver amplifier After following Step 4 xWhen playing a DVD A DVD menu or title menu may appear on the TV screen see page 21 xWhen playing a VIDEO CD A menu...

Page 18: ...TICAL and COAXIAL connectors If you play a CD with a DTS sound track a loud noise may come out from the AUDIO OUT connectors affecting your ears or causing the speakers to be damaged Notes on playing DTS sound tracks on a DVD The signals of the DTS sound tracks are output from the DIGITAL OUT OPTICAL and COAXIAL connectors only No sound will be output from the AUDIO OUT connectors If the player is...

Page 19: ...nly t FF1M t FF2M Opposite direction x2b DVD only t FR1m t FR2m The x2B x2b playback speed is about twice the normal speed The FF2M FR2m playback speed is faster than FF1M FR1m Searching for a Particular Point on a Disc Z Locating a point slowly by watching the screen Slow motion play You can use this function only for DVDs or VIDEO CDs When the player is in the pause mode press to locate a point ...

Page 20: ...layback from the point where you stopped the disc in Step 1 zTo play from the beginning of the disc When the playing time appears on the front panel display before you start playing press x to reset the playing time then press H x H Resuming Playback from the Point Where You Stopped the Disc Resume Play Notes Resume Play may not be available on some DVDs Resume Play is not available in Shuffle or ...

Page 21: ...d with the disc Press ENTER may also be expressed as Press SELECT Using the DVD s Menu TITLE M m DVD MENU Using the DVD menu Some DVDs allow you to select the disc contents using a menu When you play these DVDs you can select the language for the subtitles the language for the sound etc using the DVD menu 1 Press DVD MENU The DVD menu appears on the TV screen The contents of the menu vary from dis...

Page 22: ...r Super VCDs are played in continuous play mode only When playing VIDEO CDs with PBC Play Back Control functions Ver 2 0 discs you can enjoy simple interactive operations search functions and other such operations PBC Playback allows you to play VIDEO CDs interactively by following the menu on the TV screen On this player you can use the number buttons ENTER M m and ORETURN during PBC Playback 1 S...

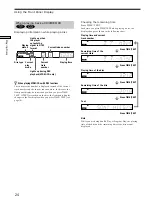
Page 23: ...up when the player outputs the signal in NTSC format DVD TITLE CHAP HOUR MIN SEC DVD TITLE HOUR MIN SEC DVD TITLE HOUR MIN SEC DVD DVD TITLE CHAP HOUR MIN SEC Remaining time of the current title Playing time and number of the current title Remaining time of the current chapter Press TIME TEXT Press TIME TEXT Press TIME TEXT Press TIME TEXT Text Press TIME TEXT Checking the remaining time Press TIM...

Page 24: ...el display does not change when you press TIME TEXT If TEXT is recorded on the disc the front panel display changes to the Text display when you press TIME TEXT see page 30 VIDEOCD CD PBC PGM SHUFFLE NTSC TRACK INDEX MIN SEC REPEAT1 A B Playing time Playing status Current play mode Current track number Current index number Disc type Lights up during PBC playback VIDEO CD only Lights up when the pl...

Page 25: ...isplay you can select the starting point play scenes in any order you like change the viewing angles make Digital Cinema Sound settings and other such operations The possible operations are different depending on the kind of disc For details on each Control Menu display item see pages 28 to 44 1 Press DISPLAY to show the Control Menu display on the TV screen 1 8 3 4 1 2 2 7 C 0 1 3 2 5 5 DVD Selec...

Page 26: ... display page 36 m Control Menu display off The Control Menu display items are different depending on the disc zYou can select some items directly Some items can be selected by pressing the corresponding button on the remote In this case only the item you selected is displayed For instructions on using the remote see the pages of each relevant item Note Some Control Menu display items require oper...

Page 27: ...he angle of the scene VES DVD only page 35 Select a mode to enjoy multichannel surround sound such as Dolby Digital and MPEG Even if you connect only front speakers Virtual Enhanced Surround VES lets you enjoy 3D sound by using 3D sound imaging to create virtual rear speakers from the sound of the front speakers L R without using actual rear speakers ADVANCED DVD only page 36 You can check play in...

Page 28: ...ck index or scene you want to search for using the number buttons then press ENTER The player starts playback at the selected number To cancel the number press CLEAR before pressing ENTER To cancel while making a selection Press ORETURN zYou can search for the title chapter track index or scene using the SEARCH MODE button 1 Press SEARCH MODE on the remote repeatedly to select TITLE CHAPTER TRACK ...

Page 29: ...me of the current track T Remaining time of the current track D Playing time of the current disc D Remaining time of the current disc When playing a Super VCD The remaining time cannot be displayed x TIME TEXT T Playing time of the current track zYou can select TIME TEXT directly Press TIME TEXT on the remote Each time you press the button the time information changes Selecting a Starting Point Us...

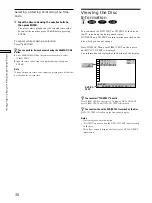
Page 30: ...el display Notes Text is displayed only in English NO TEXT appears when the DVD CD TEXT is not recorded on the disc This player can only display the first level of DVD CD TEXT information 3 Input the time code using the number buttons then press ENTER The player starts playback at the selected time colde To cancel the number press CLEAR before pressing ENTER To cancel while making a selection Pres...

Page 31: ...nd 1 L The sound of the left channel monaural 2 R The sound of the right channel monaural When playing a Super VCD The default setting is underlined 1 STEREO The stereo sound of the audio track 1 1 1 L The sound of the left channel of the audio track 1 monaural 1 2 R The sound of the right channel of the audio track 1 monaural 2 STEREO The stereo sound of the audio track 2 2 1 L The sound of the l...

Page 32: ...hannels in the playing track are displayed by numbers as follows For Dolby Digital 5 1 ch The letters in the program format display mean the following L Front left R Front right C Center monaural LS Rear left RS Rear right S Rear monaural the rear component of the Dolby Surround processed stereo signal and the Dolby Digital signal LFE LFE Low Frequency Effect Front component 2 Center component 1 R...

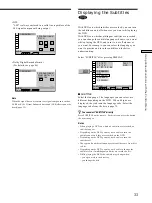
Page 33: ...ing DISPLAY x SUBTITLE Select the language The languages you can select are different depending on the DVD When 4 digits are displayed they indicate the language code Select the language code from the list on page 75 zYou can select SUBTITLE directly Press SUBTITLE on the remote Each time you press the button the item changes Notes When playing a DVD on which no subtitles are recorded no subtitles...

Page 34: ...Select ANGLE ENTER PLAY 1 8 3 4 1 2 2 7 C 0 1 3 2 5 5 DVD 9 Number buttons Cancel ANGLE ENTER RETURN PLAY With DVDs on which various angles multi angles for a scene are recorded you can change the angles For example while playing a scene of a train in motion you can display the view from either the front of the train the left window of the train or from the right window without having the train s ...

Page 35: ...or details on each item see Effects of each item The default setting is underlined OFF VES TV VES A VES B VIRTUAL SEMI MULTI DIMENSION VES A VES TV VES B 1 8 3 4 1 2 2 7 C 0 1 3 2 5 5 DVD VES Select Cancel ENTER RETURN PLAY VES TV Effects of each item OFF Outputs 2 channel signals for stereo sound 5 channel signals for Dolby Digital sound of a DVD are mixed down to 2 channels VES Virtual Enhanced ...

Page 36: ...irtual rear speakers from the sound of the front speakers L R without using actual rear speakers This mode creates 5 sets of virtual speakers surrounding the listener at a 30 angle of elevation zYou can select VES directly Press VES on the player Each time you press the button the item changes Notes When you select an item the sound cuts off for a moment When the playing signal does not contain th...

Page 37: ...D Audio Video BIT RATE 0 5 10 384kbps Mbps Audio Video BIT RATE 0 5 10 kbps Mbps 0 1000 Appears when the DVD has dual layers OFF DVD CUSTOM PARENTAL CONTROL Select ENTER 1 8 3 4 1 2 2 7 C 0 1 3 2 5 5 PLAY OFF PASSWORD DVD CUSTOM PARENTAL CONTROL 1 8 3 4 1 2 2 7 C 0 1 3 2 5 5 Select Cancel ENTER RETURN STOP ON Locking Discs Custom Parental Control Z Using a registered password you can set playback ...

Page 38: ...enever the CUSTOM PARENTAL CONTROL display asks you for your password then press ENTER The display will ask you to enter a new 4 digit password Note Unless you enter the password the player cannot play the disc for which the Custom Parental Control is set When you do not know the password press A and remove the disc 3 Select ON using M m then press ENTER x If you have not entered a password The di...

Page 39: ...y appears OFF OFF SET ON 1 8 3 4 1 2 2 7 C 0 1 3 2 5 5 PROGRAM Select Cancel ENTER RETURN DVD PLAY 2 Press 01 is highlighted It is ready to set the first title or track for Program Play 3 Select the title chapter or track you want to program using M m then press ENTER For example select title or track 2 You can also use the number buttons and ENTER button to make a selection In this case the selec...

Page 40: ... If you are using the PBC playback function you must first stop the disc before you can set a program When playing Super VCDs the total time of the programmed tracks does not appear on the screen You cannot use the Program Play function in karaoke mode x When playing a VIDEO CD or CD Select the track you want to program 4 To program other titles chapters or tracks repeat Step 3 The programmed titl...

Page 41: ...ffle tracks and play them in a random order When playing a VIDEO CD CD or DVD when Program Play is set to ON OFF does not play a disc in random order ON has the player shuffle titles or tracks selected in Program Play and play them in a random order To stop Shuffle Play Press CLEAR on the remote 1 8 3 4 1 2 2 7 C 0 1 3 2 5 5 OFF CHAPTER TITLE CHAPTER DVD SHUFFLE Select Cancel ENTER RETURN PLAY Pla...

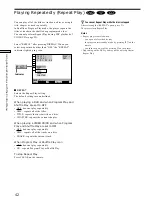
Page 42: ...ts the titles or tracks in the shuffled or programmed order You cannot perform Repeat Play during PBC playback of VIDEO CDs page 22 Select REPEAT after pressing DISPLAY When you select a repeat mode other than OFF the REPEAT indicator lights up in green x REPEAT Selects the Repeat Play setting The default settings are underlined When playing a DVD and when Program Play and Shuffle Play are set to ...

Page 43: ...ints OFF does not play a specific portion of a title chapter track repeatedly 1 8 3 4 1 2 2 7 C 0 1 3 2 5 5 SET OFF OFF DVD Select Cancel ENTER RETURN A B REPEAT PLAY Indicator Setting a portion for A B repeat 1 Select A B REPEAT and press ENTER 2 Select SET and press ENTER The A B REPEAT setting display appears 3 During playback when you find the starting point point A of the portion to be played...

Page 44: ...t panel display during A B repeat play To stop A B Repeat Play Press CLEAR on the remote Notes You can set A B Repeat for only one specific portion A B Repeat is canceled when you open or close the disc tray the player enters standby mode by pressing 1 on the remote you turn the power off by pressing on the player When you set A B Repeat the settings for Shuffle Play Repeat Play and Program Play a...

Page 45: ...p when the player is in karaoke mode When you turn the karaoke mode on with DVDs or Super VCDs the karaoke play is performed with the audio channel you selected in AUDIO of the Control Menu display With CDs or VIDEO CDs the AUDIO setting automatically changes to 1 L so that only the accompaniment is played when you turn the karaoke mode on If the vocal audio is heard with some discs select the aud...

Page 46: ...the echo function and the ECHO LEVEL control do not work Dolby Digital Karaoke format Dolby Digital format which reproduces surround sound using 5 channels contains the Dolby Digital Karaoke format specialized for karaoke In the Dolby Digital Karaoke format discs guide melody and guide vocal tracks are recorded in addition to the accompaniment You can select them when the player is in karaoke mode...

Page 47: ...al range KARAOKE SURROUND page 48 The karaoke surround function gives surround effects to the accompaniment sound KARAOKE STAR page 49 The Karaoke Star function gives effects to your voice KARAOKE PON page 49 You can enjoy karaoke with a stereo recorded disc even if it is a non karaoke disc by reducing the sound of the vocals VOCAL page 50 When playing a DVD with the Dolby Digital Karaoke format i...

Page 48: ...F OFF OFF OFF OFF OFF KEY CONTROL Adjust Cancel ENTER RETURN 7 6 5 4 3 2 1 1 2 3 4 5 6 7 Applying the Surround Effect Karaoke Surround The karaoke surround function gives surround effects to the accompaniment sound Select KARAOKE SURROUND in the Karaoke Control Menu display Select the karaoke surround mode using M m and then press ENTER To cancel the karaoke surround select OFF using M m and then ...

Page 49: ...on and indicator The indicator lights up when you select a karaoke star mode other than OFF OFF OFF OFF KARAOKE STAR DVD PLAY OFF Select Cancel ENTER RETURN UNISON DUET CHORUS OCTAVE UP OFF OCTAVE DOWN Playing Karaoke with Any Stereo Disc Karaoke Pon You can enjoy karaoke with a stereo recorded disc even if it is a non karaoke disc by reducing the sound of the vocals Press KARAOKE PON in karaoke m...

Page 50: ...ack is played and output from both front speakers L R You can listen to the vocals by pressing VOCAL while the accompaniment is being played VOCAL button and indicator The indicator lights up when the Vocal function is turned on VOCAL zYou can turn the Vocal function on and off using VOCAL in the Karaoke Control Menu display Select VOCAL in the Karaoke Control Menu display page 47 select ON or OFF...

Page 51: ... can select only 1 VOCAL SELECT VOCAL SELECT 1 4 7 2 5 8 0 3 6 9 When playing a VIDEO CD or CD To select the vocal track press VOCAL SELECT during playback Each time you press VOCAL SELECT the output channel changes as follows L R same sound is output from both speakers m STEREO When playing a Super VCD To select the vocal track press VOCAL SELECT during playback Each time you press VOCAL SELECT t...

Page 52: ... Vocals page 51 Notes When you turn the Vocal Support function on the Vocal function is automatically turned off page 50 When switching the recorded vocal and your vocal while playing a Super VCD the sound may cut off for a moment VOCAL SUPPORT VOCAL SUPPORT button and indicator The indicator lights up when the Vocal function is turned on 1 4 7 2 5 8 0 3 6 9 OFF OFF OFF VOCAL SUPPORT DVD PLAY OFF ...

Page 53: ... To cancel Chorus Medley playback Select CHORUS MEDLEY in the Karaoke Control Menu display select OFF using M m and then press ENTER Note If you press CHORUS MEDLEY while playing a disc the Chorus Medley function will not work Playing Only the First Verse of Each Title First Verse Play You can play only the first verse of each title Use this when you want to sing many songs You can use this functi...

Page 54: ...of titles or tracks RESERVE button and indicator The indicator lights up while playing the reserved titles or tracks 1 4 7 2 5 8 0 3 6 9 RESERVE DVD 1 20 RESERVE DVD 1 20 2 PLAY Pausing at the End of Each Track Auto Pause You can set the player to pause every time a track is played Select AUTO PAUSE in the Karaoke Control Menu display To turn the Auto Pause function on select ON using M m and then...

Page 55: ...the NEXT button and then return to the beginning of the current title or track with the PREV button Notes You cannot do Shuffle Play and Repeat Play while using this function The Shuffle Play or Repeat Play setting is canceled when you start reserving tracks or titles If the reserved title or track does not exist Reserve play of title is prohibited or Reserve play of track is prohibited appears an...

Page 56: ... language for the subtitles and the setup display limit playback by children and so on For details on each setup display item see pages 59 to 67 Note You can display the setup display only when the player is in stop mode 1 Press DISPLAY and select SETUP using M m 2 Press ENTER The setup display appears Select SETUP ENTER 1 8 3 4 1 2 1 C 0 0 0 0 0 0 STOP DVD ENTER M m DISPLAY ENTER M m DISPLAY ORET...

Page 57: ... to turn off the on screen menu To return to the previous screen Press ORETURN To quit while making a selection Press DISPLAY Note Some setup display items require operations other than selecting the setting For details on these items see the relevant pages SCREEN SETUP TV TYPE SCREEN SAVER BACKGROUND To set press then To quit press ENTER 16 9 4 3 LETTER BOX 16 9 4 3 PAN SCAN DISPLAY SCREEN SETUP ...

Page 58: ...AGENTA BLACK SCREEN SAVER ON OFF AUDIO SETUP page 65 CUSTOM SETUP page 61 AUTO PLAY OFF TIMER DEMO1 DEMO2 DIMMER BRIGHT DARK OFF PAUSE MODE AUTO FRAME PARENTAL CONTROL COLOR SYSTEM AUTO PAL NTSC OSD DVD MENU OTHERS CHINESE JAPANESE ITALIAN GERMAN SPANISH FRENCH DUTCH DANISH SWEDISH FINNISH PORTUGUESE RUSSIAN NORWEGIAN CHINESE 1 CHINESE 2 ENGLISH ENGLISH 4 3 LETTER BOX 4 3 PAN SCAN 16 9 TV TYPE SUB...

Page 59: ... the number buttons page 75 After you have made a selection the language code 4 digits is displayed LANGUAGE SETUP OSD DVD MENU AUDIO SUBTITLE To set press then To quit press ENGLISH ENGLISH ORIGINAL AUDIO FOLLOW ENTER DISPLAY x AUDIO Selects the language for the sound track ORIGINAL the language given priority in the disc ENGLISH CHINESE JAPANESE FRENCH GERMAN ITALIAN SPANISH DUTCH DANISH SWEDISH...

Page 60: ... 3 PAN SCAN 16 9 x SCREEN SAVER Turns on and off the screen saver If you turn on the screen saver the screen saver image appears when you leave the player or the remote in pause or stop mode for 15 minutes or when you play back a CD for more than 15 minutes The screen saver will help prevent your display device from becoming damaged ON turns on the screen saver OFF turns off the screen saver x BAC...

Page 61: ...NTROL DISPLAY CUSTOM SETUP allows you to set the playback conditions The default settings are underlined Select CUSTOM SETUP in the setup display x COLOR SYSTEM Selects the color system when you play a VIDEO CD AUTO outputs the video signal in the system of the VIDEO CD either PAL or NTSC If your TV is the DUAL system select AUTO PAL changes the video signal of an NTSC VIDEO CD and outputs it in t...

Page 62: ...OL DISPLAY CUSTOM SETUP COLOR SYSTEM AUTO PLAY DIMMER PARENTAL CONTROL To set press then To quit press AUTO OFF TRACK SELECTION OFF BRIGHT PAUSE MODE AUTO ENTER DISPLAY CUSTOM SETUP PARENTAL CONTROL Enter a new 4 digit password then press To return press To cancel press RETURN ENTER DISPLAY CUSTOM SETUP PARENTAL CONTROL Enter password then press To cancel press ENTER To return press DISPLAY RETURN...

Page 63: ...and 3 to enter a new password Playing a disc which is blocked by the playback limitation level 1 Insert the disc and press H The PARENTAL CONTROL display appears 2 Enter your 4 digit password using the number buttons then press ENTER The player starts playback When you stop playing the DVD the level returns to the original level zIf you forget your password Enter the 6 digit number 199703 whenever...

Page 64: ...s PCM DTS MPEG audio or Dolby Digital format are recorded OFF No priority given AUTO Priority given Notes When you set this item to AUTO the language may change depending on the AUDIO settings in LANGUAGE SETUP The TRACK SELECTION setting has higher priority than the AUDIO settings in LANGUAGE SETUP page 59 If you set DTS in AUDIO SETUP to OFF the DTS sound track is not played even if you set this...

Page 65: ...verted to analog signals When you select OFF you cannot set DOLBY DIGITAL MPEG and DTS AUDIO SETUP AUDIO ATT AUDIO DRC DOWNMIX DIGITAL OUT To set press then To quit press OFF STANDARD DOLBY SURROUND ON ENTER DOLBY DIGITAL MPEG D PCM PCM DTS OFF DISPLAY AUDIO SETUP allows you to set the sound according to the playback conditions The default settings are underlined Select AUDIO SETUP in the setup di...

Page 66: ...anced Surround VES to OFF Otherwise the player will not output signals from the DIGITAL OUT OPTICAL or COAXIAL connector AUDIO SETUP AUDIO ATT AUDIO DRC DOWNMIX DIGITAL OUT DOLBY DIGITAL MPEG To set press then To quit press OFF STANDARD DOLBY SURROUND ON D PCM PCM DTS OFF ENTER DISPLAY x MPEG Selects the MPEG audio signals to be output via the DIGITAL OUT OPTICAL and COAXIAL connectors You cannot ...

Page 67: ...luding an LFE signal select this If you feel a lack of bass frequencies from the front speakers when you select this select MIDDLE Notes If an LFE signal is not recorded on the disc no sound will be output from the subwoofer even if you select LARGE When you play MPEG audio sound track an LFE signal is not output from the WOOFER connector MIDDLE if you connect large speakers that will effectively ...

Page 68: ...n the TV so that you can view the pictures from the player Picture noise appears Clean the disc If the video signal from your DVD player has to go through your VCR to get to your TV the copy protection applied to some DVD programs could affect picture quality If you still experience problems after checking your connections please try connecting your DVD player directly to your TV s S video input i...

Page 69: ...Clean the disc When you play a CD with DTS sound tracks noise will come from any connector other than the DIGITAL OUT OPTICAL or COAXIAL connector page 18 Sound distortion occurs In the setup display set AUDIO ATT in AUDIO SETUP to ON The sound loses its stereo effect when you play a VIDEO CD or a CD Set AUDIO to STEREO in the Control Menu display page 31 Make sure you connect the player correctly...

Page 70: ... The language for the sound track cannot be changed when you play a DVD Multilingual tracks are not recorded on the DVD Changing the language for the track is prohibited on the DVD The subtitle language cannot be changed when you play a DVD Multilingual subtitles are not recorded on the DVD Changing the language for the subtitles is prohibited on the DVD The subtitles cannot be turned off when you...

Page 71: ... check the following table First three characters C13 C31 Exx xx is any number Cause and or Corrective Action The disc is dirty Clean the disc with a cleaning cloth page 6 The disc is not inserted correctly Open the disc tray and insert the disc correctly To prevent a malfunction the player has performed the self diagnosis function When you contact your Sony dealer or local authorized Sony service...

Page 72: ...nsumption 15 W See page 2 for further informations Dimensions approx 430 69 260 mm w h d incl projecting parts Mass approx 2 9 kg Operating temperature 5 C to 35 C Operating humidity 25 to 80 Supplied accessories See page 7 The signals from AUDIO OUT connectors are measured When you play PCM sound tracks with a 96 kHz sampling frequency the output signals from the DIGITAL OUT OPTICAL COAXIAL are c...

Page 73: ... a discrete subwoofer channel in this format DTS provides the same 5 1 discrete channels of high quality digital audio Good channel separation is realized because all of the channel data is recorded discretely and processed in digital DVD page 4 A disc that contains up to 8 hours of moving pictures even though its diameter is the same as a CD The data capacity of a single layer and single sided DV...

Page 74: ...es The picture data uses the MPEG 1 format one of the worldwide standards of digital compression technology The picture data is compressed to about 1 140 of its original size Consequently a 12 cm VIDEO CD can contain up to 74 minutes of moving pictures VIDEO CDs also contain compact audio data Sounds outside the range of human hearing are compressed while the sounds we can hear are not compressed ...

Page 75: ...h 1150 Estonian 1151 Basque 1157 Persian 1165 Finnish 1166 Fiji 1171 Faroese 1174 French 1181 Frisian 1183 Irish 1186 Scots Gaelic 1194 Galician 1196 Guarani 1203 Gujarati 1209 Hausa 1217 Hindi 1226 Croatian 1229 Hungarian 1233 Armenian 1235 Interlingua 1239 Interlingue 1245 Inupiak 1248 Indonesian 1253 Icelandic 1254 Italian 1257 Hebrew 1261 Japanese 1269 Yiddish 1283 Javanese 1287 Georgian 1297 ...

Page 76: ...ects and executes the items or settings qa MIC 1 and 2 connectors 45 Connect the microphones not supplied to these connectors The player enters karaoke mode qs remote sensor 7 Accepts the remote control signals qd VOCAL button and indicator 50 Turns the Vocal function on and off in karaoke mode qf VOCAL SELECT button 51 Selects different kinds of vocals recorded on the disc in karaoke mode qg VOCA...

Page 77: ...component using an optical digital connecting cord Take off the cap 5 VIDEO OUT 1 2 connectors 8 Connect to the video input connector on your TV or monitor 6 S VIDEO OUT 1 2 connectors 8 10 12 Connect to the S video input connector on your TV or monitor 7 COMPONENT VIDEO OUT connectors 9 Connect to a monitor or projector having component video input connectors Y CB B Y CR R Y that conform to outpu...

Page 78: ...the player to karaoke mode qh 1 on standby button 17 Press to turn on the player or place it in standby mode after power is connected by pressing on the player qj EFFECT MODE button 55 Press to insert applause with or without cheers while playing karaoke qk EFFECT DO button 55 Press to insert applause whenever you want in karaoke mode ql KEY buttons 48 Press to adjust the key to suit the vocal in ...

Page 79: ...MELODY 52 H Handling discs 6 Hooking up 8 10 12 13 I J Index 5 28 INDEX 28 K Karaoke Control Menu display 47 Karaoke mode 45 KARAOKE PON 49 KARAOKE STAR 49 KARAOKE SURROUND 48 KEY CONTROL 48 L LANGUAGE SETUP 59 LETTER BOX 60 Locating a specific point 19 by watching the TV screen 19 M N MIC microphone LEVEL 45 MPEG 66 O On screen display Control Menu display 25 Karaoke Control Menu display 47 Setup...

Page 80: ...Sony Corporation Printed in Malaysia ...

Reviews: