background image

46

EN

Additional Information

Specifications

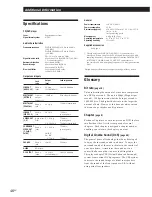
CD/DVD player

Laser

Semiconductor laser

Signal format system

NTSC

Audio characteristics

Frequency response

DVD (PCM 96 kHz): 2 Hz to 44 kHz
(±0.5 dB)*
DVD (PCM 48 kHz): 2 Hz to 22 kHz
(±0.5 dB)
CD: 2 Hz to 20 kHz (±0.5 dB)

Signal-to-noise ratio

More than 115 dB (LINE OUT (AUDIO
1, 2) connectors only)

Harmonic distortion

Less than 0.0028%

Dynamic range

More than 100 dB (DVD)
More than 97 dB (CD)

Wow and flutter

Less than detected value
(±0.001% W PEAK)

Outputs and inputs

LINE OUT
(AUDIO 1, 2)

DIGITAL OUT
(OPTICAL)

DIGITAL OUT
(COAXIAL)

LINE OUT
(VIDEO 1, 2)

S VIDEO OUT
(1, 2)

COMPONENT
VIDEO OUT
(Y, C

B

/B-Y,

C

R

/R-Y)

PHONES

S-LINK

5.1 OUTPUT

Jack
type

Phono
jacks

Optical
output
connector

Phono
jack

Phono
jack

4-pin mini
DIN

Phono
jacks

Phone
jack

Mini jack

Phono
jacks

Output
level

2 Vrms
(at 50 kilohms)

–18 dBm

0.5 Vp-p

1.0 Vp-p

Y: 1.0 Vp-p

C: 0.286 Vp-p

Y: 1.0 Vp-p

C

B

/B-Y,

C

R

/R-Y:

0.7 Vp-p

12 mW

1.6 Vrms
(at 50 kilohms)

Load impedance

Over 10 kilohms

Wave length: 660 nm

75 ohms terminated

75 ohms,
sync negative

75 ohms,
sync negative
75 ohms terminated

75 ohms,
sync negative

75 ohms

32 ohms

Over 10 kilohms

General

Power requirements

120 V AC, 60 Hz

Power consumption

22 W

Dimensions (approx.)

430 

×

 95 

×

 325 mm (17 

×

 3 3/4 

×

 12 3/4

in.) (w/h/d)
incl. projecting parts

Mass (approx.)

4.0 kg (8 lb 13 oz)

Operating temperature

41 ˚F to 95 ˚F (5 ˚C to 35 ˚C)

Operating humidity

5% to 90%

Supplied accessories

See page 6.

* The signals from LINE OUT (AUDIO 1, 2 ) connectors are

measured.  When you play the PCM sound tracks with 96 kHz
sampling frequency, the output signals from the DIGITAL OUT
(OPTICAL, COAXIAL) and 5.1 OUTPUT connectors are
converted to 48 kHz (sampling frequency)/16 bits (quantization
bits).

Design and specifications are subject to change without notice.

Glossary

Bit rate

 (page 18)

Value indicating the amount of video data compressed
in a DVD per second.  The unit is Mbps (Mega bit per
second).  1 Mbps indicates that the data per second is
1,000,000 bits.  The higher the bit rate is, the larger the
amount of data.  However, this does not always mean
that you can get higher quality pictures.

Chapter

 (page 5)

Sections of a picture or a music piece on a DVD that are
smaller than titles. A title is composed of several
chapters.  Each chapter is assigned a chapter number
enabling you to locate the chapter you want.

Digital Cinema Sound (DCS) 

 (page 40)

The general name of technology that Sony developed
to enjoy the surround sound in a home.  To enjoy the
surround sound of the movie theater in the comfort of
your own home,  it simulates the sound not in a
concert hall as usual but in a movie editing studio.
This player adopts VES (Virtual Enhanced Surround)
system from various DCS programs.  The VES system
can create the sound image of virtual rear speakers
from the sound of the front speakers (L, R) without
using actual rear speakers.

Summary of Contents for DVP-8306

Page 1: ...3 862 097 13 1 CD DVD Player Operating Instructions Mode d emploi EN F C2 C2 1998 by Sony Corporation DVP S500D ...

Page 2: ...not expressly approved in this manual could void your authority to operate this equipment NOTE This equipment has been tested and found to comply with the limits for a Class B digital device pursuant to Part 15 of the FCC Rules These limits are designed to provide reasonable protection against harmful interference in a residential installation This equipment generates uses and can radiate radio fr...

Page 3: ... Parental Control 28 Controlling the TV or the AV receiver with the Supplied Remote 30 Settings and Adjustments Using the Setup display 32 Setting the Language for Display and Sound LANGUAGE SETUP 33 Settings for Display INITIAL SETUP 1 34 Settings for Sound INITIAL SETUP 2 35 Dolby Digital Surround What is Dolby Digital Surround 36 Speaker System Hookups 36 Speaker Setup 38 Setting for Dolby Digi...

Page 4: ...de printed on the back of the unit and will only play DVDs that are labeled with identical region codes DVDs labeled ALL will also play on this unit If you try to play any other DVD the message Playing this disc prohibited by area limits will appear on the TV screen Depending on the DVD no region code indication may be labeled even though playing the DVD is prohibited by the area limits Note on pl...

Page 5: ...CD A number that divides a track some sections to easily locate the point you want on a VIDEO CD or a CD Depending on the disc no indexes may be recorded Scene On a VIDEO CD with PBC functions the menu screens moving pictures and still pictures are divided into sections called scenes Each scene is assigned a scene number enabling you to locate the scene you want Note on PBC Playback Control VIDEO ...

Page 6: ...ow To an AC outlet To an AC outlet Amplifier Receiver Unpacking Check that you have the following items Audio video S link connecting cord 1 S video cable 1 Remote commander remote RMT D102A 1 Size AA R6 batteries 2 Inserting batteries into the remote You can control the player using the supplied remote Insert two R6 size AA batteries by matching the and on the batteries When using the remote poin...

Page 7: ...gh In this case set AUDIO ATT in INITIAL SETUP 2 to ON in the setup display For details see page 35 z If your TV has an S video input connector Connect the component via the S VIDEO OUT connector using the S video cable supplied instead of the video connecting cord You will get a better picture z If you connect the player to a monitor or projector with component video input connectors that conform...

Page 8: ...l digital connecting cord p When using a coaxial digital connecting cord Notes Refer to the instructions supplied with the component to be connected You cannot make digital audio recordings of discs recorded in Dolby Digital AC 3 format directly using an MD deck or DAT deck When you make the connections above do not set DIGITAL OUT in INITIAL SETUP 2 to DOLBY DIGITAL PCM If you do a loud noise wil...

Page 9: ...to hookup the speaker system and page 38 to set each speaker position or distance etc pTo connect the player to an audio component with a built in Dolby Digital decoder In the setup display set DIGITAL OUT in INITIAL SETUP 2 to DOLBY DIGITAL PCM Use the setup display to change the various settings for the picture and sound For details see page 32 To enjoy surround sound with front speakers only se...

Page 10: ...VD 1 The operating procedure of CDs or VIDEO CDs is different from that of DVDs For details see pages 14 to 17 z You can turn on the player using the remote Press POWER when the indicator above the POWER button on the front panel is lit in red The DOLBY DIGITAL indicator lights up except for the case as follows you insert a CD or a VIDEO CD the current audio format is PCM or MPEG Audio Note If you...

Page 11: ...HAPTER SEARCH TITLE SEARCH and TIME SEARCH appear on the TV screen z When RESUME appears on the front panel display You can resume playback from the point where you stopped the DVD For details on playing from the beginning of the disc see page 25 Note You may not be able to do Resume Play depending on the DVD p P Press p P P or 1 SEARCH MODE repeatedly until CHAPTER SEARCH appears on the TV screen...

Page 12: ...or you can playback a DVD with various speed or frame by frame Each time you press JOG it changes between shuttle mode and jog mode pTo change the playback speed Shuttle mode Turn the click shuttle The playback speed changes depending on the turning direction and angle as follows FF2 about 30 times the normal speed FF1 about 10 times the normal speed 2 about twice the normal speed PLAY Normal spee...

Page 13: ...e language for the subtitles the language for the sound etc using the DVD menu Press DVD MENU The DVD menu appears on the TV screen The contents of the menu vary from disc to disc Press to select the item you want to change Depending on the disc you can use the number buttons to select the item To change other items repeat Step 2 Press ENTER 1 2 3 TITLE ENTER ENTER TITLE Notes Depending on the DVD...

Page 14: ...hat of CDs or VIDEO CDs For details see pages 10 to 13 z You can turn on the player using the remote Press POWER when the indicator above the POWER button on the front panel is lit in red 2 Connect headphones Adjust the headphone volume 2 4 3 3 4 With the label side facing up z After following Step 4 The menu screen may appear on the TV screen depending on the VIDEO CD You can play the disc intera...

Page 15: ...hat is an index See page 5 z What is a scene See page 5 z If you want to change the search mode Press SEARCH MODE Each time you press in case of a VIDEO CD SCENE SEARCH TRACK SEARCH and V VIDEO INDEX SEARCH appear on the TV screen In case of a CD only TRACK SEARCH appears Note Some discs do not allow you to start playing from a particular scene In this case if you do Scene Search before you start ...

Page 16: ... changes between shuttle mode and jog mode pTo change the playback speed Shuttle mode Turn the click shuttle The playback speed changes depending on the turning direction and angle as follows FF2 Faster than FF1 FF1 2 about twice the normal speed PLAY Normal speed SLOW1 playback direction VIDEO CD Only SLOW2 playback direction Slower than SLOW1 VIDEO CD Only PAUSEP FR10 FR20 Faster than FR10 If yo...

Page 17: ...tive operations Refer to the instructions supplied with the disc as the operating procedure may differ according to the VIDEO CD Going back to the menu screen Press ˆ or z When playing VIDEO CDs with PBC functions PBC playback starts automatically z To cancel PBC playback of a VIDEO CD with PBC functions and play the disc in Continuous Play mode There are two ways Before you start playing select t...

Page 18: ...mation of the on screen display 3 mode While playing a disc the approximate bit rate of the playback picture is always displayed by Mbps Mega bit per second z What is bit rate Bit rate refers to the amount of video data per second in a disc The higher the bit rate is the larger the amount of data However this does not always mean that you can get higher quality pictures Current title number total ...

Page 19: ...track Remaining time of the current track Playing time of the disc Remaining time of the disc While you are doing Shuffle Play Program Play or PBC Playback the playing time of the disc and the remaining time of the disc are not displayed pDisplay information of the on screen display off mode No information is displayed Messages etc will be displayed Current index number TRACK 11 12 07 TRACK REPEAT...

Page 20: ...ng time Press TIME Each time you press TIME while playing the disc the display changes as shown in the following chart The time information in the on screen display 1 or 2 mode also changes each time you press TIME TIME Remaining time of the current title Press TIME Press TIME Playing time and number of the current title Press TIME Press TIME Remaining time of the current chapter Playing time and ...

Page 21: ...information in the on screen display 1 and 2 mode also changes each time you press TIME Note While you are doing Shuffle Play Program Play or PBC playback the playing time of the disc and the remaining time of the disc are not displayed Playing time and number of the current track Remaining time of the current track Remaining time of the disc Press TIME Press TIME Press TIME Playing time of the di...

Page 22: ... You may not be able to do Repeat Play depending on the DVD pRepeating the current title While the title you want is being played press REPEAT repeatedly until TITLE REPEAT appears on the TV screen The player repeats the current title pRepeating the current chapter While the chapter you want is being played press REPEAT repeatedly until CHAPTER REPEAT appears on the TV screen The player repeats th...

Page 23: ...and the player starts repeating this specific portion REPEAT A B appears on the front panel display during A B repeat play To cancel A B Repeat Press CLEAR To cancel setting halfway Press CLEAR Notes A B Repeat is canceled when you open or close the disc tray you turn the power off When you set A B Repeat the settings for Shuffle Play and Program Play are canceled You may not be able to set A B Re...

Page 24: ...M CLEAR ENTER PROGRAM PLAY ENTER A L L CLEAR 1 T T L E I 2 T T L E I 3 T T L E I 4 T T L E I 5 T T L E I 6 T T L E I 7 T T L E I 8 T T L E I 9 T T L E I PROGRAM T 0 1 0 2 0 3 0 4 0 5 0 6 0 7 PROGRAM PLAY ENTER A L L CLEAR 1 T T L E 0 2 I 2 T T L E I 3 T T L E I 4 T T L E I 5 T T L E I 6 T T L E I 7 T T L E I 8 T T L E I 9 T T L E I PROGRAM C T 0 1 A L L 0 1 0 2 0 2 0 3 0 3 0 4 0 4 0 5 0 6 0 7 PROG...

Page 25: ...T T L E 1 5 I 3 T T L E 0 3 I 4 T T L E 0 5 I 5 T T L E 0 7 1 4 I 6 T T L E I 7 T T L E I 8 T T L E I 9 T T L E I PROGRAM T 0 1 0 2 0 3 0 4 0 5 0 6 0 7 Resuming Playback from the Point Where You Stopped a Disc Resume Play The player stores the point where you stopped a disc if RESUME appears on the front panel display In this case you can resume playback from that point As long as you do not open ...

Page 26: ...d when you open or close the disc tray you change the title If the language is displayed as 4 digits number refer to the language code list in page 52 SUBTITLE CHANGE SUBTITLE ON OFF AUDIO 3 PORTUGUESE Displaying the SubtitlesZ With DVDs on which subtitles are recorded you can turn the subtitles on and off whenever you want while playing the DVD With DVDs on which multilingual subtitles are record...

Page 27: ...you can change the angles whenever you want while playing the DVD When ANGLE appears on the front panel display while playing a DVD press ANGLE CHANGE repeatedly until you get the angle you want ANGLE 1 n ANGLE 2 n z You can specify the angle beforehand Specify the angle when ANGLE is not displayed on the front panel display When a scene on which multi angles are recorded comes the angle is automa...

Page 28: ...CREEN SAVER ON PARENTAL CONTROL 1 2 INITIAL SETUP 1 TV TYPE LETTER BOX OFF AUTO PLAY DIMMER BACKGROUND BRIGHT BLUE ENTER QUIT SETUP 1 2 4 3 SCREEN SAVER ON PARENTAL CONTROL 1 1 2 INITIAL SETUP 1 Enter password then 1 2 PARENTAL CONTROL press ENTER 1 2 INITIAL SETUP 1 Entry password Enter 1 2 PARENTAL CONTROL a number in 4 figures then press ENTER Number buttons 2 Select INITIAL SETUP 1 using then ...

Page 29: ...itation To return to the normal screen Press SET UP To turn off the Parental Control function and play the DVD after entering your password Set LEVEL to OFF in Step 9 then press 1 2 1 2 INITIAL SETUP 1 PARENTAL CONTROL OFF LEVEL STANDARD CHANGE PASSWORD ENTER QUIT SETUP USA INITIAL SETUP 1 PARENTAL CONTROL OFF LEVEL STANDARD CHANGE PASSWORD NC17 ENTER QUIT SETUP R PG13 PG 7 6 5 4 3 2 1 2 1 2 8 4 E...

Page 30: ...buttons TV DVD switch 1 2 3 4 5 6 7 8 9 0 To change the password 1 In Step 5 select CHANGE PASSWORD using then press or ENTER The display for changing the password appears 2 Follow Steps 4 and 5 to enter a new password z If you have forgot your password Enter 6 digits number 199703 in Step 4 to clear the current password To enter a new password follow the procedure from Step 4 again Notes When you...

Page 31: ...the SONY Mini Hi Fi Component system press AV RECVR repeatedly to change the input of the system Note Depending on the AV receiver you may not be able to control your AV receiver AV RECVR Receiver AV VOL 1 2 3 4 5 6 7 8 9 0 TV VIDEO CH VOL POWER Number buttons TV DVD switch 1 2 3 4 5 6 7 8 9 0 ENTER Manufacturer Panasonic Philco Philips Pioneer Portland Quasar Radio Shack RCA Sampo Sanyo Scott Sea...

Page 32: ...nt using then press or ENTER 4 Select the setting you want using then press ENTER To cancel using the setup display on the way Press SET UP Note Some setup display items require operations other than selecting the setting For details on these items see the relevant pages SET UP ENTER INITIAL SETUP 1 TV TYPE LETTER BOX OFF AUTO PLAY DIMMER BACKGROUND BRIGHT BLUE ENTER QUIT SETUP 4 3 SCREEN SAVER OF...

Page 33: ...H PORTUGUESE CHINESE JAPANESE OTHERS When you select OTHERS select and enter the language code from the list using the number buttons page 52 pAUDIO Switches the language for the sounds ORIGINAL the language given the priority in the disc ENGLISH FRENCH SPANISH ITALIAN GERMAN DUTCH PORTUGUESE CHINESE JAPANESE OTHERS When you select OTHERS select and enter the language code from the list using the ...

Page 34: ...connect the AC power cord to the AC outlet By connecting a timer not supplied you can start playing at any time you want DEMO1 starts playing the demonstration 1 automatically DEMO2 starts playing the demonstration 2 automatically pDIMMER Adjusts the lighting of the front panel display BRIGHT makes the front panel display bright DARK makes the front panel display dark OFF turns off the lighting of...

Page 35: ...the player is connected to audio component with a built in Dolby Digital AC 3 decoder D PCM Downmix PCM when you play the Dolby Digital AC 3 sound tracks the output audio signals are mixed down to 2 channels By the settings of the item SURROUND you can select whether the signals contain the surround component or not The output audio signals from the 5 1 OUTPUT connectors are also mixed down in the...

Page 36: ...r white cables to connect the center speaker and sub woofer Dolby Digital Surround What is Dolby Digital Surround Some DVDs have up to 5 1 channel soundtrack recorded in Dolby Digital AC 3 format Using an amplifier with 5 1 channel inputs and the 5 1 speakers you can enjoy more real audio presence in the comfort of your own home Even if you have fewer than 5 1 speakers the player distributes the o...

Page 37: ...NTER REAR SIGNAL GND WOOFER AUDIO IN L R L R AUDIO OUT AUDIO IN AUDIO OUT AUDIO IN y PHONO TAPE MD MONITOR VIDEO 1 VIDEO 2 TV LD L L CENTER TUNER CD COMPONENT VIDEO OUT Y B Y FRONT REAR R WOOFER CENTER R AUDIO 2 L VIDEO 2 R AUDIO 1 L VIDEO 1 1 2 OPTICAL COAXIAL DOLBY DIGITAL AC 3 PCM L INPUT 5 1 INPUT MONITOR OUTPUT 5 1 OUTPUT LINE OUT S VIDEO OUT DIGITAL OUT LINK S R Y S VIDEO IN TV CD DVD Player...

Page 38: ...ectively reproduce bass frequencies select this symbol This is default setting If you are utilizing small speakers with minimal bass response the sound distortion occurs or the effects of the surround is difficult to hear select this symbol If you will not connect the speaker select this symbol You cannot select this symbol for the front speakers The above speaker selections will activate the Dolb...

Page 39: ...To adjust the volume of all the speakers at one time Use the amplifier s volume control To return to the default setting Select the sybol or the item then press CLEAR Specifying the speaker distance 1 Press SET UP and select 1 then press ENTER 2 Select the speaker you want to adjust in DISTANCE and press ENTER 3 Adjust the value using then press ENTER Note When you set the distance the sound cuts ...

Page 40: ...The virtual speakers are reproduced as shown in Ill 2 SET UP ENTER These settings also affect the output from the LINE OUT AUDIO 1 2 connectors Notes When you select an item the sound cuts off for a moment When you select PRO LOGIC the sound may only come from the center speaker depending on the disc When the playing signal does not contain the surround component the effects may be difficult to he...

Page 41: ...r monaural the rear component of the Pro Logic processed stereo signal LFE displayed only when the LFE Low Frequency Effects signal is playing If S is displayed in gray you can enjoy the surround effect when you set MODE under 5 1 OUTPUT SETUP 2 to PRO LOGIC VES A or VES B in the setup display This affects only when the current audio format is DOLBY DIGITAL 2 0 The display examples are as follows ...

Page 42: ...lead need to be changed have it done at a qualified service shop only On placement Place the player in a location with adequate ventilation to prevent heat build up in the player Do not place the player on a soft surface such as a rug that might block the ventilation holes on the bottom Do not place the player in a location near heat sources or in a place subject to direct sunlight excessive dust ...

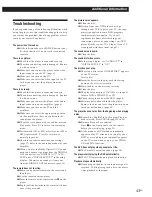
Page 43: ...e auto pause signal is recorded While playing such a disc the player stops playback at the signal Troubleshooting If you experience any of the following difficulties while using the player use this troubleshooting guide to help you remedy the problem Should any problem persist consult your nearest Sony dealer The power is not turned on If the indicator above the POWER button is not lit check that ...

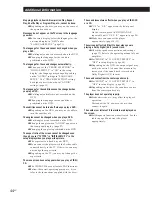
Page 44: ...etup display select the language for the on screen display in OSD under LANGUAGE SETUP page 33 The language for the sound cannot be changed when you play a DVD Multilingual sound is not recorded on the DVD Changing the language for the sound is prohibited on the DVD The language for the sound changes automatically When you set the TRACK SELECTION in INITIAL SETUP 2 to ON in the setup display the l...

Page 45: ... the following table First three digits C13 C31 Exx xx is any number Cause and or Corrective Action The disc is dirty Clean the disc with a cleaning cloth page 42 The disc is not inserted correctly Open the disc tray and insert the disc correctly To prevent the player from operating malfunctioning the self diagnosis function has worked When you contact your Sony dealer or local authorized Sony ser...

Page 46: ...mperature 41 F to 95 F 5 C to 35 C Operating humidity 5 to 90 Supplied accessories See page 6 The signals from LINE OUT AUDIO 1 2 connectors are measured When you play the PCM sound tracks with 96 kHz sampling frequency the output signals from the DIGITAL OUT OPTICAL COAXIAL and 5 1 OUTPUT connectors are converted to 48 kHz sampling frequency 16 bits quantization bits Design and specifications are...

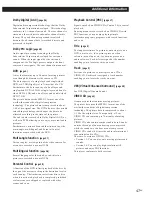
Page 47: ...el is stereo and there is discrete subwoofer channel in this format The good channel separation is realized because the all channel data is recorded discrete and processed in digital Dolby Pro Logic page 40 Audio signal processing technology that Dolby Laboratories Corporation developed for surround sound When the input signal has the surround component the Pro Logic process outputs the front cent...

Page 48: ...shuttle 12 16 Changes the playback speed º ENTER button Selects and executes the items or settings JOG button indicator 12 16 Press to play a disc frame by frame PHONES connector 10 14 Connect the headphones to this connector PHONE LEVEL control 10 14 Adjusts the headphone volume PROGRAM button 24 Press to execute the program play CLEAR button 11 15 22 23 24 Press to return to the continuous play ...

Page 49: ...AUDIO 1 2 connectors 7 Connects to the audio input connector on the TV or amplifier 4 LINE OUT VIDEO 1 2 connectors 7 Connects to the video input connector on the TV or monitor 5 S VIDEO OUT 1 2 connectors 7 Connects to the S video input connector on the TV or VCR 6 DIGITAL OUT OPTICAL connector 8 Connects to an audio component using the optical digital connecting cord 7 DIGITAL OUT COAXIAL connec...

Page 50: ... the disc etc on the front panel display SET UP button 32 Displays the setup display on the TV screen to set or adjust the items TITLE button 13 Displays the title menu on the TV screen DVD MENU button 13 Displays the DVD menu on the TV screen Click shuttle 12 16 Changes the playback speed ENTER button Selects and executes the items or settings ª DISPLAY button 18 41 Displays the current playing s...

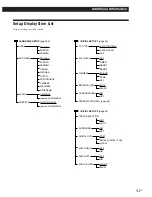
Page 51: ...NITIAL SETUP 1 page 34 TV TYPE 4 3 LETTER BOX 4 3 PAN SCAN 16 9 AUTO PLAY OFF TIMER DEMO1 DEMO2 DIMMER BRIGHT DARK OFF BACKGROUND BLUE BLACK SCREEN SAVER ON OFF PARENTAL CONTROL page 28 1 TRACK SELECTION OFF AUTO SURROUND ON OFF DIGITAL OUT PCM AUDIO DRC OFF ON AUDIO ATT OFF ON AUDIO FILTER SHARP SLOW FRENCH SPANISH ITALIAN GERMAN DUTCH PORTUGUESE CHINESE JAPANESE FRENCH SPANISH DOLBY DIGITAL PCM ...

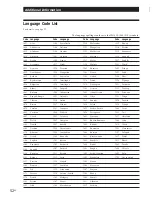
Page 52: ...ish 1283 Javanese 1287 Georgian 1297 Kazakh 1298 Greenlandic 1299 Cambodian 1300 Kannada 1301 Korean 1305 Kashmiri 1307 Kurdish 1311 Kirghiz 1313 Latin 1326 Lingala 1327 Laothian 1332 Lithuanian 1334 Latvian Lettish 1345 Malagasy 1347 Maori 1349 Macedonian 1350 Malayalam 1352 Mongolian 1353 Moldavian 1356 Marathi 1357 Malay 1358 Maltese 1363 Burmese 1365 Nauru 1369 Nepali 1376 Dutch 1379 Norwegian...

Page 53: ...AL SETUP 2 35 L LANGUAGE SETUP 33 Locating a specific point 11 15 by observing the TV screen 12 16 M N O On screen display usage 18 language 9 33 P Q Parental control 28 PBC functions 17 PBC Playback 17 47 Playback at various speeds 12 16 Continuous Play 10 14 frame by frame 12 16 Program Play 24 Repeat Play 22 Shuffle Play 23 PRO LOGIC 40 Program Play 24 R Remote 6 30 Repeating a specific portion...

Page 54: ...aser utilisé par ce lecteur CD DVD est dangereux pour les yeux ne tentez pas de démonter le boîtier Confiez l entretien de cet appareil exclusivement au personnel qualifié Cette étiquette se trouve sur le boîtier de protection laser à l intérieur de l appareil ATTENTION POUR PREVENIR TOUT RISQUE D ELECTROCUTION ENFICHEZ CORRECTEMENT LA BROCHE DE LA FICHE DANS LA PRISE Félicitations Nous vous remer...

Page 55: ...n téléviseur ou un récepteur AV avec la télécommande fournie 30 Sélections et réglages Utilisation du menu d installation 32 Sélection de la langue des menus et du son CHOIX DE LA LANGUE 33 Réglages initiaux de l affichage RÉGLAGE INITIAL 1 34 Réglages initiaux du son RÉGLAGE INITIAL 2 35 Son spatial Dolby Digital Qu est ce que le son spatial Dolby Digital 36 Raccordement d un système de haut parl...

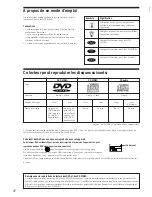
Page 56: ...écifications du système couleur NTSC Vous ne pouvez pas reproduire des disques enregistrés dans un autre système couleur tel que les systèmes PAL et SECAM Code local des DVD que vous pouvez reproduire avec cet appareil Votre lecteur DVD est identifié par un code local imprimé à l arrière de l appareil et ne peut reproduire que des DVD signalés par le même code local Les DVD portant le logo ALL peu...

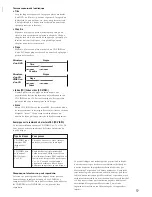
Page 57: ...Plage Séquence d images ou pièce musicale d un CD VIDÉO ou d un CD Chaque plage est dotée d un numéro de plage qui permet de la localiser Index CD Index vidéo CD VIDÉO Nombre qui divise une plage en sections qui vous permettent de réaliser rapidement une localisation sur un CD VIDÉO ou un CD Suivant les disques il est possible qu aucun index ne soit enregistré sur le disque Scène Sur un CD VIDÉO d...

Page 58: ...lage Vérifiez si vous avez reçu les accessoires suivants Câble de connexion audio vidéo S LINK 1 Câble S VIDEO 1 Télécommande RMT D102A 1 Piles AA R6 2 Installation des piles dans la télécommande Vous pouvez commander le lecteur au moyen de la télécommande fournie Introduisez deux piles R6 AA en en faisant correspondre les pôles et Lorsque vous utilisez la télécommande dirigez la vers le capteur d...

Page 59: ...e sortie audio excessif Dans ce cas réglez ATT AUDIO dans RÉGLAGE INITIAL 2 sur OUI dans le menu d installation Pour plus de détails voir page 35 z Si votre téléviseur est doté d un connecteur d entrée S VIDEO Raccordez l appareil via le connecteur S VIDEO OUT à l aide du câble S VIDEO fourni au lieu du câble de connexion vidéo De cette manière vous obtiendrez une meilleure image z Si vous raccord...

Page 60: ...ion numérique optique p Si vous utilisez un câble de connexion numérique coaxial Remarques Consultez également les instructions fournies avec l appareil à raccorder Vous ne pouvez pas réaliser d enregistrements audio numériques de disques directement enregistrés en format numérique Dolby AC 3 à l aide d une platine MD ou DAT Si vous établissez le raccordement ci dessus ne réglez pas SORTIE NUMÉRIQ...

Page 61: ...ge 36 pour le raccordement du système de haut parleurs et à la page 38 pour le choix de la position et de la distance d installation des haut parleurs pPour raccorder l autre lecteur à un appareil audio doté d un décodeur Dolby Digital intégré Dans le menu d installation réglez SORTIE NUMÉRIQUE sous RÉGLAGE INITIAL 2 sur DOLBY DIGITAL PCM Utilisez le menu d installation pour modifier les différent...

Page 62: ...iseur voir page 13 Lecture d un DVD 1 Le procédure d exploitation d un CD ou d un CD VIDÉO est différente de celle d un DVD Pour plus de détails voir pages 14 à 17 z Vous pouvez mettre le lecteur sous tension avec la télécommande Appuyez sur POWER lorsque l indicateur au dessus du commutateur POWER du panneau frontal est allumé en rouge L indicateur DOLBY DIGITAL s allume sauf dans les cas suivant...

Page 63: ...e reprise de lecture ne soit pas accessible p P Appuyez sur p P P ou 1 SEARCH MODE plusieurs fois jusqu à ce que RECH CHAPITRE apparaisse sur l écran du téléviseur 2 Les touches numériques pour sélectionner le numéro de chapitre et puis sur ENTER ou 1 SEARCH MODE plusieurs fois jusqu à ce que RECH TITRE apparaisse sur l écran du téléviseur 2 Les touches numériques pour sélectionner le numéro de ti...

Page 64: ...Chaque fois que vous appuyez sur JOG vous basculez de la molette de commande au mode JOG pPour changer la vitesse de lecture Mode shuttle Tournez la molette de commande La vitesse de lecture change en fonction du sens et de l angle de rotation de la façon suivante AV2 environ 30 fois la vitesse normale AV1 environ 10 fois la vitesse normale 2 Environ deux fois la vitesse normale LECTURE Vitesse no...

Page 65: ... titres une langue pour le son etc au moyen du menu DVD Appuyez sur DVD MENU Le menu DVD apparaît sur l écran du téléviseur Le contenu du menu varie d un disque à l autre Appuyez sur pour sélectionner le paramètre que vous voulez modifier Suivant les disques vous pouvez utiliser les touches numériques pour sélectionner le paramètre de votre choix Pour changer d autres paramètres répétez l étape 2 ...

Page 66: ... CD ou des CD VIDÉO Pour plus de détails voir pages 10 à 13 z Vous pouvez mettre le lecteur sous tension à l aide de la télécommande Appuyez sur POWER lorsque l indicateur au dessus du commutateur POWER du panneau frontal est allumé en rouge z Après avoir exécuté l étape 4 Il se peut que suivant les CD VIDÉO l écran de menu apparaisse sur l écran du téléviseur Vous pouvez reproduire le disque en m...

Page 67: ...ue Si vous avez commis une erreur en appuyant sur les touches numériques Appuyez sur CLEAR et puis sur la touche numérique correcte 6 P p z Si RESUME apparaît dans la fenêtre d affichage du panneau frontal Vous pouvez reprendre la lecture à l endroit où vous avez stoppé le DVD Pour plus de détails sur la lecture du disque à partir du début voir page 25 p P ENTER ENTER Touches numériques SEARCH MOD...

Page 68: ...mode JOG pPour changer la vitesse de lecture Mode shuttle Tournez la molette de commande La vitesse de lecture change en fonction du sens et de l angle de rotation de la façon suivante AV2 plus rapide que AV1 AV1 2 Environ deux fois la vitesse normale LECTURE Vitesse normale LENT1 sens de lecture CD VIDÉO uniquement LENT2 sens de lecture plus lent que LENT1 CD VIDÉO uniquement PAUSEP RET10 RET20 p...

Page 69: ...rations interactives Reportez vous également aux instructions fournies avec le disque parce que les procédures peuvent différer suivant les CD VIDÉO Pour revenir à l écran de menu Appuyez sur ˆ ou z Lecture de CD VIDÉO doté de fonctions PBC La lecture PBC démarre automatiquement z Pour annuler la lecture PBC d un CD VIDÉO doté de fonctions PBC et reproduire le disque en mode de lecture continue Il...

Page 70: ...tions relatives au disque grâce aux écrans de menu affichés sur l écran du téléviseur Pendant la lecture ou l arrêt d un DVD Appuyez sur DISPLAY Chaque fois que vous appuyez sur la touche l écran de menu change comme suit Ecran de menu 1 Ecran de menu 2 Ecran de menu 3 Ecran de menu désactivé pInformations affichées dans le mode d écran de menu 1 DISPLAY Numéro du titre en cours nombre total de ti...

Page 71: ...information change selon la séquence suivante Temps de lecture de la plage en cours Durée restante de la plage en cours Temps de lecture du disque Durée restante du disque Dans les modes de lecture aléatoire programmée ou PBC le temps de lecture du disque et la durée restante du disque ne sont pas affichés pInformations affichées dans le mode d écran de menu désactivé Aucune information n est affi...

Page 72: ... Appuyez sur TIME Chaque fois que vous appuyez sur TIME pendant la lecture d un disque l affichage change comme indiqué dans le schéma ci contre Les informations temporelles dans les modes d écran de menu 1 et 2 change également chaque fois que vous appuyez sur TIME TIME Durée restante du titre en cours Appuyez sur TIME Appuyez sur TIME Temps de lecture et numéro du titre en cours Appuyez sur TIME...

Page 73: ...rmations temporelles dans les modes d écran de menu 1 et 2 change également chaque fois que vous appuyez sur TIME Remarque Dans les modes de lecture aléatoire programmée ou PBC le temps de lecture du disque et la durée restante du disque ne sont pas affichés Temps de lecture et numéro de la plage en cours Durée restante de la plage en cours Durée restante du disque Appuyez sur TIME Appuyez sur TIM...

Page 74: ...u frontal et le lecteur répète la plage en cours Pour annuler la répétition de la plage en cours Appuyez sur CLEAR Remarque La lecture répétée est annulée lorsque vous mettez l appareil hors tension CLEAR 7 8 9 0 PLAGE RÉPÉTER CHAPITRE s affiche lorsque vous sélectionnez le chapitre en cours T T R E I RÉPÉTER Lecture répétée Repeat Play Vous pouvez reproduire tous les titres plages d un disque un ...

Page 75: ...endant la lecture répétée A B l indication REPEAT A B est affichée dans la fenêtre d affichage du panneau frontal Pour annuler la répétition cancel A B Appuyez sur CLEAR Pour annuler un réglage en cours Appuyez sur CLEAR Remarques La répétition A B est désactivée si vous ouvrez ou refermez le plateau de lecture vous mettez le lecteur hors tension Lorsque vous activez la répétition A B les réglages...

Page 76: ...z sur PROGRAM L écran de programmation apparaît 2 Appuyez sur L indication 01 est mise en évidence 3 Sélectionnez le titre le chapitre ou la plage que vous voulez programmer à l aide des touches et appuyez ensuite sur ENTER Par exemple sélectionnez le titre ou la plage 2 Vous pouvez également utiliser les touches numériques et la touche ENTER pour opérer votre sélection Dans ce cas le numéro sélec...

Page 77: ...pparaît dans la fenêtre d affichage du panneau frontal Dans ce cas vous pouvez reprendre la lecture à partir de cet endroit Tant que vous ne retirez pas le disque du lecteur la fonction de reprise de lecture reste accessible même si vous mettez le lecteur hors tension 1 Pendant la lecture d un disque appuyez sur p pour arrêter la lecture L indication RESUME apparaît dans la fenêtre d affichage du ...

Page 78: ...forme d un nombre à 4 chiffres reportez vous à la liste des codes de langue à la page 52 SUBTITLE CHANGE SUBTITLE ON OFF AUDIO 3 PORTUGAIS Affichage des sous titres Z Sur un DVD sur lequel des sous titres sont enregistrés vous pouvez activer ou désactiver l affichage des sous titres quand vous le voulez pendant la lecture Sur un DVD sur lequel des sous titres multilingues sont enregistrés vous pou...

Page 79: ...ez pendant la lecture du DVD Lorsque l indication ANGLE apparaît dans la fenêtre d affichage du panneau frontal durant la lecture du DVD appuyez plusieurs fois de suite sur ANGLE CHANGE jusqu à ce que obteniez l angle voulu ANGLE 1 n ANGLE 2 n z Vous pouvez spécifier l angle au préalable Spécifiez l angle si l indication ANGLE n est pas activée dans la fenêtre d affichage du panneau frontal Lorsqu...

Page 80: ...TAL 1 QUITTER SETUP 2 ENTER 1 2 1 LETTER BOX NON LECTURE AUTO BLEU 4 3 OUI QUITTER SETUP RÉGLAGE INITIAL 1 TYPE TÉLÉ RHÉOSTAT ARRIÈRE PLAN LUMINEUX ÉCONOMISEUR D ÉCRAN CONTRÔLE PARENTAL 1 2 Tapez le mot de 1 2 passe puis ENTER CONTRÔLE PARENTAL RÉGLAGE INITIAL 1 appuyez sur 1 2 Saisie du mot de passe 1 2 Entrez un nombre à 4 chiffres puis appuyez sur ENTER CONTRÔLE PARENTAL RÉGLAGE INITIAL 1 Touch...

Page 81: ...icte Pour revenir à l écran normal Appuyez sur SET UP Pour désactiver la fonction de contrôle parental et reproduire le DVD après avoir introduit votre code de passe Réglez NIVEAU sur NON à l étape 9 et appuyez ensuite sur 1 2 1 2 ENTER USA NON NIVEAU STANDARD QUITTER SETUP CONTRÔLE PARENTAL RÉGLAGE INITIAL 1 CHANGER MOT DE PASSE CHANGER MOT DE PASSE NC17 ENTER R PG13 PG 7 6 5 4 3 2 1 2 1 2 NON NI...

Page 82: ...e code approprié POWER Touches numériques Sélecteur TV DVD 1 2 3 4 5 6 7 8 9 0 Standard Numéro de code Allemagne 2109 Autriche 2046 Belgique 2057 Canada 2079 Chine 2092 Danemark 2115 Espagne 2149 Finlande 2165 France 2174 Hongkong 2219 Indonésie 2238 Italie 2254 Japon 2276 Malaysia 2363 Norvège 2379 Pays Bas 2376 Philippines 2424 Singapour 2501 Suède 2499 Suisse 2086 Taïwan 2543 Thaïlande 2528 Roy...

Page 83: ...le lecteur Vous pouvez également changer le volume sonore à l aide de la touche AV VOL Si vous raccordez le lecteur à une minichaîne hi fi SONY appuyez plusieurs fois sur AV RECVR pour modifier l entrée du système Remarque En fonction du récepteur AV il est possible que vous ne puissiez pas commander votre récepteur AV AV RECVR AV VOL 1 2 3 4 5 6 7 8 9 0 TV VIDEO CH VOL POWER Touches numériques Sé...

Page 84: ...LECTURE AUTO BLEU 4 3 NON RÉGLAGE INITIAL 1 TYPE TÉLÉ RHÉOSTAT ARRIÈRE PLAN LUMINEUX ÉCONOMISEUR D ÉCRAN CONTRÔLE PARENTAL ENTER 1 2 1 2 QUITTER SETUP LETTER BOX NON LECTURE AUTO BLEU 4 3 OUI RÉGLAGE INITIAL 1 TYPE TÉLÉ RHÉOSTAT ARRIÈRE PLAN LUMINEUX ÉCONOMISEUR D ÉCRAN CONTRÔLE PARENTAL Utilisation du menu d installation Z Le menu vous permet de réaliser la configuration initiale de régler la qua...

Page 85: ...nnez IDEM AUDIO la langue des sous titres change en fonction de la langue du son ENTER 1 2 1 2 QUITTER SETUP CHOIX DE LA LANGUE ÉCRANS FRANÇAIS ANGLAIS MENU DVD AUDIO SOUS TITRE ORIGINAL IDEM AUDIO Sélection de la langue des menus et du son CHOIX DE LA LANGUE Sélectionnez après avoir appuyé sur SET UP L indication CHOIX DE LA LANGUE vous permet de sélectionner différentes langues pour les menus ou...

Page 86: ... un programmateur non fourni vous pouvez faire démarrer la lecture à l heure de votre choix DEMO1 démarre automatiquement la démonstration 1 DEMO2 démarre automatiquement la démonstration 2 pRHÉOSTAT Réglage de l intensité de l éclairage de la fenêtre d affichage du panneau frontal LUMINEUX rend la fenêtre d affichage du panneau frontal plus lumineuse SOMBRE rend la fenêtre d affichage du panneau ...

Page 87: ...é à une appareil audio équipé d un décodeur Dolby Digital AC 3 intégré D PCM Downmix PCM lorsque vous reproduisez les pistes sonores Dolby Digital AC 3 les signaux de sortie audio sont mixés en 2 canaux Suivant les réglages de l option AMBIOPHONIE vous pouvez choisir d intégrer la composante spatiale dans les signaux ou non Les signaux de sortie audio transmis via les connecteurs 5 1 OUTPUT sont é...

Page 88: ...corder le haut parleur central et le haut parleur d extrêmes graves Son spatial Dolby Digital Qu est ce que le son spatial Dolby Digital Certains DVD comptent des canaux audio 5 1 enregistrés en format Dolby Digital AC 3 Avec un amplificateur doté de canaux d entrée 5 1 et de 5 1 haut parleurs vous pouvez créer une présence sonore plus naturelle dans le confort de votre intérieur Même si vous disp...

Page 89: ...WOOFER AUDIO IN L R L R AUDIO OUT AUDIO IN AUDIO OUT AUDIO IN y PHONO TAPE MD MONITOR VIDEO 1 VIDEO 2 TV LD L L CENTER TUNER CD COMPONENT VIDEO OUT Y B Y FRONT REAR R WOOFER CENTER R AUDIO 2 L VIDEO 2 R AUDIO 1 L VIDEO 1 1 2 OPTICAL COAXIAL DOLBY DIGITAL AC 3 PCM L INPUT 5 1 INPUT MONITOR OUTPUT 5 1 OUTPUT LINE OUT S VIDEO OUT DIGITAL OUT LINK S R Y S VIDEO IN Téléviseur Lecteur CD DVD Amplificate...

Page 90: ...les basses fréquences C est le réglage par défaut Sélectionnez ce symbole si vous constatez des distorsions acoustiques ou si les effets spatiaux sont difficilement audibles lorsque vous utilisez de petits haut parleurs avec une réponse en basses fréquences minimale Si vous ne voulez pas raccorder le haut parleur sélectionnez ce symbole Vous ne pouvez pas sélectionner ce symbole pour les haut parl...

Page 91: ...re position d écoute réglez la distance du haut parleur le plus proche Remarque Ne placez pas les haut parleurs arrière plus loin de votre position d écoute que les haut parleurs frontaux Réglage du volume des haut parleurs 1 Lorsque vous avez arrêté la lecture appuyez sur SET UP et sélectionnez 2 puis appuyez sur ENTER 2 Réglez TEST TONALITÉ sur OUI Vous entendez successivement la tonalité de tes...

Page 92: ...rs arrière Les haut parleurs virtuels sont reproduits comme indiqué dans l Ill 2 SET UP ENTER Ces réglages affecte également la sortie des connecteurs LINE OUT AUDIO 1 2 Remarques Lorsque vous sélectionnez une option le son est momentanément coupé Lorsque vous sélectionnez PRO LOGIC il se peut que suivant les disques le son ne soit diffusé que par le haut parleur central Si le signal de lecture n ...

Page 93: ... 6 7 8 9 0 DVD 1 32 55 32 50 30 50 FRANÇAIS 8 1 9 DOLBY DIGITAL 3 2 1 L C R LS RS LFE LECTURE CHAPITRE TITRE CHAPITRE SOUS TITRE AUDIO ANGLE FRANÇAIS 32 FRANÇAIS 8 1 9 L R PCM AUDIO ANGLE Ç PRO LOGIC L C R S FRANÇAIS 8 1 9 PCM AUDIO ANGLE Ç DOLBY DIGITAL 3 2 1 L C R LS RS LFE FRANÇAIS 8 1 9 AUDIO ANGLE Ç S Arrière monaural la composante arrière du signal stéréo traité Pro Logic LFE s affiche uniqu...

Page 94: ...limentation secteur devait être remplacé faites le uniquement réaliser dans un centre de service après vente agréé Installation Installez le lecteur dans un endroit suffisamment ventilé de manière à éviter toute surchauffe interne N installez pas le lecteur sur des surfaces molles comme une nappe qui risquerait d obstruer les orifices de ventilation du dessous N installez pas l appareil à proximit...

Page 95: ...la télécommande du lecteur Dirigez la télécommande vers le capteur de télécommande g du lecteur Remplacez les piles de la télécommande si elles sont épuisées L image comporte des parasites Nettoyez le disque Si le signal vidéo de votre lecteur DVD doit passer par votre magnétoscope pour arriver à votre téléviseur la protection contre la copie appliquée à certains programmes DVD pourrait affecter l...

Page 96: ... INITIAL 1 dans le menu d installation pendant la reproduction d une image élargie Le format de l écran est fixe sur votre DVD Si vous raccordez le lecteur au moyen du câble S vidéo effectuez le raccordement directement au téléviseur Sinon il est possible que vous ne puissiez pas modifier le rapport d écran En fonction du téléviseur il est possible que vous ne puissiez pas modifier le rapport d éc...

Page 97: ...ers chiffes C13 C31 Exx xx étant un nombre Cause et ou action corrective Le disque est souillé Nettoyez le disque à l aide d un chiffon de nettoyage page 42 Le disque n a pas été introduit correctement Ouvrez le plateau de lecture et introduisez le disque correctement la fonction d autodiagnostic s est activée pour empêcher tout dysfonctionnement du lecteur Lorsque vous prenez contact avec votre r...

Page 98: ...nores PCM avec une fréquence d échantillonnage de 96 kHz les signaux de sortie transmis via les connecteurs DIGITAL OUT OPTICAL COAXIAL et 5 1 OUTPUT sont convertis à 48 kHz fréquence d échantillonnage 16 bits bits de quantification La conception et les spécifications sont sujettes à modifications sans préavis Glossaire Chapitre page 5 Section d une image ou d une pièce musicale d un DVD plus peti...

Page 99: ... variable qui modifie les données à assigner en fonction du statut de l image Les données audio sont enregistrées en Dolby Digital AC 3 ainsi qu en PCM ce qui vous permet d écouter des sons d une présence renforcée Diverses fonctions avancées telles que les angles multiples le multilinguisme et le contrôle parental sont également accessibles sur les DVD Fonction d angles multiples page 27 Plusieur...

Page 100: ...tion des paramètres ou réglages Touche indicateur JOG 12 16 Appuyez sur cette touche pour activer la lecture image par image d un disque Connecteur PHONES 10 14 Branchez le casque d écoute sur ce connecteur Commande PHONE LEVEL 10 14 Réglage du volume du casque d écoute Touche PROGRAM 24 Appuyez sur cette touche pour activer la lecture programmée Touche CLEAR 11 15 22 23 24 Appuyez sur cette touch...

Page 101: ...DIO 1 2 7 Connexion du connecteur d entrée audio d un téléviseur ou d un amplificateur 4 Connecteurs LINE OUT VIDEO 1 2 7 Connexion du connecteur d entrée vidéo d un téléviseur ou d un moniteur 5 Connecteurs S VIDEO OUT 1 2 7 Connexion du connecteur d entrée S VIDEO d un téléviseur ou d un magnétoscope 6 Connecteur DIGITAL OUT OPTICAL 8 Connexion d un appareil audio à l aide d un câble de connexio...

Page 102: ...e d un disque etc dans la fenêtre d affichage du panneau frontal Touche SET UP 32 Affiche l écran de configuration sur l écran du téléviseur pour sélectionner ou ajuster les paramètres Touche TITLE 13 Affiche le menu de titres sur l écran du téléviseur Touche DVD MENU 13 Affiche le menu DVD sur l écran du téléviseur Molette de commande 12 16 Change la vitesse de lecture Touche ENTER Sélection et e...

Page 103: ...INITIAL 1 page 34 TYPE TÉLÉ 4 3 LETTER BOX 4 3 PAN SCAN 16 9 LECTURE AUTO NON MINUTERIE DEMO1 DEMO2 RHÉOSTAT LUMINEUX SOMBRE NON ARRIÈRE PLAN BLEU NOIR ÉCONOMISEUR D ÉCRAN OUI NON CONTRÔLE PARENTAL page 28 1 SÉLECTION DE PLAGE NON AUTO AMBIOPHONIE OUI NON D PCM SORTIE NUMÉRIQUE PCM DRC AUDIO NON OUI ATT AUDIO NON OUI FILTRE AUDIO NET LENT FRANÇAIS ESPAGNOL ITALIEN ALLEMAND HOLLANDAIS PORTUGAIS CHI...

Page 104: ...1269 Yiddish 1283 Javanese 1287 Georgian 1297 Kazakh 1298 Greenlandic 1299 Cambodian 1300 Kannada 1301 Korean 1305 Kashmiri 1307 Kurdish 1311 Kirghiz 1313 Latin 1326 Lingala 1327 Laothian 1332 Lithuanian 1334 Latvian Lettish 1345 Malagasy 1347 Maori 1349 Macedonian 1350 Malayalam 1352 Mongolian 1353 Moldavian 1356 Marathi 1357 Malay 1358 Maltese 1363 Burmese 1365 Nauru 1369 Nepali 1376 Dutch 1379 ...

Page 105: ...de menu langue 9 33 utilisation 18 Index F G Fenêtre d affichage du panneau frontal 20 FILTRE AUDIO 35 Fonctions PBC 17 H Haut parleurs configuration 38 raccordement 36 réglage 39 I J K L Lecture à différentes vitesses 12 16 aléatoire 23 continue 10 14 image par image 12 16 programmée 24 répétée 22 LECTURE AUTO 34 Lecture aléatoire 23 Lecture au ralenti 12 16 Lecture continue CD CD VIDÉO 14 DVD 10...

Page 106: ...54F Informations complémentaires ...

Page 107: ...55F Additional Information Additional Information ...

Page 108: ...Sony Corporation Printed in Japan ...

Reviews: