

4-286-722-
15
(1)
Personal Audio Docking System
Reference Guide
US
English
Owner’s Record
The model number and the serial number are located on the
bottom.
Record the serial number in the space provided below. Refer
to them whenever you call upon your Sony dealer regarding
this product.
Model No. ICF-CS15iP
Serial No. ________________________________
For customers in the USA
Please register this product on line at
http://www.sony.com/productregistration
Proper registration will enable us to send you
periodic updates about new products, services, and
other important announcements. Registering your
product will also allow us to contact you in the
unlikely event that the product needs adjustment
or modification. Thank you.
WARNING
To reduce the risk of fire or electric
shock, do not expose this apparatus to
rain or moisture.
To reduce the risk of fire, do not cover the
ventilation of the apparatus with newspapers,
tablecloths, curtains, etc. And do not place lighted
candles on the apparatus.
To reduce the risk of fire or electric shock, do not
expose this apparatus to dripping or splashing,
and do not place objects filled with liquids, such
as vases, on the apparatus.
Do not install the appliance in a confined space,
such as a bookcase or built-in cabinet.
Do not expose the batteries (battery pack or
batteries installed) to excessive heat such as
sunshine, fire or the like for a long time.
As the main plug is used to disconnect the unit
from the mains, connect the unit to an easily
accessible AC outlet. Should you notice an
abnormality in the unit, disconnect the main plug
from the AC outlet immediately.
The unit is not disconnected from the AC power
source (mains) as long as it is connected to the
wall outlet, even if the unit itself has been turned
off.
The nameplate and important information
concerning safety are located on the bottom
exterior.
You are cautioned that any changes or
modifications not expressly approved in this
manual could void your authority to operate this
equipment.
CAUTION
Danger of explosion if battery is incorrectly
replaced. Replace only with the same type.
NOTE
This equipment has been tested and found to
comply with the limits for a Class B digital device,
pursuant to Part 15 of the FCC Rules. These limits
are designed to provide reasonable protection
against harmful interference in a residential
installation. This equipment generates, uses and
can radiate radio frequency energy and, if not
installed and used in accordance with the
instructions, may cause harmful interference to
radio communications. However, there is no
guarantee that interference will not occur in a
particular installation. If this equipment does
cause harmful interference to radio or television
reception, which can be determined by turning
the equipment off and on, the user is encouraged
to try to correct the interference by one or more
of the following measures:
— Reorient or relocate the receiving antenna.
— Increase the separation between the equipment
and receiver.
— Connect the equipment into an outlet on a circuit
different from that to which the receiver is
connected.
— Consult the dealer or an experienced radio/TV
technician for help.
WARNING
Replace the battery for the clock backup with a
Sony CR2032 lithium battery, and the battery
for the remote commander with a Sony CR2025
lithium battery. Use of another battery may
present a risk of fire or explosion.
Battery may explode if mistreated. Do not
recharge, disassemble or dispose of in fire.
Dispose of used battery promptly, according to
local environmental laws and guidelines in
force. Keep away from children.
Important Safety
Instructions
1) Read these instructions.
2) Keep these instructions.
3) Heed all warnings.
4) Follow all instructions.
5) Do not use this apparatus near water.
6) Clean only with dry cloth.
7) Do not block any ventilation openings.
Install in accordance with the manufacturer’s
instructions.
8) Do not install near any heat sources such as
radiators, heat registers, stoves, or other
apparatus (including amplifiers) that produce
heat.
9) Do not defeat the safety purpose of the
polarized or grounding-type plug. A polarized
plug has two blades with one wider than the
other. A grounding type plug has two blades
and a third grounding prong. The wide blade
or the third prong are provided for your safety.
If the provided plug does not fit into your
outlet, consult an electrician for replacement
of the obsolete outlet.
10) Protect the power cord from being walked on
or pinched particularly at plugs, convenience
receptacles, and the point where they exit
from the apparatus.
11) Only use attachments/accessories specified by
the manufacturer.
12) Use only with the cart, stand, tripod, bracket,
or table specified by the manufacturer, or sold
with the apparatus. When a cart is used, use
caution when moving the cart/apparatus
combination to avoid injury from tip-over.
13) Unplug this apparatus during lightning storms
or when unused for long periods of time.
14) Refer all servicing to qualified service
personnel. Servicing is required when the
apparatus has been damaged in any way, such
as power-supply cord or plug is damaged,
liquid has been spilled or objects have fallen
into the apparatus, the apparatus has been
exposed to rain or moisture, does not operate
normally, or has been dropped.
For the state of California USA only
Perchlorate Material –special handling may apply, see
www.dtsc.ca.gov/hazardouswaste/perchlorate
Perchlorate Material: Lithium battery contains
perchlorate
Precautions
To disconnect AC power, grasp the plug itself,
not the cord.
Since a strong magnet is used for the speaker,
keep credit cards using magnetic coding or
spring-wound watches, CRT-based TVs, or
projectors, etc., away from the unit to prevent
possible damage from the magnet.
Do not leave the unit in a location near a heat
source such as a radiator or airduct, or in a
place subject to direct sunlight, excessive dust,
mechanical vibration, or shock.
Allow adequate air circulation to prevent
internal heat build-up. Do not place the unit on
a surface (a rug, a blanket, etc.) or near
materials (a curtain) which might block the
ventilation holes.
Should any solid object or liquid fall into the
unit, unplug the unit and have it checked by
qualified personnel before operating it any
further.
During a thunderstorm, do not touch the
antenna (aerial) and plug.
Do not touch the unit with wet hands.
Do not place the unit anywhere near water.
NOTES ON LITHIUM BATTERY
Wipe the battery with a dry cloth to assure a
good contact.
Be sure to observe the correct polarity when
installing the battery.
Do not hold the battery with metallic tweezers,
otherwise a short-circuit may occur.
Note
In the Reference Guide, “iPod” is used as a
general reference to functions on an iPod or
iPhone, unless otherwise specified by the text
or illustrations.
If you have any questions or problems concerning
your unit, please consult your nearest Sony dealer.
Operations
Power source
This unit contains a CR2032 battery as a backup
power source to keep the clock and the alarm
operating during a power interruption (No Power
No Problem system).
When to replace the battery
When the battery becomes weak, “
” appears in
the display.
If a power interruption occurs while the battery is
weak, the current time and alarm will be erased.
Replace the battery with a Sony CR2032 lithium
battery. Use of another battery may cause a fire or
explosion.
Note
If “AM 12:00” flashes in the display when the
unit is connected to an AC outlet for the first
time, the battery may be weak. In this case,
consult your nearest Sony dealer.
To replace the battery
1
Keep the AC plug connected to the AC
outlet, remove the screw of the battery
compartment at the bottom of the unit,
and open the lid (see Fig.
).
2
Remove the old battery and insert a new
one in the battery compartment with the
side facing up (see Fig.
).
3
Replace the battery compartment lid and
tighten the screw.
4
Press
,
RADIO BAND
,
AUDIO IN
or
SNOOZE/BRIGHTNESS
on the unit to
turn “
” off in the display.
Note
When you replace the battery, do not
disconnect the plug from the AC outlet.
Otherwise, the current date, current time,
alarm and station presets will be erased.
CR2032
Reset button
To reset the unit
Press the reset button with a pointed object if the
unit fails to function properly. The current time,
alarm and station presets, etc., will revert to their
factory presets (see Fig.
).
To charge your iPod
You can use the unit as a battery charger.
Charging begins when the iPod is connected to
the unit.
The charging status appears in the display on
iPod. For details, see the user’s guide of your iPod.
Setting the clock
To set the clock for the first
time
This unit is preset to the current EST (Eastern
Standard Time) at the factory, and is powered by a
backup battery. All you need to do the first time is
just plug it in and select your time zone.
1
Plug in the unit.
The current EST (Eastern Standard Time)
appears in the display.
2
Press and hold
MODE
for at least
2 seconds.
Area number “2” flashes in the display.
The and
buttons have a tactile dot.
3
Press
TIME SET +
or
–
repeatedly to
select the number as follows:
Area number
Time zone
1
Atlantic Standard Time
2
(default setting)
Eastern Standard Time
3
Central Standard Time
4
Mountain Standard Time
5
Pacific Standard Time
6
Alaska Standard Time
7
Hawaii Standard Time
4
Press
DSPL/ENT
to set.
Notes
To cancel the time zone setting, press
MODE
instead of
DSPL/ENT
in step
4
.
Though the clock is correctly set at the factory,
discrepancies may arise during transport or
storage. If necessary, set the clock to the correct
time by referring to “To set the clock manually.”
When daylight saving time (summer
time) begins
This model automatically adjusts for daylight
saving time (summer time).
“ ” is displayed from the beginning of daylight
saving time (summer time) and disappears at the
end of the daylight saving time (summer time)
automatically.
Daylight saving time (summer time) begins at:
2:00 AM on the second Sunday of March.
Standard time begins at: 2:00 AM on the first
Sunday of November.
To cancel Auto DST/summer time adjustment
during the daylight saving time (summer
time) period
The Auto DST/summer time adjustment can be
canceled.
Press and hold
CLOCK
and
SNOOZE/
BRIGHTNESS
on the unit at the same time for at
least 2 seconds while the clock is displayed.
“ ” and “OFF” appear in the display to show that
Auto DST/summer time adjustment has been
canceled. The display returns to the clock.
Notes
Changes to Auto DST/summer time adjustment
by the unit (see above) are subject to
circumstances and laws in each country/region.
Should this interfere with desired adjustment,
cancel the Auto DST/summer time adjustment
and set the DST display manually as necessary.
Customers living in a country/region that does
not use daylight saving time (summer time)
must cancel Auto DST/summer time
adjustment before using the unit.
To activate Auto DST/summer time adjustment
again, press and hold
CLOCK
and
SNOOZE/
BRIGHTNESS
on the unit at the same time for
at least 2 seconds.
“ ” and “On” appear in the display to show that
Auto DST/summer time adjustment has been
activated. The display returns to the clock.
To set the clock manually
To change the clock setting manually, operate the
unit as follows.
1
Plug in the unit.
2
Press and hold
CLOCK
until the year
flashes in the display.
3
Press
TIME SET +
or
–
repeatedly to set
the year, and then press
CLOCK
.
4
Repeat step
3
to set the month, day, hour
and minute.
The seconds start incrementing from zero.
Notes
If you do not press any button for about
1 minute while setting the clock, the clock
setting will be canceled.
A 100-year calendar (2011 - 2110) is installed in
the unit. When the date is set, the day of the
week is automatically displayed.
MON = Monday, TUE = Tuesday,
WED = Wednesday, THU = Thursday,
FRI = Friday, SAT = Saturday, SUN = Sunday
To display the year and date
During clock display, press
CLOCK
on the unit
once for the date, and press it again for the year.
After a few seconds, the display will change back
to the current time automatically.
Remote commander
Before using the supplied remote for the first
time, remove the insulation film.
Aim the remote at the (Remote sensor) of the
unit.
The VOL + and
buttons have a tactile dot.
OFF
Terminate the current function and stop
playback.
Stop a currently sounding alarm/snooze timer.
(Play/Pause)
Start playing the iPod. Press again to pause/
resume playback.
(Forward)
Go to the next track.
Press and hold while listening to the sound to
locate a desired point.
(Backward)
Go back to the previous track. During
playback, this operation returns to the
beginning of the current track. To go back to
the previous track, press twice.
Press and hold while listening to the sound to
locate a desired point.
MENU
Go back to the previous menu.
(Up)/
(Down)
Select a menu item or track for playback.
ENTER
Execute the selected menu item or begin
playback.
SOUND
Select the desired sound effect(s). (For details,
see “To enjoy the bass or expansion sound
effect.”)
VOL +/−
(Volume plus/minus)
Adjust the volume.
RADIO BAND
Activate the radio and select a band.
/−
Select the preset number or preset station. (For
details, see “Operating the radio.”)
TUNE +/−
Tune into a station when the radio is on.
Press and hold to scan AM or FM stations.
AUDIO IN
Activate the AUDIO IN function when an
optional component is connected. (For details,
see “Connecting optional components.”)
SLEEP
Set the sleep timer. (For details, see “Setting the
sleep timer.”)
Note
Some operations may differ or may not be
available on certain models of iPod.
When to replace the battery
With normal use, the battery (CR2025) should
last for about 6 months. When the remote no
longer operates the unit, replace the battery with a
new one.
the
side facing up
Note
If you are not going to use the remote for a long
time, remove the battery to avoid any damage
that may be caused by leakage and corrosion.
Operating an iPod
Compatible iPod/iPhone
models
The compatible iPod/iPhone models are as
follows.
Update software of your iPod/iPhone to the latest
version before using it with this unit.
iPod touch (4th generation)
iPod touch (3rd generation)
iPod touch (2nd generation)
iPod nano (6th generation)*
iPod nano (5th generation)
iPod nano (4th generation)
iPod nano (3rd generation)
iPod classic
iPhone 4S
iPhone 4
iPhone 3GS
iPhone 3G
* The iPod nano (6th generation) cannot be
controlled by the remote when the command of
“
MENU
,” “
,” “
,” and “
ENTER
” is pressed.
On copyrights
iPhone, iPod, iPod classic, iPod nano, and iPod
touch are trademarks of Apple Inc., registered in
the U.S. and other countries.
“Made for iPod,” and “Made for iPhone” mean
that an electronic accessory has been designed to
connect specifically to iPod or iPhone,
respectively, and has been certified by the
developer to meet Apple performance standards.
Apple is not responsible for the operation of this
device or its compliance with safety and
regulatory standards. Please note that the use of
this accessory with iPod or iPhone may affect
wireless performance.
Note
This unit is not specified for use with an iPad,
and malfunction may result if used with one.
To play
1
Set an iPod on the dock connector.
The dock connector can be tilted slightly.
2
Press
.
The iPod begins playback.
You can operate the connected iPod via this
unit or the iPod itself.
3
Adjust the volume using
or
–
(
VOL +
or
–
on the remote).
To place and remove the iPod
When placing or removing the iPod, hold it at the
same angle as the dock connector on the unit. Do
not pull the iPod forward too far.
Notes
If a pop-up message appears on the display of
the iPod touch or iPhone, see “About App.”
An iPod in a case or cover can be set in this
unit. However, if the case or cover interferes
with the connection, remove the case or cover
before setting the iPod on the dock connector.
Do not twist or bend the iPod as this may result
in connector damage.
Remove the iPod when transporting it,
otherwise a malfunction may result.
When placing or removing the iPod, hold the
unit securely.
If the battery of your iPod is extremely low,
charge it for a while before operation.
If your iPod cannot reach the supporter located
in front of the unit, attach the supplied cushion
below the supporter.
If the iPod is already playing when set onto the
unit, the sound from the iPod will be output
from the unit speakers, even if the unit was
playing sound from another function.
Sony cannot accept responsibility in the event
that data recorded to an iPod is lost or damaged
when using an iPod connected to this unit.
For details of environmental conditions for
operating your iPod, check the website of Apple
Inc.
Operating the radio
To connect the AM loop
antenna
The shape and length of the antenna is designed
to receive AM signals. Do not dismantle or roll up
the antenna.
1
Remove only the loop part from the
plastic stand.
2
Set up the AM loop antenna.
(Refer to the Startup Guide bundled with this
Reference Guide.)
3
Insert the AM antenna terminal in the
AM ANTENNA
jack on the rear of the
unit.
To adjust the AM loop antenna
Find a place and an orientation that provide good
reception.
Tip
Adjust the direction of the AM loop antenna for
the best AM broadcast sound.
To remove the AM loop antenna
Push and hold down the tab of the antenna
terminal clamp, and pull out the AM loop
antenna.
–Manual tuning
1
Press
RADIO BAND
to turn on the radio.
2
Press
RADIO BAND
repeatedly to select
the desired band.
Each time you press the button, the radio
band toggles between AM and FM as follows:
3
Press
TUNE +
or
–
repeatedly to tune to
the desired station.
4
Adjust the volume using
or
–
(
VOL +
or
–
on the remote).
To turn off the radio, press
OFF/ALARM
RESET
(
OFF
on the remote).
–Scan tuning
The unit automatically scans for AM or FM
stations.
1
Follow steps
1
to
2
in “Manual tuning”
and select the AM or FM band.
2
Press and hold
TUNE +
or
–
.
+ : scans upward through the frequency bands.
– : scans downwards through the frequency
bands.
Scanning starts from the currently-tuned
frequency. When a station is received,
scanning stops.
3
Adjust the volume using
or
–
(
VOL +
or
–
on the remote).
–Preset tuning
You can preset up to 20 FM stations and 10 AM
stations.
To preset a station
1
Follow steps
1
to
4
in “Manual tuning”
and manually tune into the station you
wish to preset.
2
Press and hold
MODE
on the unit for at
least 2 seconds.
3
Press
PRESET
+
or
–
to select the preset
number, then press
DSPL/ENT
on the
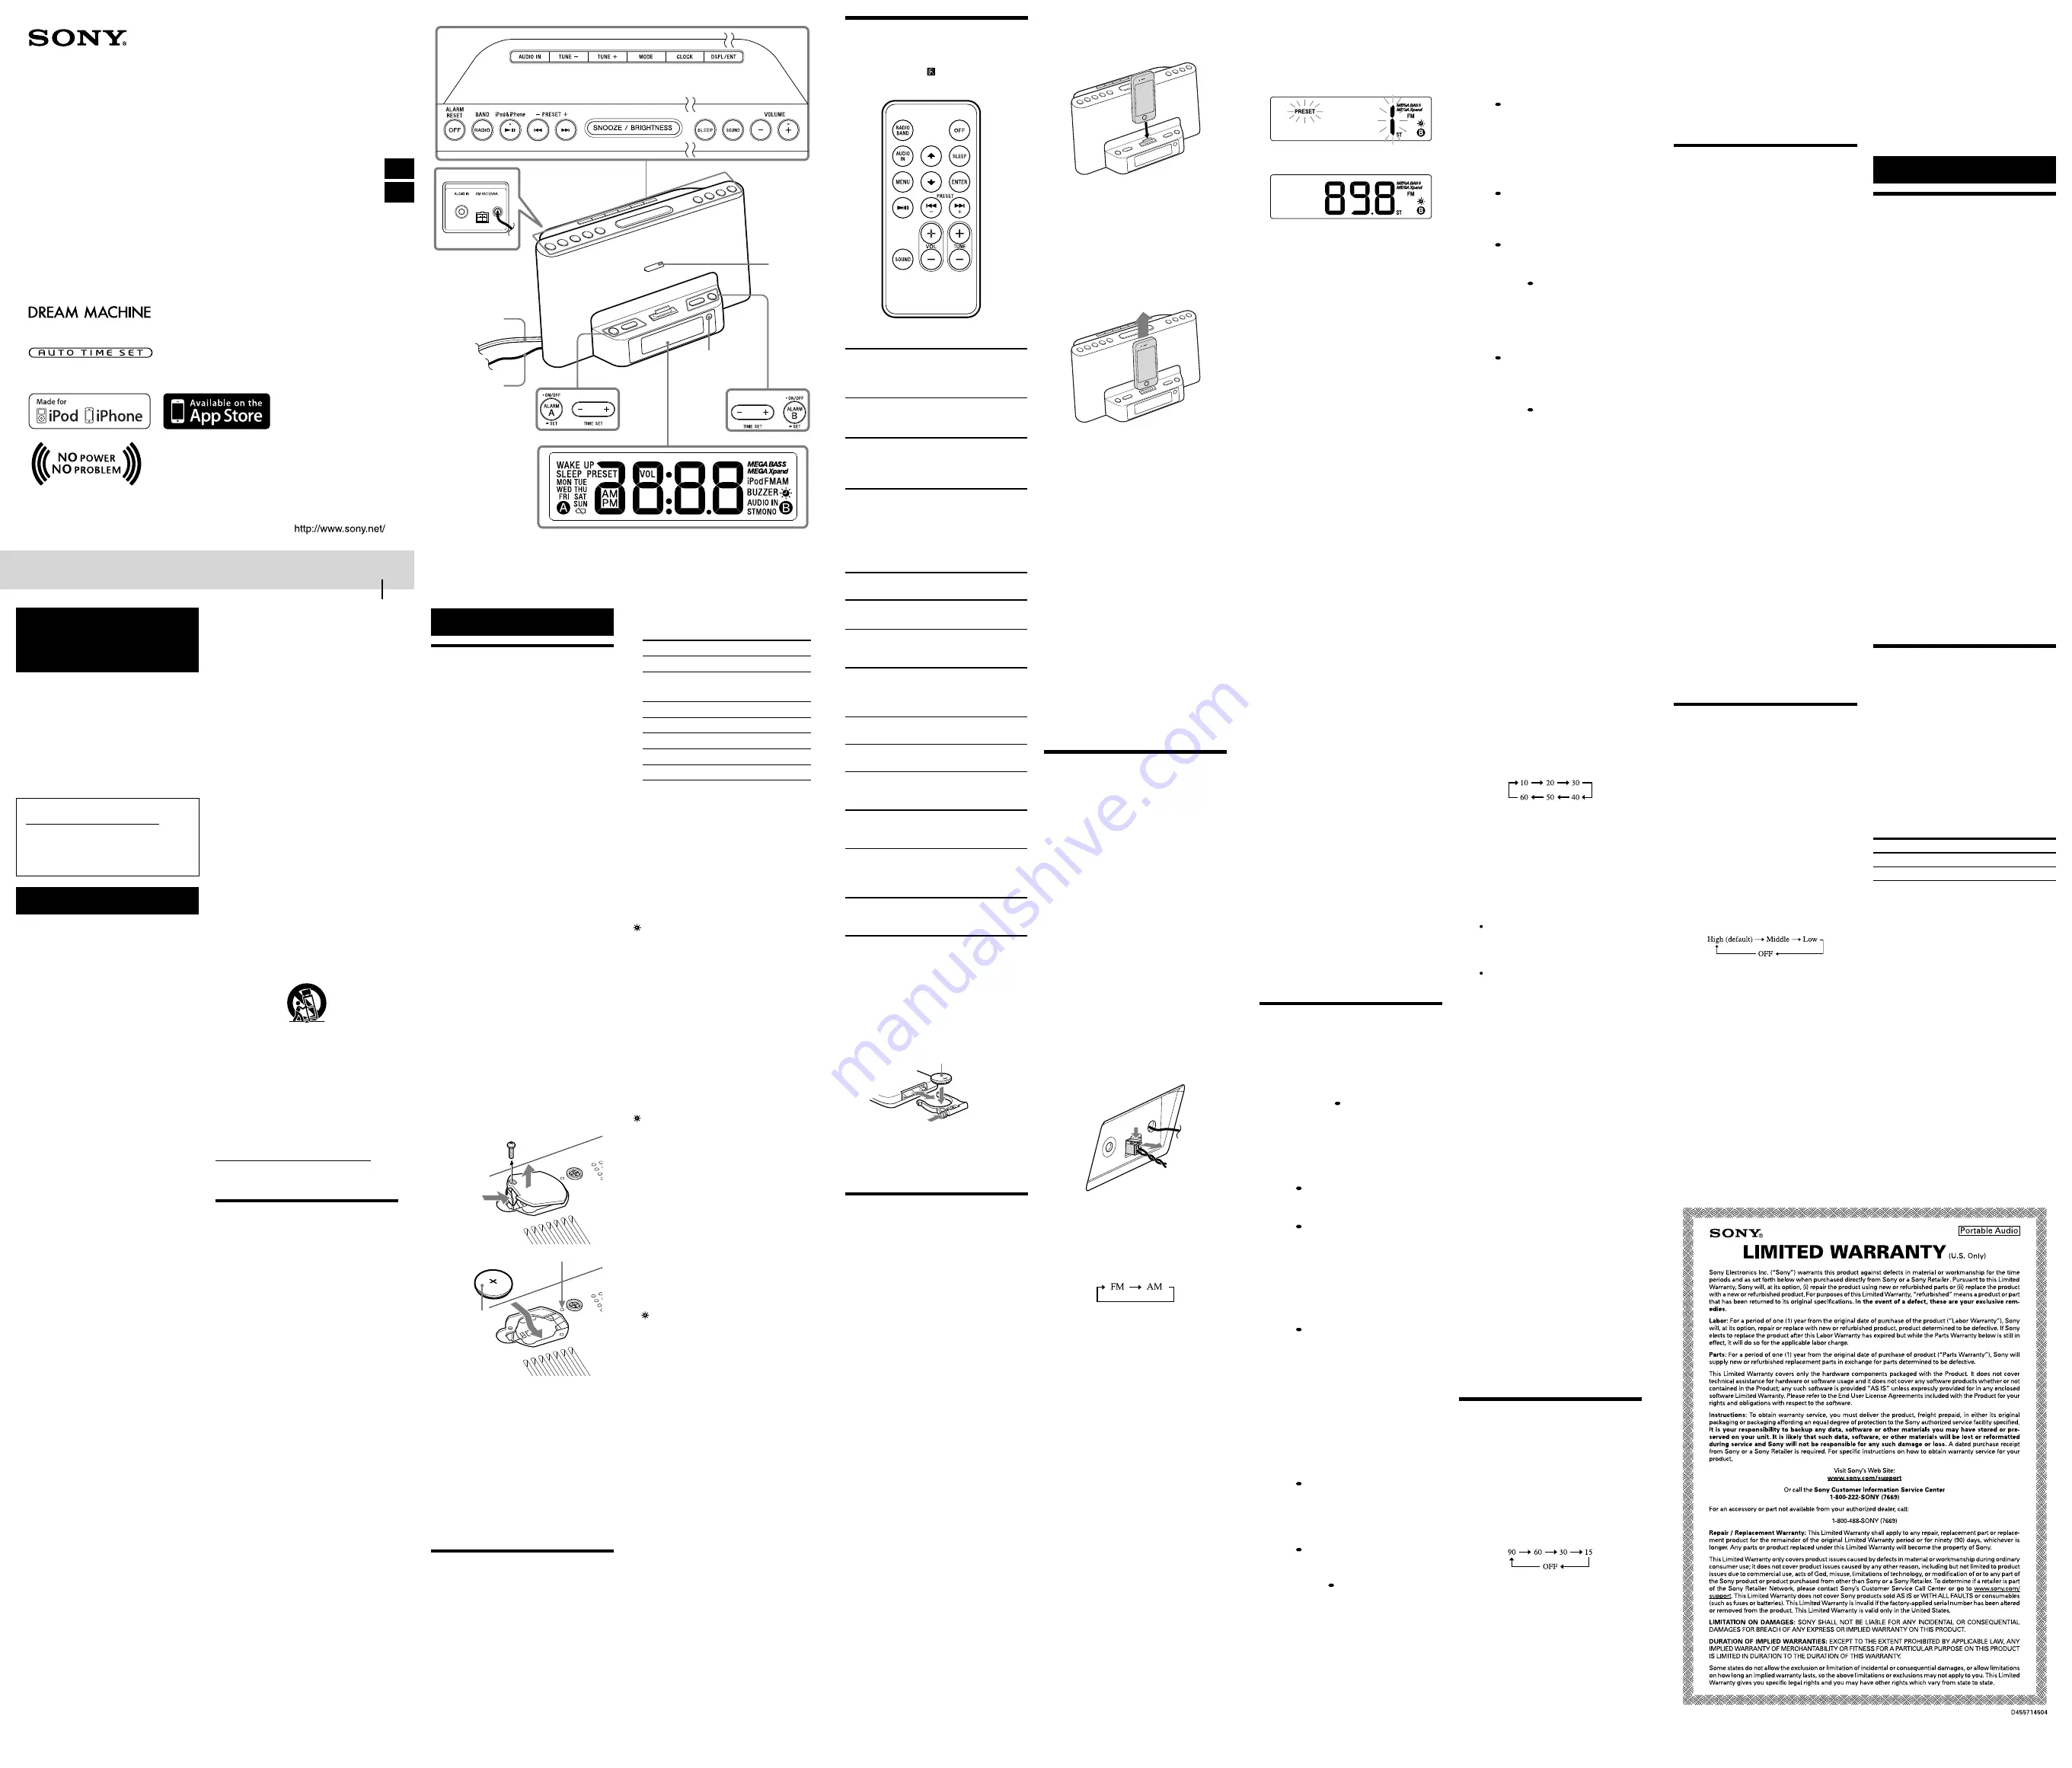
unit.
Example:
The following displays appear
when you preset FM 89.8 MHz to
preset number 1 for FM.
The display shows the frequency for about
10 seconds, and then returns to the current
time.
Notes
To preset another station, repeat these steps.
To cancel the preset number setting, press
MODE
instead of
DSPL/ENT
in step
3
.
If you store another station with the same
preset number, the previously stored station
will be replaced.
To tune in to a preset station
1
Follow steps
1
to
2
in “Manual tuning”
and select the AM or FM band.
2
Press
PRESET
+
or
–
to select the desired
preset number.
3
Adjust the volume using
or
–
(
VOL +
or
–
on the remote).
–Auto preset tuning
1
Follow steps
1
to
2
in “Manual tuning”
and select the AM or FM band.
2
Press and hold
RADIO BAND
until “AP”
flashes in the display.
3
Press
DSPL/ENT
on the unit.
The unit automatically presets the available
channels in order.
Tip
To stop auto preset tuning, press
RADIO BAND
.
To display the preset number and
frequency of the current station
Press
DSPL/ENT
on the unit once for the preset
number, and press it again for the frequency.
If you press
DSPL/ENT
on the unit once only, the
display shows the preset number for about
2 seconds, then changes to the frequency.
After a few moments, the display returns to the
current time.
To improve reception
FM:
Extend the FM wire antenna fully to increase
reception sensitivity.
AM:
Connect the supplied AM loop antenna to
the unit. Rotate the antenna horizontally for
optimum reception.
Notes on radio reception
Do not place the AM loop antenna near the
power supply unit, the unit or other AV
equipment during use, as noise may result.
Keep digital music players or mobile phones
away from the AM loop antenna or the FM
antenna, as this may lead to reception
interference.
When you are listening to the radio with an
iPhone connected to the unit, interference with
radio reception may occur.
When you are listening to the radio while
charging an iPod, interference with radio
reception may occur.
Tip
If the FM broadcast is noisy, press
MODE
on
the unit until “MONO” appears in the display,
the radio will play in monaural and the sound
will become clearer.
Setting the alarm
This unit is equipped with 3 alarm modes—iPod,
radio and buzzer. The clock needs to be set before
the alarm can be set (see “To set the clock for the
first time”).
To set the alarm
1
Press and hold
ALARM SET A
or
B
.
“WAKE UP” appears and the hour flashes in
the display.
2
Press
TIME SET +
or
–
repeatedly until
the desired hour appears.
To cycle the hour rapidly, press and hold
TIME
SET +
or
–
.
3
Press
ALARM SET A
or
B
.
The minute flashes.
4
Repeat step
2
to set the minute.
5
Press
ALARM SET A
or
B
.
The days of the week flash.
6
Repeat step
2
to set the days of the week.
You can select the days from the following
three options by pressing
TIME SET
+
or
–
:
Every day: MON TUE WED THU FRI SAT
SUN
Week day: MON TUE WED THU FRI
Week end: SAT SUN
7
Press
ALARM SET A
or
B
.
The alarm mode setting is entered.
8
Press
TIME SET +
or
–
repeatedly until
the desired alarm mode flashes.
You can choose one of 4 settings: “iPod,” “FM,”
“AM” or “BUZZER.” Set the alarm mode as
follows:
– iPod: see “
To set the alarm as iPod.”
– FM or AM: see “
To set the radio alarm.”
– BUZZER: see “
To set the buzzer alarm.”
To set the alarm as iPod
1
Perform steps
1
to
8
in “To set the alarm.”
2
Press
ALARM SET A
or
B
to select
alarm mode for “iPod.”
The volume level flashes in the display.
3
Press
TIME SET +
or
–
to adjust the
volume.
4
Press
ALARM SET A
or
B
.
The setting is entered.
5
If “A” or “B” does not appear in the
display, press
ALARM SET A
or
B
again.
The iPod will sound at the set time.
When using an iPod touch/iPhone
To wake up to music stored in an iPod touch/
iPhone, connect the iPod touch/iPhone to the
unit first, follow the steps above to set alarm
time, and then select the music function.
Even if the alarm setting for iPod is complete, if
you turn the iPod touch/iPhone power off after
inserting the iPod touch/iPhone into the unit,
the alarm will be the buzzer.
To set the radio alarm
1
Perform steps
1
to
8
in “To set the alarm.”
2
Press
ALARM SET A
or
B
to select
radio band (“FM” or “AM”).
Preset number flashes in the display.
3
Press
TIME SET +
or
–
to select the
desired preset number corresponding the
bands or “– –.”
“– –” is the last station received.
4
Press
ALARM SET A
or
B
.
The volume level flashes in the display.
5
Press
TIME SET +
or
–
to adjust the
volume.
6
Press
ALARM SET A
or
B
.
The setting is entered.
7
If “A” or “B” does not appear in the
display, press
ALARM SET A
or
B
again.
The radio will turn on at the set time.
To set the buzzer alarm
1
Perform steps
1
to
8
in “To set the alarm.”
2
Press
ALARM SET A
or
B
to select
“BUZZER” alarm mode.
The setting is entered.
3
If “A” or “B” does not appear in the
display, press
ALARM SET A
or
B
again.
The buzzer will sound at the set time.
Note
The volume of the buzzer is not adjustable.
To confirm an alarm time
setting
Press
TIME SET +
or
–
. The setting will be
displayed for about 4 seconds.
To change an alarm setting
Press and hold
TIME SET +
for at least 2 seconds
to move the alarm time forwards. Press and hold
TIME SET –
for at least 2 seconds to move the
alarm time back.
When you release the button, the changed time
will flash for about 2 seconds. To change the
alarm time again, press
TIME SET +
or
–
within
these 2 seconds, otherwise the setting change will
be fixed as displayed.
To doze for a few more
minutes
Press
SNOOZE/BRIGHTNESS
on the unit.
The sound turns off but will automatically come
on again after about 10 minutes.
You can change the snooze time by pressing
SNOOZE/BRIGHTNESS
on the unit repeatedly
within 4 seconds.
The maximum length of the snooze time is
60 minutes.
To stop the snooze timer, press
OFF/ALARM
RESET
(
OFF
on the remote).
To stop the alarm
Press
OFF/ALARM RESET
(
OFF
on the remote)
to turn off the alarm.
The alarm will sound again at the same time the
next day.
To deactivate the alarm
Press
ALARM ON/OFF A
or
B
to turn off the
alarm A or B indicator from the display.
To activate the alarm
Press
ALARM ON/OFF A
or
B
to turn on the
alarm A or B indicator in the display.
Notes
When alarm is set as iPod, only the buzzer
alarm will sound if there is no iPod on the dock
connector, music is not stored in the iPod, or
the iPod touch/iPhone is turned off.
The alarm function works as usual on the first
and last day of daylight saving time (summer
time). As a result, if the Auto DST/summer
time adjustment is set and the alarm is set at a
time skipped when the daylight saving time
begins, the alarm will sound; if the alarm is set
to a time that overlaps when daylight saving
time ends, the alarm will sound twice.
If the same alarm time is set for both alarm A
and B, alarm A takes priority.
If no operation is performed while the alarm is
occurring, the alarm will stop after about
60 minutes.
Note on the alarm in the event of a power
interruption
In the event of a power interruption, the buzzer
alarm will last about 5 minutes if the battery is not
weak. However, certain functions will be affected
as follows:
The backlight will not light up.
If the alarm mode is set to iPod or radio, it will
change to buzzer automatically.
If
OFF/ALARM RESET
is not pressed, the alarm
will sound for about 5 minutes.
If “
” appears in the display, the alarm will not
sound in the event of a power interruption.
Replace the battery if “
” appears.
The snooze function cannot be set during a
power interruption.
During a power interruption, each alarm will
sound at the set time only once.
Setting the sleep timer
You can fall asleep to music, etc., using the sleep
timer. The unit stops playback or radio
automatically after a preset duration.
1
Press
SLEEP
while the unit is turned on.
“SLEEP” appears and the sleep time flashes in
the display.
2
Press
SLEEP
to set the sleep timer
duration.
Each time you press
SLEEP
, the duration (in
minutes) changes as follows:
The display returns to current time for about
4 seconds after you have finished the duration
setting and released
SLEEP
, and then the sleep
timer starts.
The unit plays for the duration you set, and
then stops.
To turn off the unit before
the preset time
Press
OFF/ALARM RESET
(
OFF
on the remote).
To change the sleep timer
setting
You can press
SLEEP
repeatedly to select the
desired sleep timer setting, even after the sleep
timer has been activated.
To deactivate the sleep timer
Press
SLEEP
repeatedly to set the sleep timer to
“OFF” in step
2
.
Connecting optional
components
To listen to sound
1
Firmly connect the line output jack of a
portable digital music player (or other
component) to the
AUDIO IN
jack on the
back of the unit, using a suitable audio
connecting cable (not supplied).
2
Press
AUDIO IN
to display “AUDIO IN.”
3
Turn the connected component on.
4
Play the connected component.
The sound from the connected component is
output from the speakers of this unit.
5
Adjust the volume using
or
–
(
VOL +
or
–
on the remote).
To return to the radio
Press
RADIO BAND
.
The preset number followed by the frequency of
the last station appears in the display.
To return to the iPod
Press
.
To stop listening
Press
OFF/ALARM RESET
(
OFF
on the remote),
and stop playback on the connected component.
Notes
The necessary type of audio connecting cable
depends on the optional component. Make sure
to use the correct type of cable.
If the volume level is low, adjust the volume of
the unit first. If the volume is still too low,
adjust the volume of the connected component.
Disconnect the audio connecting cable from
the unit when it is not in use.
When you listen to the radio with optional
component connected, turn off the connected
component to prevent noise. If noise occurs,
even when the component is turned off,
disconnect and place the optional component
away from the unit.
Other useful functions
To enjoy the bass or
expansion sound effect
Three levels of sound effect are available by
pressing
SOUND
.
Each time you press the button, the sound effect
changes as follows:
“MEGA BASS”: Provides high quality bass sound.
“MEGA Xpand”: Expands the sound field width.
“MEGA BASS” and “MEGA Xpand”: Enables
both the above effects.
To return to standard sound, press the button
until the display(s) disappear.
To set the brightness of the
display
Four levels of brightness are available by pressing
SNOOZE/BRIGHTNESS
on the unit.
Even if brightness level is set to OFF, it will
change to Low while the alarm is occurring.
About App
A dedicated dock App for iPod touch and iPhone
available at Apple App Store.
Search for “D-Sappli” and download the free App
to find out more about the functions.
Notes
If the App to link with this unit is not
downloaded to your iPod touch/iPhone,
a pop-up message prompting you to download
D-Sappli may appear repeatedly.
Deactivate the App’s link function to stop the
pop-up message.
To deactivate the App’s link function: Remove
your iPod touch/iPhone from the dock
connector. Press
(to enter the iPod
function), and then press and hold
VOLUME
–
and
on the unit simultaneously for at least
2 seconds. (“OFF” appears in the display to
show that the App’s link function has been
deactivated.)
To re-activate the App’s link function, repeat the
above steps. (“On” appears in the display to
show that the App’s link function has been
activated.)
Additional Information
Troubleshooting
Should any problem persist after you have made
the following checks, consult your nearest Sony
dealer.
The clock flashes “AM 12:00” due to a power
interruption.
The battery is low. Replace the battery. Remove
the old battery and install a new one.
The alarm of radio, iPod or buzzer does not
sound at the preset alarm time.
Check that alarm “A” or alarm “B” is properly
displayed.
The alarm of radio or iPod is activated but no
sound comes on at the preset alarm time.
Check the alarm volume setting.
There is no sound from the iPod.
Make sure the iPod is securely connected.
Adjust the
/–
(
VOL +/–
on the
remote).
The iPod cannot be operated with this unit.
Make sure the iPod is securely connected.
Check that the iPod is compatible with this unit
(see “Compatible iPod/iPhone models”).
The iPod cannot be charged.
Make sure the iPod is securely connected.
Check that the iPod is compatible with this unit
(see “Compatible iPod/iPhone models”).
When daylight saving time (summer time)
begins, the clock does not employ the
daylight saving time (summer time)
automatically.
Make sure the clock is set correctly.
Press and hold
CLOCK
and
SNOOZE/
BRIGHTNESS
on the unit simultaneously for at
least 2 seconds to activate the Auto DST/
summer time function.
Specifications
AUDIO POWER SPECIFICATIONS
POWER OUTPUT AND TOTAL HARMONIC
DISTORTION:
With 6 ohm loads both channels driven, from
150 Hz - 10,000 Hz; rated 3 watts per channel
minimum RMS power, with no more than 10%
total harmonic distortion.
Time display
12-hour system
iPod
DC out: 5 V
MAX: 1 A
Radio
Frequency range
Band Frequency
Channel step
FM
87.5 MHz - 108 MHz 0.1 MHz
AM
530 kHz - 1 710 kHz
10 kHz
General
Speaker
Approx. 5.7 cm (2
1
/
4
inches) dia. 6 Ω
Input
AUDIO IN jack (ø 3.5 mm stereo minijack)
Power output
3.5 W + 3.5 W (at 10% harmonic distortion)
Supply voltage/Current or power
consumption
120 V AC, 60 Hz, 16 W
For clock back up: 3V DC, CR2032 battery (1)
Dimensions
Approx. 290 mm × 165 mm × 145 mm (w/h/d)
(11
1
/
2
inches × 6
1
/
2
inches × 5
3
/
4
inches)
including projecting parts and controls
Mass
Approx. 1.65 kg (3 lb 7 oz) including power
supply unit
Supplied accessories
Remote commander (1)
AM loop antenna (1)
Cushion (1)
Design and specifications are subject to change
without notice.
This unit includes a preinstalled Sony Lithium battery (CR2032) as back-up power source for the clock, which is preset
to EST (Eastern Standard Time) at the factory. And this battery is considered part of the product.
ICF-CS15iP
©2011 Sony Corporation
Printed in China
Dream Machine is a trademark of Sony Corporation.
Dream Machine es una marca comercial de Sony Corporation.
No Power No Problem is a trademark of Sony Corporation.
No Power No Problem es una marca comercial de Sony Corporation.
Auto Time Set is a trademark of Sony Corporation.
Auto Time Set es una marca comercial de Sony Corporation.
FM wire antenna
Power cord
Remote sensor
Supporter
This warranty is valid only in the United States.
Esta garantía es válida únicamente en los Estados Unidos.
Guía de referencia (reverso)
ES


