background image

7

Software Requirement

Playback of DVD-Video discs requires a PC with Windows 95
OSR2, video playback software and appropriate hardware (MPEG2
card etc.). For further details, refer to the documentation that comes
with DVD-Video playback software.
To access data on DVD-ROM or CD-ROM discs, correct device
driver must be installed on your PC.
Different software may be required depending on the type and
format of data on the discs. Therefore, be sure to refer to the
documentation that comes with the discs.

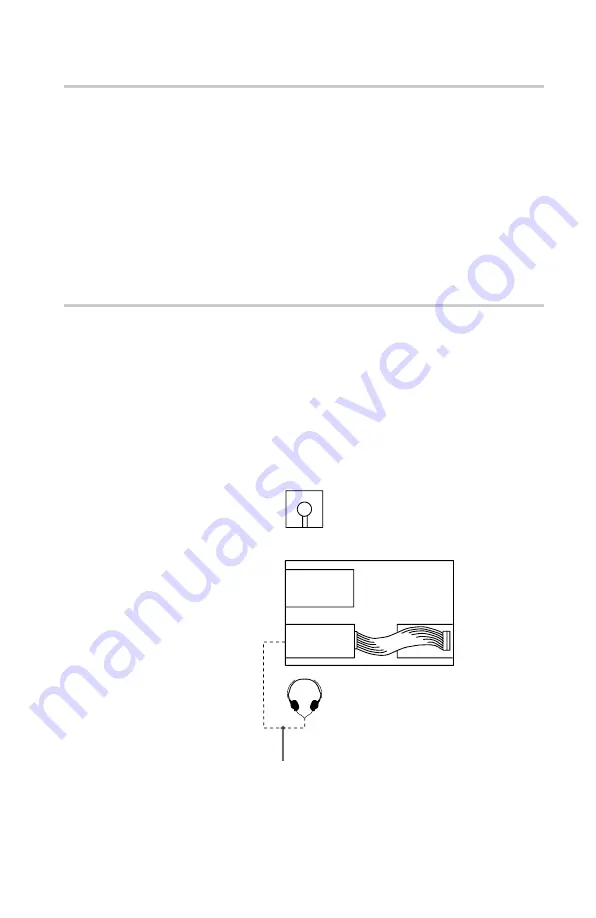
Example of System Setup

To use the DVD-ROM drive unit, the following components are
required:

• PC running under Windows95 OSR2
• Floppy disk drive
• Software (Device driver, Utilities)

The following is an example of system setup.

Introduction

Software

Host computer

Floppy disk

 drive

IDE port

DVD-ROM
Drive

Audio cable

Summary of Contents for DDU220E

Page 1: ...User s Guide DDU220E 06 DVD ROM Drive Unit 3 862 943 71 1 ...

Page 2: ...ASER RADIATION WHEN OPEN DO NOT STARE INTO BEAM ATTENTION RAYONNEMENT LASER EN CAS D OUVERTURE NE PAS REGARDER DANS LE FAISCEAU 4 993 474 01 CAUTION VORSICHT ADVARSEL ADVARSEL VARNING VARO VISIBLE AND INVISIBLE LASER RADIATION WHEN OPEN DO NOT STARE INTO BEAM OR VIEW DIRECTLY WITH OPTICAL INSTRUMENTS SICHTBARE UND UNSICHTBARE LASERSTRAHLUNG WENN ABDECKUNG GEÖFFNET NICHT IN DEN STRAHL BLICKEN AUCH ...

Page 3: ...nd on the user is encouraged to try to correct the interference by one or more of the following measures Reorient or relocate the receiving antenna Increase the separation between the equipment and receiver Connect the equipment into an outlet on a circuit different from that to which the receiver is connected Consult the dealer or an experienced radio TV technician for help This DVD ROM Drive Uni...

Page 4: ...15 of the FCC Rules Operation is subject to the following two conditions 1 This device may not cause harmful interference and 2 This device must accept any interference received including interference that may cause undesired operation Trademarks MS DOS and Windows95 are registered trademarks of Microsoft Corporation Molex is a registered trademark of Molex Inc AMP is a registered trademark of AMP...

Page 5: ...utions 10 Installing the Drive Unit in Your Computer 11 Preparation 11 Setting the Jumpers 12 Opening the Computer 13 Preparing a Space for the Drive Unit 14 Mounting the Drive Unit 15 Connecting the Drive Unit 16 Reassembling the Computer 18 Operating the Drive Unit 19 Starting the Drive Unit 19 Ejecting the Disc 21 How to Use the Disc Locks 22 Specifications 24 ...

Page 6: ...and CD RW discs Reads data from CD ROM CD ROM XA CD I and CD I Ready format discs and from CD EXTRA discs Reads data from CD BRIDGE format discs including PHOTO CD Reads standard CD Digital Audio encoded discs Video CD discs CD TEXT discs Performance The DDU220E supports 2 4 6 CAV operations when functioning as a DVD ROM drive or 4 10 CAV 8 20 CAV 10 24 CAV 14 32 CAV CD ROM drive In either case it...

Page 7: ...ver must be installed on your PC Different software may be required depending on the type and format of data on the discs Therefore be sure to refer to the documentation that comes with the discs Example of System Setup To use the DVD ROM drive unit the following components are required PC running under Windows95 OSR2 Floppy disk drive Software Device driver Utilities The following is an example o...

Page 8: ...r goes off to indicate one of the following unit conditions Steady lit DVD ROM disc is loaded Off CD ROM disc is loaded 5Busyindicator This amber indicator lights or flashes to indicate one of the following unit conditions Steady lit TOC table of contents read seek data read or audio playback in progress Flashing Drawer in motion 6Emergenc yejecthole Used to open the disc drawer manually when neit...

Page 9: ...r Outputs analog audio signals 3ConfigurationJ umper s See page 12 for details 4INTERF ACE CONNECTOR IDE bus Connect to IDE port of the host computer using a connecting cable 5DCINPUT power in connector Connect to the power supply of the host computer Pin 1 Location and Function of Parts and Controls ...

Page 10: ... in temperature as condensation may form on the lens inside the drive unit Should the surrounding temperature suddenly rise while the drive unit is turned on stop using the drive and leave the power on at least one hour before operating it or turning it off Operating the drive unit immediately after a sudden increase in temperature may result in a malfunction Transportation Close the disc drawer b...

Page 11: ...ng parts and tools these are not supplied with the drive A flat blade screwdriver Four screws 3 mm in diameter and 6 mm in length Two mounting rails if your computer has mounting tracks Unplug the computer and disconnect the cables attached to the back to give yourself more room to work Do not turn on the power of the computer before completing the entire installation process ...

Page 12: ...20E is daisy chained with a Hard Disk Drive on an IDE Card ATA compliant set the Hard Disk Drive as MASTER and the DDU220E as SLAVE If the DDU220E is the only device connected to the IDE Card set the DDU220E as MASTER It should be noted that some personal computers may use CSEL in lieu of the foresaid MASTER SLAVE selection In this case remove the existing jumpers from MASTER and SLAVE and set a j...

Page 13: ...Rear plastic panel Cover mounting screw Remove the screws Remove the computer cover Opening the Computer 1 If your computer has its rear side covered by a plastic panel attached with plastic hook pad pull it off 2 Remove the cover mounting screws 3 Remove the cover of the computer ...

Page 14: ...the screws and brackets Floppy disk drive Floppy disk drive Blanking plate Preparing a Space for the Drive Unit 1 Remove the screws and brackets securing the floppy disk drive and the lower drive bay blanking plate 2 Disconnect the floppy disk drive 3 Remove the floppy disk drive and the blanking plate ...

Page 15: ...rails are necessary attach them to the drive in unit the same way as your floppy disk drive and slide the drive unit into the lower drive bay If mounting rails are not required in your system fasten the drive unit in place with mounting screws Slide the drive unit into the lower bay ...

Page 16: ...connect audio equipment INTERFACE CONNECTOR DC INPUT connector The pin assignment is as follows After matching the beveled edges insert the plug of the power supply cable to the DC INPUT connector and push it firmly in place Caution Improper connection may damage the drive unit and void the warranty Installing the Drive Unit in Your Computer GND GND 5 V DC 12 V DC DC INPUT connector Power supply c...
Page 17: ...RFACE CONNECTOR 1 Firmly insert one end of the interface cable into the INTERFACE CONNECTOR 2 Connect the other end of the cable to the IDE port DIGITAL AUDIO connector The pin assignment is as follows Installing the Drive Unit inYour Computer Pin 1 INTERFACE CONNECTOR Interface cable Pin 1 pin Signal 1 Digital Out 2 Ground ...
Page 18: ...odule 5 After checking the following points slide the computer s cover on and fasten the cover mounting screws at the back of the computer Are the connections between the drive unit and computer correct Are the jumpers set to the appropriate positions 6 Remount the rear plastic panel and refer back to the proper installation section if you answered no to either of the questions above Reinstall the...
Page 19: ...ur computer 2 Press the eject button The drawer comes out automatically 3 Place a disc in the drawer with its label side up Note For double side DVD disc signals are read from the side facing down For further details refer to the documentation that comes with the disc Operating the Drive Place a disc with its label side up Press the eject button ...

Page 20: ... provided with the application software you are using Note The busy indicator also stays lit in amber if the disc is not properly placed on the loading tray a malfunction occurs In either case eject the disc and place it in the loading tray again making sure that it sits properly in the tray If doing this does not solve the problem and the busy indicator still remains lit in amber consult your dea...

Page 21: ...the drawer manually when it fails to come out by means of the eject button or software commands To do this follow the procedure below 1 Turn off the power of your computer 2 Insert a pointed object such as a paper clip into the emergency eject hole and push After removing a disc from the drive unit consult your dealer or qualified service personnel Operating the Drive Press the eject button Insert...

Page 22: ...is used in horizontal position you do not need to lock the disc Locking and unlocking All of the four locks are set in the unlocked position facing outward when the drive is shipped from the factory To set the lock in the locked position turn it with your fingers until you hear a click so that it faces inward Operating the Drive Disc locks locked unlocked to unlock to lock ...

Page 23: ...ocked position and leave the disc lock A in the unlocked position B C D A When the drive unit s left side is down To facilitate disc handling set the disc locks A C and D into the locked position and leave the disc lock B in the unlocked position D A C B Operating the Drive Top side Top side Right side Left side ...

Page 24: ...D TEXT discs Video CD discs Rotational speed DVD 3360 min 1 rpm 2 4 6 CAV 1 layer 3000 min 1 rpm 2 5 CAV 2 layer CD 2000 min 1 rpm 4 10 CAV 4000 min 1 rpm 8 20 CAV 5000 min 1 rpm 10 24 CAV 7000 min 1 rpm 14 32 CAV Drive performance Data transfer rate Sustained rate DVD 3240 8100 kbytes s 2 4 6 CAV 1 layer 2700 6750 kbytes s 2 5 CAV 2 layer CD 600 1500 kbytes s 4 10 CAV 1200 3000 kbytes s 8 20 CAV ...

Page 25: ... bulb 29 C Atmosphere Non condensing Non operating Storage Temperature 30 C to 50 C 22 F to 122 F Humidity 10 to 90 Atmosphere Non condensing Dimensions and mass Dimensions 146 41 4 208 mm w h d 5 3 4 1 11 16 8 1 4 inches Mass 0 90kg 2 lb Power requirement Voltage 5 V 5 DC and 12 V 10 DC Current Tray Open Close 5 V DC 0 8 A 12 V DC 0 6 A Seeking and Spin Up Down 5 V DC 0 6 A 12 V DC 2 4 A Hold Tra...

Page 26: ...79376 1 or equivalent AUDIO OUT connector Molex 5046 04A or equivalent Laser Type Semiconductor laser GaAlAs Wave length 650 nm DVD 780 nm CD Output power 0 6 mW Beam divergence 53 4 1 5 Design and specifications are subject to change without notice Specifications ...

Page 27: ...rews should not exceed 6 0 mm from the surface of the side panels or the bottom plate 5 1 2 17 8 31 8 79 25 47 5 139 7 10 1 32 1 32 21 9 7 8 13 32 0 5 0 4 1 11 16 41 4 5 111 16 42 3 203 8 146 5 3 4 7 32 148 5 7 8 4 M3 Mounting screws 4 on each side 4 M3 Mounting screws ...

Page 28: ... 1999 by Sony Corporation Printed in Malaysia DDU220E 06 DVD ROM Drive Unit User s Guide ...

Reviews: