background image

20

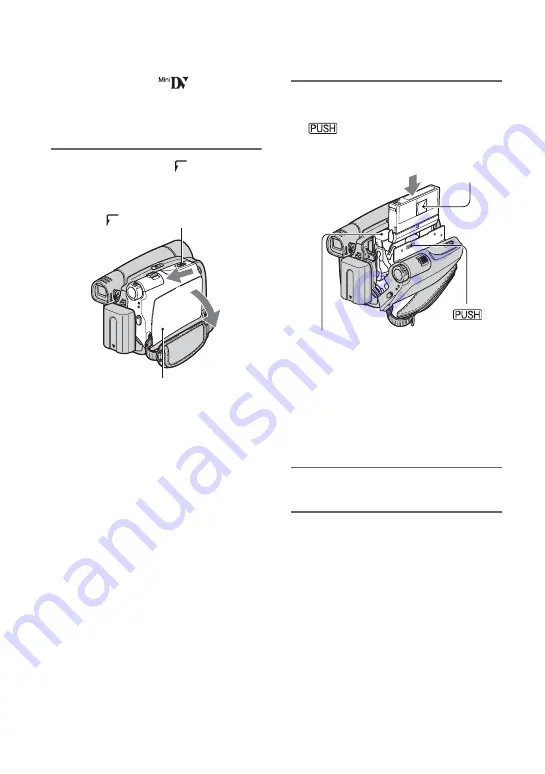
Step 7: Inserting a Cassette

You can use mini DV 

 cassettes only 

(p. 65).

• The recordable time varies depending on [REC 

MODE] (p. 46).

1

Slide and hold the 

 OPEN/

EJECT lever in the direction of the 
arrow and open the lid.

The cassette compartment automatically 
comes out and opens up.

2

Insert a cassette with its window 
facing outwards, then press 

.

The cassette compartment 
automatically slides back in.

• Do not force the cassette 

compartment closed by pressing the 
portion marked 

 while 

it is sliding in. It may cause a 
malfunction.

3

Close the lid.

To eject the cassette

Open the lid following the same procedure 
as described in step 

1

 and remove the 

cassette.

 OPEN/EJECT lever

Lid

Window

Push the center of the back 
of the cassette lightly.

Cassette compartment

{DO NOT PUSH}

Summary of Contents for DCR-HC28 - Minidv Handycam Camcorder

Page 1: ...oration Digital Video Camera Recorder Operating Guide DCR HC28 Getting Started 11 Recording Playback 22 Using the Menu 34 Dubbing Editing 48 Troubleshooting 54 Additional Information 64 Spanish Quick Guide Guía rápida en español 77 ...

Page 2: ...esence of uninsulated dangerous voltage within the product s enclosure that may be of sufficient magnitude to constitute a risk of electric shock to persons This symbol is intended to alert the user to the presence of important operating and maintenance servicing instructions in the literature accompanying the appliance WARNING ...

Page 3: ...Never spill liquid of any kind on the set Attachments Do not use attachments not recommended by the manufacturer as they may cause hazards Cleaning Unplug the set from the wall outlet before cleaning or polishing it Do not use liquid cleaners or aerosol cleaners Use a cloth lightly dampened with water for cleaning the exterior of the set Water and Moisture Do not use power line operated sets near ...

Page 4: ...fied in the operating instructions Improper adjustment of other controls may result in damage and will often require extensive work by a qualified technician to restore the set to normal operation When the set exhibits a distinct change in performance this indicates a need for service Servicing Do not attempt to service the set yourself as opening or removing covers may expose you to dangerous vol...

Page 5: ...er 1 800 222 SONY 7669 The number below is for the FCC related matters only Regulatory Information CAUTION You are cautioned that any changes or modifications not expressly approved in this manual could void your authority to operate this equipment Note This equipment has been tested and found to comply with the limits for a Class B digital device pursuant to Part 15 of the FCC Rules These limits ...

Page 6: ...ded below Refer to these numbers whenever you call your Sony dealer regarding this product For the State of California USA only Perchlorate Material special handling may apply See www dtsc ca gov hazardouswaste perchlorate Perchlorate Material Lithium battery contains perchlorate Types of cassette you can use in your camcorder You can use mini DV cassettes marked with Your camcorder is not compati...

Page 7: ...color systems differ depending on the countries regions To view your recordings on a TV you need an NTSC system based TV Television programs films video tapes and other materials may be copyrighted Unauthorized recording of such materials may be contrary to the copyright laws About this manual The images of the LCD screen and the viewfinder used in this manual for illustration purposes are capture...

Page 8: ... To record in dark places NightShot plus To adjust the exposure for backlit subjects BACK LIGHT To adjust the focus for an off center subject SPOT FOCUS To fix the exposure for the selected subject Flexible spot meter To record in mirror mode To use a tripod To use a Shoulder Belt Playback To play back the images with added special effects Picture effect Recording playback To check the remaining b...

Page 9: ...menu 45 AUDIO MIX LCD VF SET menu 45 LCD B L LCD COLOR VF B L etc TAPE SET menu 46 REC MODE AUDIO MODE REMAIN SETUP MENU menu 47 CLOCK SET LANGUAGE etc OTHERS menu 47 WORLD TIME BEEP etc Dubbing to VCR DVD device etc 48 Recording pictures from a TV or VCR DVD device etc 50 Dubbing sound to a recorded tape 51 Jacks to connect external devices 53 Troubleshooting 54 Warning indicators and messages 61...

Page 10: ...rder abroad 64 Usable cassette tapes 65 About the InfoLITHIUM battery pack 66 About i LINK 67 Maintenance and precautions 68 Specifications 71 Index 74 Additional Information Spanish Quick Guide Guía rápida en español 77 ...

Page 11: ...ber in the parentheses indicates the number of that item supplied AC Adaptor 1 p 12 Power cord 1 p 12 A V connecting cable 1 p 32 48 Lens cap 1 p 15 24 To attach the lens cap Attach the lens cap to the metal fittings of the grip belt as illustrated below using the strap Rechargeable battery pack NP FP30 1 p 12 66 Operating Guide This manual 1 ...

Page 12: ...k and click it into place 2 2 Slide the POWER switch in the direction of the arrow to OFF CHG The default setting 3 Connect the AC Adaptor to the DC IN jack on your camcorder 4 Connect the power cord to the AC Adaptor and the wall outlet The CHG charge lamp lights up and charging starts POWER switch DC IN jack DC plug AC Adaptor Power cord To the wall outlet 1 2 With the v mark facing to the LCD s...

Page 13: ...y before storing it for an extended period p 66 Charging time Approximate time min required when you fully charge a fully discharged battery pack Recording time Approximate time min available when you use a fully charged battery pack All times measured under the following conditions Top Recording with LCD screen Bottom Recording with viewfinder while the LCD panel closed Typical recording time sho...

Page 14: ...ing and playback time will be shorter when you use your camcorder in low temperatures The recording and playback time will be shorter depending on the conditions under which you use your camcorder On the AC Adaptor Use the nearby wall outlet when using the AC Adaptor Disconnect the AC Adaptor from the wall outlet immediately if any malfunction occurs while using your camcorder Do not use the AC Ad...

Page 15: ... or edit pictures After you have set the date and time CLOCK SET p 19 the next time you turn on the power of your camcorder the current date and time will be displayed on the LCD screen for a few seconds 3 Hold the camcorder correctly 4 Ensure a good grip then fasten the grip belt To turn off the power 1 Slide the POWER switch to OFF CHG 2 Attach the lens cap At the time of purchase the power will...

Page 16: ... BRT p 39 to adjust the brightness of the LCD screen You can view pictures using the viewfinder to avoid wearing down the battery or when the picture seen on the LCD screen is poor You can adjust the brightness of the viewfinder backlight by selecting LCD VF SET VF B L p 46 You can adjust the FADER and the EXPOSURE setting using the viewfinder p 37 The LCD panel 2 1 180 degrees max 90 degrees max ...

Page 17: ...indicators Press DISP BATT INFO to toggle the screen indicators such as time code on or off You can change the on screen displays to show messages in a specified language Select the screen language in LANGUAGE on the SETUP MENU p 34 47 You can easily check the meaning of each indicator p 29 that appears on the LCD screen 1 Touch 2 Touch DISP GUIDE The indicators vary depending on the settings Touc...

Page 18: ...ed on the screen If you cannot find the indicator you want to check touch PAGE r PAGE R to toggle When you touch RET the screen returns to the area selecting display To finish the operation Touch END DISP GUIDE END FOCUS MANUAL PROGRAM AE SPOTLIGHT P EFFECT SEPIA 1 2 RET PAGE PAGE Step 5 Using the touch panel Continued ...

Page 19: ...for the first time 1 Touch t MENU 2 Select SETUP MENU with then touch EXEC 3 Select CLOCK SET with then touch EXEC 4 Set Y year with then touch You can set any year up to the year 2079 5 Set M month then touch and repeat for D day H hour and M minute For midnight set it to 12 00 AM For midday set it to 12 00 PM The clock starts The date and time are not displayed while recording but they are autom...

Page 20: ...sert a cassette with its window facing outwards then press The cassette compartment automatically slides back in Do not force the cassette compartment closed by pressing the portion marked while it is sliding in It may cause a malfunction 3 Close the lid To eject the cassette Open the lid following the same procedure as described in step 1 and remove the cassette OPEN EJECT lever Lid Window Push t...

Page 21: ...21 Getting Started ...

Page 22: ...y mode on a cassette Recording A B D C With this Easy Handycam operation most of the camera settings are automatically optimally adjusted which frees you from detailed adjustments The screen font size increases for easy viewing Remove the lens cap p 15 If the POWER switch A is set to OFF CHG slide it while pressing the green button EASY appears on the screen D A 0 00 00 REC FN 60min The indicator ...

Page 23: ...turn to the default setting automatically p 41 Cancel Easy Handycam operation if you want to add any effects or settings to the images Almost all the settings are returned to the previous situation x Unavailable buttons during Easy Handycam During Easy Handycam operation the BACK LIGHT button p 26 is unavailable Invalid during Easy Handycam operation appears if operations not available during Easy...

Page 24: ...ress REC START STOP to start recording To stop movie recording Press REC START STOP again Lens cap Remove the lens cap by pressing both knobs on the sides of the cap POWER switch REC START STOP If the POWER switch is set to OFF CHG slide it while pressing the green button A The indicator A changes STBY to REC ...

Page 25: ...t playback To adjust the volume Touch t PAGE1 t VOL then to adjust the volume To search for a scene during playback Touch and hold during playback Picture Search or while fast forwarding or rewinding the tape Skip Scan You can play back in various modes V SPD PLAY p 40 A B C A Stop B Play Pause toggles as you touch it Playback automatically stops if pause is engaged for more than 3 minutes C Rewin...

Page 26: ...image blurring as desired when the power zoom lever is set to the T Telephoto side To record in dark places NightShot plus 2 Set the NIGHTSHOT PLUS switch 2 to ON and NIGHTSHOT PLUS appear The NightShot plus function uses infrared light Therefore do not cover the infrared port 3 with your fingers or other objects Remove the conversion lens optional if it is attached Adjust the focus manually FOCUS...

Page 27: ... with added special effects Picture effect 0 See P EFFECT on page 42 To check the remaining battery Battery Info 7 Set the POWER switch to OFF CHG then press DISP BATT INFO 7 The battery information appears for about 7 seconds You can view the battery information for up to 20 seconds by pressing DISP BATT INFO again while the battery information is displayed To turn off the operation confirmation ...

Page 28: ...ode hour minute second frame E Recording capacity of the tape approx 46 F Function button 34 The date time during recording and the camera setting data will be recorded automatically They do not appear on the screen during recording but you can check them as DATA CODE during playback p 39 G Tape transport indicator H Video operation buttons 25 Recording Data code during recording 1 2 3 4 5 6 Viewi...

Page 29: ...tor Meaning AUDIO MODE 46 Indicator Meaning DV input 50 Indicator Meaning NightShot plus 26 Z Warning 61 0 00 00 STBY FN E D I T 60min 60min Upper left Upper right Bottom Center Indicator Meaning Flexible spot meter 36 Manual exposure 38 9 Manual focus 36 Backlight 26 PROGRAM AE 42 Picture effect 42 n White balance 38 Wide select 44 SteadyShot off 44 Panel off 37 EDITSEARCH 44 E D I T is a referen...

Page 30: ...lable when the POWER switch is set to PLAY EDIT You can search for the start point to start the next recording while viewing the pictures on the screen The sound is not played back during the search 1 Touch t PAGE1 t MENU 2 Select CAMERA SET with then touch EXEC 3 Select EDITSEARCH with then touch EXEC 4 Select ON with then touch EXEC t 5 Touch and hold to go backward to go forward and release it ...

Page 31: ...ENU 2 Select CAMERA SET with then touch EXEC 3 Select EDITSEARCH with then touch EXEC 4 Select ON with then touch EXEC t 5 Touch The last few seconds of the most recently recorded scene are played back Then your camcorder is set to the standby Reviewing the most recently recorded scenes Rec review 0 00 00 STBY 60min EDIT FN ...

Page 32: ...ction Connect the white and red plugs left right audio and S VIDEO plug S VIDEO channel of an A V connecting cable In this case the yellow standard video plug connection is not necessary S VIDEO connection only will not output audio You can display the time code on the TV screen by setting DISP OUT to V OUT LCD p 47 When connecting your camcorder to a TV through a VCR Connect your camcorder to the...

Page 33: ...33 Recording Playback ...

Page 34: ...uch 2 Touch the desired page 3 Touch the desired button 4 Select the desired setting then touch t close With some settings you do not have to touch x To use menu items For details of the items see page 42 1 Touch t MENU on PAGE1 The menu index screen appears 2 Select the desired menu Touch to select the item then touch EXEC The process in step 3 and 4 is the same as that in step 2 3 Select the des...

Page 35: ...ect the desired menu Touch MENU then select the desired menu 3 Change your item setting After finishing the settings touch close to hide the menu screen Each touch of RET takes you to the previous screen Cancel Easy Handycam operation to use menu items normally 0 00 00 STBY FN 60min ...

Page 36: ...en the focus cannot be adjusted any closer and appears when the focus cannot be adjusted farther away To adjust the focus automatically touch AUTO in step 1 It is easier to focus on the subject by moving the power zoom lever towards T telephoto to adjust the focus then towards W wide angle to adjust the zoom for recording When you want to record a subject at close range move the power zoom lever t...

Page 37: ...d WHITE BLACK MOSC FADER MONOTONE When fading in the picture gradually changes from black and white to color When fading out it gradually changes from color to black and white Using the viewfinder You can adjust EXPOSURE and FADER while using the viewfinder by having the LCD panel rotated 180 degrees and closed with the screen facing out 1 Make sure that the CAMERA lamp lights up 2 Close the LCD p...

Page 38: ...sodium lamps or incandescent like color lamps ONE PUSH The white balance will be adjusted according to the ambient light 1 Touch ONE PUSH 2 Frame a white object such as a piece of paper to fill the screen under the same lighting conditions as you will shoot the subject 3 Touch flashes quickly When the white balance has been adjusted and stored in the memory the indicator stops flashing Do not shak...

Page 39: ...isplays camera setting data ASteadyShot off BExposure CWhite balance DGain EShutter speed FAperture value In the DATE TIME data display the date and time are displayed in the same area If you record a picture without setting the clock and will appear During Easy Handycam operation you can set DATE TIME only You can adjust the brightness of the LCD screen The recorded picture will not be affected b...

Page 40: ...o Touch change the playback direction frame play back slowly ySLOW To reverse direction frame t ySLOW play back 2 times faster double speed double speed To reverse direction frame t double speed play back frame by frame frame during playback pause To reverse direction frame during frame playback Horizontal lines may appear at the top bottom or in the center of the screen This is not a malfunction ...

Page 41: ...L SET menu p 42 PROGRAM AE z AUTO P EFFECT z z OFF AUTO SHTR z ON CAMERA SET menu p 43 D ZOOM z OFF WIDE SEL z 4 3 STEADYSHOT z ON EDITSEARCH z OFF N S LIGHT z ON VCR SET menu p 45 AUDIO MIX z LCD VF SET menu p 45 LCD B L z z BRT NORMAL LCD COLOR z z VF B L z z BRT NORMAL WIDE DISP z z TAPE SET menu p 46 REC MODE z z SP AUDIO MODE z 12BIT REMAIN z z AUTO SETUP MENU menu p 47 CLOCK SET z z z LANGUA...

Page 42: ...EACH SKI Select to prevent people s faces from appearing dark in strong light or reflected light such as at a beach in midsummer or on a ski slope PROGRAM AE SUNSETMOON Select to maintain the atmosphere of situations such as sunsets general night views or fireworks LANDSCAPE Select to shoot distant subjects clearly This setting also prevents your camcorder from focusing on glass or metal mesh in w...

Page 43: ...ilable during playback AUTO SHTR Auto shutter CAMERA SET menu D ZOOM WIDE SEL STEADYSHOT etc The default settings are marked with B The indicators in parentheses appear when the items are selected See page 34 for details on selecting menu items You can select the maximum zoom level in case you want to zoom to a level greater than 20 the default setting while recording on a tape Note that the image...

Page 44: ...lay or on the LCD screen ON Displays and on the LCD screen and enables the EDIT SEARCH function and Rec review p 30 When using the NightShot plus p 26 function to record you can record clearer pictures by setting N S LIGHT which emits infrared light invisible to ON the default setting Do not cover the infrared port with your fingers or other objects p 26 Remove the conversion lens optional if it i...

Page 45: ... The recorded picture will not be affected by this operation B BRT NORMAL Standard brightness BRIGHT Brightens the LCD screen When you connect your camcorder to outside power sources BRIGHT is automatically selected for the setting When you select BRIGHT battery life is slightly reduced during recording You can adjust the color on the LCD screen with The recorded picture will not be affected by th...

Page 46: ...gs are marked with B The indicators in parentheses appear when the items are selected See page 34 for details on selecting menu items B SP SP Records in the SP Standard Play mode on a cassette LP LP Increases the recording time to 1 5 times the SP mode Long Play If you record in the LP mode a mosaic like noise may appear or sound may be interrupted when you play back the tape on other camcorders o...

Page 47: ...LD TIME BEEP etc The default settings are marked with B See page 34 for details on selecting menu items When using your camcorder abroad you can set the time difference by touching the clock will be adjusted in accordance with the time difference If you set the time difference to 0 the clock returns to the originally set time B ON A melody sounds when you start stop recording or operate the touch ...

Page 48: ...ion Connect the white and red plugs left right audio and S VIDEO plug S VIDEO channel of an A V connecting cable In this case the yellow standard video plug connection is not necessary S VIDEO connection only will not output audio C i LINK cable optional Use an i LINK cable to connect your camcorder to another device equipped with an i LINK jack The video and audio signals are transmitted digitall...

Page 49: ... device 4 Start playback on the camcorder and recording on the VCR DVD device Refer to the operating instructions supplied with your recording device for details 5 When dubbing is complete stop your camcorder and the VCR DVD device To record the date time and camera settings data when connected by the A V connecting cable display them on the screen p 39 47 The following cannot be output via the DV...

Page 50: ...nnect your camcorder and other devices via an i LINK cable This indicator may also appear on the connected device 2 If you are recording from a VCR DVD device insert a cassette or a DVD 3 Slide the POWER switch repeatedly to turn on the PLAY EDIT lamp 4 Set your camcorder to recording pause mode Touch t PAGE3 t REC CTRL t REC PAUSE 5 When recording pictures from a VCR DVD device Start playing the ...

Page 51: ...tape has been recorded in the 16 bit mode p 46 When the tape has been recorded in the LP mode When your camcorder is connected via an i LINK cable When the tape has been recorded in 4CH MIC mode On blank sections of the tape When the tape has been recorded in a TV color system other than that of your camcorder p 64 When the write protect tab of the cassette is set to SAVE p 65 On sections recorded...

Page 52: ...RET t You can only record additional audio over a tape recorded on your camcorder The sound may deteriorate when you dub audio on a tape recorded on other camcorders including other DCR HC28 camcorders To check the recorded sound 1 Play back the tape on which you have recorded audio p 25 2 Touch t PAGE1 t MENU 3 Select VCR SET then touch to select AUDIO MIX then touch EXEC 4 Touch to adjust the ba...

Page 53: ...53 Dubbing Editing Jacks to connect external devices Open the jack cover A DV Interface i LINK p 48 50 B A V audio video OUT jack p 32 48 C DC IN jack p 12 1 2 3 ...

Page 54: ...ings of the functions that are not displayed on the screen return to their defaults Previously made settings are restored when you cancel the Easy Handycam operation p 22 41 DEMO MODE does not start You cannot view the demonstration together with NightShot plus p 26 Eject the cassette from your camcorder p 20 The camcorder gets warm The camcorder may get warmer while you use it This is not a malfu...

Page 55: ...eplace it with a new one p 12 66 The indicated time may not be correct in certain circumstances For example when you open or close the LCD panel it takes about 1 minute to display the correct remaining battery time The battery pack discharges too quickly Ambient temperature is too high or too low or the battery pack has not been charged enough This is not a malfunction Fully charge the battery aga...

Page 56: ...en This is not a malfunction These dots are not recorded The cassette cannot be ejected from the compartment Make sure the power source battery pack or AC Adaptor is connected correctly p 12 Remove the battery pack from the camcorder then attach it again p 13 Attach a charged battery pack to the camcorder p 12 Moisture condensation has occurred inside the camcorder p 69 The Cassette Memory indicat...

Page 57: ...reak even when you turn the power off Do not record pictures in SP mode and LP mode on the same tape Avoid stopping then recording a movie in the LP mode END SCH does not work Do not eject the cassette after recording p 30 There is nothing recorded on the cassette END SCH does not work correctly There is a blank section between recorded sections of the tape This is not a malfunction Refer also to ...

Page 58: ...ur when recording pictures under the discharge tube such as a fluorescent lamp sodium lamp or mercury lamp with PORTRAIT or SPORTS This is not a malfunction Cancel PROGRAM AE to reduce the anomaly p 42 Black bands appear when you record a TV screen or computer screen Set STEADYSHOT to OFF p 44 You cannot play back tape Slide the POWER switch repeatedly to turn on the PLAY EDIT lamp Rewind the tape...

Page 59: ...er device with a 4ch microphone 4CH MIC REC Your camcorder is not compatible with 4ch microphone recording Menu items are grayed out You cannot select grayed items in the current recording playback situation You cannot use SPOT FOCUS You cannot use SPOT FOCUS together with PROGRAM AE You cannot use SPOT METER You cannot use SPOT METER together with NightShot plus If you set PROGRAM AE SPOT METER i...

Page 60: ...appropriately p 52 Pictures from connected devices are not displayed correctly The input signal is not NTSC p 64 The computer does not recognize your camcorder Disconnect the cable from the computer and camcorder then connect it again securely Disconnect the cable from the computer and camcorder restart the computer then connect them again correctly You cannot view the video your camcorder is seei...

Page 61: ...e power source Reconnect it and operate your camcorder again Change the cassette Press RESET p 27 and operate your camcorder again E 61 ss E 62 ss Contact your Sony dealer or local authorized Sony service facility Inform them of the 5 digit code which starts from E E Battery level warning The battery pack is nearly used up Depending on the operating environment or battery conditions E may flash ev...

Page 62: ...sette is damaged QZ The tape is locked check the tab p 65 Q The tape has reached the end p 20 25 Rewind or change the tape x Others Cannot record due to copyright protection p 65 Cannot add audio Disconnect the i LINK cable p 51 Not recorded in SP mode Cannot add audio p 51 Not recorded in 12 bit audio Cannot add audio p 51 Cannot add audio on the blank portion of a tape p 51 Cannot add audio p 51...

Page 63: ...HDV recorded tape Cannot playback Your camcorder cannot play back this format Play back the tape with the equipment that recorded it HDV recorded tape Cannot add audio Your camcorder does not allow you to add audio on a section of a tape recorded in HDV format p 51 ...

Page 64: ...u can easily set the clock to local time abroad by the time difference you are in Select WORLD TIME in the OTHERS menu then set the time difference p 47 System Used in NTSC Bahama Islands Bolivia Canada Central America Chile Colombia Ecuador Guyana Jamaica Japan Korea Mexico Peru Surinam Taiwan the Philippines the U S A Venezuela etc PAL Australia Austria Belgium China Czech Republic Denmark Finla...

Page 65: ...re Your camcorder does not record copyright control signals on the tape when it records Notes on use x When not using your camcorder for a long time Remove the cassette and store it x To prevent accidental erasure Slide the write protect tab on the cassette to set it to SAVE x When labeling the cassette Be sure to place the label only on the locations shown in the following illustration so as not ...

Page 66: ... capacity battery pack NP FP71 FP90 FH70 FH100 optional Frequent use of the LCD screen or a frequent playback fast forward or rewind operation wears out the battery pack faster We recommend using a large capacity battery pack NP FP71 FP90 FH70 FH100 optional Be sure to set the POWER switch to OFF CHG when not recording or playing back on your camcorder The battery pack is also consumed when your c...

Page 67: ... with various digital AV devices When two or more i LINK compatible devices are daisy chained with the unit operation becomes possible from any device in the chain Note that operation method may vary or data transactions may not be possible depending on specifications and characteristics of the connected devices Normally only one device can be connected to this unit with an i LINK cable When conne...

Page 68: ...ies in the following locations Anywhere extremely hot or cold Never leave them exposed to temperatures above 60 C 140 F such as under direct sunlight near heaters or in a car parked in the sun They may malfunction or become deformed Near strong magnetic fields or mechanical vibration The camcorder may malfunction Near strong radio waves or radiation The camcorder may not be able to record properly...

Page 69: ... buttons are touched If moisture starts to condense your camcorder sometimes cannot detect condensation If this happens the cassette is sometimes not ejected for 10 seconds after the cassette lid is opened This is not a malfunction Do not close the cassette lid until the cassette is ejected x Note on moisture condensation Moisture may condense when you bring your camcorder from a cold place into a...

Page 70: ... except the AC Adaptor from your camcorder 3 Slide the POWER switch repeatedly to turn on the PLAY EDIT lamp while pressing DISP BATT INFO on your camcorder and keep pressing down DISP BATT INFO for about 5 seconds 4 Touch the displayed on the screen with the corner of the Memory Stick or the like The position of the changes If you did not press the right spot start from step 4 again You cannot ca...

Page 71: ...plied AC Adaptor and leave it with the POWER switch set to OFF CHG for more than 24 hours Specifications System Video recording system 2 rotary heads Helical scanning system Audio recording system Rotary heads PCM system Quantization 12 bits Fs 32 kHz stereo 1 stereo 2 16 bits Fs 48 kHz stereo Video signal NTSC color EIA standards Usable cassette Mini DV cassette with the mark printed Tape speed S...

Page 72: ...a recording using the LCD 2 1 W Operating temperature 0 C to 40 C 32 F to 104 F Storage temperature 20 C to 60 C 4 F to 140 F Dimensions approx 65 79 113 mm 2 5 8 3 1 8 4 1 2 in w h d including the projecting parts 65 79 113 mm 2 5 8 3 1 8 4 1 2 in w h d including the projecting parts with supplied battery pack NP FP30 attached Mass approx 360 g 12 oz main unit only 420 g 14 oz including the NP FP...

Page 73: ...bject to change without notice On trademarks InfoLITHIUM is a trademark of Sony Corporation i LINK and are trademarks of Sony Corporation is a trademark Handycam and are registered trademarks of Sony Corporation Microsoft Windows and Windows Media are trademarks or registered trademarks of U S Microsoft Corporation in the U S and other countries All other product names mentioned herein may be the ...

Page 74: ...p 12 CLOCK SET 19 Connect TV 32 50 VCR 32 48 50 D D ZOOM Digital zoom 43 DATA CODE 28 39 DATE TIME 19 28 39 DC IN jack 12 DC plug 12 DEMO MODE 47 54 DISP GUIDE Display guide 17 DISP OUT Display output 47 Display indicators 28 DISP BATT INFO button 17 27 Double speed Playback 40 Dubbing 48 51 DV Interface 48 50 53 E EASY button 22 Easy Handycam 22 35 EDITSEARCH 30 44 END SCH END SEARCH 30 57 EXPOSU...

Page 75: ... Reverse 40 Slow 40 Playing time 14 PORTRAIT Soft portrait 42 Power cord 12 POWER switch 12 15 Pre installed rechargeable battery 71 PROGRAM AE 42 59 R REC CTRL Recording control 50 REC MODE Recording mode 46 Rec review 31 REC START STOP button 22 24 Rechargeable battery pack See Battery Recording 24 Recording capacity 28 Recording time 13 REMAIN 46 RESET button 27 Reversal Playback 40 S S VIDEO c...

Page 76: ... 28 Viewfinder 16 Back light 46 Viewfinder lens adjustment lever 16 VOL Volume 25 V OUT LCD 47 W Wall outlet 12 Warning indicators 61 Warning messages 62 WHITE 37 WHT BAL White balance 38 59 Wide angle 26 WIDE DISP Wide display 46 WIDE SEL Wide select 44 WORLD TIME 47 Write protect tab 65 Z Zoom 26 Zoom lever 26 Index Continued ...

Page 77: ...mentos El número entre paréntesis indica la cantidad del elemento Adaptador de alimentación de ca 1 Cable de alimentación 1 Cable de conexión A V 1 Tapa del objetivo 1 Para instalar la tapa del objetivo Acople la tapa del objetivo a los adaptadores de metal de la correa de sujeción como se ilustra a continuación utilizando la bandolera Batería recargable NP FP30 1 Guía de operaciones Este manual 1...

Page 78: ...HG Ajuste predeterminado 3 Conecte el adaptador de alimentación de ca a la toma de entrada de cc de la videocámara 4 Conecte el cable de alimentación al adaptador de alimentación de ca y al tomacorriente de pared El indicador CHG carga se enciende y se inicia el proceso de carga Interruptor POWER Toma de entrada de cc Enchufe de cc Adaptador de alimentación de ca Cable de alimentación Al tomacorri...

Page 79: ... una mano el botón de liberación V BATT batería 2 Extraiga la batería con la otra mano en el sentido de la flecha Cuando guarde la batería Descargue completamente la batería antes de guardarla durante un período prolongado Tiempo de carga Tiempo aproximado min necesario para cargar totalmente una batería descargada por completo Tiempo de grabación Tiempo aproximado min disponible cuando utiliza un...

Page 80: ...ión reproducción Tiempo calculado con la videocámara a 25 C Se recomienda de 10 C a 30 C El tiempo de grabación y de reproducción será más corto cuando use la videocámara a bajas temperaturas El tiempo de grabación y de reproducción será más corto en función de las condiciones de uso de la videocámara Acerca del adaptador de alimentación de ca Si utiliza el adaptador de alimentación de ca conéctel...

Page 81: ...ara reproducir o editar imágenes Luego de ajustar la fecha y la hora AJ RELOJ la próxima vez que encienda su videocámara la fecha y hora actual aparecerán en la pantalla LCD durante algunos s segundo 3 Sostenga la videocámara correctamente 4 Asegúrese de que la sostiene correctamente y luego ajuste la correa de sujeción Para apagar la videocámara 1 Deslice el interruptor POWER hasta la posición OF...

Page 82: ...e reproducción Consulte BRIL LCD para ajustar el brillo de la pantalla LCD Puede ver imágenes utilizando el visor para evitar el desgaste de la batería o cuando la imagen en la pantalla LCD es mala Puede ajustar el brillo de fondo del visor seleccionando AJ LCD VIS LUZ F VIS Puede ajustar los valores de AU GR DESV y de EXPOSIC con el visor El panel LCD 2 1 180 grados máx 90 grados máx 90 grados co...

Page 83: ...r los indicadores de pantalla Presione DISP BATT INFO para activar o desactivar los indicadores de pantalla como el código de tiempo Puede cambiar las indicaciones en pantalla para mostrar mensajes en un idioma en particular Toque t MENU t AJUS MENÚ t LANGUAGE para seleccionar el idioma de la pantalla Puede comprobar fácilmente el significado de cada indicador que aparece en la pantalla LCD 1 Toqu...

Page 84: ...de encontrar el indicador que desea comprobar toque PÁG r PÁG R para activarlos o desactivarlos Cuando toque VOLV la pantalla volverá a la visualización de selección del área Para finalización la operación Toque FIN VIST GUÍA FIN ENFOQUE MANUAL EXP AUT PR ESCEN EFECTO IMG SEPIA 1 2 VOLV PÁG PÁG Paso 5 Uso del panel sensible al tacto Continuación ...

Page 85: ...MENU 2 Seleccione AJUS MENÚ con luego toque EJEC 3 Seleccione AJ RELOJ con luego toque EJEC 4 Ajuste A año con luego toque Puede seleccionar cualquier año hasta el año 2079 5 Ajuste M mes y toque y a continuación repita el mismo proceso para D día H hora y M minutos Ajuste la medianoche a las 12 00 AM Ajuste el mediodía a las 12 00 PM El reloj se pone en funcionamiento Durante la grabación no se v...

Page 86: ... afuera y a continuación presione El compartimiento del videocasete se desliza automáticamente hacia adentro No fuerce el compartimiento del videocasete presionando la parte con la marca mientras se desliza hacia adentro Podría provocar una falla de funcionamiento 3 Cierre la tapa Para expulsar el videocasete Abra la tapa realizando el mismo procedimiento como se describe en el paso 1 y extraiga e...

Page 87: ...START STOP para iniciar la grabación Para detener la grabación de la película Presione REC START STOP nuevamente Tapa del objetivo Extraer la tapa del objetivo presionando ambas palancas en los laterales de la tapa Interruptor POWER REC START STOP Si el interruptor POWER está en la posición OFF CHG deslícelo mientras presiona el botón verde A GRAB El indicador A cambia ESPERA a GRAB ...

Page 88: ... PÁG 1 t VOL luego para ajustar el volumen Para buscar una escena durante la reproducción Mantenga presionado durante la reproducción Búsqueda de imágenes o durante el avance rápido o rebobinado de la cinta Exploración con salto Puede reproducir en diversos modos REP VEL V A B C A Detener B Reproducir Pausa se alterna cada vez que toca el botón La reproducción se detiene automáticamente si se acci...

Page 89: ......

Page 90: ......

Page 91: ......

Page 92: ...http www sony net Printed in Japan Additional information on this product and answers to frequently asked questions can be found at our Customer Support Website US ...

Reviews: