background image

2

Connecting to a 
PictBridge printer

Mode switch: 

/

/

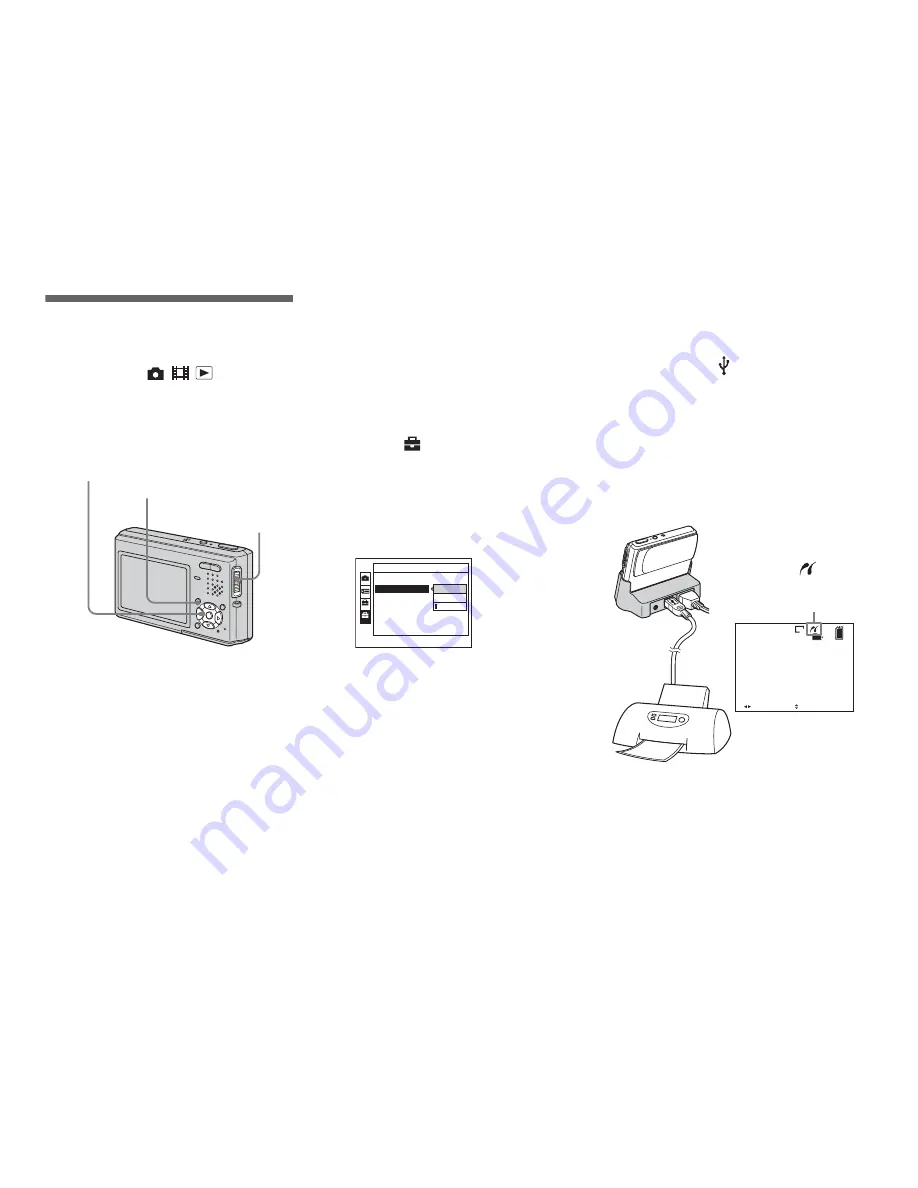
When the USB connection is set on the 
Setup screen, you can connect the camera 
mounted in the USB cradle directly to a 
printer using the USB cable.

Using the AC Adaptor is recommended to 
prevent the power from turning off partway 
through printing.

Preparing the camera

Set the USB mode on the camera to connect 
the camera with a printer.

Before operation

Set the menu to the Setup screen (Operating 
Instructions, page 44).

a

Select 

 (Setup 2) with 

V

then select [USB Connect] 
with 

B

/

v

/

V

.

b

Select [PictBridge] with 

B

/

v

then press 

z

.

The USB mode is set.

Connecting the camera to 
the printer

Connect the camera to the USB cradle. 
Then, connect the 

 (USB) jack on the 

USB cradle and the USB jack on the printer 
with the USB cable (supplied). Turn on the 
camera and the printer.
The camera turns to playback mode 
regardless of the mode switch position and 
an image in the selected playback folder 
appears on the LCD screen.

MENU

Control button

Mode switch

2

2

1

Setup 2

Video Out:
Clock Set:

NTSC

File Number:

USB Connect:

PictBridge

Normal

PTP

2

/

9

101

5M

BACK/NEXT

VOLUME

10:30

AM

2004  1  1

101-0002

After the connection 
is made, the 


indicator appears on 
the LCD screen.

Printer

Summary of Contents for Cybershot,Cyber-shot DSC-T1

Page 1: ...ing a computer by using a PictBridge compliant printer Using a PictBridge compliant printer easily prints the index print An index print function may not be provided depending on a printer Connecting to a PictBridge printer 2 Printing images 3 Printing index images 5 Troubleshooting 9 Warnings and messages 10 ...

Page 2: ...elect USB Connect with B v V b Select PictBridge with B v then press z The USB mode is set Connecting the camera to the printer Connect the camera to the USB cradle Then connect the USB jack on the USB cradle and the USB jack on the printer with the USB cable supplied Turn on the camera and the printer The camera turns to playback mode regardless of the mode switch position and an image in the sel...

Page 3: ...t was recorded at the same time is printed When an error notification is received from the connected printer the indicator flashes for approximately 5 seconds Check the connected printer In single image mode a Display the image you want to print with b B b Press MENU The menu appears c Select Print with b B then press z d Select This image with v V then press z The print setting screen appears Ite...

Page 4: ...images Select Date in step 5 then select the date format with b B You can select from Day Time or Date When you chose Date the date will be inserted in the order set in Setting the date and time Operating Instructions page 17 This function may not be provided depending on a printer In index nine image sixteen image mode a Press Index to display the index nine image screen Press Index twice to disp...

Page 5: ...en press z To insert the date and time on images Select Date in step 8 then select the date format with b B You can select from Day Time or Date When you chose Date the date will be inserted in the order set in Setting the date and time Operating Instructions page 17 This function may not be provided depending on a printer Printing index images Mode switch You can print some images side by side We...

Page 6: ...ith b B f Select Quantity with v V select the number of sheets laid side by side with b B You can select the number up to 20 You can arrange the specified quantity of an image side by side g Select OK with V B then press z The image is printed Do not disconnect the USB cable while the USB cable disconnected prohibited indicator appears on the LCD screen To cancel printing Select Cancel in step 4 o...

Page 7: ...rs c Select Print with B then press z d Select Select with b B then press z e Select the desired image with v V b B then press z The mark appears on the selected image f Repeat step 5 to print other images g Press MENU h Select Index with v then select On with b B i Select Quantity with v V select the number of sets you want to print with b B You can select the number up to 20 j Select OK with V B...

Page 8: ...he date and time on images Select Date in step 9 then select the date format with b B You can select from Day Time or Date When you chose Date the date will be inserted in the order set in Setting the date and time Operating Instructions page 17 This function may not be provided depending on a printer ...

Page 9: ...ll images recorded using a model other than this camera or images that have been processed by a computer p Check that the camera and the printer are connected correctly using a USB cable p Turn on the printer See the operating instructions of the printer for details p Disconnect and connect the USB cable again If you cannot print still disconnect the USB cable turn off and on the printer then conn...

Page 10: ...r Printer busy The connected printer is currently printing or otherwise cannot accept print requests Check the connected printer Paper error The connected printer is out of paper the paper has jammed or some other paper error has occurred Check the connected printer Ink error The connected printer has some ink error Check the connected printer Printer error The camera has received an error notific...

Reviews: