background image

69

Tr

ou
bl

e

s

hoo

ting

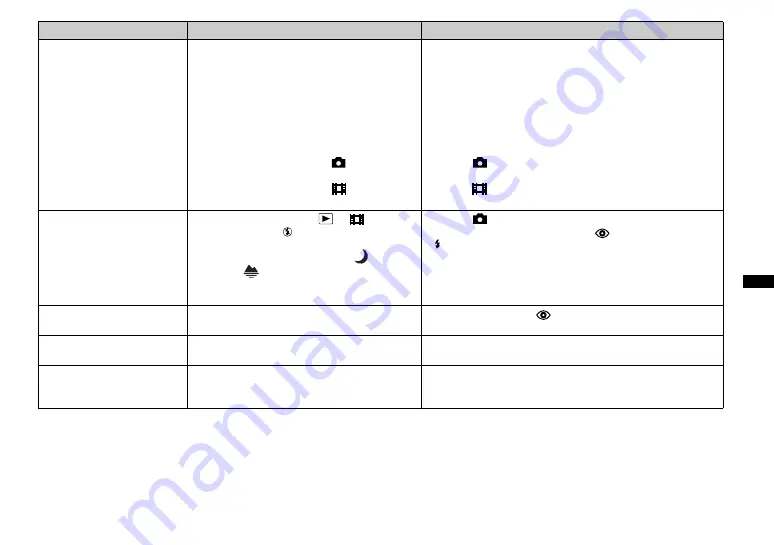
Your camera cannot record 
images.

• No “Memory Stick Duo” is inserted. 
• The capacity of the “Memory Stick Duo” is 

insufficient.

• You are using a “Memory Stick Duo” with a 

write-protect switch, and the switch is set to 
LOCK. 

• You cannot shoot while the flash is charging. 

• The mode switch is not set to 

 when shooting 

a still image.

• The mode switch is not set to 

 when shooting 

a movie. 

p

Insert a “Memory Stick Duo” (page 17).

p

Delete the images saved in the “Memory Stick Duo” (page 50)
or format it (page 51).

p

Change the “Memory Stick Duo.”

p

Set it to the recording position (page 83). 

p

Set it to 

 (page 20).

p

Set it to 

 (page 46).

The flash does not work.

• The mode switch is set to 

 or 

.

• The flash is set to 

 (No flash).

• When shooting still images, either 

 (Twilight 

mode) or 

 (Vivid nature mode) is selected for 

the Scene Selection function, or the camera is in 
Burst mode.

p

Set it to 

 (page 20).

p

Set the flash to auto (no indicator), 

(Red-eye reduction) or 

 (Forced flash) (page 23).

p

Set it to other modes (pages 18 and 29).

The eyes of the subject 
come out red.

p

Set the flash mode to 

(Red-eye reduction) (page 23).

The date and time are 
recorded incorrectly.

• The date and time are not set correctly. 

p

Set the correct date and time (page 15).

When shooting a movie, the 
image looks like a single-
frame advance.

• The image looks like a single-frame advance 

because of image data processing.

p

The recorded movie will be normal.

Symptom

Cause

Solution

Summary of Contents for Cyber-shot DSC-U40

Page 1: ...hese numbers whenever you call upon your Sony dealer regarding this product Model No DSC U40 Serial No DSC U40 2003 Sony Corporation Getting started ________________________ Shooting still images __________________ Enjoying still images __________________ Enjoying movies ______________________ Deleting images _______________________ Enjoying images on your computer ______ Troubleshooting _________...

Page 2: ...he interference by one or more of the following measures Reorient or relocate the receiving antenna Increase the separation between the equipment and receiver Connect the equipment into an outlet on a circuit different from that to which the receiver is connected Consult the dealer or an experienced radio TV technician for help The supplied interface cable must be used with the equipment in order ...

Page 3: ...e midway fail restart the application or disconnect and connect the USB cable again Certain countries may regulate disposal of the battery used to power this product Please consult with your local authority For the Customers in the U S A THIS DEVICE COMPLIES WITH PART 15 OF THE FCC RULES OPERATION IS SUBJECT TO THE FOLLOWING TWO CONDITIONS 1 THIS DEVICE MAY NOT CAUSE HARMFUL INTERFERENCE AND 2 THI...

Page 4: ...Duo cover Do not open the battery Memory Stick Duo cover while the access lamp is lit Precaution on copyright Television programs films video tapes and other materials may be copyrighted Unauthorized recording of such materials may be contrary to the provision of the copyright laws Do not shake or strike the camera In addition to malfunctions and inability to record images this may render the Memo...

Page 5: ...ges and are not actual images shot using this camera Trademarks Memory Stick Duo and are trademarks of Sony Corporation Memory Stick PRO Duo and are trademarks of Sony Corporation MagicGate Memory Stick Duo is a trademark of Sony Corporation Memory Stick and MagicGate Memory Stick are trademarks of Sony Corporation Memory Stick PRO and are trademarks of Sony Corporation MagicGate and are trademark...

Page 6: ...s 35 Viewing an index screen four image 36 Selecting the folder and playing back images Folder 37 Enlarging an image Enlarged playback 39 Choosing images to print Print DPOF mark 40 Connecting your camera to a PictBridge compliant printer 42 Printing images 44 Shooting movies 46 Viewing movies on the LCD screen 49 Deleting images 50 Formatting a Memory Stick Duo 51 Copying images to your computer ...

Page 7: ...splay If a code starting with an alphabet letter appears 77 Menu items 78 Precautions 81 On Memory Stick 83 On Nickel Metal Hydride batteries 84 On the battery charger 85 Specifications 86 LCD screen displays 87 Index 89 Troubleshooting Additional information Index ...

Page 8: ...or details of operation 5 1 2 3 4 6 7 8 A Shutter button 20 B POWER button 14 C POWER lamp 14 D Lens cover 14 E Mode switch To view images 35 To shoot still images 20 To shoot images continuously 31 To shoot movies 46 F Flash 23 G Self timer lamp 23 H Lens ...

Page 9: ...ge lamp orange 24 C MENU button 15 D Control buttons Menu on v V 15 Menu off SCENE 23 28 E EXEC Enlarged playback button 15 39 F Hook for neck strap G Battery Memory Stick Duo cover H OPEN button 12 I Access lamp 17 J USB jack cover K USB jack 57 L RESET button bottom surface 67 ...

Page 10: ...rers The battery life may be quite a bit shorter depending on the conditions under which the batteries are used This is especially true in low temperatures where some batteries are noticeably weaker You may not be able to shoot in temperatures below 5 C 41 F The battery remaining indicator will not display the correct information The camera may turn off even when the indicator shows that there is ...

Page 11: ...oles of the batteries and the terminals of the charger by wiping them with a dry cloth Always use the supplied case when transporting the Nickel Metal Hydride batteries If the positive and negative terminals come into contact with metallic material and are shorted the batteries could overheat or catch fire At the time of purchase or when the Nickel Metal Hydride batteries have not been used for a ...

Page 12: ... dirt off of the battery terminals and the contacts on the battery Memory Stick Duo cover Skin oil and other dirt on the battery terminals and contacts can significantly shorten the operating time provided by the batteries Close the battery Memory Stick Duo cover Close the battery Memory Stick Duo cover while holding the batteries in Make sure the cover is closed securely To remove the batteries H...

Page 13: ...ing on the conditions of use Shooting still images Under the average conditions1 Nickel Metal Hydride batteries Alkaline batteries When using Sony alkaline batteries 1 Shooting in the following situations Shooting one time every 30 seconds The flash strobes once every two times The power turns on and off once every ten times Viewing still images2 2 Viewing single images in order at about 3 second ...

Page 14: ...cially available AC plug adaptor a if necessary depending on the design of the wall outlet wall socket b Do not use an electronic transformer travel converter as this may cause a malfunction BC CS2A CS2B Turning on off your camera Slide the lens cover in the direction of the arrow or press POWER The POWER lamp green lights up and the power is on When you turn on your camera for the first time the ...

Page 15: ...s v V to select the desired value then press EXEC to make the setting Press MENU then the menu disappears from the LCD screen EXEC MENU Control buttons Setting the date and time Slide the lens cover in the direction of the arrow or press POWER to turn on the power The POWER lamp green lights up and the DATE NOTATION screen appears on the LCD screen To change the date and time press MENU and select...

Page 16: ...he item to be set is indicated with v V After entering the number v V moves to the next item Repeat this step until all of the items are set Midnight is displayed as 12 00AM and noon is displayed as 12 00PM If you selected D M Y in step 2 set the time on a 24 hour cycle Select OK with the control button v then press EXEC The date and time are entered and the clock starts to keep time If you make a...

Page 17: ...ect direction and push it all the way in so that it is securely seated in the connector If the Memory Stick Duo is not inserted correctly you may not be able to record or display images in the Memory Stick Duo This may also damage the camera or the Memory Stick Duo Be careful not to drop the batteries when opening or closing the battery Memory Stick Duo cover Close the battery Memory Stick Duo cov...

Page 18: ...the image size see page 19 Select the desired image size with the control buttons v V then press EXEC The image size is set When you press MENU the menu disappears and the indicator is displayed on the LCD screen The image size selected here is maintained even when the power is turned off 1 RETURN FOCUS SELFTIMER WHITE BAL AUTO OFF AUTO SIZE BURST 2M 2M 2M MENU 2 RETURN FOCUS SELFTIMER WHITE BAL A...

Page 19: ...es VGA 640 480 Shooting more images Attaching images to e mail or creating home pages Number of images that can be saved in a Memory Stick Duo Units number of images When the images recorded using earlier Sony models are played back the image size indication may be different from the actual image size Images viewed on the LCD screen of the camera all appear the same size The actual number of image...

Page 20: ...outdoors during clear weather or under other intense light undesired light ghosting may enter the screen If this happens shade the lens with your hand or other object while recording The exposure and focus are adjusted to the center of the LCD screen Press and hold the shutter button halfway down A beep sounds When the AE AF lock indicator changes from flashing to light up the camera is ready for ...

Page 21: ...t into focus use the Focus preset function page 30 The subject is distant from the camera and dark The contrast between the subject and its background is poor The subject is seen through glass such as a window A fast moving subject The subject reflects or has a lustrous finish such as a mirror or a luminous body A flashing subject A backlit subject LCD light You can use LCD LIGHT under with MENU a...

Page 22: ...de switch to and press MENU The menu appears on the LCD screen You can also carry out this operation when the mode switch is set to Select with the control button v then press EXEC Select SELFTIMER with the control buttons v V then press EXEC When the mode switch is set to select with the control button v 2M 2M 2M 10 101 When DISPLAY is OFF Warning messages etc are displayed When DISPLAY is ON All...

Page 23: ...utter button while standing in front of the camera the focus and the exposure may not be correctly set 3 10 101 SELFTIMER ON OFF 2M 2M 2M EXEC 4 10 101 2M 2M 2M Self timer lamp Selecting a flash mode Set the mode switch to and press the control button v repeatedly to select a flash mode Each time you press v the indicator changes as follows No indicator Auto Based on the lighting conditions the ca...

Page 24: ...allow your hand to shake while holding the unit While charging the flash the Flash charge lamp flashes After the charging is complete the lamp goes out This setting is maintained even when the power is turned off Red eye reduction The flash pre strobes before shooting to reduce the red eye phenomenon Red eye reduction may not produce the desired effects depending on individual differences the dist...

Page 25: ...hen press EXEC The CREATE REC FOLDER screen appears Once you create a new folder you cannot delete the new folder with the camera Images are recorded in the newly created folder until a different folder is created or selected 2 RETURN FORMAT CREATE FOLDER CHANGE FOLDER 101 EXEC Select OK with the control button v then press EXEC A new folder is created with a number one higher than the largest num...

Page 26: ... EXEC The CHANGE REC FOLDER screen appears Select the desired folder with the control buttons v V then press EXEC You cannot select the 100MSDCF folder as a recording folder The image is stored in the newly selected folder You cannot move recorded images to a different folder with this camera 1 RETURN FOCUS SELFTIMER WHITE BAL AUTO OFF AUTO SIZE BURST 2M 2M 2M MENU 2 RETURN FORMAT CREATE FOLDER CH...

Page 27: ...ct OK with the control button v then press EXEC When you press MENU the menu disappears and the selected folder is displayed To cancel changing the recording folder Select CANCEL in step 4 4 OK CANCEL CHANGEREC FOLDER 102MSDCF EXEC ...

Page 28: ...ght scene backgrounds at the same time In addition the cross filter effect enhances street lamps or other lights with cross shaped rays Note that as shutter speeds decrease shaking increases The flash strobes in red eye reduction mode When setting the focus to AUTO the focus is adjusted to approximately 1 m to infinite To record subjects closer than 1 m use the Focus preset page 30 Twilight mode T...

Page 29: ...etting the focus to AUTO the focus is adjusted to approximately 1 m to infinite Set the mode switch to and turn on the power Press the control button V SCENE repeatedly to select a desired mode Each time you press V SCENE the indicator changes as follows Soft snap mode t Illumination snap mode t Twilight mode t Vivid nature mode t Active outdoor mode t No indicator Auto To cancel Scene Selection P...

Page 30: ... power then press MENU The menu appears on the LCD screen You can also carry out this operation when the mode switch is set to Select with the control button v then press EXEC Select FOCUS with the control buttons v V then press EXEC When the mode switch is set to select with the control button v Focus setting information is approximate and should be used as a reference 0 5 m 0 2 m 1 RETURN FOCUS ...

Page 31: ... power is turned off 3 AUTO 0 2m 1 0m 0 5m FOCUS EXEC Shooting images continuously Burst Set the mode switch to and turn on the power then press MENU The menu appears on the LCD screen You cannot use the flash in this mode The recording interval is approximately 0 5 seconds However the recording interval may be longer in a dark place Select with the control button v then press EXEC Select SIZE BUR...

Page 32: ...then hold the shutter button fully down Up to two images are recorded with 2M or up to ten images are recorded with VGA while you hold down the shutter button If you release the shutter button in the middle of shooting shooting will stop at that point Only the images that were shot while the shutter button was held down are recorded 3 SIZE BURST BURST VGA VGA VGA VGA 2M BURST VGA VGA VGA 2M 2M 2M ...

Page 33: ...nt Shooting under fluorescent lighting Incandescent Places where the lighting conditions change quickly Under bright lighting such as photography studios Set the mode switch to and turn on the power then press MENU The menu appears on the LCD screen You can also carry out this operation when the mode switch is set to Select with the control button v then press EXEC Select WHITE BAL with the contro...

Page 34: ...ntained even when the power is turned off z Shooting techniques The image is affected by the lighting conditions For example the entire image appears blue under sunlight in the summer and white items gain a reddish tint under incandescent light bulbs etc The human eye can resolve these problems but digital still cameras cannot recognize the correct colors without adjustments Normally the camera ma...

Page 35: ...f the screen indicators see page 88 For details on viewing movies see page 49 7 8 12 00PM 101 0007 2003 7 4 101 2M 2M 2M Single single image screen Index four image screen Viewing single images Set the mode switch to and turn on the power The last image in the selected recording folder page 26 appears on the LCD screen If you close the lens cover while viewing images the power shuts off Select the...

Page 36: ...EXEC The display switches to the index four image screen To display the next previous index screen Press the control buttons v V to move the yellow border To return to the single image screen Select SINGLE in step 2 Or when four frames are displayed press EXEC to display the single image shown with the yellow border 1 RETURN DELETE DELETE IN FOLDER INDEX DPOF MENU 2 RETURN DELETE DELETE IN FOLDER ...

Page 37: ...n Select with the control button V then press EXEC Select CHANGE FOLDER with the control button V then press EXEC The CHANGE FOLDER screen appears Select the desired folder with the control buttons v V then press EXEC 1 RETURN DELETE DELETE IN FOLDER INDEX DPOF MENU 2 RETURN PRINT CHANGE FOLDER FORMAT 101 EXEC 3 CHANGE FOLDER 102MSDCF 1 IMAGE CREATED 1 05PM 2003 7 4 EXEC ...

Page 38: ...image in the folder is displayed the following indicators appear on the LCD screen Moves to the previous folder Moves to the next folder Moves to both the previous and next folders When no images are stored in the folder NO FILE IN THIS FOLDER appears You can play back images from the last shot one without selecting the folder 4 OK CANCEL CHANGE FOLDER 102MSDCF EXEC 4 4 12 00PM 101 0004 2003 7 4 1...

Page 39: ...arge images recorded using other devices The enlarged image cannot be recorded as a new file Press EXEC Enlarged playback repeatedly to select the desired enlargement level The center of the screen is enlarged Each time you press EXEC Enlarged playback the enlargement level changes as follows 2 5 t 5 t normal no indicator t To cancel Enlarged playback Press EXEC Enlarged playback repeatedly to set...

Page 40: ...dard You cannot mark movies You cannot specify the number of copies you want to have printed Set the mode switch to and turn on the power Display the image you want to print with the control buttons v V Press MENU and select with the control button v then press EXEC To mark the print DPOF mark in index image screen Perform step 2 on page 36 and switch to index screen 1 10 30AM 101 0006 2003 7 4 6 ...

Page 41: ...C Select ON with the control button v then press EXEC When you press MENU the menu disappears and the mark is marked on the displayed image To unmark the print DPOF mark Select OFF in step 4 The mark disappears 3 RETURN DELETE DELETE IN FOLDER INDEX DPOF EXEC 4 DPOF ON OFF EXEC ...

Page 42: ... the camera to a printer in the following situations Proper operation is not guaranteed The printer is not PictBridge compliant There is no battery in the camera or there is insufficient power remaining in the batteries Set the mode switch to and turn on the power Display the image you want to print with the control buttons v V Press MENU and select with the control button V then press EXEC Do not...

Page 43: ...arations to make the connection Select CANCEL in step 3 Connect the camera to the printer The message CONNECTING PictBridge appears When the connection is completed the selected image is displayed and the PictBridge mark appears on the screen 3 CANCEL RETURN PRINT CHANGE FOLDER CONNECT A PRINTER FORMAT 101 EXEC 4 PictBridge CONNECTING ...

Page 44: ...s on the screen check the meaning of the message on page 76 then select EXIT with EXEC Press MENU and select with the control button v then press EXEC If you set LCD LIGHT to OFF under in the MENU you can extend the battery life Select PRINT 1 PAGE with the control buttons v V and press EXEC 1 10 30AM 101 0006 2003 7 4 6 8 101 2M 2M 2M 2 RETURN PRINT 1 PAGE INSERT DATE EXEC MENU 3 RETURN PRINT 1 P...

Page 45: ...V in step 1 To change a folder select CHANGE FOLDER under in the MENU and then select the folder containing the image you want to print To attach a date to an image Select INSERT DATE and select the desired date display format with the control buttons v V You can select D HR MIN or Y M D The date will be attached to the image to be printed Some printers may not support this function The setting se...

Page 46: ... The image size is displayed For details on the shooting time for each image size see page 48 Select 320 240 or 160 112 with the control buttons v V then press EXEC The image size is set When you press MENU the menu disappears and the indicator is displayed on the LCD screen The image size selected here is maintained even when the power is turned off 1 RETURN FOCUS SELFTIMER WHITE BAL SIZE AUTO OF...

Page 47: ... select 0 2 m or 0 5 m with the Focus preset function page 30 The flash does not function when shooting movies To stop recording press the shutter button fully again Indicators during shooting Indicators on the LCD screen are not recorded You can use DISPLAY under with MENU and the control buttons v V to turn the display on and off page 22 For detailed descriptions of the indicators see page 87 To...

Page 48: ...ting conditions For numbers of still images that can be recorded see page 19 When shooting time exceeds 99 minutes 59 seconds 99 59 is displayed Image size 160 112 320 240 Capacity 8MB 5 min 35 sec 1 min 26 sec 16MB 11 min 13 sec 2 min 54 sec 32MB 22 min 43 sec 5 min 52 sec 64MB 45 min 40 sec 11 min 48 sec 128MB 1 h 31 min 34 sec 23 min 39 sec MSX M256 2 h 45 min 35 sec 42 min 47 sec MSX M512 5 h ...

Page 49: ...ot with a size of 160 112 is displayed in a smaller size Movies cannot be rewound or fast forwarded with this camera Press EXEC The movie is played back To stop playback Press EXEC Indicators while viewing movies Indicators on the LCD screen are not recorded You can use DISPLAY under with MENU and the control buttons v V to turn the display on and off page 22 For detailed descriptions of the indic...

Page 50: ...step 2 on page 36 and switch to index screen Select DELETE with the control buttons v V then press EXEC The image has not yet been deleted at this point To delete all the images in the folder Select DELETE IN FOLDER in step 3 You cannot delete images write protected by another device 1 101 0007 12 00PM 2003 7 4 7 8 101 2M 2M 2M 2 RETURN DELETE DELETE IN FOLDER INDEX DPOF MENU EXEC 3 RETURN DELETE ...

Page 51: ...emory Stick Duo to record images this process is also called initialization The Memory Stick Duo provided with this camera and those available commercially are already formatted and can be used immediately This operation is available no matter what position the mode switch is in Turn on the power and press MENU The menu appears on the LCD screen When you format a Memory Stick Duo note that all dat...

Page 52: ... control buttons v V then press EXEC Select OK with the control button v then press EXEC When the message FORMATTING disappears the format is complete To cancel formatting Select CANCEL in step 4 3 RETURN PRINT CHANGE FOLDER FORMAT 101 EXEC 4 OK CANCEL FORMAT FORMATTING EXEC ...

Page 53: ...ected to a computer only the data in the folder selected by the camera is copied to the computer To select a folder when the camera is connected to your computer press MENU and perform the procedures to change a folder for playback Communication with your computer When your computer resumes from the suspend or sleep mode communication between your camera and your computer may not recover at the sa...

Page 54: ... in that order b Click Cyber shot on the model selection screen The installing menu screen appears c Click USB Driver on the installing menu screen The InstallShield Wizard screen appears d Click Next When the Information screen appears click Next The USB driver installation starts When the installation is completed the screen informs you of completion e Click Yes I want to restart my computer now...

Page 55: ...click OK The Welcome to the InstallShield Wizard for Image Transfer screen appears This section describes the English screen c Click Next When the Licence Agreement screen appears click Yes Read the agreement carefully If you accept the terms of the agreement proceed with the installation The Information screen appears d Click Next e Select the folder to be installed then click Next Select the pro...

Page 56: ...y software to copy view and edit images and to create Video CDs For details see the software s help files a Click ImageMixer on the installing menu screen Select the desired language then click OK The Welcome to the InstallShield Wizard screen appears This section describes the English screen b Follow the instructions on each succeeding screen Install ImageMixer according to the instructions that ...

Page 57: ... cable directly to your computer without using a USB hub d Connect the USB cable to your computer The camera turns on Note that the power cannot be turned on if a Memory Stick Duo is not inserted in the camera When you use a desktop computer we recommend that you connect the USB cable to the USB connector on the rear panel When using Windows XP the AutoPlay wizard automatically appears on the desk...

Page 58: ...Transfer and Date folders are created inside the My Documents folder and all of the image files recorded with the camera are copied into these folders You can change the Image Transfer settings page 59 When ImageMixer page 56 is installed and image copying is completed using Image Transfer ImageMixer automatically launches and images appear Windows XP Connect the camera and your computer with the ...

Page 59: ...s an example of copying images to the My Documents folder When the Removable Disk icon is not shown see page 60 When using Windows XP see page 60 b Double click DCIM then double click the folder which contains the desired images The folder opens c Drag and drop the image files into the My Documents folder The image files are copied to the My Documents folder When you try to copy an image to a fold...

Page 60: ...oPlay Wizard a Make a USB connection page 57 Click Copy pictures to a folder on my computer using Microsoft Scanner and Camera Wizard then click OK The Scanner and Camera Wizard screen appears b Click Next The images stored on the Memory Stick Duo are displayed c Click the checkbox of images that you do not want to copy to your computer and remove the checkmark then click Next The Picture Name and...

Page 61: ...yed This section describes the procedure for viewing images copied in the My Documents folder When not using Windows XP double click My Documents on the desktop You can use the ImageMixer Ver 1 5 for Sony software to view and edit images on your computer For details see the software s help files b Double click the desired folder and image file The image is displayed ...

Page 62: ...era When no new folders have been created this is only 101MSDCF Folder containing movies and other image data recorded using a camera without the folder creation function Folder File name File meaning 101MSDCF up to 999MSDCF DSC0ssss JPG Still image files MOV0ssss MPG Movie files Data in the 100MSDCF or MSSONY folders is for playback only and your camera cannot record images in these folders For m...

Page 63: ...a Right click the image file and click Rename Change the file name to DSC0ssss ssss stands for any number within the range from 0001 to 9999 Extensions may be displayed depending on the settings made on your computer The extension for a still image is jpg and for a movie is mpg Do not change the extensions b Copy the file to a folder in the Memory Stick Duo 1 Right click the image file and click C...

Page 64: ...ng is the NORMAL mode This section describes the USB connection using the NORMAL mode When the camera is connected to your computer via a USB cable the camera can draw its power from your computer USB Bus Powered Compatible only with Mac OS X When connected to a computer only the data in the folder selected by the camera is copied to the computer To select a folder when the camera is connected to ...

Page 65: ...aining the desired image files 4 Drag and drop the image files to the hard disk icon The image files are copied to your hard disk See page 62 for details about the image file storage destinations and file names c Viewing the images on your computer 1 Double click the hard disk icon 2 Double click the desired image file in the folder containing the copied files The image file opens Close down all a...

Page 66: ...or album to the menu screen The selected image is added to the menu screen This section describes the English screen d Click You can preview the image e Click The disc creating dialogue appears f Insert a blank CD R into the CD R drive and click OK The disc creation starts You cannot use CD RW discs The CD R drive is required to create a Video CD For the Macintosh edition Roxio manufactured Toast ...

Page 67: ... indicator is incorrect or sufficient battery remaining indicator is displayed but the power runs out soon You have used the camera in an extremely cold location The batteries are discharged The battery contacts or the terminals on the battery Memory Stick Duo cover are dirty The batteries are exhibiting the memory effect page 11 The batteries are dead page 84 p Install charged batteries page 10 p...

Page 68: ...the mode switch to or pages 20 and 46 The image is out of focus The subject is too close When shooting still images Illumination snap mode Twilight mode Vivid nature mode or Active outdoor mode is selected for the Scene Selection function You are shooting movies at a distance closer than 1 0 m 3 feet 3 3 8 inches The Focus preset function is selected p Make sure to position the lens farther away f...

Page 69: ...Set it to page 46 The flash does not work The mode switch is set to or The flash is set to No flash When shooting still images either Twilight mode or Vivid nature mode is selected for the Scene Selection function or the camera is in Burst mode p Set it to page 20 p Set the flash to auto no indicator Red eye reduction or Forced flash page 23 p Set it to other modes pages 18 and 29 The eyes of the ...

Page 70: ...display a print DPOF mark You cannot display print DPOF marks on movies Symptom Cause Solution Your camera cannot delete an image You are using a Memory Stick Duo with a write protect switch and the switch is set to LOCK p Set it to the recording position page 83 You have deleted an image by mistake Once you have deleted an image you cannot restore it p When you are using a Memory Stick Duo with a...

Page 71: ... then install the USB driver pages 54 and 60 You cannot turn on the camera during USB connection The camera is not connected directly to your computer No Memory Stick Duo is inserted p Connect the camera directly to your computer without passing through a hub or other device p Insert a Memory Stick Duo page 17 You cannot copy images The camera is not correctly connected to your computer You are no...

Page 72: ...ng the Memory Stick Duo backwards The Memory Stick Duo has been inserted into a Memory Stick Duo adaptor p Insert it from the right side page 17 p Insert it directly into the camera You cannot record on a Memory Stick Duo You are using a Memory Stick Duo with a write protect switch and the switch is set to LOCK The Memory Stick Duo is full p Set it to the recording position page 83 p Delete unnece...

Page 73: ...er is off You cannot print a movie You may not be able to print a still image recorded using other devices or an image processed using a computer p Confirm that your camera is correctly connected to the printer using the USB cable p Turn the printer on For details see the operation manual supplied with the printer Printing was stopped You disconnected the USB cable before the mark disappeared You ...

Page 74: ...ter about one minute and turn on the camera If the functions still do not work press the RESET button located on the bottom of the camera using a fine tipped object then turn the power on again page 67 If you press the RESET button all settings including the date and time are cleared You cannot identify an indicator on the LCD screen p Check the indicator pages 87 and 88 The lens gets fogged Moist...

Page 75: ...y Stick Duo using your camera NO FILE IN THIS FOLDER No images have been recorded in this folder FOLDER ERROR A folder with the same first three digits number already exists in the Memory Stick Duo For example 123MSDCF and 123ABCDE Select other folders or create a new folder CANNOT CREATE MORE FOLDERS The folder whose first three digits of the name is 999 exists in the Memory Stick Duo You cannot ...

Page 76: ... PRINTER IS BUSY The printer cannot accept a job because it is currently printing Check the printer PAPER ERROR A paper related error occurred with the printer for example it has run out of paper or has a paper jam Check the printer INK ERROR An ink related error occurred with the printer Check the printer PRINTER ERROR A printer error occurred Check the printer or make sure the image file you wan...

Page 77: ...mes repairs may be necessary Contact your Sony dealer or local authorized Sony service facility and inform them of the 5 digit code Example E 61 10 Code Cause Countermeasure C 32 ss There is trouble with your camera s hardware Turn the power off and on again page 14 C 13 ss The camera cannot read or write data on the Memory Stick Duo Re insert the Memory Stick Duo several times An unformatted Memo...

Page 78: ...A BURST Selects the image size when shooting still images pages 18 and 31 FOCUS xAUTO 0 2 m 0 5 m 1 0 m Selects the auto focus method or sets the focus preset distance page 30 SELFTIMER ON xOFF Sets the self timer page 22 WHITE BAL xAUTO Sets the white balance page 33 Item Setting Description SIZE x320 240 160 112 Selects the image size to be used when shooting a movie page 46 FOCUS xAUTO 0 2 m 0 ...

Page 79: ...EL Creates a folder for recording images page 25 CHANGE FOLDER OK CANCEL Changes a folder for recording images page 26 Item Setting Description DELETE OK CANCEL Deletes the displayed image page 50 DELETE IN FOLDER OK CANCEL Deletes all images in the folder page 50 INDEX SINGLE Switches between four image display and single image display page 35 DPOF ON xOFF Marks unmarks the print DPOF mark on sti...

Page 80: ...ion LCD LIGHT xON OFF Selects the brightness of the LCD screen Selecting ON makes the screen bright and easy to see but also uses up the battery charge faster page 21 DISPLAY xON OFF Displays all indicators Displays warning messages etc Item Setting Description CLOCK SET DATE NOTATION DATE TIME SET Sets the date notation page 15 x Y M D M D Y D M Y Sets the date and time page 15 BEEP xON SHUTTER O...

Page 81: ...the camera surface Clean the camera surface with a soft cloth slightly moistened with water then wipe the surface with a dry cloth Do not use the following as this may damage the finish or the casing Thinner Benzine Alcohol Diposable cloth Volatile insecticide Contact with rubber or vinyl for a long time Note on operating temperature Your camera is designed for use between the temperatures of 0 C ...

Page 82: ...is continually charged as long as you are using the camera However if you use the camera for only short periods it discharges gradually and if you do not use the camera at all for about one month it becomes completely discharged In this case be sure to charge this rechargeable button battery before using the camera However even if this rechargeable button battery is not charged you can still use t...

Page 83: ...be careful not to edit or delete data by mistake Do not remove the Memory Stick Duo while reading or writing data Data may be corrupted in the following cases When the Memory Stick Duo is removed or the camera is turned off during read or write operation When the Memory Stick Duo is used in locations subject to static electricity or electrical noise We recommend backing up important data Do not pr...

Page 84: ...batteries Effective use of the battery At the time of purchase or if the Nickel Metal Hydride batteries have not been used for a long time they may not be sufficiently charged We recommend that you charge the batteries before you use them Battery performance decreases in low temperature surroundings and the battery life is shortened under such circumstances To use the battery longer we recommend y...

Page 85: ...tteries again Otherwise there is a danger of leaks excessive heat explosions or electric shock When charging a high capacity battery other than the supplied battery using the supplied battery charger the full capacity of the battery may not be available When the CHARGE lamp flashes this may indicate a battery error or that batteries other than the specified type have been inserted Check that the b...

Page 86: ...om USB cable Power consumption when shooting 1 21 W Operating temperature range 0 C to 40 C 32 F to 104 F Storage temperature range 20 C to 60 C 4 F to 140 F Dimensions 82 8 39 0 26 0 mm 3 3 8 1 9 16 1 1 16 inches W H D protruding sections not included Mass Approx 114 g 4 0 oz two batteries Memory Stick Duo and neck strap included Exif Print Compatible PRINT Image Matching II Compatible PictBridge...

Page 87: ...K Self diagnosis display 77 L Self timer indicator 22 M Low battery warning indicator 75 When shooting movies A Recording mode indicator 46 B Battery remaining indicator 13 C Focus preset indicator 30 D White Balance indicator 33 E Low battery warning indicator 75 F Status indicator 46 G Recording folder indicator 25 H Remaining Memory Stick capacity indicator I Shooting time Recording time maximu...

Page 88: ...lected folder I Change folder indicator 38 J Recording date time of the playback image When playing back moving images K Recording mode indicator 49 L Folder_file name 62 M Playback folder indicator 37 N Image number O Counter P Change folder indicator 38 Q Recording date time of the playback image 101 0012 2003 12 12 9 30AM 7 4 101 2 5 2M 2M 2M 1 7 9 8 q 2 3 4 5 6 8 0 12 101 320 320 320 qa qd qf ...

Page 89: ...3 24 28 selecting a flash mode 23 Focusing Focus preset 30 shooting using auto adjustment mode 20 Folder folder for playback 37 recording folder 26 Format 51 I Image file storage destinations 62 Image size 18 19 Image Transfer 55 ImageMixer 56 Index screen 36 J JPG 62 L LCD screen DISPLAY 22 87 LCD light 21 M Memory Stick 17 83 Memory Stick Duo 17 83 MENU 15 Menu settings 78 Mode switch 8 Moisture...

Page 90: ...Burst 31 movie 46 Single image screen 35 Still image deleting 50 shooting 20 viewing images on the LCD screen 35 viewing images on your computer 61 65 U USB USB Bus Powered 53 64 USB cable 57 58 65 USB connection 57 USB driver 54 Using your camera abroad 14 V Video CD 66 Viewing images on the LCD screen 35 49 Viewing images on your computer 61 65 W Warnings and messages 75 White Balance 33 Z Zoom ...

Page 91: ......

Page 92: ...rinted on 100 recycled paper using VOC Volatile Organic Compound free vegetable oil based ink Additional information on this product and answers to frequently asked questions can be found at our Customer Support Website 3 0 8 4 8 9 2 1 1 ...

Reviews: