background image

52

GB

*

  HDR-CX110E/CX115E/CX116E/CX150E/

CX155E

**

  HDR-XR150E/XR155E


Insert the recording media in the 
recording device.

If your recording device has an input 

selector, set it to the input mode.


Disconnect the USB cable.

Creating a standard definition 
image quality (STD) disc with a 
recorder, etc.

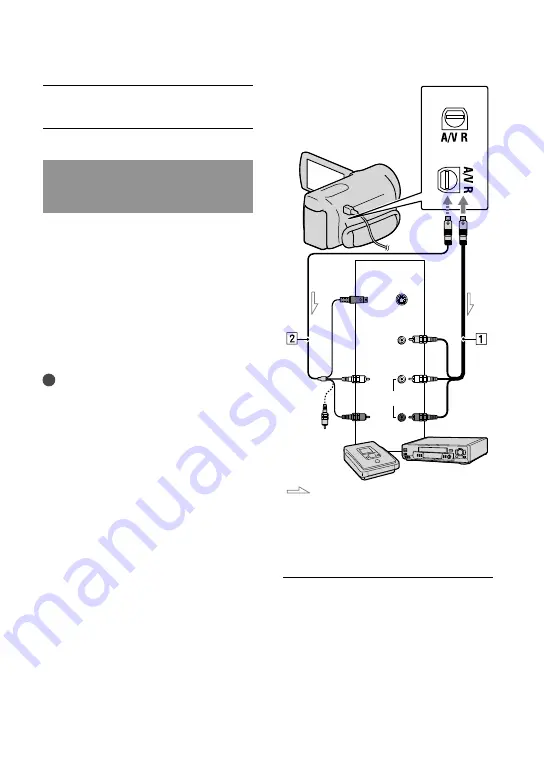
You can dub images played back on your 

camcorder on a disc or video cassette, 

by connecting your camcorder to a disc 

recorder, a Sony DVD writer, etc., other 

than DVDirect Express, with the A/V 

connecting cable. Connect the device in 

either way of 

 or 

. Refer also to the 

instruction manuals supplied with the 

devices to be connected.

Notes

Connect your camcorder to the wall outlet (wall 

socket) using the supplied AC Adaptor for this 

operation (p. 13).

Sony DVD writer may not be available in some 

countries/regions.

High definition image quality (HD) movies 

will be dubbed with standard definition image 

quality (STD).

 A/V connecting cable (supplied)

Connect the A/V connecting cable to the 

input jack of another device.

 A/V connecting cable with S VIDEO 

(sold separately)

When connecting to another device 

via the S VIDEO jack, by using an A/V 

connecting cable with an S VIDEO cable 

(sold separately), higher quality images can 

be produced than with an A/V connecting 

cable. Connect the white and red plug 

(left/right audio) and the S VIDEO plug 

(S VIDEO channel) of the A/V connecting 

cable with an S VIDEO cable. If you 

connect the S VIDEO plug only, you will 

hear no sound. The yellow plug (video) 

connection is not necessary.

A/V Remote Connector

Signal flow

S VIDEO

VIDEO

(Yellow)

(White)

AUDIO

(Red)

Input

(Yellow)

*

**

Summary of Contents for CX115E

Page 1: ...X115E CX116E CX150E CX155E XR150E XR155E Table of contents 10 Getting started 12 Recording Playback 21 Making good use of your camcorder 32 Saving movies and photos with a computer 34 Saving images with an external device 45 Customizing your camcorder 54 Additional information 62 Quick reference 71 ...

Page 2: ...e or injury may result AC Adaptor Do not use the AC Adaptor placed in a narrow space such as between a wall and furniture Use the nearby wall outlet wall socket when using the AC Adaptor Disconnect the AC Adaptor from the wall outlet wall socket immediately if any malfunction occurs while using your camcorder Even if your camcorder is turned off AC power source mains is still supplied to it while ...

Page 3: ... waste batteries applicable in the European Union and other European countries with separate collection systems This symbol on the battery or on the packaging indicates that the battery provided with this product shall not be treated as household waste On certain batteries this symbol might be used in combination with a chemical symbol The chemical symbols for mercury Hg or lead Pb are added if th...

Page 4: ...le Party Sony Electronics Inc Address 16530 Via Esprillo San Diego CA 92127 U S A Telephone No 858 942 2230 This device complies with Part 15 of the FCC Rules Operation is subject to the following two conditions 1 This device may not cause harmful interference and 2 this device must accept any interference received including interference that may cause undesired operation CAUTION You are cautioned...

Page 5: ...eable battery pack NP FV50 1 CD ROM Handycam Application Software 1 p 35 PMB software including PMB Help Handycam Handbook PDF Operating Guide This manual 1 See page 18 for the memory card you can use with this camcorder Using the camcorder Do not hold the camcorder by the following parts and also do not hold the camcorder by the jack covers LCD Screen Battery pack The camcorder is not dustproofed...

Page 6: ...ecorded with high definition image quality HD on the camcorder with the following devices Other AVCHD format compatible devices which are not compatible with High Profile Devices which are not compatible with the AVCHD format You may not be able to play back normally images recorded on your camcorder with other devices Also you may not be able to play back images recorded on other devices with you...

Page 7: ...ory the desired medium HDR CX116E CX150E CX155E XR150E XR155E YES YES Carl Zeiss lens Your camcorder is equipped with a Carl Zeiss lens which was developed jointly by Carl Zeiss in Germany and Sony Corporation and produces superior images It adopts the MTF measurement system for video cameras and offers a quality typical of a Carl Zeiss lens MTF Modulation Transfer Function The number value indica...

Page 8: ...emory card when the access lamp p 19 is lit or flashing removing the battery pack or AC Adaptor from the camcorder or applying mechanical shock or vibration to the camcorder when the Movie Photo lamps p 22 or the access lamp p 19 are lit or flashing When using a shoulder belt sold separately do not crash the camcorder against an object Do not use your camcorder in very loud areas On the drop senso...

Page 9: ...otos p 25 Playing movies and photos Playback on the camcorder p 26 Playing images on a TV p 29 Saving images Saving movies and photos with a computer p 34 Saving movies and photos in external media p 45 Saving images with a DVD writer recorder p 47 Deleting movies and photos p 32 If you delete the image data that has been saved on your computer or a disc you can record new images on the free media...

Page 10: ...ing good use of your camcorder Deleting movies and photos 32 Saving movies and photos with a computer Preparing a computer Windows 34 When using a Macintosh 35 Starting PMB Picture Motion Browser 37 Selecting the method for creating a disc computer 38 Creating a disc with one touch One Touch Disc Burn 40 Importing movies and photos to a computer 41 Creating an AVCHD disc 42 Playing an AVCHD disc o...

Page 11: ...ng your camcorder Using menus 54 Getting detailed information from the Handycam Handbook 61 Additional information Troubleshooting 62 Precautions 64 Specifications 66 Quick reference Screen indicators 71 Parts and controls 72 Index 75 ...

Page 12: ...X115E CX116E CX150E CX155E HDR XR150E XR155E Power cord Mains lead To the wall outlet wall socket AC Adaptor DC plug DC IN jack CHG charge lamp Battery pack CHG charge lamp DC IN jack Power cord Mains lead To the wall outlet wall socket AC Adaptor DC plug Battery pack ...

Page 13: ...HG charge lamp lights up and charging starts The CHG charge lamp turns off when the battery pack is fully charged 4 When the battery is charged disconnect the AC Adaptor from the DC IN jack of your camcorder Tips See page 68 on recording and playing time When your camcorder is on you can check the approximate amount of remaining battery power with the remaining battery indicator at the upper left ...

Page 14: ...layback times with your camcorder In the default setting the power turns off automatically if you leave your camcorder without any operation for about 5 minutes to save battery power A SHUT OFF Notes on the AC Adaptor Use the nearby wall outlet wall socket when using the AC Adaptor Disconnect the AC Adaptor from the wall outlet wall socket immediately if any malfunction occurs while using your cam...

Page 15: ...ess POWER 2 Select the desired geographical area with then touch NEXT To set the date and time again touch MENU Show others CLOCK LANG under GENERAL SET category CLOCK SET When an item is not on the screen touch until the item appears 3 Set SUMMERTIME date and time then touch The clock starts If you set SUMMERTIME to ON the clock advances 1 hour MODE lamp POWER button Touch the button on the LCD s...

Page 16: ... GENERAL SET category BEEP OFF If the button you touch does not react correctly calibrate the touch panel To turn off the power Close the LCD screen The Movie lamp flashes for a few seconds and the power is turned off Tips You can turn off your camcorder also by pressing POWER When POWER ON BY LCD is set to OFF turn off your camcorder by pressing POWER Changing the language setting You can change ...

Page 17: ...hard disk Memory card In the default setting both movies and photos are recorded on this recording media You can perform recording playback and editing operations on the selected medium Tips See page 68 for the recordable time of movies Selecting the recording media for movies HDR CX116E CX150E CX155E XR150E XR155E Touch MENU Show others MEDIA SETTINGS under MANAGE MEDIA category MOVIE MEDIA SET T...

Page 18: ... movies and or photos on a memory card HDR CX116E CX150E CX155E XR150E XR155E Types of memory card you can use with your camcorder You can use the following memory cards for this camcorder Memory Stick PRO Duo Mark2 media Memory Stick PRO HG Duo media SD memory cards SDHC memory cards SDXC memory cards Speed Class 4 or faster is required for each SD card However operation with all memory cards is ...

Page 19: ... a label or the like on memory card or memory card adaptor Doing so may cause a malfunction Open the cover and insert the memory card with the nothched edge in the direction as illustrated until it clicks Close the cover after inserting the memory card The Create a new Image Database File screen may appear if you insert a new memory card In that case touch YES If you record only photos on the memo...

Page 20: ...en inserting or ejecting the memory card be careful so that the memory card does not pop out and drop Dubbing or copying movies and photos from the internal recording media to memory card HDR CX116E CX150E CX155E XR150E XR155E Touch MENU Show others MOVIE DUB PHOTO COPY under EDIT category then follow the displays on the screen ...

Page 21: ...Memory card HDR CX116E CX150E CX155E Internal memory HDR XR150E XR155E Internal hard disk Tips To change the recording media see page 17 HDR CX116E CX150E CX155E XR150E XR155E To open the lens cover Slide the LENS COVER switch to open Tips When you finish recording or when you play back images close the lens cover 1 Fasten the grip belt HDR CX110E CX115E CX116E CX150E CX155E ...

Page 22: ...een is already open press POWER p 15 You can switch recording modes by pressing MODE Press MODE to light up the desired recording mode lamp HDR CX110E CX115E CX116E CX150E CX155E HDR XR150E XR155E MODE button Movie When recording a movie Photo When recording a photo MODE button Movie When recording a movie Photo When recording a photo ...

Page 23: ...witching the recording movie photo playback modes To display the icons and indicators again touch anywhere on the screen except the rec zoom buttons on the LCD Notes If you close the LCD screen while recording movies the camcorder stops recording The maximum continuous recordable time of movies is about 13 hours When a movie file exceeds 2 GB the next movie file is created automatically It will ta...

Page 24: ...E XR155E You can check the recordable time estimated remaining capacity etc by touching MENU Show others MEDIA INFO under MANAGE MEDIA category The LCD screen of your camcorder can display recording images across the entire screen full pixel display However this may cause slight trimming of the top bottom right and left edges of images when played back on a TV which is not compatible with full pix...

Page 25: ...MODE to turn on the Photo lamp The LCD screen display switches for photo recording mode and the screen aspect ratio becomes 4 3 Press PHOTO lightly to adjust the focus then press it fully You can record photos also by touching on the LCD screen When disappears the photo is recorded Tips You can check the recordable number of photos on the LCD p 71 To change the image size touch MENU Show others IM...

Page 26: ...E XR150E XR155E 1 Open the LCD screen of your camcorder Your camcorder is turned on To turn on your camcorder when the LCD screen is already open press POWER p 15 2 Press VIEW IMAGES The VISUAL INDEX screen appears after some seconds You can display the VISUAL INDEX screen also by touching VIEW IMAGES on the LCD screen 3 Touch or a desired movie to playback a movie Touch the Photo a desired photo ...

Page 27: ...ed movie Notes You may not be able to play back the images with other devices than camcorder Tips When playback from the selected movie reaches the last movie the screen returns to the INDEX screen Touch during pause to play back movies slowly As you repeat touching during playback movies are played as fast as about 5 times about 10 times about 30 times about 60 times You can also display the VISU...

Page 28: ...ou can also adjust the sound volume by using in the OPTION MENU Viewing photos Your camcorder displays the selected photo Tips When viewing photos recorded on the memory card playback folder appears on the screen To start stop slide show Next OPTION MENU Previous To the VISUAL INDEX screen ...

Page 29: ...TV to the connected jack Refer to the instruction manuals of the TV Turn on your camcorder and touch MENU Show others TV CONNECT Guide under OTHERS category on the LCD screen Use the supplied AC Adaptor as the power source p 13 Touch High Definition TV Touch to select the input jack of your TV then touch The connection medhod is displayed If you touch HINT you can see tips for the connection or ch...

Page 30: ...the LINE IN input on the VCR using the A V connecting cable Set the input selector on the VCR to LINE VIDEO 1 VIDEO 2 etc To set the aspect ratio according to the connected TV 16 9 4 3 Set TV TYPE to 16 9 or 4 3 according to your TV When your TV is monaural When your TV has only one audio input jack Connect the yellow plug of the A V connecting cable to the video input jack and connect the white l...

Page 31: ...ignal record movies with 4 3 aspect ratio Touch MENU Show others OTHER REC SET under SHOOTING SET category WIDE SELECT 4 3 p 57 If your TV VCR has a 21 pin adaptor EUROCONNECTOR Use a 21 pin adaptor sold separately to view playback pictures Tips If you connect your camcorder to the TV using more than one type of cable to output images the order of priority of the TV input jacks is as follows HDMI ...

Page 32: ...deleted movie is included in the saved Highlight Playback scenario the movie is also deleted from the scenario Tips You can delete an image on the playback screen from OPTION MENU To delete all images recorded in the recording media and recover all the recordable space of the media format the media Reduced size images which enable you to view many images at the same time on an index screen are cal...

Page 33: ...on memory card by recording date In step 2 touch DELETE DELETE by date DELETE by date To delete all photos on the same day at one time touch DELETE DELETE by date Touch to select the recording date of the desired movies photos then touch Touch the image on the LCD screen to confirm the image Touch to return to the previous screen Touch YES ...

Page 34: ...cessing HD FX HD FH movies However Intel Pentium III 1 GHz or faster is sufficient for the following operations Importing the movies and photos to the computer One Touch Disc Burn Creating a Blu ray disc AVCHD disc DVD video Intel Core Duo 1 66 GHz or faster is required when creating a DVD video by converting high definition image quality HD to standard definition image quality STD Copying a disc ...

Page 35: ...e to use some functions of those PMB when installing the PMB from the supplied CD ROM Also PMB Launcher is installed from the supplied CD ROM and you can start PMB or other software by using the PMB Launcher Double click the PMB Launcher short cut icon on the computer screen to start PMB Launcher Confirm that your camcorder is not connected to the computer Turn on the computer Log on as an Adminis...

Page 36: ... install third party software If the installation screen appears follow the instructions to install the required software Restart the computer if required to complete the installation When the installation is completed following icons will appear Remove the CD ROM from your computer Starts PMB Displays PMB Help Displays PMB Launcher PMB Launcher enables you to start PMB or other software or to ope...

Page 37: ...age files follow the steps on page 32 Do not delete the image files on the camcorder directly from the computer Do not copy the files on the recording media from the computer Operation is not guaranteed You can create a Blu ray disc by using a computer with a Blu ray disc burner Install the BD Add on Software for PMB p 43 Starting PMB Picture Motion Browser Double click the PMB short cut icon on t...

Page 38: ...n image quality HD p 42 Ordinary DVD playback devices a DVD player a computer that can play DVDs etc Importing movies and photos to a computer p 41 Creating a standard definition image quality STD disc p 43 To create a Blu ray disc the BD Add on Software for PMB must be installed p 43 Characteristics of each type of disc Using a Blu ray disc enables you to record high definition image quality HD m...

Page 39: ...f following type with PMB For Blu ray disc see page 43 Disc type Features DVD R DVD R DVD R DL Unrewritable DVD RW DVD RW Rewritable Notes Always maintain your PlayStation 3 to use the latest version of the PlayStation 3 system software The PlayStation 3 may not be available in some countries regions ...

Page 40: ... first p 41 and then create a standard definition image quality STD disc p 43 Install PMB beforehand p 35 however do not start PMB Connect your camcorder to the wall outlet wall socket using the AC Adaptor supplied for this operation p 13 With One Touch Disc Burn function on your camcorder you can save movies and photos recorded on the internal recording media only HDR CX116E CX150E CX155E XR150E ...

Page 41: ...ording media that contains the images you want to save on the camcorder screen USB CONNECT Internal memory USB CONNECT Internal hard disk USB CONNECT Memory card The displayed recording media differ depending on the model If the USB SELECT screen does not appear touch MENU Show others USB CONNECT under OTHERS category The window for import appears on the computer screen 3 Click Import Refer to PMB...

Page 42: ...nition image quality HD movies are marked with You cannot save photos on a disc To select plural movies hold the Ctrl key down and click thumbnails 4 At the top of the window click Create AVCHD Format Discs HD The window used to select movies appears To add movies to the previously selected ones select the movies in the main window and drag and drop onto the window for selecting movies 5 Follow th...

Page 43: ...u cannot add contents to either type of disc after creating the disc Creating a standard definition image quality STD disc that can be played on ordinary DVD players You can create a standard definition image quality STD disc by selecting movies previously imported to your computer p 41 Notes You may select high definition image quality HD movies as sources However image quality is converted from ...

Page 44: ...rt the software See Video Disc Copier help on the operation You cannot copy high definition image quality HD movies by converting them to standard definition image quality STD You cannot copy to a Blu ray disc Editing movies You can cut out only necessary parts from a movie and save it as another file Double click the movie to be edited on PMB then click Show Edit Palette on the right side of the ...

Page 45: ...the external media is connected to your camcorder However the format screen may appear even if you use the external media of FAT file system Operation is not assured with every device satisfying requirements for operating Connect your camcorder to the wall outlet wall socket using the supplied AC adaptor p 13 Refer to the instruction manual supplied with the external media For details on available...

Page 46: ...DEX screen change as illustrated below You can make menu settings of the external media such as deleting images Touch MENU Show others on the VISUAL INDEX screen To save desired movies and photos You can save images from the memory cards to the external media Notes You cannot copy or search photos by date which are recorded on the memory card Touch Play without copying in step 5 above The VISUAL I...

Page 47: ...l media has the AC power cable connect it to the wall outlet wall socket To finish the external media connection Touch on the VISUAL INDEX screen of the external media Disconnect the USB Adaptor Cable Creating a disc with a DVD writer recorder Selecting the method for creating a disc Several methods for creating an AVCHD disc or a standard definition image quality STD disc from high definition ima...

Page 48: ...ect the DVD writer to the USB jack of your camcorder with the USB cable of the DVD writer Ordinary DVD device Player DVD player Computer that can play DVDs etc Creating device DVD writer DVDirect Express p 48 DVD writer other than DVDirect Express p 51 Disc recorder etc p 52 Disc type Standard definition image quality STD disc Notes Always maintain your PlayStation 3 to use the latest version of t...

Page 49: ...TION Perform this operation in the following cases When dubbing a desired image When creating multiple copies of the same disc When converting high definition HD movies to standard definition STD movies and creating a disc When dubbing images in the memory card HDR CX116E CX150E CX155E XR150E XR155E Touch DISC BURN OPTION in step 4 Select the recording media containing the movie s you want to save...

Page 50: ...disc of the same contents insert a new disc and touch CREATE SAME DISC After the operation is completed touch EXIT END on the camcorder screen Disconnect the USB cable from your camcorder Notes Do not do any of the following when creating a disc Turn off the camcorder Disconnect the USB cable or the AC adaptor Subject the camcorder to mechanical shock or vibration Eject the memory card from the ca...

Page 51: ...D writer may not be available in some countries regions Connect the AC Adaptor and the power cord mains lead to the DC IN jack of your camcorder and the wall outlet wall socket p 13 Turn on your camcorder and connect a DVD writer etc to the USB jack of your camcorder with the USB cable supplied The USB SELECT screen appears on the camcorder screen If the USB SELECT screen does not appear touch MEN...

Page 52: ... supplied AC Adaptor for this operation p 13 Sony DVD writer may not be available in some countries regions High definition image quality HD movies will be dubbed with standard definition image quality STD A V connecting cable supplied Connect the A V connecting cable to the input jack of another device A V connecting cable with S VIDEO sold separately When connecting to another device via the S V...

Page 53: ...ecorders connected with an HDMI cable To hide the screen indicators such as a counter etc on the screen of the monitor device connected touch MENU Show others OUTPUT SETTINGS under GENERAL SET category DISP OUTPUT LCD PANEL the default setting To record the date time or camera settings data touch MENU Show others PLAYBACK SET under PLAYBACK category DATA CODE a desired setting In addition touch ME...

Page 54: ...g media p 59 GENERAL SET Other setup items p 60 Menu items are described in more details in the Handycam Handbook Setting menus Touch MENU Touch Show others on the MY MENU screen See the next page for details on MY MENU Touch the central part in the left side of screen to change the display Touch the menu item to be changed After changing the setting touch To finish setting the menu touch To retur...

Page 55: ... the menu items more easily by registering the menu items you use most often on MY MENU You can register 6 menu items on each MY MENU of the MOVIE PHOTO and PLAYBACK Example deleting SPOT MTR FCS and registering FADER Touch MENU Touch MY MENU SETTING Touch MOVIE Touch SPOT MTR FCS Touch Touch FADER under MANUAL SETTINGS category When MY MENU is displayed touch Repeat the same steps above to regist...

Page 56: ...and the menu items you can change in the context appear Touch OPTION Touch the desired tab the item to change the setting After completing the setting touch Notes Grayed out menu items or settings are not available When the item you want is not on the screen touch another tab There may be no tab The tabs and items that appear on the screen depend on the recording playback status of your camcorder ...

Page 57: ...ays the frame to make sure the subject is horizontal or vertical STEADYSHOT Sets the SteadyShot function when recording movies CONVERSION LENS Sets the type of an attached conversion lens sold separately Optimizes the SteadyShot function and focus according to the attached lens LOW LUX Records bright color images in the dim FACE DETECTION Adjusts the image quality of the face s automatically PRIOR...

Page 58: ... SET Sets image quality for recording playback or editing movies DATA CODE Displays the detailed recording data during playback EDIT category DELETE DELETE Deletes movies DELETE Deletes photos SCENARIO ERASE ERASE Erases scenarios saved in Highlight Playback ERASE ALL Erases all scenarios saved in Highlight Playback PROTECT PROTECT Protects movies to avoid deleting PROTECT Protects photos to avoid...

Page 59: ... music files DOWNLOAD MUSIC Download music files that can be played with Highlight Playback BATTERY INFO Displays the battery information MANAGE MEDIA category MEDIA SETTINGS MOVIE MEDIA SET 1 2 Sets the media for recording movies p 17 PHOTO MEDIA SET 1 2 Sets the media for recording photos p 18 MEDIA INFO Displays information on the recording media such as free space MEDIA FORMAT INT MEMORY 1 Del...

Page 60: ...DMI cable DISP OUTPUT Sets whether the on screen displays appears on the TV screen or not CLOCK LANG CLOCK SET Sets the date and time p 15 AREA SET Adjusts for a time difference without stopping the clock p 15 SUMMERTIME Sets the summertime p 15 LANGUAGE SET Sets the display language p 16 POWER SETTINGS A SHUT OFF Changes the A SHUT OFF setting p 13 POWER ON BY LCD Sets whether or not the camcorde...

Page 61: ...layed click Handbook 3 Click the desired language and the model name of your camcorder Install and follow the on screen instructions to install Handycam Handbook The model name of your camcorder is printed on its bottom surface To view the Handycam Handbook double click the short cut icon on the computer screen When using a Macintosh open the Handbook GB folder in the CD ROM then copy Handbook pdf...

Page 62: ...e plug of the AC Adaptor to the wall outlet wall socket p 13 The camcorder does not operate even when the power is set to on It takes a few seconds for your camcorder to be ready to shoot after the power is turned on This is not a malfunction Disconnect the AC Adaptor from the wall outlet wall socket or remove the battery pack then reconnect it after about 1 minute If your camcorder still does not...

Page 63: ... them give them all the numbers of the error code beginning with C or E C 04 The battery pack is not an InfoLITHIUM battery pack V series Use an InfoLITHIUM battery pack V series p 12 Connect the DC plug of the AC Adaptor to your camcorder securely p 12 C 06 The battery pack temperature is high Change the battery pack or place it in a cool place C 13 C 32 Remove the power source Reconnect it and o...

Page 64: ...malfunction Near strong radio waves or radiation The camcorder may not be able to record properly Near AM receivers and video equipment Noise may occur On a sandy beach or anywhere dusty If sand or dust gets in your camcorder it may malfunction Sometimes this malfunction cannot be repaired Near windows or outdoors where the LCD screen or the lens may be exposed to direct sunlight This damages the ...

Page 65: ...mcorder to a wall outlet wall socket using the supplied AC Adaptor and leave it with the LCD screen closed for more than 24 hours Do not damage the power cord mains lead such as by placing anything heavy on it Do not use a deformed or damaged battery pack Keep metal contacts clean If the battery electrolytic liquid has leaked Consult your local authorized Sony service facility Wash off any liquid ...

Page 66: ...V 1080 50i specification Movie recording format HD MPEG 4 AVC H 264 AVCHD format compatible STD MPEG 2 PS Audio recording system Dolby Digital 2ch Dolby Digital Stereo Creator Photo recording format DCF Ver 2 0 Compatible Exif Ver 2 21 Compatible MPF Baseline Compatible Recording media Movie Photo Internal memory HDR CX116E 8GB HDR CX150E CX155E 16GB Internal hard disk HDR XR150E XR155E 120GB Memo...

Page 67: ...voltage DC 8 4 V Maximum charge current 2 1 A Capacity Typical 7 0 Wh 1 030 mAh Minimum 6 6 Wh 980 mAh Type Li ion For photos 36 900 mm 1 7 16 35 1 2 in 4 3 Color temperature AUTO ONE PUSH INDOOR 3 200 K OUTDOOR 5 800 K Minimum illumination 11 lx lux in default setting shutter speed 1 50 second 3 lx lux LOW LUX is set to ON shutter speed 1 25 second 1 The unique pixel array of Sony s ClearVid and ...

Page 68: ...d definition image quality STD Recording condition REC MODE is set to HQ Typical recording time shows the time when you repeat recording start stop turning the power on off and zooming Expected recording time of movies To set the recording mode touch MENU Show others REC MODE under SHOOTING SET category In the default setting the recording mode is HD HQ Internal memory HDR CX116E High definition i...

Page 69: ...ks or registered trademarks of Intel Corporation or its subsidiaries in the United States and other countries PlayStation is a registered trademark of Sony Computer Entertainment Inc Adobe the Adobe logo and Adobe Acrobat are either registered trademarks or trademarks of Adobe Systems Incorporated in the United States and or other countries SDXC and SDHC logos are trademarks of SD 3C LLC MultiMedi...

Page 70: ...70 GB All other product names mentioned herein may be the trademarks or registered trademarks of their respective companies Furthermore and are not mentioned in each case in this manual ...

Page 71: ...D STD and recording mode FX FH HQ LP Recording playback editing media 0 00 00 Counter hour minute second 00min Estimated recording remaining time FADER 9999 9999 9999 Approximate number of recordable photos and recording media Playback folder 100 112 Current playing movie or photo Number of total recorded movies or photos Bottom Indicator Meaning FACE DETECTION set to OFF SMILE DETECTION LOW LUX M...

Page 72: ...d their positions are approximate and may differ from what you actually see Some indicators may not appear depending on your camcorder model Parts and controls Figures in are reference pages HDR CX110E CX115E CX116E CX150E CX155E HDR XR150E XR155E Lens Carl Zeiss lens LENS COVER switch 21 Built in microphone ...

Page 73: ... CX116E CX150E CX155E HDR XR150E XR155E VIEW IMAGES button 26 Speaker RESET button Press RESET using a pointed object Press RESET to initialize all the settings including the clock setting HDMI OUT jack 29 USB jack 36 40 41 45 48 HDR CX115E CX116E CX155E XR155E output only MODE button 22 movie Photo lamps 22 DISC BURN button 40 INTELLIGENT AUTO button POWER button 15 HDR CX110E CX115E CX116E CX150...

Page 74: ...p belt 21 Hook for a shoulder belt Memory card slot 19 BATT battery release lever 13 Memory card Access lamp 19 While the lamp is lit or flashing the camcorder is reading or writing data Tripod receptacle Attach a tripod sold separately to the tripod receptacle using a tripod screw sold separately the length of the screw must be less than 5 5 mm 7 32 in ...

Page 75: ...cators 71 Self diagnosis display 63 Setting the date and time 15 Software 35 Specifications 66 Supplied items 5 T Thumbnail 32 Tripod 74 Troubleshooting 62 Turning the power on 15 TV 29 TV CONNECT Guide 29 U USB cable 48 51 USB CONNECT 41 51 V VISUAL INDEX 26 Volume 28 W Wall outlet wall socket 12 Warning indicators 63 Windows 34 A A V connecting cable 30 52 AVCHD 38 B Battery pack 12 Blu ray disc...

Page 76: ...GB Additional information on this product and answers to frequently asked questions can be found at our Customer Support Website http www sony net Printed on 70 or more recycled paper Printed in China ...

Reviews: