background image

l

AR

G*&


HI J4&,<

>K,7/  !?

L6 ?U q'&& +,29 >'j&  !


LF  aZ

0%.

@

 Tno%6  W;8

 FUNCTION

789 LF

 0%.

CD

345( LF 

A

 78%6  W482

MODE

+;=6 dj& LK 

“PGM”

Q=6 :: LF 

L

d1 qt& )6 IF6    W482

u%t( ?U q'&9

M

 C6 W482

N

m;( ?@ A;6 

N0


)*/

@

 P'o%6  W;8

FUNCTION

 0%. 789 LF 

CD

A

 3'456 789  W482

PLAY MODE

+;=6 dj& LK 

“PGM”

Q=6 :: LF 

L

 C6 W482

.

 C6 9 

.

>

  W482 >B [ 

DISPLAY/

ENTER

u%t( q'&69 d1; qt& )6 IF6 

M

 C6 W482 

u

G!


K,7/  ! O1

 78%6  W482

 MODE

 +;=6 APf LK

“PGM”

Q=6 :: [

P  = )72 %/ QR,R " 56

 Q=6  W482

DISPLAY

q'&6 ( > dj ,C6 pv d'* W4"& + 3 )*

m;(

S K&,7 ,

 C6 W482

x

R0 c2 <&9 X/U 789 )* +K9 + 

> )6h m0;6 w >' 3'45& 6K )* 0%.

=; $x e 10 A50

#

1;6 I%.f 

: %

de +c )* dFf, )6 1;6 I0' OP- de  %/

L6 ?U s* 6 w''6


,'0B + N&, p6 m0;6

L6 p v 78%6 


3% 9 I0%.U +'1K wP  %/& $

 Tno%6 

FUNCTION

L6 


fy 789

Tno%6  3%- R c2 )6h m0;6 w >

FUNCTION

L6 


0%. +'1K R-* 9 f 789

3f, ,m0;F6 \A502 = zr 10 3'1&  !

 de )* t* .:

B

 C6 W482 >B 

z

 de )* ,%H%( 

B

3'16 A;6

-29 #3

MODE

DISPLAY

N

 ! QR,R

K,7/ /

Summary of Contents for CFD-CD777S MK2

Page 1: ...CD Radio Cassette Corder 3 260 754 11 1 2003 Sony Corporation CFD CD777S MK2 GB Operating Instructions page 2GB ...

Page 2: ... servicing to qualified personnel only Warning Do not install the appliance in a confined space such as a bookcase or built in cabinet To prevent fire or shock hazard do not place objects filled with liquids such as vases on the appliance The FUNCTION selector is located at the front When you turn on the player the OPR BATT indicator lights up ...

Page 3: ...k 14 Playing tracks repeatedly Repeat Play 15 Creating your own program Program Play 16 The Tape Player Recording through a microphone Using as a PA system 17 The Audio Emphasis Selecting the audio emphasis DYNAMIC SOUND SYSTEM 18 Setting Up Choosing the power sources 19 Connecting optional components 21 Additional Information Precautions 22 Troubleshooting 24 Maintenance 26 Specifications 27 Inde...

Page 4: ...ges 19 20 1 Set FUNCTION to CD 2 Press Z PUSH OPEN CLOSE down to open the lid of the CD compartment and place a CD on the CD compartment 3 Close the lid of the CD compartment Basic Operations Playing a CD With the label side up 1 4 2 3 ...

Page 5: ... again to resume play after pause go to the next track Press go back to the previous track Press remove the CD Press ZPUSH OPEN CLOSE turn off the player Set FUNCTION to TAPE CD RADIO OFF 4 Press u N on the remote The player plays all the tracks once VOLUME u Level meter FUNCTION Z PUSH OPEN CLOSE Tip During operation the level meter shows the frequency level of the sound Adjusting the volume will...

Page 6: ...ng to the radio For hookup instructions see pages 19 20 1 Set FUNCTION to RADIO 2 Set BAND to select the band you want 3 Turn TUNING to tune in the station you want For better SW reception use FINE TUNING 3 1 2 3 ...

Page 7: ... reception Reorient the antenna for FM Reorient the player itself for MW For SW extend the antenna vertically for FM Tips During operation the level meter shows the frequency level of the sound Adjusting the volume will not affect the level meter If the FM broadcast is noisy set ISS FM MODE at the rear to MONO Radio will play in monaural for MW VOLUME Level meter FUNCTION for SW ...

Page 8: ...ges 19 20 1 Set FUNCTION to TAPE CD RADIO OFF 2 Press xZ to open tape compartment and insert a recorded tape Use TYPE I normal tape only Close the compartment 3 Press PLAY N The player starts playing With the side you want to play facing you 3 2 1 3 2 ...

Page 9: ...o play Set DIR MODE to both sides of the tape repeatedly both sides of the tape from the front side to reverse side only If play begins from the reverse side the tape stops at the end of that side DIRECTION h H DIR MODE Level meter VOLUME xZ X m M m M X xZ Note During playback do not press M m or N on the other deck as this causes excessive wow and flutter Tips During operation the level meter sho...

Page 10: ...rtment 2 Select the program source you want to record To record from the CD player set FUNCTION to CD and insert a CD see page 4 To record from the radio set FUNCTION to RADIO and tune in the station you want using BAND and TUNING see page 6 To record from the built in microphone MIC set FUNCTION to TAPE CD RADIO OFF With the side you want to record on facing you Display 3 1 2 MIC ...

Page 11: ... volume or selecting the audio emphasis see page 18 will not affect the recording level If the MW program makes a whistling sound after you ve pressed z in step 3 set the ISS FM MODE Interference Suppress Switch at the rear to the position that most decreases the noise For the best results use the AC power as a power source To erase a recording proceed as follows 1 Insert the tape into deck B 2 Di...

Page 12: ...o deck A and a blank tape into deck B Use TYPE I normal tape only Close the compartment 2 Set FUNCTION to DUBBING 3 To dub at high speed press HIGH SPEED DUBBING to ON To dub at normal speed press HIGH SPEED DUBBING to OFF 2 4 1 1 4 3 5 With the side you want to record on facing you ...

Page 13: ...his causes excessive wow and flutter Tips Adjusting the volume or selecting the audio emphasis see page 18 will not affect the recording level For the best results use the AC power as a power source When the tape in deck A ends first deck B will continue recording till the tape end When the tape in deck B ends first deck A plays on according to the setting of the DIR MODE switch Deck A Deck B xZ x...

Page 14: ...the point a point while observing forward or the display backward in pause and hold down until you find the point Note You cannot locate a specific track if SHUF REP or PGM is lit in the display Turn off the indication by pressing x Tip When you locate a track numbered over 10 press 10 first then the corresponding number buttons Example To play track number 23 press 10 first then 2 and 3 Checking ...

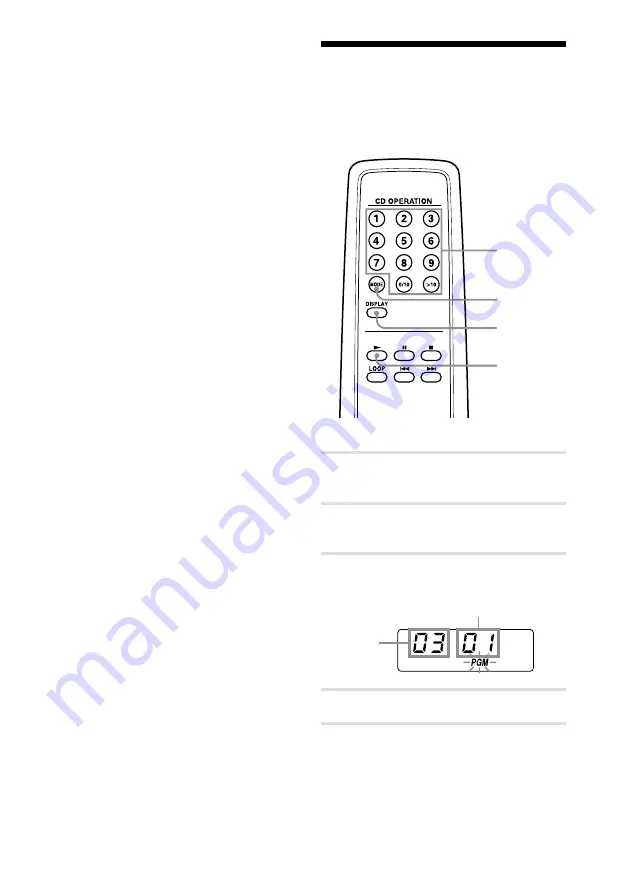
Page 15: ...he track that you want to repeat 3 Press N 1 Press MODE until REP ALL appears 2 Press N 1 Press MODE until SHUF REP appears 2 Press N 1 Press MODE until PGM REP appears 2 Program tracks see step 3 on page 16 3 Press N On the player Use PLAY MODE instead of MODE or to select the track instead of the number button and u instead of N To cancel Repeat Play Press MODE until REP disappears from the disp...

Page 16: ...rom the display To check the order of tracks before play Press DISPLAY Every time you press the button the track number appears in the programed order To change the current program Press x once if the CD is stopped and twice if the CD is playing The current program will be erased Then create a new program following the programing procedure Tips You can play the same program again since the program...

Page 17: ...e into deck B and press z to start recording Using as a PA system 1 Plug the microphone into the MIX MIC jack and turn on the microphone if it has a power switch 2 Set FUNCTION to TV LINE IN 3 Sing or speak into the microphone and adjust the volume Notes Acoustic feedback howling tend to occur when you use a microphone with echo function If acoustic feed back howling occurs turn down the volume or...

Page 18: ...duce high frequency noise tape hiss Using the PRESET MODE Set the PRESET MODE selector to the sound mode you want Use To MANUAL select the sound using the 5 BAND GRAPHIC EQUALIZER DISCO get powerful clear sounds emphasizing low and high range audio PARTY get light bright sounds emphasizing high and middle range audio LIVE get wide ranging sounds having presense Adjusting the sound balance of the l...

Page 19: ... on the diagram and slide the speaker box all the way up and away from the player Connect the supplied speakers to this player If you connect any other speakers or equipment malfunction may occur 2 Connect the black wires to minus and the red wires to plus terminals the right speaker wires to the R and the left speaker wires to the L terminals ACIN 4 Battery compartment 1 Speaker terminals 2 to a ...

Page 20: ...s not supplied Replacing batteries With normal use the batteries should last for about six months When the remote no longer operates the player replace all the batteries with new ones 4 Using the player on batteries Insert eight R20 size D batteries not supplied into the battery compartment To use the player on batteries disconnect the AC power cord from the player Replacing batteries Replace the ...

Page 21: ...refer to the instruction manual of the component to be connected 1 Connect a component to the player 2 Set FUNCTION to TV LINE IN and play the connected component Note Connect the cables firmly to avoid any malfunction Tip You can record the sound of the connected component Insert a blank tape and press z on deck B FUNCTION TV LINEIN Rear panel of this player to line out jack Audio connecting cabl...

Page 22: ...e or corrosion The nameplate indicating operating voltage power consumption etc is located at the rear On placement Do not leave the player in a location near heat sources or in a place subject to direct sunlight excessive dust or mechanical shock Do not place the player on an inclined or unstable place Do not place anything within 10 mm of the side of the cabinet The ventilation holes must be uno...

Page 23: ...a car parked in direct sunlight as there can be a considerable rise in temperature inside the car Do not stick paper or sticker on the CD nor scratch the surface of the CD After playing store the CD in its case If there is a scratch dirt or fingerprints on the CD it may cause tracking error Music discs encoded with copyright protection technologies This product is designed to play back discs that ...

Page 24: ...e cassette is in place The audio is weak The audio quality is poor Clean the heads pinch roller and capstans see page 26 Demagnetize the heads using a demagnetizer see page 26 The sound is distorted The TYPE II high position or TYPE IV metal tape is being used Use TYPE I normal tape only Troubleshooting General The power is not on Connect the AC power cord to a wall outlet securely Make sure the b...

Page 25: ... player Make sure the remote sensor is not exposed to strong light such as direct sunlight or fluorescent lamp light Move closer to the player when using the remote After trying the above remedies if you still have problems unplug the AC power cord and remove all the batteries After all the indications in the display disappear plug the AC power cord and insert the batteries again If the problem pe...

Page 26: ... alcohol or benzine Maintenance Cleaning the lens If the lens becomes dirty it may cause a skipping of sound during CD operation Clean with a commercially available blower Cleaning the tape heads and tape path Wipe the heads the pinch roller and the capstans with a cleaning swab slightly moistened with cleaning fluid or alcohol after every 10 hours of operation for optimum playback and recording q...

Page 27: ...Approx 120 sec with Sony cassette C 60 Frequency response TYPE I normal 80 12 500 Hz General Speaker Woofer 10 cm 4 in dia 4 ohms cone type 2 Tweeter 5 cm 2 in dia Outputs Headphones jack stereo minijack For 16 68 Ω impedance headphones Maximum power output 24 W Power requirements For CD radio cassette corder 110 120 220 240 V AC selectable 50 60 Hz 12 V DC 8 R20 size D batteries DC IN 12V jack Fo...

Page 28: ...ape heads 26 Display 14 Dubbing 12 G H GRAPHIC EQUALIZER 18 I J K Improving broadcast reception 7 L Listening to the radio 6 Locating a specific track 14 M N O MEGA BASS 18 P Q PA system 17 Playing a CD 4 a tape 8 tracks repeatedly 15 Power sources 19 PRESET MODE 18 Program Play 16 Public address system See PA system R Recording on a tape 10 Repeat Play 15 S Selecting audio emphasis 18 tracks 5 Se...

Page 29: ... P r Q r P LC a0H J b 3 e f J q 4 u 3 4 2 f E q J E0 J P qr E C q h 2 Z S XE2 V Z 2 E E E BALANCE q 2 q E q f J D g h q vE i H j E MEGA BASS q 8 U 4 k l m q q B 3 C 1 1 VOLTAGE SELECTOR r GRAPHIC EQUALIZER q q Ei q q S Z S Z S Z EZ T B n J C Og PRESET MODE q ...

Page 30: ... MW 0 9 W b S oB L V F Z E 2 P P Z E V CE E 2 x E P i q r C 60 E L P8P8 P A TYPE I 2E9 q rr r NW U 7 1 C Q N U E A a qr E o 1 E a E E E nP NE E n U E C Q n q P E 2 E C Q B E B B 0 E 2E9 r r t r r q r qqr P B E 2 P C E 2 t q R20 a c U D N n DC IN 12V P LC a0H J b A L P t E 2 R6 a c U AA N B ld E 2 EQC 0 E 5 E V FM R20P E 2 C E LR20 E 2 C E 5 6 R20P E 2 C E LR20 E 2 C E 6 6 R20P E 2 V C E LR20 E 2 C...

Page 31: ...qr X P bE Bd JE0 E m o C 3 c Qo O L m 5 O QD V Z P H QC L 2 QC X B E P EM L XY P E V Z QC L s 5 P 0 P 1 Z 2 z LX e 1D B 7 _ a 5 C V 2 5 L C r r P E 1 P C H E 2 T b C C s D5 O QD E LC S P E P EM E E 6 DE 4BK O H L 3 H d B QC QB B S _ a0H b 0 V Z 3 K k 0 V Z b L A W L 3 H0 X 2 c 5 1 K Z C 5 1 X V C C A B ...

Page 32: ... 3 1 g H t X J D f E 7 _ P P LC a0H J b h D 2 L XY2 H H J P C a0H J b P f J D C P P LC s o f E E 2 C L XY2 s o JE nQ s g T W B W 1 P LC a0H J b C L d B jE B 3 d H P Q E K J P Q P EQ O QD A E 7dC J X8 H H C vE LC E O QD s 1 P EQ IE JE E 2 A jEB J P aB 3 c X Sony ...

Page 33: ... t X J D IE YP O QD 3 1 LC P s i P LC a0H J b C 2 A Q L0M E D A Q 5 MW L0M 5 E 89 h 12 91 0 G PL C Q 5R2 E S 7 1 k D E OQ 2 t X FM 1 2 L jE P 1 LC P P I 9D T Q K 7 5 U L 5 0b P E JE b 1B V T W5 REC z 9 5 6 5 XN 2 YB h 0 A g E Y s D L XY2 V g L XY2 FUNCTION E Og TAPE DUBBING 9 5 Z F 5 F N H1 EZ U m VZ 1 g t X J D IE YP O QD 3 E C A Q 5 3 4 TYPE II E C N C Og U TYPE IV P aB 89 3 Q P N U E C TYPE I h...

Page 34: ...L e c 1Z E T L X 2 c k A 2 5 _ JE x 0 2 J o E S P J L C 5 V Z G 1 2 5 JE nQ vE XE 2 5 c s g X J Ec D JE nQ t4 1 J D 12E 0 J J Ec x S 2 5 C B 2 5 H A Q f P C P 1 b m t X 2 Y H B OP Q P iy C 5 A A B 0 1 2 0 3 4 0 5 6 O 2 5 e 89 a Q 2 z 5 B CD T b x 2 z b Qb 2 O JE1 J Ad 5 DE XE P B L 5 C 2 5 5 789 P 5 789 B O CD 89 P C L0M 5 B 8 P X 1 t X A jEB J DE Sony ...

Page 35: ...c U D N V d C 3 Q C b 2 jE 2 Q k ld 1 mg 2 a 5 b V P J D 9E K B 0 J Ec S EB 0 lE 2 5 gE LX JE nQ h 02 LX 0 0 gE C m C Oo2 5 E K LX JE S D L p qr s W Oo2 5 0 Q H B C C S h2 0 EQC 5 J D E P Q E g s g t4 1 J lE2 h 0 5 u HP 0 L XY2 nQ E JE nQ v 8 C Q W B n a DE XE C Q C5 B P w 1 b5 P x d2 LC x n L L0Q V JE s E y P 0 L z x D EK h g z x VT0 2 P E L0M C J D 789 J D J P Q L b E 2 C J EZ A c x b E 2 P E Og...

Page 36: ... S L W LE c Z U _b u a 9 6 4 FUNCTION 89 a D n B g W TAPE CD RADIO OFF R SU2 4 v w 8U LE S KD 8E 1x SU 4 2 _b u a 9 FUNCTION 89 aw 1 nk TV LINE IN Kh 0 M i S M Q R 0S T A 9 JC UV G X Y UV KZ X L M KD 5 Z f 7q4 YZ r 4 0 1 y a h 1 KD 8E S l aK9 0 z S U B ...

Page 37: ...4 AB C D E f M 4 4 6 4 P1cE E 8E 4 L F R 7 1 F 8 G R6 H I C AA 9 JC A KA D 1 E 1 5 f g 8E KD LE 4 L F R 7 V 6 Sh R U T 1ci4 S U S 4 KD f j LE 4 k 0 1 R20 l C D mC I E M R l7 IR 4 KD f g KD LE D n KD hoE 9 p E OPR BATT L KD _ E 1 f R U T 1c4 8 U KD KD LE B 2 j B LE c q4 L M B r s 1 LE c T 1c4 CD LE KD DC IN 12V r b l r t ...

Page 38: ... AR A B AC IN 0 12 34 56 7 89 7 A 0 1 AB C DE F 4 B 4 H D E 4 0 I D J KD L 4 M N O KD PQ 8E R S PQ 8E T 1 R SU 4 V 6 KD 2 W X YZ 2 4 U W X 8E YZ 2 W X 8E YZ R YZ W X 8E T L 3 ...

Page 39: ...1 kHz 2 4 kHz 2 A 10 kHz B C0 5 3 D E F G H HI 5 J F PRESET MODE K 6 L HC M J3H PRESET MODE L 34 HC MANUAL N O P 2 Q 5 BAND GRAPHIC EQUALIZER DISCO C RH C 0 S L T 5 5 U VW C PARTY X C W W 0 S L T 5 5 U C LIVE D S L T 5 01 2 34 5 0 BALANCE 678 Q O CP 2 L 5 BAND GRAPHIC EQUALIZER M J3H Y Z K 6 L PRESET MODE 5 H S MANUAL U D H 2X 2 5 Y ...

Page 40: ... C DE F0 FUNCTION FG G H I J K 1G TAPE CD RADIO OFF L 2 MD FG N O B D F z P 0 01 2 G 3 56 MIX MIC 0 7 89 6 AB C DE F0 FUNCTION FQ O H G 8 TV LINE IN 2 R S P 56 T F0 U V R W G X Y GZ C 2 V T V 8 C _ T 8O G X Y GZ R b U _ c U V 0 1 2 3 G I J U 3 d 0 T O U 3 ...

Page 41: ...Y ENTER u t q 6 9 d 1 qt 6 I F6 M C6 W482 u G K 7 O 1 78 6 W482 MODE 6 A P f L K PGM Q 6 P 72 Q R R 56 Q 6 W482 DISPLAY q 6 dj C6 pv d W4 3 m S K 7 C6 W482 x R0 c2 9 X U 789 K 9 6 h m 0 6 w 3 45 6 K 0 x e 1 0 A 50 1 6 I f de c d Ff 6 1 6 I 0 OP de L6 U s 6 w 6 0 B N p6 m 0 6 L6 p v 78 6 3 9 I 0 U 1K w P Tn o 6 FUNCTION L6 fy789 Tn o 6 3 R c2 6 h m 0 6 w FUNCTION L6 0 1K R 9 f 789 3f m 0 F6 A 502 z...

Page 42: ...do REP 1 a fU 6 W48 J N 6 U b C6 W48 N C6 OP K MODE M 4 L K S do REP ALL a C6 W48 N C6 OP K MODE M 4 L K S do SHUF REP a C6 W48 N C6 OP K MODE M 4 L K S do PGM REP a b r 7H G I 1 D l Ps b C6 W48 N F C6 _ PLAY MODE U C6 MODE 9 9 U C6 9 fU 6 u U C6 N G 78 6 W482 MODE 6 P L K REP Q 6 Fh 3 45 6 W4 OP K29 W482 LOOP K9 LF 0 ACH 6 A B 6 Fh 3 45 6 C6 LOOP 789 L62 345 6 3 45 6 ...

Page 43: ... L K U I S V 9 SHUF REP 9 PGM C6 W4 S X Q 6 LF x C6 W48 Z 6 N C 10 B U9 6 W482 _ C6 W482 ab 6 10 6 W482 B U9 2 6c 9 3 0 I F 6 Q 6 DISPLAY 0 1 2 3 4 56 C6 W48 DISPLAY C6 G DISPLAY ENTER de D 6 K9 LF H T 6 789 67 8 56 Q 6 W482 DISPLAY _ f gQ 6 9 G DISPLAY ENTER D345 H 3 45 6 789 0 T 3 45 6 9 6 h r 6 h F6 C6 9 6 h r 0 i6 C6 9 6 I aZ 6 d C 6 I F6 C6 dj F 2 9 3 ...

Page 44: ...R0 db P G1 8 UZ Tl FUNCTION db GC G1 HIGH SPEED DUBBING b Ib G w h4 K z 7 A B19 L G ZS D 1 A ZS W 9 6G L G B r J e 30 l U 9d X 2 NN H N H I m U U mt A P j mt hx B Gb U I m U 7 9 6G N H I m U mt B P j mt I hx A G K 9 I j d n o DIR MODE T V W G 0 xZ mt N H A mt B 0 1 12 345 678 9 A B ...

Page 45: ... AR S T mt p 6G 2 i 9WN A mt 2 i B O U D 2 i J e 30 TYPE I I 5 67 9 0 K B N A Tl 0 FUNCTION G1 DUBBING G1 GC GU GC HIGH SPEED DUBBING 0 9 I ON G1 N GC GU GC HIGH SPEED DUBBING 0 Q K OFF U ...

Page 46: ... K z b b 0 A h F H 9 6G 8 UZ MIC B Ua 9 IH H 3 G D KH h F w b U MIX MIC 9 6G wUF P 9 IH C m h F H 7 A B19 L G ZS D 1 A ZS W 9 6G L G B r 23 H H C R1 MW C b w2 z 0 5 2k ISS FM MODE N H B I E A 9 7 T k C H 9 C 2 J e 30 l U 9d Y K 2 NN H U C E 6GH N H GH mt I 9WN B h 0 9 j 9WN h K k TV LINE IN N H T k C Tl 0 FUNCTION k 9WN h TV LINE IN 0 z mt N H B 0 1 12 345 678 9 B ...

Page 47: ... TYPE I I 5 67 9 0 K B N A J K N b 1 WxC E p 6G C 1 234 9 I D 9 6G CD 0 Tl FUNCTION 1 234 0 CD B 1 A 1 234 EZ D Tl 0 N D 9 6G FUNCTION N 0 RADIO D H J e 3xC m b 2c 0 EZ BAND d H TUNING 1 A B A 9 IH H h F H D 9 6G MIC B Tl 0 FUNCTION 0 TAPE CD RADIO OFF B ...

Page 48: ...5 9 3 n o iS u b DIRECTION h H BT k J A p N H I n o0 A R 3 F v W0 0 xZ K J 3 L 1 M A NJG 3 L O P JE DIR MODE I 7 I ua o 5 F 5 C 7 I ua o mt 0 4 mt D K GF mt w b m1 U T I hx GF mt D 9 I C QR0 db P O 3P 8 UZ 4 M m N 5N H G Q 3 w h4 Wy p K z b b 0 7 A B19 L GH 8L 9 I 8 UZ C C L G H ZS P L G H L GH 8L 5 C um l I 9 I 0 1 N N H p B O 3P 0 EZ D PLAY X D N H m A U 7 R p N H I mq U B N H I O 3P p A l K b 5...

Page 49: ...r AR I J Tl FUNCTION I N 1 234 Q K 0 TAPE CD RADIO OFF 0 xZ I 5 67 5 6_ p 6G 2 i O U D 2 i J e 30 TYPE I I 5 67 9 0 K B N A 9 I 0 PLAY N 9 I 96GH 9 ...

Page 50: ...78 9 7 A B19 L GH 8L 9 I 8 UZ C C L G H ZS P L G H L GH 8L c 2c gC h 0 FM i I j ISS FM MODE 0 T k C N H MONO C N 9 3 G L G L G M N VOLUME N Q K Tl 0 FUNCTION 0 TAPE CD RADIO OFF E F EG H c l m n o0 0 FM pG 1 9 IH n o0 0 23 H MW 5 K SW q N l m C E j ...

Page 51: ... AR FUNCTION RADIO _ J 1 0 BAND _ W a b 2c M N TUNING C H 2c 5 K X K 30 9d X SW Y 2c M J e 30 FINE TUNING ...

Page 52: ...OLUME O 3P Q K 0 0 x O 3 R SH T 0 u 5 7 A 0 C D EF X B Q UV 3 L W 5 0 C 9 I R SH T X K 1P GH 0 YC G GH 0 5N 0 1 23 O 1 0 ZPUSH OPEN CLOSE 9 IH Q K FUNCTION TAPE CD RADIO OFF 7 7 A B19 8L 9 I 8 UZ C C L G H L GH ZS P L G H L GH 8L B 1 1 VOLUME u FUNCTION Z PUSH OPEN CLOSE x C D ...

Page 53: ... AR FUNCTION CD 0 Z PUSH OPEN CLOSE 1 234 5 67 8 2 9 3 1 234 5 67 1 234 1 234 5 67 8 2 9 0 ...

Page 54: ... 49 O MP Q O M R4 7 S R4 7 T UV W X U 2 59 Y Z MC UN B 4 UN B B W0 B O M B H O MP _ U a bT 0 7 C c H O M _ UQ 5 0 Z MCde 4 H T 2 Z fK Ug A W hG B DYNAMIC SOUND SYSTEM US B i 2 B9 W B Uj 4B P F 1 U 8 CD k 5 K l 2 E N W Q 1 H g m S ...

Page 55: ... AR 01 2 3 45 678 0 1 2 34 5 6 7 89 4 0 A B C D FUNCTION E 9 F GH I4 J7 K OPR BATT ...

Page 56: ... AR AR 2003 Sony Corporation CFD CD777S MK2 CD Radio Cassette Corder ...

Reviews: