background image

Setting Up

23

Setting Up

Connecting
optional
components

You can enjoy the sound from
a TV or VCR through the
speakers of this player.

For details, refer to the
instruction manual of the
component to be connected.

Before making connections, be sure to turn off the
power of each equipment, and set FUNCTION to
TAPE•CD/RADIO OFF.

1

Connect a component to the player.

2

Set FUNCTION to TV/LINE IN and play the
connected component.

Note

Connect the cables
firmly to avoid any
malfunction.

Tip

You can record the
sound of the connected
component. Insert a
blank tape, and press 

r

on deck B.

Rear panel of this
player

to line out jack

Audio connecting
cable (not supplied)

TV, VCR,
cassette player/
recorder, etc.

FUNCTION

TV/LINE IN

TV/LINE  IN

R

L

Summary of Contents for CFD-CD777L

Page 1: ...3 864 133 61 1 1998 by Sony Corporation CD Radio Cassette Corder Operating Instructions CFD CD777S CFD CD777L ...

Page 2: ...re To avoid electrical shock do not open the cabinet Refer servicing to qualified personnel only Warning Do not install the appliance in a confined space such as a bookcase or built in cabinet The FUNCTION selector is located at the front When you turn on the player the OPR BATT indicator lights up ...

Page 3: ...ng a specific track 16 Playing tracks repeatedly Repeat Play 17 Creating your own program Program Play The Tape Player 19 Recording through a microphone Using as a PA system Setting Up 20 Hooking up the system 23 Connecting optional components 24 Adjusting the audio emphasis DYNAMIC SOUND SYSTEM Additional Information 25 Precautions 27 Troubleshooting 29 Maintenance 30 Specifications Back cover In...

Page 4: ...ons see pages 20 22 1 Set FUNCTION to CD 2 Press 6 PUSH OPEN CLOSE down to open the lid of the CD compartment and place a CD on the CD compartment 3 Close the lid of the CD compartment With the label side up 1 4 2 3 CD TAPE RADIO TV LINE IN DUBBING FUNCTION CD RADIO OFF ...

Page 5: ...pplayback Press p pauseplayback Press ontheremote press P Pressthebuttonagainto resumeplayafterpause gotothenexttrack Press gobacktotheprevioustrack Press remove the CD Press 6 PUSHOPEN CLOSE turnofftheplayer SetFUNCTIONtoTAPE CD RADIO OFF Tip During operation the level meter shows the frequency level of the sound Adjusting the volume will not affect the level meter VOLUME Level meter FUNCTION 6 P...

Page 6: ...et FUNCTION to RADIO 2 Set BAND to select the band you want 3 Turn TUNING to tune in the station you want For better SW reception use FINE TUNING CFD CD777S CFD CD777L 3 1 2 3 CD TAPE RADIO TV LINE IN DUBBING FUNCTION CD RADIO OFF FM SW2 SW1 MW BAND FM MW SW LW BAND TUNING FINE TUNING ...

Page 7: ...fect the level meter If the FM broadcast is noisy set ISS FM MODE at the rear to MONO Radio will play in monaural To Do this adjustthevolume Turn VOLUME turnofftheradio Set FUNCTION to TAPE CD RADIO OFF To improve broadcast reception Reorient the antenna for FM Reorient the player itself for MW or LW For SW extend the antenna vertically for FM for MW LW for SW VOLUME Level meter FUNCTION ...

Page 8: ...TAPE CD RADIO OFF 2 Press p6 to open tape compartment and insert a recorded tape Use TYPE I normal tape only Close the compartment 3 Press PLAY The player starts playing With the side you want to play facing you 3 2 1 3 2 CD TAPE RADIO TV LINE IN DUBBING FUNCTION CD RADIO OFF STOP EJECT PLAY ...

Page 9: ... only To play Set DIR MODE to bothsidesofthetape repeatedly bothsidesofthetape fromthefrontsideto reversesideonly If play begins from the reverse side the tape stops at the end of that side Note During playback do not press 0 or on the other deck as this causes excessive wow and flutter Tips During operation the level meter shows the frequency level of the sound Adjusting the volume will not affec...

Page 10: ... CD and insert a CD see page 4 To record from the radio set FUNCTION to RADIO and tune in the station you want using BAND and TUNING see page 6 To record from the built in microphone MIC set FUNCTION to TAPE CD RADIO OFF With the side you want to record on facing you 3 1 STOP EJECT CD TAPE RADIO TV LINE IN DUBBING FUNCTION CD RADIO OFF CD TAPE RADIO TV LINE IN DUBBING FUNCTION CD RADIO OFF CD TAPE...

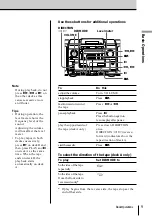
Page 11: ...MW LW program makes a whistling sound after you ve pressed r in step 3 set the ISS FM MODE Interference Suppress Switch at the rear to the position that most decreases the noise For the best results use the AC power as a power source Use these buttons for additional operations To Press Stoprecording p6 on deck B Pauserecording P on deck B Pressthebuttonagainto resume recording To erase a recording...

Page 12: ... blank tape into deck B 2 Set FUNCTION to DUBBING 3 To dub at high speed press HIGH SPEED DUBBING to ON To dub at normal speed press HIGH SPEED DUBBING to OFF With the side you want to record on facing you 2 4 1 1 4 3 STOP EJECT CD TAPE RADIO TV LINE IN DUBBING FUNCTION CD RADIO OFF HIGH SPEED DUBBING ON OFF 5 ...

Page 13: ...nd flutter Tips Adjusting the volume or the audio emphasis see page 24 will not affect the recording level For the best results use the AC power as a power source When the tape in deck A ends first deck B will continue recording till the tape end When the tape in deck B ends first deck A plays on according to the setting of the DIR MODE switch To stop dubbing Press p6 on deck A and B Use these but...

Page 14: ... mode Checking the remaining time Press DISPLAY DISPLAY ENTER on the player while playing a CD To display Press DISPLAY remaining time on the once currenttrack remaining time on the CD twice andthenumberoftracksleft playingtimeandthecurrent threetimes tracknumber For a track whose number is more than 20 the remaining time appears as in the display Total playing time Total track number ...

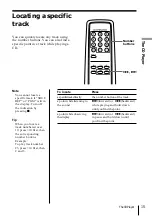
Page 15: ...lelisteningto forward or backward the sound while playing and hold down untilyoufindthepoint apointwhileobserving forward or backward thedisplay in pause and hold down until you find the point Note You cannot locate a specific track if SHUF REP or PGM is lit in the display Turn off the indication by pressing p Tip When you locate a track numbered over 10 press 10 first then the corresponding numbe...

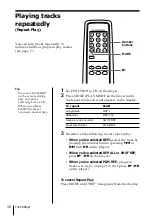
Page 16: ...medtracks PGM REP 3 Do either of the following to start repeat play When you ve selected REP1 select the track by pressing the number button pressing or then on the player When you ve selected REP ALL or SHUF REP press on the player When you ve selected PGM REP program tracks see step 3 on page 17 then press on the player To cancel Repeat Play Press MODE until REP disappears from the display Tip P...

Page 17: ...ODE until PGM appears in the display 3 Press the number buttons for the tracks you want to program in the order you want 4 Press to start program play On the player 1 Set FUNCTION to CD 2 Press PLAY MODE until PGM appears in the display 3 Press or then press DISPLAY ENTER for the tracks you want to program in the order you want 4 Press Playing order MODE DISPLAY continued Programed track ...

Page 18: ...After you ve created the program insert a blank tape into deck B and press r on deck B to start recording To cancel Program Play Press MODE until PGM disappears from the display To check the order of tracks before play Press DISPLAY Every time you press the button the track number appears in the programed order To change the current program Press p once if the CD is stopped and twice if the CD is ...

Page 19: ... c c u r s t u r n d o w n t h e v o l u m e o r m o v e t h e m i c r o p h o n e a w a y f r o m t h e s p e a k e r s Recording through a microphone 1 P l u g t h e m i c r o p h o n e i n t o t h e M I X M I C j a c k a n d t u r n o n t h e m i c r o p h o n e i f i t h a s a p o w e r s w i t c h 2 S e t F U N C T I O N t o T A P E C D R A D I O O F F 3 I n s e r t a b l a n k t a p e i n t ...

Page 20: ...wn until it snaps into place A Tips To detach the speakers unlock speaker see B on the diagram and slide the speaker box all the way up and away from the player Connect the supplied speakers to this player If you connect any other speakers or equipment malfunction may occur Right speaker Left speaker Speaker cord AC IN 4 Battery compartment 1 Speaker terminals 2 to a wall outlet A B ...

Page 21: ...inus and the red wires to plus terminals the right speaker wires to the R and the left speaker wires to the L terminals 2 Connecting the AC power cord Insert one end of the supplied AC power cord to the AC IN socket located at the rear of the player and the other end to the wall outlet CFD CD777S only Adjusting the voltage Be sure to set the VOLTAGE SELECTOR at the rear to your local power supply ...

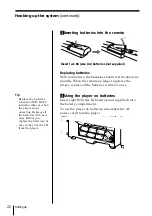
Page 22: ...s the player replace all the batteries with new ones 4 Using the player on batteries Insert eight R20 size D batteries not supplied into the battery compartment To use the player on batteries disconnect the AC power cord from the player Tip Replace the batteries when the OPR BATT indicator dims or when the player stops operating Replace all the batteries with new ones Before you replace the batter...

Page 23: ...ower of each equipment and set FUNCTION to TAPE CD RADIO OFF 1 Connect a component to the player 2 Set FUNCTION to TV LINE IN and play the connected component Note Connect the cables firmly to avoid any malfunction Tip You can record the sound of the connected component Insert a blank tape and press r on deck B Rear panel of this player to line out jack Audio connecting cable not supplied TV VCR c...

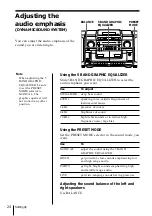
Page 24: ...igh frequency noise tape hiss Using the PRESET MODE Set the PRESET MODE selector to the sound mode you want Use To MANUAL adjust the sound using the 5 BAND GRAPHIC EQUALIZER DISCO get powerful clear sounds emphasizing low and high range audio PARTY get light bright sounds emphasizing high and middle range audio LIVE get wide ranging sounds having presense Adjusting the sound balance of the left an...

Page 25: ...he moisture to evaporate If the player has not been used for a long time set it in the playback mode to warm it up for a few minutes before inserting a cassette If you have any questions or problems concerning your player please consult your nearest Sony dealer On safety As the laser beam used in the CD player section is harmful to the eyes do not attempt to disassemble the casing Refer servicing ...

Page 26: ...e rise in temperature inside the car Do not stick paper or sticker on the CD nor scratch the surface of the CD After playing store the CD in its case If there is a scratch dirt or fingerprints on the CD it may cause tracking error Notes on cassettes Break off the cassette tab from side A or B to prevent accidental recording If you want to reuse the tape for recording cover the broken tab with adhe...

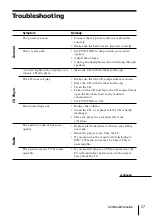
Page 27: ...ation Set FUNCTION to CD Reduce the volume Clean the CD or replace it if the CD is badly damaged Place the player in a location free from vibration Replace all the batteries with new ones if they are weak Move the player away from the TV If you are using the remote while listening to MW LW radio noise may be heard This is unavoidable If you are listening to an FM program near the TV with an indoor...

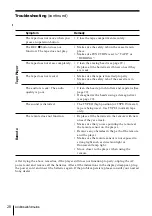
Page 28: ...e remote sensor on the player Remove any obstacles in the path of the remote and the player Make sure the remote sensor is not exposed to strong light such as direct sunlight or fluorescent lamp light Move closer to the player when using the remote Tape Player Symptom The tape does not move when you press an operation button The REC r button does not function The tape does not play The tape does n...

Page 29: ...ld detergent solution Do not use any type of abrasive pad scouring powder or solvent such as alcohol or benzine Cleaning the lens If the lens becomes dirty it may cause a skipping of sound during CD operation Clean with a commercially available blower Cleaning the tape heads and tape path Wipe the heads the pinch rollers and the capstans with a cleaning swab slightly moistened with cleaning fluid ...

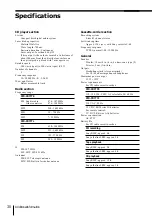
Page 30: ...z IF FM 10 7 MHz SW MW LW 455 kHz Antennas FM SW Telescopic antenna MW LW Built in ferrite bar antenna Cassette corder section Recording system 4 track 2 channel stereo Fast winding time Approx 120 s sec with Sony cassette C 60 Frequency response TYPE I normal 80 12 500 Hz General Speaker Woofer 10 cm 4 in dia 4 ohms cone type 2 Tweeter 5 cm 2 in dia Outputs Headphones jack stereo minijack For 16 ...

Page 31: ... w h d 30 9 3 4 10 1 4 inches incl projecting parts Mass Approx 9 5 kg 20 lb 15 oz incl batteries Supplied accessory AC power cord 1 Remote control 1 Design and specifications are subject to change without notice Optional accessories Sony MDR headphone series ...

Page 32: ...Display 14 Dubbing 12 G H GRAPHIC EQUALIZER 24 I J K Improving broadcast reception 7 L Listening to the radio 6 Locating a specific track 15 M N O MEGA BASS 24 P Q PA system 19 Playing a CD 4 a tape 8 tracks repeatedly 16 PRESET MODE 24 Program Play 17 Public address system See PA system R Recording on a tape 10 Repeat Play 16 S Selecting audio emphasis 24 tracks 15 Setting up 20 T Troubleshooting...

Reviews: