9
CDX-GT42IPW/GT44IP/GT420IP
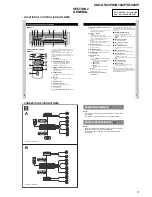
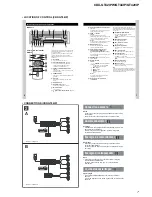
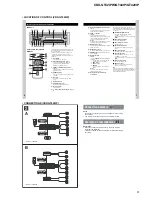
• LOCATION OF CONTROL (CDX-GT420IP)
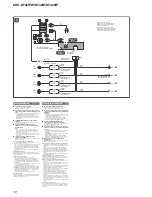
• CONNECTIONS (CDX-GT420IP)
6
Location of controls and basic operations
Main unit
Card remote commander
RM-X151
This section contains instructions on the location
of controls and basic operations. For details, see
the respective pages.
For iPod operation, see “iPod” on page 9. The
corresponding buttons on the card remote
commander control the same functions as those
on the unit.
A
OFF button
To power off; stop the source.
B
EQ3 (equalizer) button page 10
To select an equalizer type (XPLOD,
VOCAL, EDGE, CRUISE, SPACE,
GRAVITY, CUSTOM or OFF).
C
Volume control dial/select button
page 10
To adjust volume (rotate); select setup items
(press and rotate).
D
SOURCE button
To power on; change the source (Radio/CD/
AUX/PD).
E
Disc slot
Insert the disc (label side up), playback
starts.
F
Display window
G
AUX input jack page 11
To connect a portable audio device.
H
Z
(eject) button
To eject the disc.
I
(front panel release) button page 5
SEEK
SCRL
SEEK
PAUSE
ALBUM
REP
SHUF
EQ3
DSPL
OFF
BTM
PUSH SELECT
1
6
2
3
5
4
MODE
SOURCE
AUX
1
qa qs
q;
9
2
qd
qh
qg
4
5
8
6
7
3
qf
OFF
DSPL
SCRL
SEL
SOURCE
MODE
1
3
2
4
6
5
ATT
VOL
+
–
+
–
4
wa
qs
1
wd
qj
qk
w;
ql
wf
ws
7
J
DSPL (display)/SCRL (scroll) button
page 8
To change display items (press); scroll the
display item (press and hold).
K
SEEK –/+ buttons
CD/PD:
To skip tracks (press); skip tracks
continuously (press, then press again within
about 1 second and hold); reverse/fast-
forward a track (press and hold).
Radio:
To tune in stations automatically (press); find
a station manually (press and hold).
L
MODE button page 8
To select the radio band (FM/AM); select the
play mode of iPod.
M
BTM button page 8
To start the BTM function (press and hold).
N
RESET button
(located behind the front
panel)
page 4
O
Number buttons
CD/PD:
(1)
/
(2)
:
ALBUM –/+
(during MP3/WMA
playback)
To skip albums (press); skip albums
continuously (press and hold).
(3)
:
REP page 8
(4)
:
SHUF page 8
(6)
:
PAUSE
To pause playback. To cancel, press
again.
Radio:
To receive stored stations (press); store
stations (press and hold).
P
Receptor for the card remote
commander
The following buttons on the card remote
commander have also different buttons/functions
from the unit. Remove the insulation film before
use (page 4).
qj
<
(
.
)/
,
(
>
) buttons
To control CD/radio/PD, the same as
(SEEK)
–/+ on the unit.
Setup, sound setting, etc., can be operated by
<
,
.
qk
DSPL (display) button
To change display items.
ql
VOL (volume) +/– button
To adjust volume.
w;
ATT (attenuate) button
To attenuate the sound. To cancel, press
again.
wa
SEL (select) button
The same as the select button on the unit.
ws
M
(+)/
m
(–) buttons
To control CD/PD, the same as
(1)
/
(2)
(ALBUM –/+) on the unit.
Setup, sound setting, etc., can be operated by
M
m
.
wd
SCRL (scroll) button
To scroll the display item.
wf
Number buttons
To receive stored stations (press); store
stations (press and hold).
Note
If the unit is turned off and the display disappears, it
cannot be operated with the card remote commander
unless
(SOURCE)
on the unit is pressed, or a disc is
inserted to activate the unit first.
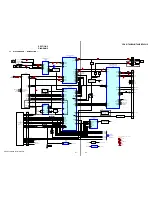
A
B
AUDIO OUT
FRONT
AUDIO OUT
REAR
*
AUDIO OUT
FRONT
AUDIO OUT
REAR
*
*
AUDIO OUT SUB/REAR
*
AUDIO OUT SUB/REAR
Exemple de raccordement
Remarques
•
Raccordez d’abord le câble de mise à la masse avant de
raccorder l’amplifi cateur.
•
L’alarme est émise uniquement lorsque l’amplifi cateur intégré
est utilisé.
Connection example
Notes
•
Be sure to connect the ground (earth) lead before connecting
the amplifi er.
•
The alarm will only sound if the built-in amplifi er is used.


