background image

9

CDX-GT30W/GT300/GT300EE/GT300S/GT350/GT350S

6

Location of controls and basic operations

Main unit

Front panel removed

Card remote commander 
RM-X151

Refer to the pages listed for details. The 
corresponding buttons on the card remote 
commander control the same functions as those 
on the unit.

A

OFF button

To power off; stop the source.

B

Volume control dial/select button

  11

To adjust volume (rotate); select setup items 
(press and rotate).

C

Receptor for the card remote 
commander

D

PTY (Programme Type) button  

10

To select PTY in RDS.

E

Display window

F

DSO button  

2

To select the DSO mode (1, 2, 3 or OFF). 
The larger the number, the more enhanced 
the effect.

G

OPEN button

5

CDX-GT300S
CDX-GT300

RESET

ql

w;

qk

OFF

DSPL

SCRL

SEL

SOURCE

MODE

1

3

2

4

6

5

ATT

VOL

+

+

7

H

GP

*

1

/ALBM

*

2

 +/– buttons

*

3

To skip groups/albums (press); skip groups/
albums continuously (press and hold).

I

SEEK –/+ buttons

CD:
To skip tracks (press); skip tracks 
continuously (press, then press again within 
about 1 second and hold); reverse/fast-
forward a track (press and hold).
Radio:
To tune in stations automatically (press); find 
a station manually (press and hold).

J

DSPL (display) button 


8

To change display items.

K

SENS/BTM button  

8

To improve weak reception: LOCAL/MONO 
(press); start the BTM function (press and 
hold).

L

SOURCE button

To power on; change the source (Radio/CD/
MD*

4

/AUX).

M

MODE button  

8, 12

To select the radio band (FM/MW/LW)/
select the unit*

5

.

N

AF (Alternative Frequencies)/TA 
(Traffic Announcement) button  

9

To set AF and TA/TP in RDS.

O

Number buttons

CD/MD*

4

:

(3)

REP  

8

(4)

SHUF  

8

(5)

BBE MP

*

6


3

To activate the BBE MP function, set 
“BBEMP-ON.” To cancel, set 
“BBEMP-OFF.”

(6)

PAUSE

*

6

To pause playback. To cancel, press 
again.

Radio:
To receive stored stations (press); store 
stations (press and hold).

P

EQ3 (equalizer) button  

11

To select an equalizer type (XPLOD, 
VOCAL, EDGE, CRUISE, SPACE, 
GRAVITY, CUSTOM or OFF).

Q

AUX input jack  

12

To connect a portable audio device.

R

RESET button  

4

S

(eject) button  

5

To eject the disc.

T

Disc slot  

5

To insert the disc.

The following buttons on the card remote 
commander have also different buttons/functions 
from the unit.

wa

<

 (

.

)/

,

 (

>

) buttons

To control CD/radio, the same as 

(SEEK)


–/+ on the unit.

ws

VOL (volume) +/– button

To adjust volume.

wd

ATT (attenuate) button

To attenuate the sound. To cancel, press 
again.

wf

SEL (select) button

The same as the select button on the unit.

wg

M

 (+)/

m

 (–) buttons

To control CD, the same as 

(GP/ALBM)

 +/– on the unit.

wh

SCRL (scroll) button  

8

To scroll the display item.

wj

Number buttons

To receive stored stations (press); store 
stations (press and hold).

*1

When an ATRAC CD is played.

*2

When an MP3/WMA is played. 

*3

If the changer is connected, the operation is 
different, see page 13.

*4

When an MD changer is connected.

*5

When a CD/MD changer is connected.

*6

When playing back on this unit.

Note

If the unit is turned off and the display disappears, it 
cannot be operated with the card remote commander 
unless 

(SOURCE)

 on the unit is pressed, or a disc is 

inserted to activate the unit first.

Tip

For details on how to replace the battery, see 
“Replacing the lithium battery of the card remote 
commander” on page 15.

AUDIO OUT FRONT

AUDIO OUT REAR

*

BUS AUDIO IN

BUS CONTROL IN

BUS AUDIO IN

BUS CONTROL IN

A

B

*

 not supplied 

nicht mitgeliefert
non fourni
non in dotazione
niet bijgeleverd

Source selector

*

Signalquellenwähler

*

Sélecteur de source

*

Selettore di fonte

*

Geluidsbronkiezer

*

XA-C30

*

 AUDIO OUT SUB/REAR

Voorbeeldaansluitingen  

Opmerkingen (

2

-A)

•  Sluit eerst de aarddraad aan voordat u de versterker aansluit.
•  U hoort de pieptoon alleen als de ingebouwde versterker wordt 

gebruikt.

Tip (

2

-B- )

Om twee of meer CD/MD-wisselaars aan te sluiten, hebt u de 
geluidsbronkiezer XA-C30 (niet bijgeleverd) nodig.

Exemple de raccordement  

Remarques (

2

-A) 

•  Raccordez d’abord le câble de mise à la masse avant de 

connecter l’amplifi cateur.

•  L’alarme est émise uniquement lorsque l’amplifi cateur intégré 

est utilisé.

Conseil (

2

-B- )

Dans le cas du raccordement de deux changeurs de CD/MD 
ou plus, le sélecteur de source XA-C30 (non fourni) est 
indispensable. 

Anschlussbeispiel  

Hinweise (

2

-A)

•  Schließen Sie unbedingt zuerst das Massekabel an, bevor Sie 

den Verstärker anschließen.

•  Der Warnton wird nur ausgegeben, wenn der integrierte 

Verstärker verwendet wird.

Tipp (

2

-B- )

Zum Anschließen von zwei oder mehr CD/MD-Wechslern wird 
der Signalquellenwähler XA-C30 (nicht mitgeliefert) benötigt.

Esempio di collegamento  

Note (

2

-A) 

•  Assicurarsi di collegare il cavo di terra prima di collegare 

l’apparecchio all’amplifi catore.

•  L’allarme viene emesso solo se è in uso l’amplifi catore 

incorporato.

Suggerimento (

2

-B- )

Per collegare due o più cambia CD/MD, occorre utilizzare il 
selettore di fonte XA-C30 (non in dotazione).

Connection example  

Notes (

2

-A)

•  Be sure to connect the earth lead before connecting the 

amplifi er.

•  The alarm will only sound if the built-in amplifi er is used. 

Tip (

2

-B- )

For connecting two or more CD/MD changers, the source 
selector XA-C30 (not supplied) is necessary. 

• LOCATION OF CONTROL (CDX-GT300/GT300S) (AEP, UK model)

• CONNECTIONS (CDX-GT300/GT300S) (AEP, UK model)

Summary of Contents for CDX-GT300

Page 1: ... model FM3 65 74 MHz at 30 kHz setp EE model 87 5 108 MHz at 50 kHz step E CH MX model 87 5 107 9 MHz at 200 kHz step E CH MX model FM tuning interval 50 kHz 200 kHz switchable E CH MX model Antenna terminal External antenna connector Intermediate frequency 10 7 MHz 450 kHz Usable sensitivity 9 dBf Selectivity 75 dB at 400 kHz Signal to noise ratio 67 dB stereo 69 dB mono Harmonic distortion at 1 ...

Page 2: ...D Power requirements 12 V DC car battery negative ground Dimensions Approx 178 50 181 mm 7 1 8 2 7 1 4 in w h d Mounting dimensions Approx 182 53 162 mm 7 1 4 2 1 8 6 1 2 in w h d Mass Approx 1 2 kg 2 lb 11 oz Supplied accessories Parts for installation and connections 1 set Card remote commander RM X151 US and foreign patents licensed from Dolby Laboratories Note This unit cannot be connected to ...

Page 3: ...careful Strong viscosity Unleaded solder is more viscous sticky less prone to flow than ordinary solder so use caution not to let solder bridges occur such as on IC pins etc Usable with ordinary solder It is best to use only unleaded solder but unleaded solder may also be added to ordinary solder This label is located on the bottom of the chassis CD Playback You can play CD DA also containing CD T...

Page 4: ... Assy M903 20 2 10 Servo Board 20 3 DIAGRAMS 3 1 Block Diagram CD Section 21 3 2 Block Diagram Main Section 22 3 3 Block Diagram Key Section 23 3 4 Circuit Boards Location 23 3 5 Printed Wiring Boards CD Mechanism Section 25 3 6 Schematic Diagram CD Mechanism Section 1 2 26 3 7 Schematic Diagram CD Mechanism Section 2 2 27 3 8 Printed Wiring Board Main Section 28 3 9 Schematic Diagram Main Section...

Page 5: ...AUX input jack 10 To connect a portable audio device R RESET button 4 S Z eject button 5 To eject the disc T Disc slot 5 To insert the disc The following buttons on the card remote commander have also different buttons functions from the unit wa buttons To control CD radio the same as SEEK on the unit ws VOL volume button To adjust volume wd ATT attenuate button To attenuate the sound To cancel pr...

Page 6: ...illumination signal Be sure to connect the black ground lead to a metal surface of the car first 6 To the 12 V power terminal which is energized in the accessory position of the ignition key switch Notes If there is no accessory position connect to the 12 V power battery terminal which is energized at all times Be sure to connect the black ground lead to a metal surface of the car first When your ...

Page 7: ...o connect a portable audio device R RESET button 4 S Z eject button 5 To eject the disc T Disc slot 5 To insert the disc The following buttons on the card remote commander have also different buttons functions from the unit wa buttons To control CD radio the same as SEEK on the unit ws VOL volume button To adjust volume wd ATT attenuate button To attenuate the sound To cancel press again wf SEL se...

Page 8: ... to the 12 V power battery terminal which is energized at all times Be sure to connect the black ground lead to a metal surface of the car first When your car has a built in FM AM antenna in the rear side glass see Notes on the control and power supply leads 7 To the 12 V power terminal which is energized at all times Be sure to connect the black ground lead to a metal surface of the car first Rem...

Page 9: ...CRL scroll button 8 To scroll the display item wj Number buttons To receive stored stations press store stations press and hold 1 When an ATRAC CD is played 2 When an MP3 WMA is played 3 If the changer is connected the operation is different see page 13 4 When an MD changer is connected 5 When a CD MD changer is connected 6 When playing back on this unit Note If the unit is turned off and the disp...

Page 10: ...P REMOTE IN d un amplificateur de puissance facultatif Ce raccordement existe seulement pour les amplificateurs Le raccordement à tout autre système peut endommager l appareil B Vers le cordon de liaison d un téléphone de voiture Avertissement Si vous disposez d une antenne électrique sans boîtier de relais le branchement de cet appareil au moyen du cordon d alimentation fourni 3 risque d endommag...

Page 11: ...lect switch in the supplied installation connections manual P Number buttons CD MD 4 3 REP 8 4 SHUF 8 5 BBE MP 6 2 To activate the BBE MP function set BBEMP ON To cancel set BBEMP OFF 6 PAUSE 6 To pause playback To cancel press again Radio To receive stored stations press store stations press and hold Q EQ3 equalizer button 9 To select an equalizer type XPLOD VOCAL EDGE CRUISE SPACE GRAVITY CUSTOM...

Page 12: ...12 CDX GT30W GT300 GT300EE GT300S GT350 GT350S ...

Page 13: ... the display item O Number buttons CD MD 4 3 REP 8 4 SHUF 8 5 BBE MP 6 3 To activate the BBE MP function set BBEMP ON To cancel set BBEMP OFF 6 PAUSE 6 To pause playback To cancel press again Radio To receive stored stations press store stations press and hold P EQ3 equalizer button 9 To select an equalizer type XPLOD VOCAL EDGE CRUISE SPACE GRAVITY CUSTOM or OFF Q AUX input jack 10 To connect a p...

Page 14: ...14 CDX GT30W GT300 GT300EE GT300S GT350 GT350S ...

Page 15: ... to the following sequence 2 1 SUB PANEL ASSY Page 16 2 2 CD MECHANISM BLOCK Page 16 SET 2 3 MAIN BOARD Page 17 2 4 CHASSIS T SUB ASSY Page 17 2 5 ROLLER ARM ASSY Page 18 2 6 CHASSIS OP ASSY Page 18 2 8 SL MOTOR ASSY M902 Page 19 2 10 SERVO BOARD Page 20 2 7 OPTICAL PICK UP Page 19 2 9 LE MOTOR ASSY M903 Page 20 ...

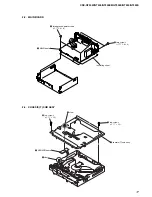
Page 16: ...the disassembly procedure in the numerical order given 2 1 SUB PANEL ASSY 2 two claws 3 two claws 5 sub panel assy flexible flat cable 17 core CN701 4 1 two screws PTT 2 6 6 6 bracket CD 7 CD mechanism block 4 CN350 3 1 screw PTT 2 6 6 2 screw PTT 2 6 6 5 two screws PTT 2 6 4 Ver 1 2 ...

Page 17: ...T350 GT350S 2 4 CHASSIS T SUB ASSY 2 3 MAIN BOARD 1 three ground point screws PTT 2 6 6 3 MAIN board 2 two screws PTT 2 6 8 insulating sheet 5 SENSOR board 6 chassis T sub assy 4 claw 3 claw 1 two screws P 1 7 2 2 2 two screws P 1 7 2 2 ...

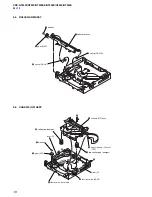
Page 18: ...LLER ARM ASSY 3 washer 4 gear RA1 5 roller arm assy 1 spring RAL B 2 spring RAR B 4 washer 0 coil spring damper 9 two coil springs damper qa chassis OP assy 5 gear LE1 1 optical pick up 16 core CN1 lever D slider R 6 7 8 2 Remove the six solders 3 tension spring KF60 Ver 1 2 ...

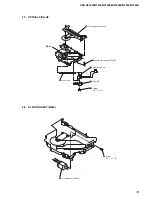
Page 19: ...300EE GT300S GT350 GT350S 2 8 SL MOTOR ASSY M902 2 7 OPTICAL PICK UP 1 tension coil spring CHKG 2 chucking arm sub assy 3 screw B 1 4 5 4 rack SL 5 claw 6 main shaft 7 optical pick up 1 screw P 1 4 1 8 2 SL motor assy M902 ...

Page 20: ...lever D bracket LEM N slider R 6 screw P 1 7 2 2 8 screw M 1 7 2 5 qa screw M 1 7 2 5 qf two toothed lock screws M 1 4 qs screw M 1 7 2 5 9 bearing LEB N 0 gear LE assy qg LE motor assy M903 1 Remove the solders 5 claw 6 SERVO board 4 screw 1 Remove the eight solders 2 Remove the three solders 3 optical pick up 16 core CN1 Ver 1 2 ...

Reviews: