background image

15

Mémorisation des noms de 
station 

— Fonction de mémoire des stations

Vous pouvez attribuer un nom à chaque station 
de radio et le sauvegarder en mémoire ; il 
s’affiche ensuite à l’écran lorsque la station est 
syntonisée. Le nom attribué à la station peut 
comprendre jusqu’à 8 caractères.

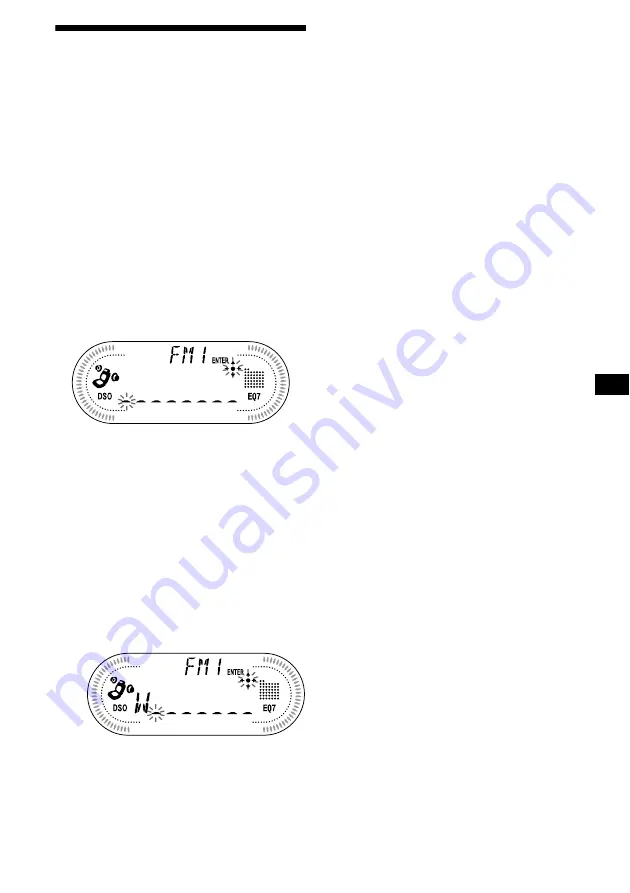
Mémorisation des noms de station

1

Syntonisez une station dont vous 
voulez mémoriser le nom.

2

Appuyez sur 

(MENU)

, puis appuyez 

plusieurs fois sur l’un des côtés de 

(DISC/PRESET)

 jusqu’à ce que 

l’indication “NAMEEDIT” s’affiche.

3

Appuyez sur 

(ENTER)

.

4

Entrez les caractères du nom souhaité

1

Appuyez plusieurs fois sur le côté 
(+)

*

1

 de la touche 

(DISC/PRESET)


pour sélectionner le caractère 
souhaité.

A


t


B


t


C

 ... 

t


0


t


1


t


2

 ... 

t


+


t


t


*

 ... 

t

 _*

2


t


A

*1

Pour aller en sens inverse, appuyez sur le 
côté (–) de la touche 

(DISC/PRESET)

.

*2

(espace)

2

Appuyez sur le côté (+) de 

(SEEK)


lorsque vous avez repéré le 
caractère souhaité.

Si vous appuyez sur le côté (–) de 

(SEEK)

vous pouvez revenir vers la gauche. 

3

Répétez les étapes 

1

 et 

2

 pour 

entrer le reste du nom.

5

Appuyez sur 

(ENTER)

.

Conseils
• Pour corriger ou effacer un nom, procédez par 

réécriture ou entrez “

_

”.

• Il existe une autre méthode pour mémoriser les 

noms de station : au lieu d’effectuer les étapes 2 et 
3, appuyez sur 

(LIST)

 pendant deux secondes. 

Vous pouvez également compléter l’opération en 
appuyant sur 

(LIST)

 pendant deux secondes au lieu 

d’effectuer l’étape 5.

Suppression du nom de la station

1

Pendant la réception radio, appuyez 
sur 

(MENU)

, puis appuyez plusieurs 

fois sur un des côtés de la touche 

(DISC/PRESET)

 jusqu’à ce que “NAME 

DEL” s’affiche.

2

Appuyez sur 

(ENTER)

.

3

Appuyez plusieurs fois sur l’un des 
côtés de 

(DISC/PRESET)

 pour 

sélectionner le nom de station que 
vous souhaitez supprimer.

4

Appuyez sur 

(ENTER)

 pendant deux 

secondes. 

Le nom est effacé.
Répétez les étapes 3 et 4 si vous voulez 
effacer d’autres noms.

5

Appuyez deux fois sur 

(MENU)

.

L’appareil revient au mode de réception radio 
normal.

Remarque
Si vous avez déjà effacé tous les noms de station, 
l’indication “NO DATA” s’affiche à l’étape 4.

Summary of Contents for CDX-CA700X Installation/Connection

Page 1: ...enever you call upon your Sony dealer regarding this product Model No CDX CA720X CA700X CA705M Serial No CDX CA720X CDX CA700X CDX CA705M For installation and connections see the supplied installation connections manual En ce qui concerne l installation et les connexions consulter le manuel d installation raccordement fourni 2002 Sony Corporation 3 237 887 11 1 US FR FM AM Compact Disc Player ...

Page 2: ...particular installation If this equipment does cause harmful interference to radio or television reception which can be determined by turning the equipment off and on the user is encouraged to try to correct the interference by one or more of the following measures Reorient or relocate the receiving antenna Increase the separation between the equipment and receiver Connect the equipment into an ou...

Page 3: ...Receiving the stored stations 13 Storing only the desired stations 14 Storing station names Station Memo 14 Tuning in a station through a list List up 15 Other Functions Using the rotary commander 16 Adjusting the sound characteristics 17 Quickly attenuating the sound 17 Changing the sound and display settings Menu 18 Setting the equalizer EQ7 19 Setting the Dynamic Soundstage Organizer DSO 19 MP3...

Page 4: ...button 10 n Frequency select switch located on the bottom of the unit 2 The AM FM tuning interval is factory set to the 10 k 200 k position Make sure that the 9 k 50 k position is selected o Receptor for the card remote commander p SOUND button 17 q ENTER button To enter a setting r EQ7 button 19 1 Warning when installing in a car without an ACC accessory position on the ignition switch After turn...

Page 5: ...n m DISC M m buttons n ENTER button o ATT button Note If the unit is turned off by pressing OFF for 2 seconds it cannot be operated with the card remote commander unless SOURCE on the unit is pressed or a disc is inserted to activate the unit first Tip See Replacing the lithium battery on page 22 for details on how to replace the batteries SEEK EQ7 S O UND ENT E R LIS T M ENUD I SC PRES E T OPE N ...

Page 6: ...o keep the disc clean do not touch the surface Handle the disc by its edge Keep your discs in their cases or disc magazines when not in use Do not subject the discs to heat high temperature Avoid leaving them in parked cars or on dashboards rear trays Do not attach labels or use discs with sticky ink residue Such discs may stop spinning when used causing a malfunction or may ruin the disc Do not u...

Page 7: ...c is not for audio use Some CD Rs CD RWs depending on the equipment used for its recording or the condition of the disc may not play on this unit You cannot play a CD R a CD RW that is not finalized A process necessary for a recorded CD R CD RW disc to be played on the audio CD player Getting Started Resetting the unit Before operating the unit for the first time or after replacing the car battery...

Page 8: ...tery drain 2 Press OPEN then slide the front panel to the right and gently pull out the left end of the front panel Notes If you detach the panel while the unit is still turned on the power will turn off automatically to prevent the speakers from being damaged Do not drop or put excessive pressure on the front panel and its display window Do not subject the front panel to heat high temperature or ...

Page 9: ...aying a CD with this unit you can also control external CD MD units If you connect MP3 playable CD units eg MP3 CD changer you can play MP3 files compressed audio files with quality sound See MP3 playable CD Unit optional on page 20 Note If you connect an optional CD unit with the CD TEXT function the CD TEXT information will appear in the display when you play a CD TEXT disc Playing a disc With t...

Page 10: ...pears in the source display it starts to play If MS or another MD unit appears in the source display press MODE to select your desired MD unit to start playback Display items When the disc track changes any prerecorded title 1 of the new disc track is automatically displayed if the Auto Scroll function is set to ON names exceeding 8 characters will be scrolled page 18 1 When pressing DSPL NO NAME ...

Page 11: ...layback press 2 on the card remote commander repeatedly until the desired setting appears in the display Shuffle Play starts To return to normal play mode select SHUF OFF Note SHUF ALL will not shuffle tracks between CD units and MD units Labeling a CD Disc Memo For a CD unit with the CUSTOM FILE function You can label each disc with a custom name Disc Memo You can enter up to 8 characters for a d...

Page 12: ...s will appear 5 Press either side of DISC PRESET repeatedly to select the disc name you want to erase The stored names will appear 6 Press ENTER for 2 seconds The name is erased Repeat steps 5 and 6 if you want to erase other names 7 Press MENU twice The unit returns to normal CD play mode Notes When the Disc Memo for a CD TEXT disc is erased the original CD TEXT information is displayed If you ca...

Page 13: ...ored in the memory Preset Search function If preset tuning does not work Press either side of SEEK to search for the station automatic tuning Scanning stops when the unit receives a station Repeat until the desired station is received Tips If automatic tuning stops too frequently turn on the Local Seek to limit seek to stations with stronger signals see Changing the sound and display settings on p...

Page 14: ...Station Memo You can assign a name to each radio station and store it in memory The name of the station currently tuned in appears in the display You can assign a name using up to 8 characters for a station Storing the station names 1 Tune in a station whose name you want to store 2 Press MENU then press either side of DISC PRESET repeatedly until NAMEEDIT appears 3 Press ENTER 4 Enter the charact...

Page 15: ... station whose name you want to erase 4 Press ENTER for 2 seconds The name is erased Repeat steps 3 to 4 if you want to erase other names 5 Press MENU twice The unit returns to normal radio reception mode Note If you have already erased all of the station names NO DATA appears in step 4 Tuning in a station through a list List up 1 During radio reception press LIST momentarily The frequency or the ...

Page 16: ...urning off the ignition By rotating the control Rotate and release to Skip tracks Tune in stations automatically Rotate hold and release to Fast forward reverse a track Find a station manually By pushing in and rotating the control Push in and rotate the control to Receive preset stations Change the disc When an optional CD MD unit is connected Press To SOURCE Change source radio CD MD 1 Power on ...

Page 17: ...ess SOUND the item changes as follows BAS bass t TRE treble t BAL left right t FAD front rear 2 Adjust the selected item by pressing either side of SEEK When adjusting with the rotary commander press SOUND and rotate the VOL control Note Adjust within 3 seconds after selecting the item Quickly attenuating the sound With the rotary commander or the card remote commander Press ATT on the rotary comm...

Page 18: ...n Display A SCRL Auto Scroll Select ON to scroll all automatically displayed names exceeding 8 characters When A SCRL is set to off and the disc track name is changed the disc track name does not scroll DIM Dimmer to change the brightness of the display CDX CA720X only Select ON to dim the display Select OFF to deactivate the Dimmer P M Play Mode LOCAL ON OFF Local seek mode page 13 Select ON to o...

Page 19: ...d frequency Each time you press SEEK the frequency changes 62 Hz y 157 Hz y 396 Hz y 1kHz y 2 5kHz y 6 3kHz y 16kHz 2Press either side of DISC PRESET to adjust the desired volume level The volume level is adjustable in 1 dB steps from 10 dB to 10 dB To restore the factory set equalizer curve press ENTER for 2 seconds 5 Press MENU twice When the effect setting is complete the normal playback mode a...

Page 20: ...hile displaying an ID3 tag the album number does not appear 2 If the disc has been labeled by this unit using the CUSTOM FILE function Disc Memo is displayed preferentially 3 When pressing DSPL NO NAME indicates that there is no disc name album name or track title and NO ID3 indicates that there is no ID3 tag Notes Some characters cannot be displayed Characters and signs which cannot be displayed ...

Page 21: ... ALBM 1 to play the albums in the current optional CD unit with the MP3 file control function in random order SHUF DISC to play the tracks on the current disc in random order SHUF CHGR 2 to play the tracks in the current optional CD MD unit in random order SHUF ALL 3 to play all the tracks in all the connected CD MD units including this unit in random order 1 Available only when optional CD unit w...

Page 22: ...on before cleaning the connectors and remove the key from the ignition switch Never touch the connectors directly with your fingers or with any metal device Replacing the lithium battery Under normal conditions batteries will last approximately 1 year The service life may be shorter depending on the conditions of use When the battery becomes weak the range of the card remote commander becomes shor...

Page 23: ...nt cover with a thin screwdriver 3Repeat step 2 for the other side 2 Remove the unit 1Use a thin screwdriver to push in the clip on the left side of the unit then pull out the left side of the unit until the catch clears the mounting 2Repeat step 1 for the right side 3Slide the unit out of its mounting 4 mm ...

Page 24: ...rminal Power amplifier control terminal Inputs Telephone ATT control terminal Illumination control terminal BUS control input terminal BUS audio input terminal Remote controller input terminal Antenna input terminal Tone controls Bass 10 dB at 62 Hz Treble 10 dB at 16 kHz Loudness 8 dB at 100 Hz 2 dB at 10 kHz Power requirements 12 V DC car battery negative ground Dimensions Approx 178 50 178 mm 7...

Page 25: ...er antenna does not extend The power antenna does not have a relay box Cannot turn off the indication You entered the name edit mode tPress LIST for 2 seconds CD MD playback A disc cannot be loaded Another CD MD is already loaded The CD MD is forcibly inserted upside down or in the wrong way Playback does not begin Defective MD or dirty CD CD R CD RW that is not finalized You tried to playback a C...

Page 26: ... for about 5 seconds and an alarm sound will be heard BLANK 1 No tracks have been recorded on an MD 2 t Play an MD with recorded tracks on it ERROR 1 An inserted CD is dirty or inserted upside down 2 t Clean or insert the CD correctly An inserted CD MD cannot play because of some problem 2 t Insert another CD MD HI TEMP The ambient temperature is more than 50 C 122 F t Wait until the temperature g...

Page 27: ...27 Messages L SEEK The Local Seek mode is on during automatic tuning page 13 or You have reached the beginning or the end of the disc and you cannot go any further ...

Page 28: ...enant des informations telles que le nom du disque le nom de l artiste et les noms des pistes Ces informations sont enregistrées sur le disque CDX CA705M uniquement Le logo XM Ready indique que ce produit commande un tuner XM Sony vendu séparément Consultez votre revendeur agréé Sony le plus proche pour obtenir plus d informations sur le tuner XM Pour en savoir plus sur le fonctionnement du tuner ...

Page 29: ... des stations mémorisées 14 Mémorisation des stations souhaitées uniquement 14 Mémorisation des noms de station Fonction de mémoire des stations 15 Syntonisation d une station à partir d une liste Affichage automatique des titres 16 Autres fonctions Fonctionnement du satellite de commande 16 Réglage des caractéristiques du son 18 Atténuation rapide du son 18 Modification des réglages du son et de ...

Page 30: ...r 11 n Sélecteur de fréquence situé sur le dessous de l appareil 2 L intervalle de syntonisation AM FM est réglé par défaut sur la position 10k 200 k Assurez vous que la position 9 k 50 k est sélectionnée o Récepteur de la mini télécommande p Touche SOUND 18 q Touche ENTER Pour entrer une valeur r Touche EQ7 19 1 Avertissement en cas d installation de l appareil dans une voiture dont le contact ne...

Page 31: ... Touche SOURCE f Touches SEEK g Touche SOUND h Touche OFF i Touches VOL j Touche EQ7 k Touche MODE l Touche LIST m Touches DISC M m n Touche ENTER o Touche ATT SEEK D ISC PRES E T D I S C PRESE T SEEK EQ7 S O UND ENT E R LIS T M ENUD I SC PRES E T OPE N D I SC PRESE T SEEK pour déplacer la sélection vers la gauche SEEK pour déplacer la sélection vers la droite DISC PRESET pour déplacer la sélectio...

Page 32: ...nt de l utiliser Les antennes électriques se déploient automatiquement lorsque l appareil fonctionne Si vous avez des questions ou des problèmes au sujet du fonctionnement de cet appareil qui ne sont pas abordés dans ce mode d emploi consultez votre détaillant Sony Condensation Les jours de pluie et dans les régions très humides de la condensation peut s accumuler dans les lentilles et l écran d a...

Page 33: ...ntraîne une déformation du disque Les disques de forme non standard p ex en forme de cœur de carré ou d étoile ne peuvent pas être lus sur cet appareil N utilisez pas de tels disques car ils pourraient endommager le lecteur Vous ne pouvez pas écouter des CD de 8 cm Avant d insérer les disques dans le lecteur nettoyez les avec un chiffon conçu à cet effet disponible dans le commerce Essuyez chaque ...

Page 34: ...ur OFF La lecture du disque CD ou MD ou la réception radio s arrête l éclairage des touches et l affichage restent allumés Si le contact de votre voiture n est pas doté d une position ACC accessoire veillez à appuyer sur OFF pendant 2 secondes pour éviter que la batterie ne se décharge 2 Appuyez sur OPEN faites glisser la façade vers la droite puis tirez doucement vers vous l extrémité gauche de l...

Page 35: ...08 1 Appuyez sur MENU puis appuyez plusieurs fois sur l un des côtés de DISC PRESET jusqu à ce que l indication CLOCK s affiche 1Appuyez sur ENTER L indication des heures clignote 2Appuyez sur un des côtés de DISC PRESET pour régler l heure 3Appuyez sur le côté de SEEK L indication des minutes clignote 4Appuyez sur un des côtés de DISC PRESET pour régler les minutes 2 Appuyez sur ENTER L horloge c...

Page 36: ...ppareil en option raccordé la lecture de la même source continue sur le lecteur CD ou MD en option Avec l appareil en option 1 Appuyez plusieurs fois sur SOURCE pour sélectionner CD ou MD MS 2 Appuyez plusieurs fois sur MODE jusqu à ce que l appareil souhaité apparaisse La lecture commence MS lecteur MG Memory Stick System up MGS X1 Précautions à prendre lors du raccordement d appareils MGS X1 ou ...

Page 37: ... de lecture appuyez plusieurs fois sur 1 sur la mini télécommande jusqu à ce que le réglage souhaité apparaisse dans l écran d affichage La lecture répétée commence Pour revenir en mode de lecture normal sélectionnez REP OFF Lecture des pistes au hasard Lecture aléatoire Vous pouvez sélectionner SHUF DISC pour écouter les pistes du disque en cours de lecture dans un ordre aléatoire SHUF CHGR 1 pou...

Page 38: ...e méthode pour identifier un CD au lieu d effectuer les étapes 2 et 3 appuyez sur LIST pendant 2 secondes Vous pouvez également compléter l opération en appuyant sur LIST pendant 2 secondes au lieu d effectuer l étape 5 Vous pouvez identifier les CD à l aide d un appareil ne disposant pas de la fonction CUSTOM FILE si cet appareil est raccordé à un lecteur CD disposant de cette fonction Le mémo du...

Page 39: ...vous ayez repéré le disque souhaité 3 Appuyez sur ENTER pour lancer la lecture du disque Remarque Certaines lettres ne peuvent pas être affichées exception fonction de mémo de disque Radio L appareil peut mémoriser jusqu à 6 stations pour chaque bande radio FM1 FM2 FM3 AM1 et AM2 Attention Pour syntoniser des stations pendant que vous conduisez nous vous conseillons d utiliser la fonction de mémor...

Page 40: ...eption mono voir Modification des réglages du son et de l affichage à la page 18 La qualité sonore est améliorée mais le son est diffusé en mode mono l indication ST disparaît Remarque Si des interférences surviennent cet appareil réduira automatiquement la bande de fréquence captée pour éliminer les parasites fonction IF AUTO Dans ce cas certaines émissions FM peuvent passer en réception mono mêm...

Page 41: ...ôté de SEEK vous pouvez revenir vers la gauche 3Répétez les étapes 1 et 2 pour entrer le reste du nom 5 Appuyez sur ENTER Conseils Pour corriger ou effacer un nom procédez par réécriture ou entrez _ Il existe une autre méthode pour mémoriser les noms de station au lieu d effectuer les étapes 2 et 3 appuyez sur LIST pendant deux secondes Vous pouvez également compléter l opération en appuyant sur L...

Page 42: ... un satellite de commande en option Fonctionnement du satellite de commande Apposez d abord l étiquette appropriée suivant la position de montage du satellite de commande Le satellite de commande fonctionne par pression sur les touches et par rotation des commandes Fonctionnement par pression sur les touches Appuyez sur Pour SOURCE changer de source radio CD MD 1 mettre l appareil sous tension MOD...

Page 43: ...ment Fonctionnement par pression et rotation de la commande Exercez une pression sur la commande et tournez la pour syntoniser les stations mémorisées changer de disque Lorsqu un lecteur CD ou MD en option est raccordé Modification du sens de fonctionnement Le sens de fonctionnement des commandes est réglé par défaut comme indiqué sur l illustration ci dessous Si vous devez monter le satellite de ...

Page 44: ... changer le sens de fonctionnement du satellite de commande Sélectionnez NORM pour utiliser le satellite de commande dans le sens par défaut Sélectionnez REV lorsque vous installez le satellite de commande à la droite du volant P OUT 4 0V 5 5V pour modifier la tension de pré sortie de l amplificateur de puissance à 4 0 V ou 5 5 V Ne peut être sélectionné que lorsque l appareil est éteint CDX CA720...

Page 45: ...facilement passer d une catégorie de réglage à l autre SET DSPL P M SND ou EDIT en appuyant sur un des côtés de DISC PRESET pendant 2 secondes Réglage de l égaliseur EQ7 Vous pouvez sélectionner un des sept types de réglages de l égalisateur dont chacun correspond à un type de musique XPLOD VOCAL CLUB JAZZ NEW AGE ROCK CUSTOM et OFF égaliseur éteint Vous pouvez mémoriser et ajuster les réglages de...

Page 46: ...mal Réglage du répartiteur dynamique du son émis DSO Si vos haut parleurs sont installés dans la partie inférieure des portières le son est émis à un niveau proche du sol et il se peut qu il ne soit pas clair La fonction DSO Dynamic Soundstage Organizer crée un son plus ambiant comme s il y avait des haut parleurs dans le tableau de bord haut parleurs virtuels Vous pouvez sauvegarder un réglage DS...

Page 47: ... affiche à l écran comme type de disque et la lecteur commence mais aucun son n est produit Avant de lancer la lecture d une piste cet appareil lit toutes les informations des pistes et des albums du disque Selon la structure des pistes cette recherche d informations peut durer plus d une minute avant que la lecture ne puisse commencer Pendant cette période l indication READ s affiche à l écran At...

Page 48: ...éfile pas Lecture répétée de pistes Lecture répétée Une piste ou un album entier du disque placé dans l appareil principal ou la totalité de ce disque est répété à la fin de la lecture La fonction de lecture répétée est disponible dans les modes suivants REP TRACK pour répéter une seule piste REP ALBM 1 pour répéter un album REP DISC 2 pour répéter tout le disque 1 Disponible uniquement lorsqu un ...

Page 49: ...nt raccordés En cours de lecture appuyez plusieurs fois sur 2 sur la mini télécommande jusqu à ce que le réglage souhaité s affiche à l écran La lecture aléatoire commence Pour revenir en mode de lecture normal sélectionnez SHUF OFF Remarque La fonction SHUF ALL ne passera pas de façon aléatoire de la lecture de pistes de lecteurs CD à la lecture de pistes de lecteurs MD Informations complémentair...

Page 50: ...n autre type de pile peut entraîner un risque d incendie ou d explosion Remarques sur la pile au lithium Tenez les piles au lithium hors de la portée des enfants Si la pile venait à être avalée consultez immédiatement un médecin Essuyez la pile avec un chiffon sec pour assurer un bon contact Veillez à respecter la polarité lors de l installation de la pile Ne tenez pas la pile avec des pinces méta...

Page 51: ...maximale 52 W 4 à 4 ohms Généralités Sorties Sorties audio avant arrière Fil de commande de relais d antenne électrique Fil de commande d amplificateur de puissance Entrées Fil de commande ATT téléphone Fil de commande de l éclairage Connecteur d entrée de commande BUS Connecteur d entrée audio BUS Connecteur d entrée de commande à distance Connecteur d entrée de l antenne Commandes de tonalité Gr...

Page 52: ... sont pas raccordés correctement au connecteur d alimentation de la voiture destiné aux accessoires L appareil n est pas alimenté Vérifiez les raccordements Si tout est en ordre vérifiez le fusible La voiture n est pas équipée d une position ACC tAppuyez sur SOURCE ou insérez un disque pour activer l appareil L appareil est alimenté en continu La voiture n est pas équipée d une position ACC L ante...

Page 53: ...areil est en mode de réception mono t Désactivez le mode de réception mono page 19 Des interférences se produisent en cours de réception FM Le mode de réception étendue est sélectionné tRéglez le mode IF sur IF AUTO page 14 Affichage des erreurs pour cet appareil et les changeurs CD MD en option Les indications suivantes clignotent pendant environ 5 secondes et une alarme retentit BLANK 1 Aucune p...

Page 54: ...r la situation consultez votre détaillant Sony le plus proche Messages L SEEK Le mode de recherche locale est activé en cours de syntonisation automatique page 14 ou Vous avez atteint le début ou la fin du disque et vous ne pouvez pas aller plus loin ...

Page 55: ......

Page 56: ...Sony Corporation Printed in Thailand ...

Reviews: