background image

17

EN

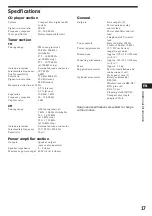
Specifications

CD player section

System

Compact disc digital audio
system

Signal-to-noise ratio

90 dB

Frequency response

10 – 20,000 Hz

Wow and flutter

Below measurable limit

Tuner section

FM

Tuning range

FM tuning interval:
50 kHz/200 kHz
switchable
87.5 – 108.0 MHz
(at 50 kHz step)
87.5 – 107.9 MHz
(at 200 kHz step)

Antenna terminal

External antenna connector

Intermediate frequency

10.7 MHz

Usable sensitivity

8 dBf

Selectivity

75 dB at 400 kHz

Signal-to-noise ratio

65 dB (stereo),
68 dB (mono)

Harmonic distortion at 1 kHz

0.5 % (stereo),
0.3 % (mono)

Separation

35 dB at 1 kHz

Frequency response

30 – 15,000 Hz

Capture ratio

2 dB

AM

Tuning range

AM tuning interval:
9 kHz/10 kHz switchable
531 – 1,602 kHz
(at 9 kHz step)
530 – 1,710 kHz
(at 10 kHz step)

Antenna terminal

External antenna connector

Intermediate frequency

10.71 MHz/450 kHz

Sensitivity

30 µV

Power amplifier section

Outputs

Speaker outputs
(sure seal connectors)

Speaker impedance

4 – 8 ohms

Maximum power output 40 W 

×

 4 (at 4 ohms)

General

Outputs

Line outputs (2)
Power antenna relay
control lead
Power amplifier control
lead
Telephone ATT control
lead

Tone controls

Bass ±10 dB at 100 Hz
Treble ±10 dB at 10 kHz

Power requirements

12 V DC car battery
(negative ground)

Dimensions

Approx. 178 

×

 50 

×

 185 mm

(w/h/d)

Mounting dimensions

Approx. 182 

×

 53 

×

 162 mm

(w/h/d)

Mass

Approx. 1.2 kg

Supplied accessories

Parts for installation and
connections (1 set)
Front panel case (1)

Optional accessories

Rotary commander
RM-X4S
Wireless remote RM-X47
RCA pin cord
RC-63 (1 m)
Cleaning cloth XP-CD1
Compact disc single
adapter CSA-8

Design and specifications are subject to change
without notice.

Additional Information

Summary of Contents for CDX-4480ESP - Am/fm Compact Disc Changer

Page 1: ... Disc Player CDX 4480ESP ES C 3 862 044 21 1 For installation and connections see the supplied installation connections manual Para obtener información sobre la instalación y las conexiones consulte el manual de instalación conexiones suministrado テ サセ コヲwクヒ ホスuク sアオ Aスミームィ エ ィムェコ ァヲwクヒ スuク sアオサ ゥ ム ィ C ...

Page 2: ...2 EN Welcome Thank you for purchasing the Sony Compact Disc Player This unit lets you enjoy a variety of features by using either an optional rotary commander RM X4S or a wireless remote RM X47 ...

Page 3: ...taching the front panel 6 Setting the clock 7 CD Player Listening to a CD 7 Playing a CD in various modes 8 Radio Memorizing stations automatically Best Tuning Memory BTM 9 Memorizing only the desired stations 9 Receiving the memorized stations 9 Storing the station names Station Memo 10 Locating a station by name List up 11 Other Functions Using the rotary commander 11 Adjusting the sound charact...

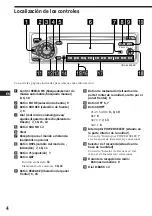
Page 4: ...manual During radio reception Number buttons 9 D BASS dial 13 Refer to the pages for details 1 SEEK AMS seek Automatic Music Sensor manual search control 8 9 10 2 MODE band select 9 3 SOURCE source select button 7 9 4 Dial volume bass treble left right front rear control 7 10 11 12 5 SOUND button 12 6 Display window 7 Receptor for the optional wireless remote 8 DSPL display mode change button 7 10...

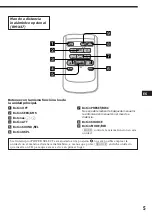
Page 5: ... PRESET DISC button You cannot do manual search and manual tuning with the remote 8 SOURCE button 9 MODE DIR button MODE controls the same function on this unit When the POWER SELECT switch is set to the B position the unit cannot be operated with the wireless remote unless SOURCE on the unit is pressed or a CD is inserted to activate the unit first OFF SOURCE DIR SEL FF REW SOUND ATT DSPL SEEK AM...

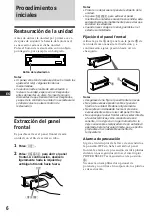
Page 6: ...larm If you turn the ignition key switch to the OFF position without removing the front panel the caution alarm will beep for a few seconds only when the POWER SELECT switch is set to the A position If you connect an optional power amplifier and do not use the built in amplifier the beep tone will be disabled A B Reset button OFF RELEASE Getting Started Resetting the unit Before operating the unit...

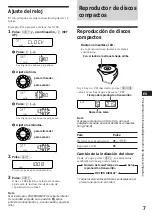
Page 7: ...to go forward to go forward to go backward Elapsed playing time Track number Getting Started CD Player Labelled side up SETUP CLOCK SETUP 1OO SETUP 1OOO SETUP 1OOO SOURCE SETUP 1OO8 SETUP 1OO8 5 215 TRACK CD CD Player Listening to a CD Simply insert the CD Playback starts automatically If a CD is already inserted press SOURCE repeatedly until CD appears Note To play back an 8 cm CD use the optiona...

Page 8: ...u press SHIFT only the items you can select light up 2 Press 3 PLAY MODE repeatedly until INTRO appears To search forward To search backward SEEK AMS SETUP PLAYMODE REP SHUF REP1 REP1 CD SETUP PLAYMODE REP SHUF 1 SHUF CD 3 Press 4 n to select INTRO ON Intro Scan starts 4 Press SHIFT To go back to the normal playback mode select INTRO OFF in step 3 above Playing tracks repeatedly Repeat Play 1 Duri...

Page 9: ...a few stations are received some number buttons will retain heir former setting When a number is indicated in the display the unit starts storing stations from the one currently displayed If a CD is not in the unit only the tuner band appears even if you press SOURCE Memorizing only the desired stations You can store up to 10 stations on each band 20 for FM1 and FM2 10 for AM in the order of your ...

Page 10: ...ter FM1 FM1 FM1 If you cannot tune in a preset station Push the SEEK AMS control up or down momentarily to search for the station Automatic Tuning Scanning stops when the unit receives a station Push the SEEK AMS control up or down repeatedly until the desired station is received Note If the automatic tuning stops too frequently press SHIFT then press 3 PLAY MODE repeatedly until LOCAL local seek ...

Page 11: ... DISPLAY 2 Z Clock Z 1 If the station name of a station is not stored NO NAME appears in the display for one second 2 All the items above are scrolled in the display one by one in order Erasing the station name 1 Tune in any station and press LIST for two seconds 2 Press DSPL for two seconds 3 Rotate the dial to select the name that you want to erase 4 Press 5 ENTER for two seconds The name is era...

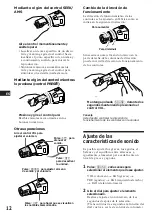
Page 12: ...t n FAD front rear 2 Adjust the selected item by rotating the dial Adjust within three seconds after selecting After three seconds the dial functions as volume control Rotate the control momentarily and release it to Locate a specific track on a disc Rotate and hold the control until you locate the specific point in a track then release it to start playback Tune in the stations automatically Rotat...

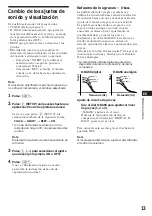
Page 13: ... 4 n to select the desired setting for example ON or OFF 4 Press SHIFT When the mode setting is complete the normal playback mode appears Boosting bass sound D bass You can enjoy clear and powerful bass sound The D bass function boosts the low frequency signal with a sharper curve than conventional bass boost You can hear the bass line more clearly even if the vocal sound is the same volume You ca...

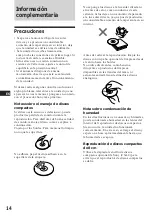
Page 14: ...er CSA 8 to protect the CD player from being damaged Additional Information Precautions If your car was parked in direct sunlight resulting in a considerable rise in temperature inside the car allow the unit to cool off before operating it If no power is being supplied to the unit check the connections first If everything is in order check the fuse If no sound comes from the speakers of two speake...

Page 15: ...ws again after replacement there may be an internal malfunction In such a case consult your nearest Sony dealer Warning Never use a fuse with an amperage rating exceeding the one supplied with the unit as this could damage the unit Cleaning the connectors The unit may not function properly if the connectors between the unit and the front panel are not clean To prevent this open the front panel by ...

Page 16: ...tary commander RM X4S Several labels are supplied with the rotary commander Attach the label that matches the functions of this unit and the mounting position of the rotary commander After you mount the rotary commander attach the label as in the illustration below SOUND LIST MODE SOUND LIST MODE ...

Page 17: ...10 kHz at 10 kHz step Antenna terminal External antenna connector Intermediate frequency 10 71 MHz 450 kHz Sensitivity 30 µV Power amplifier section Outputs Speaker outputs sure seal connectors Speaker impedance 4 8 ohms Maximum power output 40 W 4 at 4 ohms General Outputs Line outputs 2 Power antenna relay control lead Power amplifier control lead Telephone ATT control lead Tone controls Bass 10...

Page 18: ...s connected and you are not using the built in amplifier The beep tone is attenuated page 13 Cause Solution Another CD is already loaded The CD was forcibly inserted upside down Dusty disc The ambient temperature is more than 50 C Press 6 for two seconds Press the reset button The unit is installed at an angle of more than 60 The unit is not installed in a sturdy part of the car Problem CD cannot ...

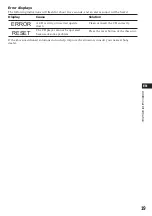
Page 19: ...dications will flash for about five seconds and an alarm sound will be heard Display ERROR RESET Cause A CD is dirty or inserted upside down The CD player cannot be operated because of some problem If the above mentioned solutions do not help improve the situation consult your nearest Sony dealer Additional Information ...

Page 20: ...Enhorabuena por la adquisición de este reproductor de discos compactos de Sony Esta unidad le permitirá disfrutar de varias funciones mediante el uo de un mando rotativo RM X4S o un mando a distancia inalámbrico RM X47 ...

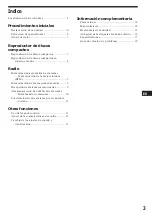
Page 21: ...7 Reproductor de discos compactos Reproducción de discos compactos 7 Reproducción de discos compactos en diversos modos 8 Radio Memorización automática de emisoras Memorización de la mejor sintonía BTM 9 Memorización de las emisoras deseadas 9 Recepción de emisoras memorizadas 9 Almacenamiento de nombres de emisoras Memorando de emisoras 10 Localización de una emisora por su nombre Listado 11 Otra...

Page 22: ...onsulte las páginas indicadas para obtener más información 1 Control SEEK AMS búsqueda sensor de música automático búsqueda manual 8 9 10 2 Botón MODE selección de banda 9 3 Botón SOURCE selección de fuente 7 9 4 Dial control de volumen graves agudos izquierdo derecho delantero trasero 7 10 11 12 5 Botón SOUND 12 6 Visor 7 Receptor para el mando a distancia inalámbrico opcional 8 Botón DSPL cambio...

Page 23: ...ueda manual ni la sintonización manual con el mando a distancia 8 Botón SOURCE 9 Botón MODE DIR MODE controla la misma función en esta unidad Si el interruptor POWER SELECT está ajustado en la posición B no será posible emplear la unidad con el mando a distancia inalámbrico a menos que pulse SOURCE en dicha unidad o que inserte un CD para que ésta se active en primer lugar OFF SOURCE DIR SEL FF RE...

Page 24: ... encendido a la posición OFF sin haber extraído el panel frontal la alarma de precaución emitirá pitidos durante unos segundos sólo si el interruptor POWER SELECT está ajustado en la posición A Si conecta un amplificador opcional de potencia y no utiliza el incorporado los pitidos se desactivarán B A Procedimientos iniciales Restauración de la unidad Antes de utilizar la unidad por primera vez o d...

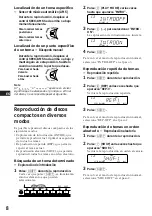
Page 25: ...zar para retroceder para avanzar para retroceder Con el lado de la etiqueta hacia arriba Tiempo de reproducción transcurrido Número de tema SETUP CLOCK SETUP 1OO SOURCE SETUP 1OOO SOURCE SETUP 1OOO SETUP 1OO8 SETUP 1OO8 5 215 TRACK CD Reproductor de discos compactos Reproducción de discos compactos Basta con insertar el CD La reproducción se iniciará de forma automática Si ya hay un CD insertado p...

Page 26: ...FT 6 7 REP SHUF PLAYMODE CD PLAYMODE CD Localización de un tema específico Sensor de música automático AMS Durante la reproducción desplace el control SEEK AMS hacia arriba o abajo momentáneamente Localización de un punto específico de un tema Búsqueda manual Durante la reproducción desplace el control SEEK AMS hacia arriba o abajo y manténgalo en esta posición Suéltelo cuando encuentre la parte q...

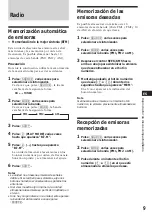
Page 27: ...ervarán sus parámetros anteriores Si el visor muestra algún número la unidad almacenará las emisoras a partir del mostrado en el visor Si no hay ningún disco en la unidad sólo aparece la banda del sintonizador aunque pulse SOURCE Reproductor de discos compactos Radio Memorización de las emisoras deseadas Es posible almacenar un máximo de 10 emisoras de cada banda 20 de FM1 y FM2 y 10 de AM en el o...

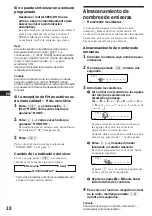
Page 28: ...r Si no puede sintonizar una emisora programada Desplace el control SEEK AMS hacia arriba o abajo momentáneamente para buscar la emisora sintonización automática La exploración se detiene cuando la unidad recibe una emisora Desplace el control SEEK AMS hacia arriba o abajo varias veces hasta recibir la emisora que desee Nota Si la sintonización automática se detiene con demasiada frecuencia pulse ...

Page 29: ...nombre de la emisora no está almacenado en el visor aparecerá durante un segundo NO NAME 2 Todos los elementos anteriores se desplazan por el visor uno por uno en orden Borrado del nombre de una emisora 1 Sintonice cualquier emisora y mantenga pulsado LIST durante dos segundos 2 Mantenga pulsado DSPL durante dos segundos 3 Gire el dial para seleccionar el nombre que desee borrar 4 Mantenga pulsado...

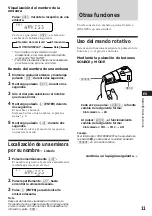
Page 30: ... trasero 2 Gire el dial para ajustar el elemento seleccionado Realice el ajuste en un intervalo de tres segundos después de la selección Transcurridos tres segundos la función del dial vuelve a ser la de control de volumen Para aumentar Para disminuir Gire el control VOL para ajustar el volumen Pulse OFF para desactivar la unidad Pulse SOUND para ajustar el menú de sonido y el volumen Pulse LIST p...

Page 31: ...SHIFT Una vez finalizado el ajuste de modo aparecerá la indicación de modo de reproducción normal Otras funciones Refuerzo de los graves D bass Es posible disfrutar de graves intensos y nítidos La función D bass refuerza la señal de frecuencias bajas con una curva más marcada que la del refuerzo de graves convencional Es posible escuchar la línea de graves con mayor nitidez aunque el sonido vocal ...

Page 32: ...ra evitar que el reproductor de discos compactos se dañe Información complementaria Precauciones Si aparca el automóvil bajo la luz solar directa y se produce un considerable aumento de temperatura en su interior deje que la unidad se enfríe antes de utilizarla Si la unidad no recibe alimentación compruebe las conexiones en primer lugar Si todo está en orden examine el fusible Si los altavoces no ...

Page 33: ... amperaje superior al del suministrado con la unidad ya que ésta podría dañarse Limpieza de los conectores La unidad puede no funcionar correctamente si los conectores de la misma y del panel frontal están sucios Con el fin de evitarlo abra el panel frontal pulsando RELEASE a continuación sepárelo y limpie los conectores con un bastoncillo humedecido en alcohol No aplique demasiada presión ya que ...

Page 34: ...RM X4S Con el mando rotativo se suministra una serie de etiquetas Adhiera la etiqueta que corresponda a las funciones de esta unidad y a la posición de montaje del mando rotativo Después de montar el mando rotativo adhiera la etiqueta como se muestra en la ilustración siguiente SOUND LIST MODE SOUND LIST MODE ...

Page 35: ... de antena Conector de antena externa Frecuencia intermedia 10 71 MHz 450 kHz Sensibilidad 30 µV Sección del amplificador de potencia Salidas Salidas de altavoz conectores de sellado seguro Impedancia de altavoz 4 8 ohmios Salida máxima de potencia 40 W 4 a 4 ohmios Generales Salidas Salidas de línea 2 Cable de control de relé de antena motorizada Cable de control de amplificador de potencia Cable...

Page 36: ...e funcionamiento no se activan El sonido se omite debido a vibraciones Recepción de radio Causa Solución Memorice la frecuencia correcta La emisión es demasiado débil La emisión es demasiado débil n Utilice la sintonización manual Realice la sintonización con precisión La emisión es demasiado débil n Realice el ajuste en el modo monofónico MONO página 10 Problema No es posible realizar la sintoniz...

Page 37: ... o insértelo correctamente Pulse el botón de restauración de la unidad Indicación ERROR RESET Causa Un CD está sucio o insertado al revés El reproductor de CD no funciona debido a algún problema Si el problema no se soluciona con las sugerencias anteriormente enumeradas póngase en contacto con el proveedor Sony más próximo Información complementaria ...

Page 38: ...2 C Sony Corporation ...

Reviews: