background image

2

WARNING

To reduce the risk of fire or electric shock, do 
not expose this TV to rain or moisture.

This symbol is intended to 
alert the user to the presence 
of uninsulated “dangerous 
voltage” within the TV’s 
enclosure that may be of 
sufficient magnitude to 
constitute a risk of electric 
shock to persons.

This symbol is intended to 
alert the user to the presence 
of important operating and 
maintenance (servicing) 
instructions in the literature 
accompanying the TV.

The TV shall not be exposed to dripping or 
splashing and no objects filled with liquids, such 
as vases, shall be placed on the TV.

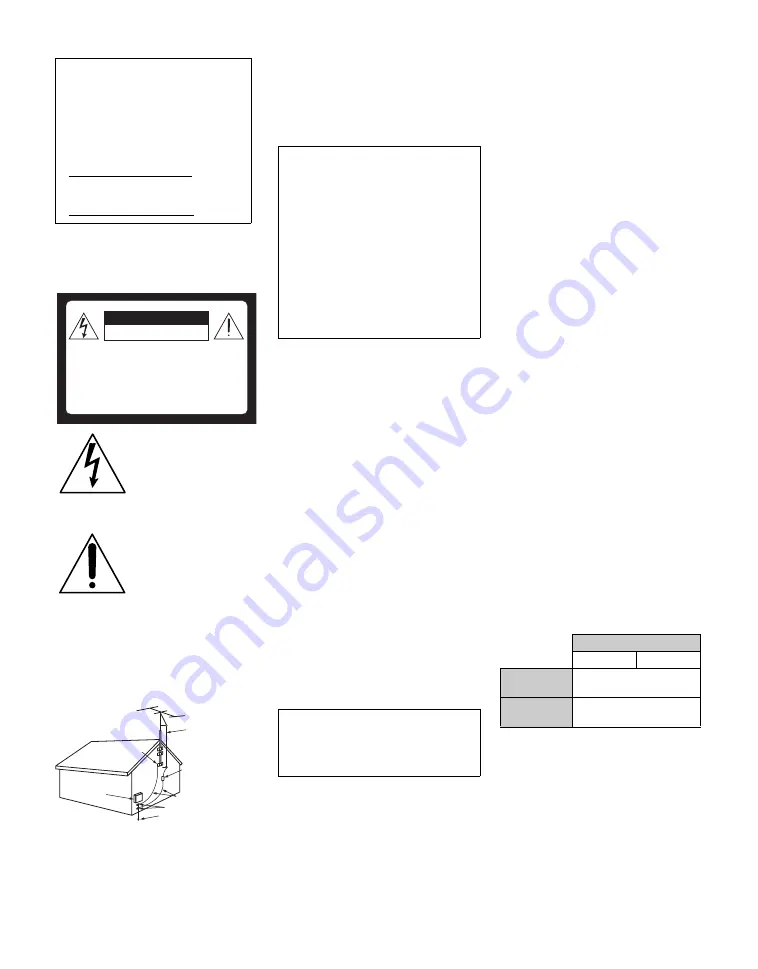
Antenna grounding according 
to the National Electrical Code, 
ANSI/NFPA 70

CAUTION

To prevent electric shock and blade exposure, do 
not use this polarized AC plug with an extension 
cord, receptacle or other outlet unless the blades 
can be fully inserted.

NOTIFICATION

This equipment has been tested and found to 
comply with the limits for a Class B digital 
device, pursuant to Part 15 of the FCC Rules. 
These limits are designed to provide reasonable 
protection against harmful interference in a 
residential installation. This equipment 
generates, uses and can radiate radio frequency 
energy and, if not installed and used in 
accordance with the instructions, may cause 
harmful interference to radio communications. 
However, there is no guarantee that interference 
will not occur in a particular installation. If this 
equipment does cause harmful interference to 
radio or television reception, which can be 
determined by turning the equipment off and on, 
the user is encouraged to try to correct the 
interference by one or more of the following 
measures:

s

Reorient or relocate the receiving 
antenna.

s

Increase the separation between the 
equipment and receiver.

s

Connect the equipment into an outlet on a 
circuit different from that to which the 
receiver is connected.

s

Consult the dealer or an experienced 
radio/TV technician for help.

The shielded interface cable recommended in 
this manual must be used with this equipment in 
order to comply with the limits for a digital 
device pursuant to Subpart B of Part 15 of FCC 
Rules.

For customer in Canada

This Class B digital apparatus complies with 
Canadian ICES-003.

Safety

s

Operate the TV only on 120-240 V AC.

s

Use the AC power cord specified by Sony 
and suitable for the voltage where you use 
it.

s

The plug is designed, for safety purposes, 
to fit into the wall outlet only one way. If 
you are unable to insert the plug fully into 
the outlet, contact your dealer.

s

If you will not be using the TV for several 
days, disconnect the power by pulling the 
plug itself. Never pull on the cord.

s

For details concerning safety precautions, 
see “Important Safety Instructions” on 
page 3.

Installing

s

The TV should be installed near an easily 
accessible power outlet.

s

To prevent internal heat buildup, do not 
block the ventilation openings.

s

Do not install the TV in a hot or humid 
place, or in a place subject to excessive 
dust or mechanical vibration.

s

Avoid operating the TV at temperatures 
below 41°F (5°C).

s

If the TV is transported directly from a 
cold to a warm location, or if the room 
temperature changes suddenly, the picture 
may be blurred or show poor color due to 
moisture condensation. In this case, 
please wait a few hours to let the moisture 
evaporate before turning on the TV.

s

To obtain the best picture, do not expose 
the screen to direct illumination or direct 
sunlight. It is recommended to use spot 
lighting directed down from the ceiling or 
to cover the windows that face the screen 
with opaque drapery. It is desirable to 
install the TV in a room where the floor 
and walls are not of a reflective material.

CAUTION

Use the following Sony TVs only with the 
following WALL-MOUNT BRACKET or 
TV-stand.

Use with other WALL-MOUNT BRACKET or 
TV-stand may cause instability and possibly 
result in injury.

Owner’s Record

The model and serial numbers are located 
at the rear of the TV. Record these 
numbers in the spaces provided below. 
Refer to them whenever you call upon 
your Sony dealer regarding this TV.

Model Name 

Serial No. 

CAUTION

RISK OF ELECTRIC SHOCK

DO NOT OPEN

ATTENTION

RISQUE DE CHOC ELECTRIQUE,

NE PAS OUVRIR

PRECAUCION

RIESGO DE CHOQUE ELECTRICO

NO ABRIR

Antenna lead-in 
wire

Antenna discharge 
unit (NEC Section 
810-20)

Grounding conductors 
(NEC Section 810-21)

Ground clamps

Power service grounding 
electrode system 
(NEC Art 250 Part H)

Ground clamps

Electric service 
equipment

NEC: National Electrical Code

Declaration of Conformity

Trade Name: SONY
Model: KDL-32L4000/KDL-37L4000
Responsible Party: Sony Electronics Inc.
Address: 16530 Via Esprillo,
San Diego, CA 92127 U.S.A.
Telephone Number: 858-942-2230

This device complies with part 15 of the FCC 
rules. Operation is subject to the following 
two conditions: (1) This device may not 
cause harmful interference, and (2) this 
device must accept any interference received, 
including interference that may cause 
undesired operation.

Pursuant to FCC regulations, you are 
cautioned that any changes or modifications 
not expressly approved in this manual could 
void your authority to operate this 
equipment.

Sony TV Model No.

KDL-32L4000

KDL-37L4000

Sony Wall-Mount 
Bracket Model No.

SU-WL500

Sony TV-Stand 
Model No.

 SU-FL300M

Summary of Contents for BRAVIA KDL-32L4000

Page 1: ...LCD Digital Color TV 3 700 289 12 1 Operating Instructions KDL 32L4000 KDL 37L4000 2008 Sony Corporation ...

Page 2: ... If you will not be using the TV for several days disconnect the power by pulling the plug itself Never pull on the cord s For details concerning safety precautions see Important Safety Instructions on page 3 Installing s The TV should be installed near an easily accessible power outlet s To prevent internal heat buildup do not block the ventilation openings s Do not install the TV in a hot or hum...

Page 3: ...all in accordance with the manufacturer s instructions 8 Do not install near any heat sources such as radiators heat registers stoves or other apparatus including amplifiers that produce heat 9 Do not defeat the safety purpose of the polarized or grounding type plug A polarized plug has two blades with one wider than the other A grounding type plug has two blades and a third grounding prong The wi...

Page 4: ...h cloth or other materials s Never place the TV on a bed sofa rug or other similar surface where ventilation openings may be blocked s Unless proper ventilation is provided the TV may accumulate dust and cause damage s Never allow liquid or solid objects to fall into the ventilation openings s If any liquid or solid object falls inside the TV unplug the TV immediately and have it checked by qualif...

Page 5: ...pillar or any place you might bump your head or receive bodily injury s To prevent fire keep flammable objects or open flame e g candles away from the TV s Do not place optional equipment on top of the TV Prevent the TV from toppling over Take measures to prevent the TV from toppling over and causing injury damage to the TV and property s Secure the TV to a wall and or stand s Never install the TV...

Page 6: ...o connected s Use only an original Sony AC power cord with your TV no brand substitution is allowed s Do not use AC power cord supplied with the TV with any other equipment s Never use a damaged AC power cord A damaged AC power cord can cause a short circuit which may result in a fire or electric shock Do not use a damaged or poorly fitting AC power outlet as your TV s power source s Insert the pl...

Page 7: ...pact can cause the LCD screen glass to crack break or scatter s If damage occurs to the LCD panel small traces of liquid crystal sandwiched between the glass may be found on scattered broken glass s Do not touch the broken glass with bare hands As with any broken glass pieces avoid skin contact and exposure to your eyes or mouth Avoid direct contact with liquid or damp surfaces of the glass as the...

Page 8: ......

Page 9: ...ppling 17 Use a Sony TV Stand 17 Recommended Measures to Secure the TV 17 Bundling the Connecting Cables 19 Setting Up the Channel List Initial Setup 20 Basic Operations Remote Control 21 TV Controls 24 Using the Menus Overview of MENU 25 Using the Picture Settings 25 Using the Sound Settings 26 Using the Screen Settings 27 Using the PC Settings 28 Using the Channel Settings 29 Using the Parental ...

Page 10: ...es against the list on page 39 Assembling the Table Top Stand Follow the assembling steps required to place on a TV stand 1 Take out the Table Top Stand and screws from the carton The screws are found in the accessory bag 2 Place the Table Top Stand onto a level and stable surface Put your hands into the package when taking out the TV from the carton Accessory bag Screws TV unit Table Top Stand ...

Page 11: ...plied screws to attach the TV unit to the Table Top Stand Do not put stress on the LCD panel and the frame around the screen Be careful not to pinch your hands or the AC power cord when you install the TV to the Table Top Stand If an electric screwdriver is used set the torque to tighten at approximately 1 5 N m 15 kgf cm Rear of TV Screw ...

Page 12: ...ipment connections please refer to the Quick Setup Guide Cable System or VHF UHF Antenna System Cable or VHF UHF or VHF only Antenna From Cable settings in Channel settings select Cable On or Cable Off for your type of input signal Cable Box Digital Cable Box Use this hookup if s You subscribe to a cable TV system that uses scrambled or encoded signals requiring a cable box to view all channels an...

Page 13: ...Rear of TV CABLE ANTENNA input AUDIO L R AUDIO CABLE ANTENNA L R AUDIO L PR PB Y R AUDIO VIDEO S VIDEO RGB MONO AUDIO L R 1080i 720p 480p 480i FIX IN PC IN VIDEO IN COMPONENT IN DIGITAL AUDIO OUT OPTICAL AUDIO OUT 1 2 1 1 2 A V cable Satellite Receiver CATV Antenna cable not supplied Satellite antenna cable S VIDEO cable S VIDEO VIDEO yellow AUDIO L white AUDIO R red Rear of TV VIDEO IN 2 is also ...

Page 14: ...AUDIO OUT 1 2 1 1 2 A V cable CATV cable Antenna cable not supplied S VIDEO AUDIO L white AUDIO R red S VIDEO cable VCR VIDEO yellow Rear of TV VIDEO IN 2 is also available for a VIDEO cable connection If your VCR is not equipped with S VIDEO use a VIDEO cable yellow instead of the S VIDEO cable Run the Initial Setup program as described in Setting Up the Channel List on page 20 after completing y...

Page 15: ...ent connect its audio output jack to the TV s L MONO audio input jack 2 HDMI IN 1 HDMI L AUDIO R HDMI High Definition Multimedia Interface provides an uncompressed all digital audio video interface between this TV and any HDMI equipped audio video equipment such as a set top box DVD player and A V receiver HDMI supports enhanced or high definition video plus digital audio 3 HDMI IN 2 If the equipm...

Page 16: ...t to your DVD player s or digital set top box s component video YPBPR and audio L R jacks Component video provides better picture quality than the S VIDEO 5 and the composite video 1 8 connections 7 DIGITAL AUDIO OUT OPTICAL Connects to the optical audio input of a digital audio equipment that is PCM Dolby digital compatible 9 AUDIO OUT L AUDIO R FIX Connect to the left and right audio input jacks...

Page 17: ...Install the TV where it cannot be pulled pushed or knocked over Route all AC power cords and connecting cables so that they are not accessible to curious children Use a Sony TV Stand Use a Sony specified TV stand see page 2 and follow the instruction manual provided with the Sony TV stand If a Sony specified TV stand is not used consider the following recommended measures Recommended Measures to S...

Page 18: ... rear of the TV Rope or chain attach to one M6 anchor bolt Wall anchor attach to the wall stud strong enough to support the weight of the TV pass the rope through the wall anchor then attach to the other M6 anchor bolt Contact Sony Customer Support to obtain the optional Support Belt Kit by providing your TV model name For United States call 1 800 488 7669 or visit www sony com accessories For Can...

Page 19: ...g Started 19 Getting Started Bundling the Connecting Cables You can bundle the connecting cables with the supplied cable band as illustrated below Do not bundle the AC power cord with other connecting cables ...

Page 20: ...tial Setup programming found cable channels you will be able to scan antenna channels as well Connect the antenna using an A B RF switch not supplied and change the switch to antenna then start Auto Program to search antenna channels If the Initial Setup programming found antenna channels the Auto Program process will finish If you want to scan cable channels you can do it later using the Channel ...

Page 21: ... Your Favorites list will be cleared each time you run Auto Program see pages 20 and 29 for Auto Program 4 PICTURE Press repeatedly to cycle through the available picture modes Vivid Standard Custom The picture modes can also be accessed in the Picture settings For details see Using the Picture Settings on page 25 5 RETURN Press to go back to the previous screen when displaying MENU items and sett...

Page 22: ...finition source 16 9 Original source High definition source m m Wide Zoom Wide Zoom Normal Normal This mode is not available Full Full Normal is not available when you are watching a 720p or 1080i source from a component video input or a 720p 1080i or 1080p source from an HDMI input or a digital TV Changing the Wide Screen Mode for PC Timing Button Description qa qs For PC timing see below Incomin...

Page 23: ...isplay the Tools Menu that is associated with your current input analog TV digital TV or external inputs See pages 25 26 30 and 34 qh JUMP Press to jump back and forth between two channels The TV alternates between the current channel and the last channel that was selected qj 0 9 ENT Press 0 9 to select a channel the channel changes after two seconds Press ENT to change channels immediately qk CH ...

Page 24: ...ection or setting 3 VOLUME Press to adjust the volume In the MENU screen these buttons serve as left right buttons 4 CHANNEL Press to scan through channels To scan quickly through channels press and hold down either In the MENU screen these buttons serve as up down buttons 5 POWER Press to turn on and off the TV 6 TIMER LED Lights up in orange when the sleep timer is set 7 STANDBY LED Lights up in...

Page 25: ...ent Picture Mode settings to the default values Backlight Adjust to brighten or darken the backlight Picture Adjust to increase or decrease picture contrast Brightness Adjust to brighten or darken the picture Color Adjust to increase or decrease color intensity Hue Adjust to increase or decrease the green tones Color Temp White adjustment Cool Select to give the white colors a bluish tint Neutral ...

Page 26: ...s received If no SAP signal is present the TV remains in Stereo mode Mono Select for mono reception Use to reduce noise during weak stereo broadcasts MTS is only available for analog programs Alternate Audio Digital channels only Select among the available options to switch among the alternate audio streams The program you are tuned to may be broadcasted in a different language in the alternate au...

Page 27: ... Off Select to turn off the Auto Wide option Choose a screen mode from the Wide Mode option Auto Wide is not available when you are watching analog TV 4 3 Default Select the default Screen Mode to use for 4 3 sources Wide Zoom Enlarges the 4 3 picture to fill the 16 9 screen displaying as much of the original image as possible Normal Select to display the 4 3 picture in its original size Full Sele...

Page 28: ...he picture to fill the display area keeping its original aspect ratio Full2 Select to enlarge the picture to fill the display area Auto Adjustment Select to automatically adjust the display position and phase of the picture when the TV receives an input signal from the connected PC Note that Auto Adjustment may not work well with certain input signals In such cases manually adjust the options belo...

Page 29: ...t to show or hide Then press to select it 2 Press V v to determine if the channel will be shown or hidden Then press to select it Channels that you set to be hidden can be accessed only with the 0 9 buttons You can set channels to be hidden that are automatically set in Auto Program Label Channels Allows you to assign labels such as station call letters to channel numbers 1 Press V v to scroll thr...

Page 30: ...All Select to clear the entire downloadable rating system This action will delete the current Digital Rating menu and the menu will no longer be available until the TV is tuned to a channel that contains downloadable ratings Unrated Available only when Country is set to U S A Allow Allows programs and movies that are broadcasted without a rating Block Blocks all programs and movies that are broadc...

Page 31: ...Movie Rating G All children and general audience PG Parental guidance suggested PG 13 Parental guidance for children under 13 R Restricted viewing parental guidance is suggested for children under 17 NC 17 and X No one 17 or under allowed TV Rating Block programs by their rating content or both Age Based Ratings TV Y All children TV Y7 Directed to children age 7 and older TV G General audience TV ...

Page 32: ...ntrol feature off To reactivate the Parental Lock settings turn off the TV When the TV is turned on again your Parental Lock settings are reactivated Option Description English Rating C All children C8 Children 8 years and older G General programming PG Parental guidance 14 Viewers 14 and older 18 Adult programming French Rating G General programming 8 ans Not recommended for young children 13 ans...

Page 33: ...el DVD for the Component input Then when you press INPUT to change inputs the video label you assigned to that input appears on screen 1 Press V v to highlight the video input Video 1 2 Component 1 2 HDMI 1 2 PC to which you want to assign a label Then press to select the input 2 Press V v to highlight one of the displayed labels Then press to select the label You can select from the following lab...

Page 34: ...ts of a program Should be set to CC1 for most programs Text1 Text2 Text3 Text4 Displays network station information presented using either half or the whole screen if available Digital CC Allows you to set digital closed captioning to Basic digital EIA 608 or Advanced digital EIA 708 Advanced Allows you to select advanced digital EIA 708 closed caption options Select from the available options Adv...

Page 35: ...ure from some video sources Check the connection between the optional video equipment and the TV Press INPUT on the remote control page 23 Press MENU on the remote control Select your desired input from the external inputs list Poor picture Double images or ghosts Check antenna cable connections Check the antenna location and direction Only snow and noise appear on the screen Check if the antenna ...

Page 36: ...reen For more details check the documentation that came with your DVD or contact your program provider Certain programs on DVD or other digital sources display a loss of detail especially during fast motion or dark scenes The compression used by certain digital broadcasts and DVDs may cause your TV s screen to display less detail than usual or cause artifacts small blocks or dots pixelations to ap...

Page 37: ...least two people Do not attempt to lift the TV by yourself For bracket installation refer to the instruction guide provided by the Wall Mount Bracket model for your TV Sufficient expertise is required in installing this TV especially to determine the strength of the wall for withstanding the TV s weight For product protection and safety reasons Sony strongly recommends that you use the Wall Mount ...

Page 38: ... 48 4 60 VESA Guidelines 1024 768 56 5 70 VESA 1024 768 60 0 75 VESA WXGA 1280 768 47 4 60 VESA 1280 768 47 8 60 VESA 1360 768 47 7 60 VESA This TV s PC input does not support Sync on Green or Composite Sync This TV s PC VGA input does not support interlaced signals For the best picture quality it is recommended to use the signals from the above chart with a 60 Hz vertical frequency from a persona...

Page 39: ...5 in inches 2 4 3 4 Speaker output 10 W 10 W NTSC American TV standard ATSC 8VSB terrestrial ATSC compliant 8VSB QAM on cable ANSI SCTE 07 2000 Does not include CableCARD functionality Channel coverage Analog Digital Terrestrial 2 69 2 69 Cable 1 135 1 135 Antenna 75 ohm external terminal for VHF UHF Power consumption KDL 32L4000 in use 165 W in standby less than 1 0 W KDL 37L4000 in use 190 W in ...

Page 40: ...orizontal Center 28 Hue 25 I Info Banner 33 Infrared Receiver IR 24 INPUT button 23 24 Installing the TV on a wall 37 J JUMP button 23 L Label Channels 29 Label Video Inputs 33 Language 33 M MENU button 21 24 Movie Rating 31 MTS 26 MUTING button 21 N Noise Reduction 25 P PC IN 16 Phase 28 Picture 25 PICTURE button 21 Picture Mode 25 Pitch 28 POWER button 22 24 POWER LED 24 Power Management 28 Powe...

Page 41: ......

Page 42: ......

Page 43: ......

Page 44: ...d Quick Setup Guide z Experience difficulty operating your television Contact Sony Customer Support at http www sony com tvsupport or to speak with a support representative United States 1 800 222 SONY 7669 Canada 1 877 899 SONY 7669 Sony will work to resolve your questions more quickly than your retailer or place of purchase Please Do Not Return the Product to the Store ...

Reviews: