


– 16 –
KDF-E42/50A12U
RM-ED002
34
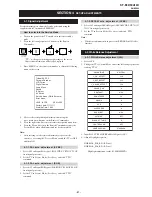
Pa
rental Lo
ck
Sets an age restriction for
p
ro
g
ram
mes.
Any programme that
exceeds
the
age restriction can
only b
e watc
hed after a P
IN
Code
is
ente
red
co
rrectly.
1
Pre
ss
the nu
mb
er butto
ns to en
te
r you
r exi
stin
g PIN
code.
If you have not
p
rev
iou
sly set a PIN, a
message appe
ars to
inform you. Press OK, then follow the instruction of “PIN code
”
be
low.
2
Pr
ess
m
/
M
to select th
e age restricti
on or “None
” (for
unrestricted watchin
g), then
p
re
ss
OK.
3
Pr
ess
<
.
PIN Cod
e
Sets a PIN code
for the first
tim
e,
or
to change
you
r PIN
code.
1
Enter a PIN
as follows:
If you have
previou
sly
set a PIN
P
ress
th
e n
u
m
b
er buttons
to
enter y
our ex
isting
PIN.
If you have
not
set a
PIN:
Pr
ess the
n
u
m
b
er
buttons to enter
the factor
y
setting PIN
of
99
99.
2
Pre
ss
the nu
mb
er butto
ns to en
te
r the ne
w
PIN code.
3
Whe
n re
que
sted
, press the numbe
r
b
u
tton
s
to enter
th
e new PIN
a
gain
for confirmation
.
A m
essag
e
ap
pears
to inform you tha
t th
e
ne
w PIN
ha
s been
ac
cepted.
4
Pr
ess
<
.
Ti
p
PIN code 999
9
is
al
ways accepted.
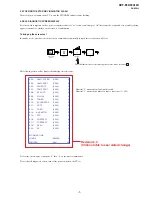
Technical
Se
t-
u
p
Displays
the Tech
nic
al Set-up m
en
u
. Do
the following option
s.
1
Pr
ess
m
/
M
to select th
e desired
o
p
tion, th
en press
OK.
• A
u
to Service Update: Enables the TV
to detect and
store new
dig
ital services
as they become availab
le.
•
Software downlo
ad: En
ables
the TV
to automatically
receive
so
ftware
u
pdates, fre
e
thr
ough
you
r existing aerial (when
issued). Sony recommends that this option
is set to “On” at
al
l
times. If you
do no
t want you
r
so
ftware to be up
date
d, set this
option to
“O
ff”.
• System
Information: Displays
the current
sof
tware version
and
the signal
level. Instead
of
step
2, Press
<
.
2
Pr
ess
m
/
M
to select the “
O
n”,
then press
OK.
CA Mod
ule
Se
t-
u
p
This
op
tion will allow you to
acc
ess a Pay Per View
service once
you obtain a Con
d
itional
Access Module (CAM)
and
a view card.
See page
36 fo
r the loca
tion of
t
he MODEM
an
d
(PCMCIA)
so
ckets.
Option
D
escr
iption
35
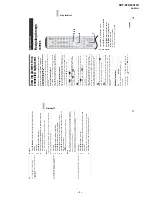
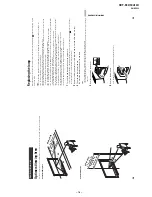
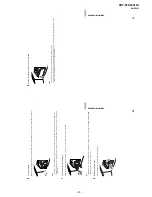
Using Optional Equipment
Connecting optional equipment
Using Optional Equipment
Yo
u can
conn
ect a
wide
ran
ge
of o
ptio
nal
eq
uipmen
t to
your
TV.
Connecting cables
are not supplied.
Connecting to
the
side of the TV
To connec
t
D
o
this
S VHS/H
i
8/DVC
camcorder
A
Connect
to
the S
video
socke
t
4
or
th
e video
socke
t
4,
and
the
audio so
ckets
4. To
avo
id
pic
ture
noise, do
not con
nect
the
camcorder to
th
e video
socke
t
4
and
the S video so
cket
4
at the same
tim
e.
If you
con
n
ect mono
equ
ipment, con
n
ect
to the L/G/S/I sockets
4,
an
d
set “Dual
Sound
” to
“A”
(page
24).
Personal Computer
B
Connect to the
P
C
Input
soc
ket
5
and
th
e au
dio
sock
et
5.
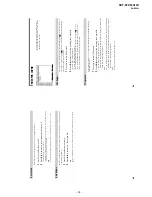
He
adph
ones
S
VH
S/H
i8/D
VC
camcord
er
C
ontinu
ed
T
o co
nn
e
c
t
D
o thi
s
Head
phones
C
Connect to
the
i
s
o
cket
to listen to
sound
from the TV on
headp
hones.
Note:
It is recommended to
u
se
a PC
cab
le with fe
rrite
s.


