background image

KDL-40/32P36xx KDL-40/37/32P56xx KDL-40/37/32S56xx

4-141-451-11(0)

7

 GB

Start-up G

uide

4

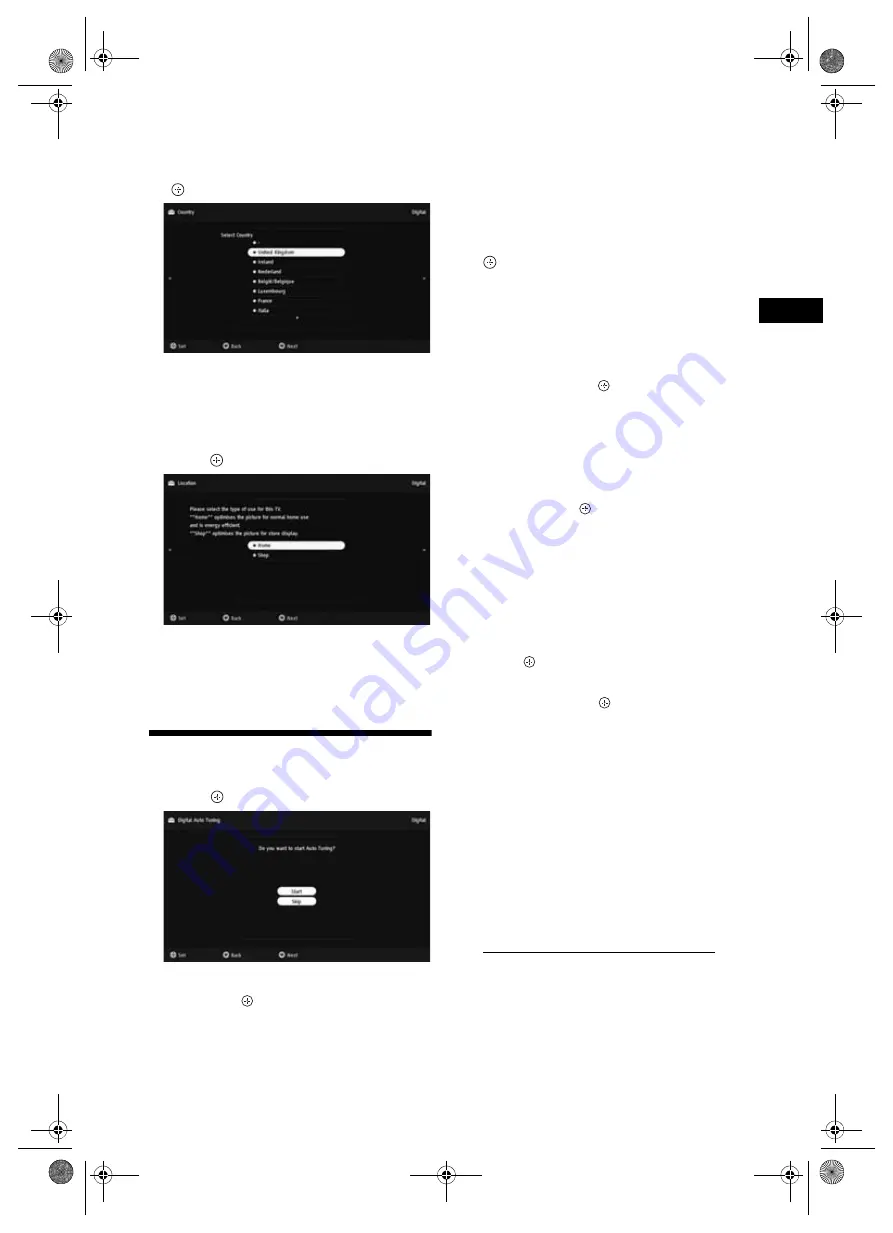
Press 

F

/

f

 to select the country/region in 

which you will operate the TV, then press 

.

If the country/region which you want to use on 
the TV does not appear in the list, select “-” 
instead of a country/region.

5

Press 

F

/

f

 to select the location type in 

which you will operate the TV, then 
press .

In Shop mode, some settings will be periodically 
reset for Shop usage.

This option selects the initial picture mode 
appropriate for the typical lighting condition in 
these environments.

7: Auto-tuning the TV

1

Press .

2

Press 

F

/

f

 to select “Antenna” or “Cable”, 

then press  .

If you select “Cable”, the screen for selecting the 

scan type appears. See “To tune the TV for Cable 

connection” (page 7).
The TV starts searching for all available digital 

channels, followed by all available analogue 

channels. This may take some time, so do not 

press any buttons on the TV or remote while 

proceeding.

If a message appears for you to confirm the 

aerial connection

No digital or analogue channels were found. 

Check all the aerial/cable connections and press 

 to start auto-tuning again. 

3

Programme Sorting (Only in analogue 

mode): Changes the order in which the 

analogue channels are stored on the TV.

1

Press 

F

/

f

 to select the channel you want to 

move to a new position, then press 

g

.

2

Press 

F

/

f

 to select the new position for your 

channel, then press 

.

If you do not change the order in which the 

analogue channels are stored on the TV, press 

HOME to go to next step.

~

•  This step will not appear if any analogue channel is 

found.

The message "Set-up complete" will appear on 

the screen.  Press 

.

The TV has now tuned in all the available 

channels.

z


• System Update 

You can update the TV system using USB memory.
Obtain information from the website below.
http://support.sony-europe.com/TV/

To tune the TV for Cable connection

1

Press .

2

Press 

F

/

f

 to select “Quick Scan” or “Full 

Scan”, then press  .

"Quick Scan" :

 channels are tuned according to 

the cable operator information within the 

broadcast signal. 

Recommended setting for "Frequency" and 

"Network ID" is "Auto".

This option is recommended for fast tuning when 

supported by your cable operator. 

If the "Quick Scan" does not tune, please use the 

"Full Scan" method below.

"Full Scan" : 

All available channels are tuned 

and stored. This procedure may take some time.

This option is recommended when "Quick Scan" 

is not supported by your cable provider.

For further information about supported cable 

providers, refer to support web site: 

http://support.sony-europe.com/TV/DVBC

3

Press 

G

/

g

/

f

 to select “Start”.

The TV starts searching for channels. Do not 

press any buttons on the TV or remote.

~

• Some cable providers do not support “Quick Scan”. If no 

channels are detected using “Quick Scan”, perform “Full 
Scan”.

030STU.fm  Page 7  Thursday, March 18, 2010  1:47 PM

Summary of Contents for BRAVIA 4-168-148-15 (1)

Page 1: ...KDL 40EX4xx KDL 40EX6xx KDL 40NX5xx KDL 37EX4xx KDL 32BX3xx KDL 32BX4xx KDL 32EX3xx KDL 32EX4xx KDL 32EX6xx KDL 32NX5xx KDL 26EX3xx KDL 22EX3xx 010COV fm Page 1 Monday February 22 2010 10 37 AM 1 15 2010 Sony Corporation For useful information about Sony products 4 168 148 1 1 100BCO fm Page 1 Monday February 22 2010 10 36 AM 5 416814815 ...

Page 2: ...ntries areas and DVB C cable may not operate correctly with some providers For a list of compatible cable providers refer to the support web site http support sony europe com TV DVBC is a registered trademark of the DVB Project HDMI the HDMI logo and High Definition Multimedia Interface are trademarks or registered trademarks of HDMI Licensing LLC Manufactured under license from Dolby Laboratories...

Page 3: ...ide 4 i MANUAL Additional Information Table of Contents for digital channels only Before operating the TV please read Safety Information 9 Retain this manual for future reference Full operating instructions can be found on the screen Instructions about Installing Wall Mount Bracket are included within this TV s instructions manual 010COVTOC fm Page 3 Tuesday January 12 2010 6 53 PM ...

Page 4: ...se of batteries in an environmentally friendly way Certain regions may regulate disposal of batteries Please consult your local authority Handle the remote with care Do not drop or step on it or spill liquid of any kind onto it Do not place the remote in a location near a heat source a place subject to direct sunlight or a damp room 2 Attaching the stand Follow the assembling steps required to pla...

Page 5: ...tall a wood screw 4 mm in diameter not supplied in the TV stand Coaxial cable Connecting an aerial cable only Connecting an aerial cable VCR DVD recorder with SCART Scart lead VCR DVD recorder Coaxial cable Coaxial cable Terrestrial signal or cable Terrestrial signal or cable Connecting an aerial cable VCR DVD recorder with HDMI HDMI cable Coaxial cable Coaxial cable VCR DVD recorder Terrestrial s...

Page 6: ...ables only for KDL 40 32NX5xx You can bundle the connecting cables as illustrated below Do not bundle the mains lead with other connecting cables 6 Selecting the language country region and location 1 Connect the TV to your mains socket 220 240V AC 50Hz 2 Press 1 on the side of the TV When you turn on the TV for the first time the Language menu appears on the screen When you turn on the TV the pow...

Page 7: ...o a new position then press g 2Press F f to select the new position for your channel then press If you do not change the order in which the analogue channels are stored on the TV press HOME to go to next step This step will not appear if any analogue channel is found The message Set up complete will appear on the screen Press The TV has now tuned in all the available channels z System Update You c...

Page 8: ...or KDL 22EX3xx Adjust the tilt Detaching the Table Top Stand from the TV Do not remove the Table Top Stand for any reason other than to wall mount the TV only for KDL 22EX3xx z Be sure the TV is on the vertical position before switching on TV set must not be powered on with LCD panel face down to avoid uneven picture uniformity Top view Front 0º 8º 8º Table Top Stand Table Top Stand 030STU fm Page...

Page 9: ...re to unplug the mains lead for your safety and take care not to catch your feet on the cables Disconnect the mains lead from the mains socket before working on or moving the TV set Keep the mains lead away from heat sources Unplug the mains plug and clean it regularly If the plug is covered with dust and it picks up moisture its insulation may deteriorate which could result in a fire Notes Do not...

Page 10: ...y equipment emitting electromagnetic radiation away from the TV set Otherwise picture distortion and or noisy sound may occur This equipment has been tested and found to comply with the limits set out in the EMC Directive using a connection signal cable shorter than 3 meters Batteries Observe the correct polarity when inserting batteries Do not use different types of batteries together or mix old ...

Page 11: ...ic from the Table of Contents then press Use the corresponding coloured button to go to next or previous page and to return to Table of Contents If the explanation is linked to other topic the symbol will appear Press F f G g to select then press Press RETURN to go back 3 Press RETURN to exit The XMB XrossMediaBar is a menu of BRAVIA features and input sources displayed on the TV screen 050OPT fm ...

Page 12: ...ctions supplied with the Wall Mount Bracket to properly carry out the installation Refer to Detaching the Table Top Stand from the TV page 8 Place the TV on the Table Top Stand when securing the Mounting Hook KDL 46EX4xx KDL 40BX4 EX4 EX6 NX5xx KDL 37EX4xx KDL 32BX3 BX4 EX3 EX4 EX6 NX5xx KDL 26EX3xx KDL 22EX3xx Screw PSW6 16 Mounting Hook Square hole Screw PSW4 12 Mounting Hook Sufficient expertis...

Page 13: ...G H KDL 46EX4xx 112 7 67 4 8 4 42 4 16 2 36 9 64 0 46 4 KDL 40NX5xx 102 3 62 8 12 2 43 9 16 0 34 9 59 1 47 9 KDL 40BX4xx 99 6 59 8 12 2 42 5 15 9 34 1 56 6 46 2 KDL 40EX4xx 99 2 59 8 12 2 42 5 16 0 34 1 56 7 46 3 KDL 40EX6xx 95 2 58 1 13 3 43 1 12 0 29 7 54 6 45 4 KDL 37EX4xx 92 1 56 4 14 0 42 7 15 8 32 7 53 4 46 3 KDL 32NX5xx 82 5 51 7 17 2 43 2 15 6 30 9 48 8 47 1 KDL 32BX3 BX4xx 80 4 49 7 17 2 ...

Page 14: ...locations diagram table Model Name Screw location Hook location KDL 46EX4xx d g b KDL 40BX4 EX4 NX5xx d g b KDL 40EX6xx e j b KDL 37EX4xx d g b KDL 32BX3 BX4 EX3 EX4 NX5xx e g c KDL 32EX6xx f j c KDL 26EX3xx a KDL 22EX3xx b Screw location Hook location b a c Hook location b a 060ADD fm Page 14 Tuesday January 12 2010 5 57 PM ...

Page 15: ...p 1080p24 1080i 720p 576p 576i 480p 480i Audio Two channel linear PCM 32 44 1 and 48 kHz 16 20 and 24 bits Dolby Digital PC see page 17 Analogue audio minijack HDMI 1 only AV3 Video input phono jack AV3 Audio input phono jacks DIGITAL AUDIO OUT OPTICAL Digital optical jack Two channel linear PCM Dolby Digital Audio output Left Right phono jacks PC IN PC Input 15 Dsub see page 17 G 0 7 Vp p 75 ohms...

Page 16: ...112 7 x 67 4 x 10 2 cm 102 3 x 62 8 x 10 0 cm KDL 40NX5xx 99 6 x 59 8 x 9 9 cm KDL 40BX4xx 99 2 x 59 8 x 10 0 cm KDL 40EX4xx 95 2 x 58 1 x 7 4 cm KDL 40EX6xx 92 1 x 56 4 x 9 8 cm 82 5 x 51 7 x 10 2 cm KDL 32NX5xx 80 4 x 49 7 x 9 6 cm KDL 32BX3 BX4xx 80 0 x 49 7 x 9 7 cm KDL 32EX3 EX4xx 76 4 x 47 5 x 7 3 cm KDL 32EX6xx 67 2 x 42 3 x 9 9 cm 55 1 x 36 7 x 8 2 cm Mass Approx with stand 20 4 kg 22 4 kg...

Page 17: ... Hz Standard VGA 640 480 31 5 60 VGA SVGA 800 600 37 9 60 VESA Guidelines XGA 1024 768 48 4 60 VESA Guidelines WXGA 1280 768 47 4 60 VESA WXGA 1280 768 47 8 60 VESA WXGA 1360 768 47 7 60 VESA SXGA 1280 1024 64 60 VESA UXGA 1600 1200 75 60 VESA HDTV 1920 1080 67 5 60 EIA Signals Horizontal Pixel Vertical Line Horizontal frequency kHz Vertical frequency Hz Standard VGA 640 480 31 5 60 VGA SVGA 800 6...

Page 18: ...ve your TV serviced by qualified service personnel z You can refer to the complete troubleshooting section in the on screen instruction manual For further information please contact Sony Customer Information Centre at the address or telephone that appears on the supplied guarantee Picture No picture screen is dark and no sound Check the aerial cable connection Connect the TV to the mains and press...

Page 19: ... new TV has a digital tuner built in which means it is ready to receive the Freeview signal by simply plugging it into your aerial socket check if you can get digital TV through your aerial now or whether you ll have to wait until switchover at www digitaluk co uk When the TV switchover happens in your area there are at least two occasions when you will need to re tune your TV in order to continue...

Page 20: ...ng then press 6 Press F f to select Digital Auto Tuning then press 7 Follow the on screen instructions If you are missing any channels it may be that they are not available in your area or that your aerial needs upgrading If you have any questions please contact Sony on 08705 111 999 or call Digital UK on 0845 6 50 50 50 or visit www digitaluk co uk 060ADD fm Page 20 Tuesday January 12 2010 5 57 P...

Reviews: