background image

2-1 (E)

BKSM-R103

Section 2

Installation

2-1. Installation of Board and Rear Panel

n

To avoid shock hazard, be sure to turn the power of the
DSM-R1/D1 off and unplug the appliance from the outlet
before installing.

Installation position

The APR-31 board can be installed in either “1” (OUT 1)
side or “2” (OUT 2) side of the DSM-R1/D1.
The installation position of the ANALOG OUT rear panel
depends on the APR-31 board position.
When the APR-31 board is installed in “1” side, install the
ANALOG OUT rear panel to the “1” side.
Similarly, when the APR-31 board is installed in “2” side,
install the ANALOG OUT rear panel to the “2” side.

OUT 2 side

OUT 1 side

DSM-R1/D1

APR-31 board

OUT 2 side

OUT 1 side

1

2

1

2

Preparations

(1) Turn the power of the DSM-R1/D1 off, then unplug

the appliance from the outlet.

(2) Remove the six screws, and remove the top panel from

the DSM-R1/D1.

DSM-R1/D1

B 4

x

6

Top panel

Summary of Contents for BKSM-R103

Page 1: ...ANALOG OUTPUT BOARD BKSM R103 INSTALLATION MANUAL 1st Edition Serial No 10001 and Higher ...

Page 2: ... Um die Gefahr eines elektrischen Schlages Feuergefahr und Verletzungen zu vermeiden sind bei Wartungsarbeiten strikt die Angaben in der Anleitung zu befolgen Andere als die angegeben Wartungsarbeiten dürfen nur von Personen ausgeführt werden die eine spezielle Befähigung dazu besitzen AVERTISSEMENT Ce manual est destiné uniquement aux personnes compétentes en charge de l entretien Afin de réduire...

Page 3: ...Purpose of this manual 3 E Contents 3 E Related manual 3 E 1 Overview 1 1 E 2 Installation 2 1 Installation of Board and Rear Panel 2 1 E 2 2 Matching Connectors and Cables 2 5 E 2 3 Input and Output Signal of Connector 2 5 E 2 4 Internal Switch 2 6 E ...

Page 4: ......

Page 5: ...plains the overview of the BKSM R103 Section 2 Installation Explains how to install the BKSM R103 to the DSM R1 D1 the connector informa tion for peripheral equipment connections etc Related manual Besides this Installation Manual the following manual is available for the BKSM R103 Maintenance Manual Not supplied with the BKSM R103 This manual describes the information that premise the service bas...

Page 6: ......

Page 7: ...installed in the following units DSM R1 Digital Satellite Demodulator DSM D1 SDTI Demultiplexer The BKSM R103 consists of the following components APR 31 board 1 pc ANALOG OUT rear panel assembly with 3 pin XLR connectors 1 1 pc ANALOG OUT rear panel assembly with 5 pin XLR connectors 1 1 pc Coaxial cable 1 pc Harness with white connectors 1 pc Harness with red connectors 2 1 pc Screw for board in...

Page 8: ......

Page 9: ...ion position of the ANALOG OUT rear panel depends on the APR 31 board position When the APR 31 board is installed in 1 side install the ANALOG OUT rear panel to the 1 side Similarly when the APR 31 board is installed in 2 side install the ANALOG OUT rear panel to the 2 side OUT 2 side OUT 1 side DSM R1 D1 APR 31 board OUT 2 side OUT 1 side 1 2 1 2 Preparations 1 Turn the power of the DSM R1 D1 off...

Page 10: ...panel from the DSM R1 D1 n Keep the removed blank panel and screws 2 Secure the ANALOG OUT rear panel using the four screws B 3x6 supplied with the BKSM R103 n The BKSM R103 comes with the two varieties of the ANALOG OUT rear panel assembly Use either of the two panels for your purpose Rear panel with 3 pin XLR connectors Enables 2 channel audio output Rear panel with 5 pin XLR connectors Enables ...

Page 11: ...he CP 309 board 5 Route the harness as shown in the figure 6 Connect the harness white to CN900 A 7 on the APR 31 board Connection Coaxial cable BNC connector _ CN600 APR 31 board Harness white CN1 CP 309 board _ CN900 APR 31 board 2 1 Installation of Board and Rear Panel CN900 white CN600 CN900 white CN600 APR 31 board APR 31 board CP 309 board CN1 white BNC connector CP 309 board CN1 white BNC c...

Page 12: ...harness red to CN1000 A 6 Connection Coaxial cable BNC connector _ CN600 APR 31 board Harness white CN1 CP 333 board _ CN900 APR 31 board Harness red CN2 CP 333 board _ CN1000 APR 31 board n There is no necessity to perform the check adjustment after the APR 31 board and the ANALOG OUT rear panel installing 2 1 Installation of Board and Rear Panel CN900 white CN600 CN900 white CN600 APR 31 board A...

Page 13: ... the equivalent 2 ITT CANNON XLR 3 12C or the equivalent n When XLR 5 pin connector is connected to the analog audio input XLR 3 pin female of the VTR use the following cable Cable SONY CCXA 53 or the equivalent 2 3 Input and Output Signal of Connector 1 VIDEO BNCx1 Analog composite video signal output 1 0 Vp p 75 Z sync negative 2 AUDIO XLR 3 pinx2 or XLR 5 pinx2 Analog audio signal output 4 dBm ...

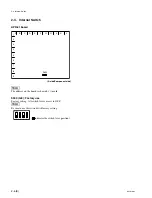
Page 14: ... The address on the board is shown by mark S300 G 9 Factory use Factory setting All switch levers are set to OFF n Be sure to use this switch with factory setting indicates the switch lever position 2 4 Internal Switch A B C D E F G H J K L 1 9 2 3 4 5 6 7 8 S300 1 2 3 4 ON ...

Page 15: ...des acquéreurs de l équipement décrit dans ce manuel Sony Corporation interdit formellement la copie de quelque partie que ce soit de ce manuel ou son emploi pour tout autre but que des opérations ou entretiens de l équipement à moins d une permission écrite de Sony Corporation Das in dieser Anleitung enthaltene Material besteht aus Informationen die Eigentum der Sony Corporation sind und ausschli...

Page 16: ...Printed in Japan Sony Corporation 1998 2 16 Broadcasting Professional Systems Company 1998 Published by Global Support Promotion Dept BKSM R103 SY J E 3 200 069 01 ...

Reviews: