background image

Sh
ootin

g imag

es

63

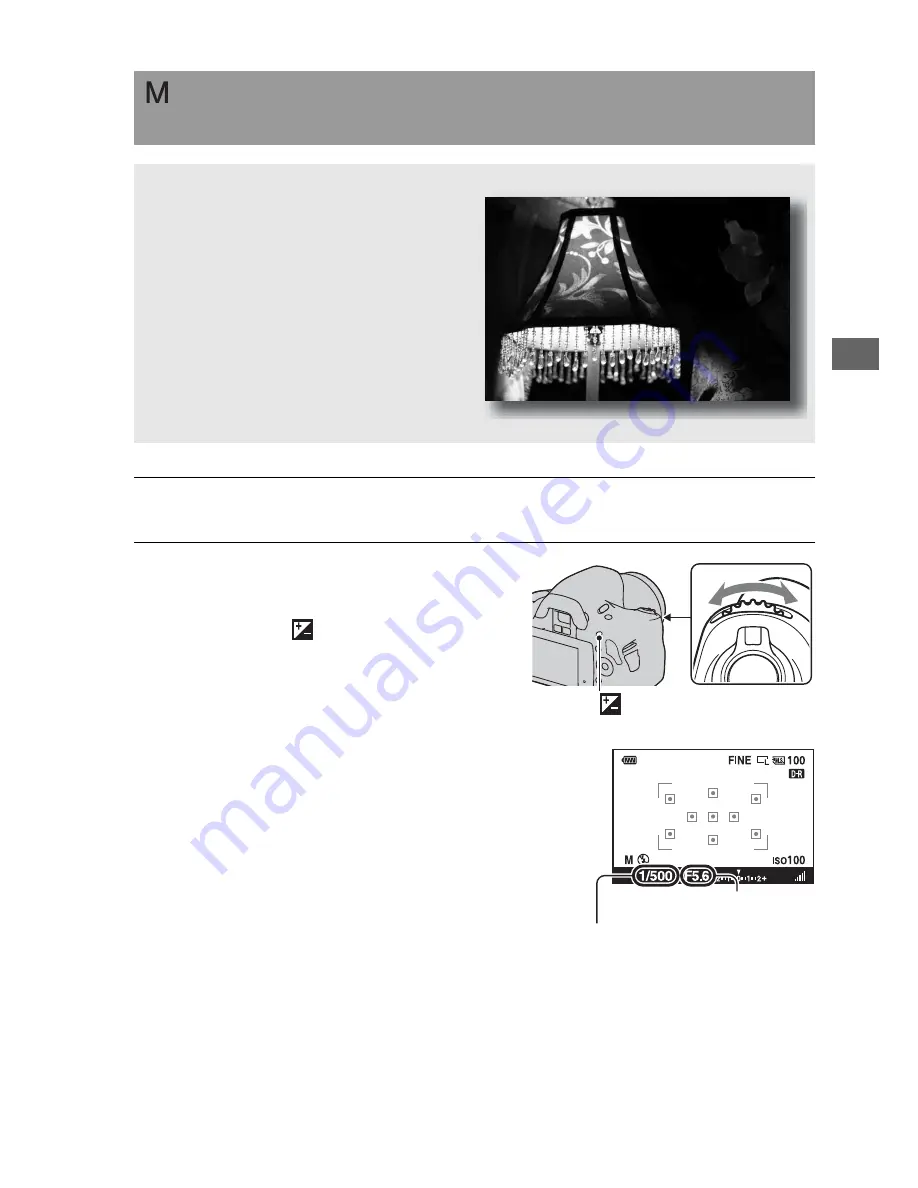
 Shooting with the exposure adjusted manually (Manual 

exposure)

This mode is suitable for

z

Shooting with the desired exposure 
setting by adjusting both the shutter 
speed and aperture.

1

Set the mode dial to M.

2

Rotate the control dial to adjust 
the shutter speed, and while 
pressing the 

 button, rotate the 

control dial to adjust the aperture.

• You can select the item the control dial 

adjusts (shutter speed or aperture) with 
[Ctrl dial setup] (page 121).

 button

Shutter speed

Aperture (F-number)

Summary of Contents for A390L2LENSKIT

Page 1: ...ex Camera Instruction Manual DSLR A390 A mount Preparing the camera Before your operation Shooting images Using the shooting function Using the viewing function Changing your setup Viewing images on a computer Printing images ...

Page 2: ...ptor of the proper configuration for the power outlet Battery pack If the battery pack is mishandled the battery pack can burst cause a fire or even chemical burns Observe the following cautions Do not disassemble Do not crush and do not expose the battery pack to any shock or force such as hammering dropping or stepping on it Do not short circuit and do not allow metal objects to come into contac...

Page 3: ... the following two conditions 1 This device may not cause harmful interference and 2 this device must accept any interference received including interference that may cause undesired operation This Class B digital apparatus complies with Canadian ICES 003 UL is an internationally recognized safety organization The UL Mark on the product means it has been UL Listed If you have any questions about t...

Page 4: ...that to which the receiver is connected Consult the dealer or an experienced radio TV technician for help The supplied interface cable must be used with the equipment in order to comply with the limits for a digital device pursuant to Subpart B of Part 15 of FCC Rules Notice for the customers in the countries applying EU Directives The manufacturer of this product is Sony Corporation 1 7 1 Konan M...

Page 5: ...reated as household waste On certain batteries this symbol might be used in combination with a chemical symbol The chemical symbols for mercury Hg or lead Pb are added if the battery contains more than 0 0005 mercury or 0 004 lead By ensuring these batteries are disposed of correctly you will help prevent potentially negative consequences for the environment and human health which could otherwise ...

Page 6: ...e supplied one and approved by ASTA or BSI to BS 1362 i e marked with an or mark must be used If the plug supplied with this equipment has a detachable fuse cover be sure to attach the fuse cover after you change the fuse Never use the plug without the fuse cover If you should lose the fuse cover please contact your nearest Sony service station Notice for customers in the United Kingdom ...

Page 7: ... the pixels are operational for effective use However there may be some tiny black points and or bright points white red blue or green in color that constantly appear on the LCD monitor These points are normal in the manufacturing process and do not affect the images in any way To deal with such issues that may appear in Live View mode you may reduce the effect by using the Pixel mapping function ...

Page 8: ... this Instruction Manual The data on performance and specifications is defined under the following conditions except as described in this Instruction Manual at an ordinary ambient temperature of 25ºC 77 F and using a fully charged battery pack ...

Page 9: ... Selecting a function setting 39 The functions selected by the Control button 40 The functions selected by the Fn Function button 41 The functions selected by the MENU button 41 Shooting images Adjusting the angle of the LCD monitor 43 Shooting an image without camera shake 44 Correct posture 44 Using the SteadyShot function 45 Using a tripod 46 Shooting with the automatic setting 47 Shooting with...

Page 10: ... Graphic Display 70 LCD monitor Standard Display 72 Viewfinder 74 Using the shooting function Selecting the focus method 75 Using autofocus 75 Shooting with your desired composition Focus lock 77 Selecting the focus method to suit the movement of the subject Autofocus mode 78 Selecting the focus area AF area 79 Adjusting the focus manually Manual focus 80 Zooming in in one step 81 Using the flash ...

Page 11: ... Remote Commander 101 Usingtheviewing function Playing back images 102 Checking the information of recorded images 106 Protecting images Protect 109 Deleting images Delete 110 Viewing images on a TV screen 112 Changing your setup Setting image size and image quality 116 Setting the method for recording on a memory card 118 Changing the noise reduction setting 120 Changing the functions of the cont...

Page 12: ...12 Others Specifications 148 Troubleshooting 152 Warning messages 162 Precautions 165 Index 167 ...

Page 13: ...ces BC VH1 Battery charger 1 Power cord mains lead 1 not supplied in the U S A and Canada Rechargeable battery pack NP FH50 1 USB cable 1 Shoulder strap 1 Eyepiece cover 1 Body cap 1 Attached on the camera Eyecup 1 Attached on the camera CD ROM Application Software for α camera 1 Quick Start Guide 1 Instruction Manual This manual 1 ...

Page 14: ...NP FH50 InfoLITHIUM battery pack supplied The InfoLITHIUM battery pack can be charged even when it has not been fully depleted It can also be used when it has not been fully charged Charging the battery pack 1 Insert the battery pack on the battery charger Push the battery pack until it clicks ...

Page 15: ... Turns the light on and off repeatedly at the interval of 0 15 seconds Slow flashing Turns the light on and off repeatedly at the interval of 1 5 seconds 2 Connect the battery charger to the wall outlet wall socket Light on Charging Light off Normal charge completed One hour after the lamp is turned off Full charge completed For customers in the U S A and Canada For customers in countries regions ...

Page 16: ... the CHARGE lamp lights up again We recommend charging the battery pack in an ambient temperature of between 10 C to 30 C 50 F to 86 F Notes Connect the battery charger to the nearest wall outlet wall socket When charging is finished disconnect the power cord mains lead from the wall outlet wall socket and remove the battery pack from the battery charger If you leave the charged battery pack on th...

Page 17: ...tery cover open lever open the battery cover 2 Firmly insert the battery pack all the way while pressing the lock lever with the tip of the battery Lock lever 3 Close the battery cover Turn off the camera and slide the lock lever in the direction of the arrow Be careful not to drop the battery pack Lock lever ...

Page 18: ...ime that the battery pack can be used is shorter in cold places and the speed of continuous shooting slows down We recommend that you put the battery pack in a pocket close to your body to warm it up and insert it in your camera immediately before you start shooting The battery pack will run out quickly if you use the flash frequently use continuous shooting often or turn the camera on and off fre...

Page 19: ...g conditions and environment in which each battery pack is used How to store the battery pack If the battery pack is not to be used for a long time fully charge it and then fully use it up once a year on your camera before storing the battery pack in a dry cool place to prolong the battery life ...

Page 20: ...en attaching a lens E mount lenses are not compatible with this camera 1 Remove the body cap from the camera and the packaging lid from the rear of the lens When changing the lens quickly change the lens away from dusty locations so as to keep dust or debris from getting inside the camera Packaging lid 2 Mount the lens by aligning the orange index marks on the lens and camera Orange index marks 3 ...

Page 21: ...n the image sensor However quickly change the lens away from dusty locations when attaching removing a lens If dust or debris lands on the image sensor Clean the image sensor using Cleaning mode in the Setup menu page 32 1 Press the lens release button all the way in and turn the lens counterclockwise until it stops Lens release button 2 Replace the packaging lid on the lens and attach the body ca...

Page 22: ...media are referred to as the Memory Stick PRO Duo media and the SD memory card and SDHC memory card are referred to as the SD memory card in this Instruction Manual 1 Open the memory card cover 2 Insert Memory Stick PRO Duo media or an SD memory card Insert the memory card until it clicks as illustrated Face side SD memory card Terminal part 3 Select the type of memory card you want to use using t...

Page 23: ...y be corrupted Data may be damaged if you place the memory card near strongly magnetized material or use the memory card in a static prone or electrically noisy environment We recommend backing up important data such as to a hard disk of a computer When you carry or store the memory card put it in the case supplied with it Do not expose the memory card to water Do not touch the terminal section of...

Page 24: ...mall children They might accidentally swallow it Notes on the Memory Stick media used with the camera The types of Memory Stick media that can be used with this camera are listed in the table below However proper operation cannot be guaranteed for all Memory Stick PRO Duo media functions This is equipped with MagicGate function MagicGate is copyright protection technology that uses encryption tech...

Page 25: ...n the camera on To turn the camera off set it to OFF 2 Verify that OK is selected on the LCD monitor then press the center of the control button 3 Select each item with b B and set the numeric value with v V When changing the sequence of YYYY MM DD first select YYYY MM DD with b B then change it with v V 4 Repeat step 3 to set other items then press the center of the control button ...

Page 26: ...6 To cancel the date time setting operation Press the MENU button To set up the date time again MENU button t 2 t Date Time setup 5 Verify that OK is selected then press the center of the control button ...

Page 27: ...ries are described in the following pages Rechargeable battery pack page 14 Battery charger page 14 Power cord mains lead not supplied in the U S A and Canada page 14 USB cable pages 130 146 CD ROM page 138 Attaching the shoulder strap Attach both ends of the strap onto the camera You can also attach the eyepiece cover page 28 on the strap Eyepiece cover ...

Page 28: ...located below the viewfinder may be activated depending on the situation and the focus may be adjusted or the LCD monitor may continue to flash In such cases turn off both Eye Start AF page 67 and Auto off w VF page 125 Using the eyepiece cover and eyecup 1 Tilt the LCD monitor downward 2 Carefully slide the eyecup off by pushing on each side of the eyecup Put your fingers under the eyecup and sli...

Page 29: ...mory card formatted with this camera The values are defined using Sony standard memory cards for testing The values may vary depending on the shooting conditions Image size L 14M Aspect ratio 3 2 Memory Stick PRO Duo media Units Images Once you insert a memory card into the camera and set the power switch to ON the number of images that can be recorded should you continue to shoot using the curren...

Page 30: ...alculated with a battery pack at full capacity and in the following situation At an ambient temperature of 25 C 77 F Quality is set to Fine Autofocus mode is set to Automatic AF Shooting once every 30 seconds The flash strobes once every two times The power turns on and off once every ten times The measurement method is based on the CIPA standard CIPA Camera Imaging Products Association Capacity S...

Page 31: ...ing a commercially available blower If dust lands on the image sensor it may appear on the photo image Turn the camera to the cleaning mode then clean it using a blower page 32 Do not use a spray blower to clean the inside of the camera Using this may cause a malfunction Do not use a cleaning solution containing organic solvents such as thinner or benzine Clean the camera surface with a soft cloth...

Page 32: ...er during cleaning can cause damage to the shutter The cleaning should be completed quickly The use of an AC PW10AM AC Adaptor sold separately is recommended Do not use a spray blower because it may scatter water droplets inside the camera body Cleaning the image sensor 1 Confirm that the battery is fully charged page 18 2 Press the MENU button then select 3 with b B on the control button MENU but...

Page 33: ...6 Use the blower to clean the image sensor surface and the surrounding area Do not touch the image sensor with the tip of the blower Complete the cleaning quickly Hold the camera s face downward to prevent the dust from resettling in the camera When cleaning the image sensor do not put the tip of a blower into the cavity beyond the mount 7 Attach the lens and turn the camera off ...

Page 34: ...of operation A Shutter button 47 B Power switch 25 C Control dial 60 121 D Self timer lamp 98 E Lens contacts F Remote sensor G Mirror H Mount I Built in flash 82 J Image sensor position mark 77 K Mode dial 47 66 L Lens release button 21 M Focus mode switch 75 80 Do not directly touch these parts Front side ...

Page 35: ...8 H LIVE VIEW OVF switch 67 I Smart teleconverter button 81 J For shooting Exposure button 86 For viewing Zoom in button 103 K Fn Function button 41 L Control button Enter 39 Spot AF button 79 M Control button When the menu is turned on v V b B 39 When the menu is turned off DISP 38 69 102 97 ISO 90 82 N Delete button 110 O Playback button 102 Do not directly touch these parts Rear side ...

Page 36: ...IN terminal When connecting the AC PW10AM AC Adaptor sold separately to the camera turn the camera off then plug the connector of the AC Adaptor to the DC IN terminal on the camera J Battery cover 17 K Tripod receptacle Use a tripod with a screw length of less than 5 5 mm 7 32 inch You will be unable to firmly secure the camera to tripods having screws longer than 5 5 mm 7 32 inch and may damage t...

Page 37: ...erter 81 Image quality 117 Image size 116 Aspect ratio 116 Memory card 22 100 Remaining number of recordable images 29 7500K G9 White balance Preset Custom Color temperature Color filter 91 D Range Optimizer 94 Creative Style 94 Display Indication Drive mode 97 Histogram 87 Focus mode 78 AF area 79 Metering 89 P A S M Mode dial 47 66 Flash mode 82 Red eye reduction 84 2 0 Flash compensation 88 ISO...

Page 38: ...Indication z Focus 76 1 125 Shutter speed 61 F3 5 Aperture 59 EV scale 64 100 Camera shake warning 45 SteadyShot scale 45 Each time you press DISP on the control button the screen changes as follows Histogram on Indicators off Indicators on Histogram page 87 ...

Page 39: ...hite balance t Select the desired setting When you start an operation an operation guide of control button functions will be displayed at the bottom of the screen Please refer to the guide when operating the camera The step by step description of the above example is as follows Example When the Fn button is pressed From the menu list use the control button to move the cursor to the setting of your...

Page 40: ...the control button DISP Display pages 38 69 102 Flash page 82 ISO page 90 Drive mode page 97 Single shot adv page 97 2 Select White balance with v V b B on the control button then press the center z to execute 3 Following the operation guide select and execute the desired function For example to change select with v V adjust the value to with b B then press the center z to execute Operation guide ...

Page 41: ...r operations The functions selected by the Fn Function button Shooting mode Viewing mode Autofocus mode 78 Metering mode 89 White balance 91 AF area 79 D RangeOptimizer 94 Creative Style 94 Delete 110 Image Index 104 Specify Printing 143 Slide show 105 Protect 109 Rotate 103 The functions selected by the MENU button Recording menu 1 Image size 116 Aspect ratio 116 Quality 117 Flash compens 88 AF i...

Page 42: ...1 LCD brightness 124 Power Save LV 122 Power Save OVF 122 CTRL FOR HDMI 114 Display Color 122 Help Guide disp 122 2 Date Time setup 123 Language 123 File number 118 Folder name 118 Select folder 119 New folder 119 3 USB connection 130 145 Audio signals 122 Pixel mapping 156 Cleaning mode 32 Version 126 Reset default 127 ...

Page 43: ...usting the angle of the LCD monitor You can adjust the angle of the LCD monitor to meet various shooting situations You can shoot from various shooting positions Low position High position Adjust the LCD monitor to an easily viewable angle ...

Page 44: ...ting in a blurred image To reduce camera shake follow the instructions below Stabilize your upper body and take a position that keeps the camera from moving Point 1 One hand holds the grip of the camera and the other hand supports the lens Point 2 Take a secure stance with your feet shoulder width apart Correct posture In Live View mode In viewfinder mode ...

Page 45: ...educe the effect of camera shake by the equivalent of approximately 2 5 to 3 5 increments of shutter speed The SteadyShot function is set to On in the default setting The SteadyShot scale indicator To deactivate the SteadyShot function MENU button t 1 t SteadyShot t Off Due to potential camera shake the Camera shake warning indicator flashes In this case use a tripod or the flash Camera shake warn...

Page 46: ...er button down slowly In the following cases we recommend that you mount the camera on a tripod Shooting without a flash under dark conditions Shooting with slow shutter speeds which are typically used in night time shooting Shooting a close subject such as in macro shooting Shooting with a telescopic lens Note When using a tripod deactivate the SteadyShot function because there is a potential for...

Page 47: ...on of the selected mode and methods of shooting are displayed on the screen Help Guide disp You can clear the Help Guide page 122 1 Set the mode dial to or Flash Off 2 Adjust the LCD monitor to an easily viewable angle and hold the camera 3 Place the desired subject within the focus area If the Camera shake warning indicator flashes carefully shoot the subject holding the camera steady or by using...

Page 48: ...ngs set the mode dial to P then shoot your subject 5 Press the shutter button halfway down to focus When the focus is confirmed z or Focus indicator lights up page 76 Focus indicator 6 Press the shutter button fully down to shoot Pressing the shutter button after the SteadyShot scale indicator becomes low makes the SteadyShot function more effective SteadyShot scale indicator ...

Page 49: ...ting for the subject When you turn the mode dial the explanation of the selected mode and methods of shooting are displayed on the screen Help Guide disp You can clear the Help Guide page 122 Note The camera makes appropriate judgments on the situation to adjust the settings Since the camera turns on the automatic setting function many features will be unavailable such as exposure compensation ISO...

Page 50: ...Use the lens hood sold separately to shoot backlit subjects Use the red eye reduction function if the eyes of your subject turn red from the flash page 84 Set the flash mode to Flash Off when you shoot without the flash page 82 Taking portrait photos This mode is suitable for zBlurring away backgrounds and sharpening the subject zExpressing skin tones softly Shooting techniques ...

Page 51: ...the openness of the scenery set the lens to wide angle Set the flash mode to Fill flash when you shoot with the flash page 82 Taking landscape photos This mode is suitable for zShooting the entire range of scenery in sharp focus with vivid colors Shooting techniques ...

Page 52: ...Flash Off when you shoot a subject within 1 m 3 3 feet When shooting in macro mode the SteadyShot function will not be fully effective Use a tripod to achieve better results Set the flash mode to Flash Off when you shoot without the flash page 82 Taking small subject photos This mode is suitable for zShooting close subjects such as flowers insects dishes or small goods Shooting techniques ...

Page 53: ...the shutter button is pressed Press and hold the shutter button halfway down until the right moment Set the flash mode to Fill flash when you shoot with the flash page 82 Taking moving subject photos This mode is suitable for zShooting moving subjects outdoors or in bright places Shooting techniques ...

Page 54: ...lor compared with other modes This is also suitable for shooting the beautiful red of the sunrise Set the flash mode to Fill flash when you shoot with the flash page 82 Taking sunset photos This mode is suitable for zShooting the red of the sunset beautifully Shooting techniques ...

Page 55: ...ubject does not move to prevent the image from blurring The shutter speed is slower so using a tripod is recommended Note The picture may not be taken properly when shooting a wholly dark night scene Taking night view photos This mode is suitable for zShooting night scenes at a distance without losing the dark atmosphere of the surroundings Shooting techniques ...

Page 56: ... the image by controlling the amount of exposure the amount of light the camera takes in which is the most important factor in photo shooting Changing the brightness of the picture by the amount of exposure When using a faster shutter speed the camera opens the shutter for a shorter time This means less time for the camera to take in light resulting in a darker picture To take a brighter picture y...

Page 57: ...Shooting images 57 When you turn the mode dial the explanation of the selected mode and methods of shooting are displayed on the screen Help Guide disp You can clear the Help Guide page 122 ...

Page 58: ... keeping the custom settings for ISO sensitivity Creative Style D Range optimizer etc 1 Set the mode dial to P 2 Set the shooting functions to your desired settings pages 75 to 101 Set the flash mode to Fill flash when you shoot with the flash page 82 3 Adjust the focus and shoot the subject ...

Page 59: ... the subject in sharp focus and blur everything in front of and beyond the subject Opening the aperture narrows the range that is in focus Depth of field becomes shallower zShooting the depth of the scenery Narrowing down the aperture widens the range that is in focus Depth of field becomes deeper 1 Set the mode dial to A ...

Page 60: ...ure value F number with the control dial Smaller F number The foreground and background of the subject are blurred Larger F number The subject and its foreground and background are all in focus You cannot check the blurring of an image on the LCD monitor or in the viewfinder Check the recorded image and adjust the aperture Aperture F number 3 Adjust the focus and shoot the subject The shutter spee...

Page 61: ...is mode is suitable for zShooting a moving subject at a moment in time Use a faster shutter speed to crisply shoot an instant of the movement zTracing the movement to express the dynamism and flow Use a slower shutter speed to shoot a trailing image of the moving subject 1 Set the mode dial to S ...

Page 62: ...ction Set the flash mode to Fill flash when you shoot with the flash page 82 However when using the flash if you close the aperture a larger F number by making the shutter speed slower the light of the flash will not reach distant subjects 2 Select the shutter speed with the control dial Shutter speed 3 Adjust the focus and shoot the subject The aperture is automatically adjusted to obtain correct...

Page 63: ...g by adjusting both the shutter speed and aperture 1 Set the mode dial to M 2 Rotate the control dial to adjust the shutter speed and while pressing the button rotate the control dial to adjust the aperture You can select the item the control dial adjusts shutter speed or aperture with Ctrl dial setup page 121 button Shutter speed Aperture F number ...

Page 64: ...Fill flash when you shoot with the flash page 82 However the flash range differs according to the aperture value When you shoot with the flash check the flash range page 84 3 Shoot the image after the exposure is set Check the exposure value on the EV scale Toward Images become brighter Toward Images become darker The b B arrow appears if the set exposure is beyond the range of the EV scale The ar...

Page 65: ... is suitable for zShooting trails of light such as fireworks zShooting trails of stars 1 Set the mode dial to M 2 Rotate the control dial to the left until BULB is indicated BULB 3 While pressing the button rotate the control dial to adjust the aperture F number button ...

Page 66: ...te Commander Notes When using a tripod turn off the SteadyShot function page 45 The longer the exposure time the more conspicuous the noise on the image After shooting noise reduction Long exp NR will be done for the same amount of time that the shutter was open You cannot do any further shooting during the reduction 4 Press the shutter button halfway down to adjust the focus 5 Press and hold the ...

Page 67: ...F To deactivate the Eye Start AF function MENU button t 1 t Eye Start AF t Off When attaching the FDA M1AM Magnifier sold separately or the FDA A1AM Angle Finder sold separately to the camera setting Eye Start AF to Off is recommended because the eyepiece sensors located below the viewfinder may be activated Switching to the viewfinder Set the LIVE VIEW OVF switch to OVF The screen status changes ...

Page 68: ...der Turn the dial toward when you are far sighted toward when you are near sighted Training the camera on a light allows you to adjust the diopter easily Put your fingers under the eyecup and slide it upward to remove the eyecup then adjust the diopter When attaching the FDA M1AM Magnifier sold separately or the FDA A1AM Angle Finder sold separately to the camera remove the eyecup as illustrated a...

Page 69: ...ress DISP on the control button to switch between the Graphic Display and the Standard Display When you rotate the camera to a vertical position the display automatically rotates to adjust to the camera position Standard Display No display Graphic Display Default setting ...

Page 70: ... pages in parentheses for details of operation A B The pointer indicates the current value C LCD monitor Graphic Display Display Indication P A S M Mode dial 47 66 1 125 Shutter speed 61 F5 6 Aperture 59 SteadyShot 45 Display Indication Shutter speed indicator 61 Aperture indicator 59 Display Indication Flash mode 82 Red eye reduction 84 Drive mode 97 2 0 Exposure compensation 86 ISO AUTO ISO sens...

Page 71: ...Shooting images 71 D Display Indication Remaining battery 18 Image quality 117 Image size 116 Aspect ratio 116 Memory card 22 100 Remaining number of recordable images 29 ...

Page 72: ...peed 61 F5 6 Aperture 59 2 0 Exposure 86 SteadyShot 45 Display Indication Flash mode 82 Red eye reduction 84 Exposure compensation 86 Flash compensation 88 EV scale 64 100 ISO AUTO ISO sensitivity 90 Drive mode 97 Focus mode 78 AF area 79 Metering mode 89 Creative Style 94 AWB 7500K G9 White balance Auto Preset Custom Color temperature Color filter 91 D Range Optimizer 94 Display Indication ...

Page 73: ...Shooting images 73 C Display Indication Remaining battery 18 Image quality 117 Image size 116 Aspect ratio 116 Memory card 22 100 Remaining number of recordable images 29 ...

Page 74: ...s supplied with the flash Viewfinder Display Indication AF area 79 Shooting area for aspect ratio 16 9 116 Display Indication Flash compensation 88 Flash charging 82 WL Wireless flash 85 High speed sync Manual focus 80 z Focus 125 Shutter speed 61 5 6 Aperture 59 EV scale 64 100 0 Shooting unavailable warning 97 Camera shake warning 45 SteadyShot scale 45 Aspect ratio 16 9 116 ...

Page 75: ...o auto focus To switch to manual focus The lens is equipped with a focus mode switch Lens Always set the focus mode switch on the camera to AF Set the focus mode switch on the lens to AF Set the focus mode switch on the lens to MF The lens is not equipped with a focus mode switch Camera Set the focus mode switch on the camera to AF Set the focus mode switch on the camera to MF Using autofocus 1 Se...

Page 76: ...uilding A subject that is very bright or glittering such as the sun the body of an automobile or the surface of water Ambient light is not sufficient 3 Press the shutter button halfway down to check the focus and shoot the image When the focus is confirmed the focus indicator changes to z or below The green frames are indicated at an area where the focus has been confirmed Focus area sensor Focus ...

Page 77: ...he focus mode switch on the camera to AF The mark located on the top of the camera shows the location of the image sensor When you measure the exact distance between the camera and the subject refer to the position of the horizontal line The image sensor is the part of the camera that acts as the film Shooting with your desired composition Focus lock 1 Place the subject within the AF area and pres...

Page 78: ...n Scene Selection Selecting the focus method to suit the movement of the subject Autofocus mode Single shot AF The camera focuses and the focus is locked when you press the shutter button halfway down Automatic AF The Autofocus mode is switched between Single shot AF and Continuous AF according to the movement of the subject When you press and hold the shutter button halfway down if the subject is...

Page 79: ...ea AF area Select the desired AF area to suit the shooting conditions or your preference The green frames are indicated at an area where the focus has been confirmed The area used for focusing is illuminated briefly in viewfinder mode Area Wide The camera determines which of the nine AF areas is used in focusing within the AF area If you press and hold the center of the control button you can adju...

Page 80: ...on is used When using a tele converter sold separately etc rotation of the focusing ring may not be smooth The correct focus in the viewfinder is not achieved if the diopter is not adjusted properly in viewfinder mode page 68 The direct manual focus function is not available on this camera Adjusting the focus manually Manual focus 1 Set the focus mode switch on the lens to MF 2 When the lens is no...

Page 81: ...2176 pixels S 2416 1600 pixels Notes When the LIVE VIEW OVF switch is set to OVF the smart teleconverter is unavailable When Quality is set to RAW or RAW JPEG the smart teleconverter is unavailable When the smart teleconverter is available when in autofocus mode AF area is set to Spot When the smart teleconverter is available Metering mode is set to Multi segment 1 Set the LIVE VIEW OVF switch to ...

Page 82: ...matically if it is dark or you are shooting into the light 1 on the control button t Select the desired setting 2 After the flash has finished charging shoot the subject Flashing The flash is being charged When the indicator flashes you cannot release the shutter Lit The flash has been charged and is ready to fire When you press the shutter button halfway down under dark lighting in autofocus mode...

Page 83: ...ns required to prevent shadows from appearing on an image vary depending on the lens When the exposure mode is set to AUTO or Scene Selection the Slow sync Rear sync and Wireless items cannot be selected Flash Off Does not fire even if it is dark Autoflash Fires if it is dark or against light Fill flash Fires every time you trigger the shutter Slow sync Fires every time you trigger the shutter Slo...

Page 84: ...used To deactivate the AF illuminator MENU button t 1 t AF illuminator t Off To use the red eye reduction The red eye reduction reduces the red eye phenomenon by providing pre flash low flash light a few times before shooting when using the flash MENU button t 1 t Red eye reduc t On Aperture F2 8 F4 0 F5 6 ISO setting AUTO 1 4 7 1 m 4 6 23 feet 1 5 m 3 3 16 feet 1 3 6 m 3 3 11 feet 100 1 3 6 m 3 3...

Page 85: ...tter The camera cannot carry out the wireless lighting ratio control Turn off the wireless flash mode after wireless flash shooting If the built in flash is used while the wireless flash mode is still active inaccurate flash exposures will result Change the channel of the external flash when another photographer is using a wireless flash nearby and his her built in flash light causes your external...

Page 86: ...side depending on your preference You can make the entire image brighter by shifting to the side The entire image becomes darker when you shift it to the side Using brightness compensation for the entire image Exposure compensation 1 Press the button The exposure compensation screen is displayed in the viewfinder mode button 2 Adjust the exposure with the control dial Toward over Brightens an imag...

Page 87: ...t be set when the exposure mode is set to AUTO M Manual exposure or Scene Selection To shoot while checking the screen using the histogram 3 Adjust the focus and shoot the subject Shooting techniques The histogram displays the luminance distribution that shows how many pixels of a particular brightness exist in the picture To display the histogram press DISP on the control button pages 38 and 102 ...

Page 88: ...ct which is within the flash range MENU button t 1 t Flash compens t Select the desired setting Toward Makes the flash level higher Toward Makes the flash level lower The exposure compensation will change the histogram accordingly The right illustration is an example Shooting with the exposure compensation on the positive side brightens the whole picture making the entire histogram shift to the br...

Page 89: ...rform the compensation If the flash is used the amount of flash light is also changed However flash compensation only changes the amount of flash light Fn button t Metering mode t Select the desired mode Use Multi segment metering for general shooting Note When the exposure mode is set to AUTO or Scene Selection Metering mode is fixed to Multi segment and you cannot select other modes Selecting th...

Page 90: ... When the exposure mode is set to P A S and ISO is set to AUTO ISO is automatically set between ISO 100 and ISO 400 The AUTO setting is not provided in recording mode M If you change the recording mode to M with the AUTO setting it is switched to 100 Set the ISO according to your shooting conditions 1 Press ISO on the control button to display the ISO screen 2 Select the desired value with v V on ...

Page 91: ...posure mode is set to AUTO or Scene Selection White balance is fixed to AWB Auto WB and you cannot select other modes If the only light source available is a mercury lamp or a sodium lamp the camera will not be able to acquire the accurate white balance because of the characteristics of the light source Use the flash in such cases Fn button t White balance t Select the desired setting When AWB is ...

Page 92: ... to suit a specific light source the color tones are adjusted for the light source preset white balance Shade Cloudy Tungsten Fluorescent Flash Shooting technique Registering the color tones Custom white balance 1 Fn button t White balance t 2 Select SET with b B on the control button then press the center of the control button 3 Hold the camera so that the white area fully covers the focus area l...

Page 93: ...et the white balance again to get a more correct white balance value To call the custom white balance setting Fn button t White balance t Custom Note If the flash is used when the shutter button is pressed a custom white balance is registered with the flash light taken into account Take pictures with the flash in later shootings 4 Press the center of the control button The monitor returns to the r...

Page 94: ...sy Correcting the brightness of the image D Range Optimizer Off No optimization Standard When there is a sharp contrast of light and shadow between the subject and the background which is common when shooting into the sun the camera attenuates the contrast across the entire image to produce an image with proper brightness and contrast Advanced By dividing the image into small areas the camera anal...

Page 95: ...shooting portraits Landscape The saturation contrast and sharpness are heightened for shooting vivid and crisp scenery Distant landscapes also stand out more Night view The contrast is attenuated for shooting a nightscape that is more faithful to the real view Sunset For shooting the beautiful red of the setting sun B W For shooting images in black and white monotone Contrast The higher the value ...

Page 96: ... result in or print images that do not faithfully reproduce the color When displaying images that were recorded with Adobe RGB on the camera or non Adobe RGB compliant devices the images are displayed with low saturation Changing the range of color reproduction Color Space sRGB This is the standard color space of the digital camera Use sRGB in normal shooting such as when you intend to print out t...

Page 97: ...Sports Action in Scene Selection you cannot shoot single shot The camera records the images continuously at the following speeds Our measurement conditions The speed of continuous shooting is slower depending on shooting conditions Shooting single shot on the control button t Single shot adv Shooting continuously Live View mode Maximum 2 images per second Viewfinder mode Maximum 2 5 images per sec...

Page 98: ...nd self timer is convenient when the photographer appears in a photo and the 2 second self timer is convenient to reduce the camera shake Self timer Cont is convenient to prevent failure because the camera continuously shoots either three or five images after a 10 second pause 2 Adjust the focus and shoot the subject When you press and hold the shutter button the recording continues Fine Standard ...

Page 99: ...tness you like after shooting is finished When the flash is fired flash bracket shooting is used to shift the amount of flash light To shoot press the shutter button shot by shot 2 Adjust the focus and shoot the subject When the self timer is activated audio signals and the self timer lamp indicate the condition The self timer lamp flashes quickly and the audio signal sounds quickly right before t...

Page 100: ...e same number of indices as the number of recordable images is displayed on the EV scale However in flash bracket shooting the indices are not displayed in the viewfinder When the bracket shooting starts the indices that indicate already recorded images start to disappear one by one Bracket Cont Shoots three images with the exposure shifted by a selected step Press and hold the shutter button unti...

Page 101: ...g the SHUTTER and 2SEC the shutter is released after 2 seconds buttons on the RMT DSLR1 Wireless Remote Commander sold separately Also refer to the operating instructions supplied with the Wireless Remote Commander Note When you shoot images using the viewfinder use the eyepiece cover page 28 Shooting with the Remote Commander 1 on the control button t Remote Commander 2 Focus on the subject point...

Page 102: ...rol button the screen changes as follows To select the orientation when playing back an image recorded in the portrait position MENU button t 1 t PlaybackDisplay t Select the desired setting Note When you play back the image on a TV or a computer the image will be displayed in the portrait position even if Manual rotate is selected 1 Press the button button 2 Select an image with b B on the contro...

Page 103: ...d for closer examination This is convenient to check the focus condition of a recorded image Rotating an image 1 Fn button t Rotate 2 Press the center of the control button The image is rotated counter clockwise When you want to do another rotation repeat step 2 Once you rotate the image the image is played back in the rotated position even if you turn off the power Enlarging images 1 Display the ...

Page 104: ... To return to the single image screen Press the center of the control button when you select the desired image To select a folder 3 Select the portion you want to enlarge with v V b B on the control button Image size Scaling range L Approx 1 1 14 M Approx 1 1 11 S Approx 1 1 7 2 Switching to the display of the image list 1Select the folder bar with b B on the control button then press the center 2...

Page 105: ... have been played back You can view the previous next image with b B on the control button To pause the slide show Press the center of the control button Pressing again starts the slide show again To end in the middle of the slide show Press the button To choose the interval between the images in slide show Fn button t Slide show t Interval t Select the desired number of seconds To play back repea...

Page 106: ...ay Display Indication Memory card 22 100 0003 Folder file number 135 Protect 109 DPOF3 DPOF set 143 Image quality 117 Image size 116 Aspect ratio 116 Remaining battery warning 18 1 125 Shutter speed 61 F3 5 Aperture 59 ISO100 ISO sensitivity 90 2010 1 1 10 37AM Date of recording 3 7 File number total number of images NO CARD No card warning Display Indication ...

Page 107: ... 18 Display Indication Histogram 87 P A S M Mode dial 47 66 1 125 Shutter speed 61 F3 5 Aperture 59 ISO100 ISO sensitivity 90 0 3 Exposure compensation 86 0 3 Flash compensation 88 Metering mode 89 35mm Focal length 150 Creative Style 94 AWB 1 5500K M1 White balance Auto Preset Color temperature Color filter 91 D Range Optimizer 94 2010 1 1 10 37AM Date of recording 3 7 File number total number of...

Page 108: ...t the flashing segments on the histogram display When the image has a high key or low key portion that portion is flashed on the histogram display Luminance limit warning Luminance R Red G Green B Blue Flashing ...

Page 109: ...ted images canceling the protection of the selected images 1 Fn button t Protect t Marked images 2 Select the image you want to protect with b B on the control button then press the center of the control button A mark appears on the selected image To cancel a selection press the center again 3 To protect other images repeat step 2 4 Press the Fn button 5 Select OK with v on the control button then...

Page 110: ...otected images cannot be deleted Deleting the image that is currently displayed 1 Display the image you want to delete and press the button button 2 Select Delete with v then press the center of the control button Deleting the selected images 1 Fn button t Delete t Marked images 2 Select the images you want to delete with the control button then press the center of the control button A mark appear...

Page 111: ...n 5 Select Delete with v on the control button then press the center of the control button Deleting all the images in the folder 1 Fn button t Image Index t Select the desired number of images 2 Select the folder bar with b on the control button Folder bar 3 Press the center of the control button then select the folder you want to delete with v V 4 Press the button 5 Select Delete with v then pres...

Page 112: ...suitable for connection to your TV on the other end 1 Turn off both your camera and the TV and connect the camera to the TV 2 Turn on the TV and switch the input See also the operating instructions supplied with the TV 3 Turn on the camera Images shot with the camera appear on the TV screen Select the desired image with b B on the control button The LCD monitor on the camera does not turned on 1 T...

Page 113: ...photo like expression of subtle textures and colors To use your camera abroad The camera automatically detects the color system to match that of the connected video device On TV color systems If you want to view images on a TV screen you need a TV with a video input jack and the video cable The color system of the TV must match that of your digital still camera Check the following lists for the TV...

Page 114: ...1 Connect a TV that supports BRAVIA Sync to the camera page 112 The input is automatically switched and the image shot with the camera appears on the TV screen 2 Press the LINK MENU button on the TV Remote Control 3 Operate with the control button on the TV Remote Control Delete Selects the method for deleting images from single or all images page 110 Image Index Switches to the image index screen...

Page 115: ...unction 115 If the camera performs unnecessary operations in response to the TV Remote Control when the camera is connected to another manufacturer s TV using an HDMI connection set CTRL FOR HDMI in the Setup menu to Off ...

Page 116: ...W image with Quality the image size of the RAW image corresponds to L This size is not displayed on the LCD monitor MENU button t 1 t Aspect ratio t Select the desired ratio Image size L 14M 4592 3056 pixels M 7 7M 3408 2272 pixels S 3 5M 2288 1520 pixels L 12M 4592 2576 pixels M 6 5M 3408 1920 pixels S 2 9M 2288 1280 pixels Aspect ratio 3 2 A normal ratio 16 9 An HDTV ratio ...

Page 117: ...ndard if you play back and enlarge an image recorded in RAW format Quality RAW File format RAW raw data This format does not perform any digital processing on the images Select this format to process images on a computer for professional purposes The image size is fixed to the maximum size The image size is not displayed on the LCD monitor RAW JPEG File format RAW raw data JPEG A RAW image and a J...

Page 118: ...il the number reaches 9999 Reset The camera resets numbers in the following cases and assigns numbers to files from 0001 When the recording folder contains a file a number one higher than the largest number is assigned When the folder format is changed When all the images in the folder are deleted When the memory card is replaced When the memory card is formatted Selecting the folder name format S...

Page 119: ... folder t Select the desired folder Note You cannot select the folder when you select the setting Date form Note that formatting irrevocably erases all data on a memory card including protected images MENU button t 1 t Format t OK Notes During the format the access lamp lights up Do not eject the memory card while the lamp is lit Format the memory card using the camera If you format it on a comput...

Page 120: ...ous self timer images even when it is set to On When the exposure mode is set to AUTO or Scene Selection you cannot turn off noise reduction When shooting with the ISO set at 1600 or above the camera reduces the noise that becomes more noticeable when the camera sensitivity is high Select On to prioritize the image quality Select Off to prioritize the timing of shooting MENU button t 2 t High ISO ...

Page 121: ...n set the camera so that the adjustable item the shutter speed or the aperture value can be selected using only the control dial It is convenient if you select the most commonly used item when adjusting the exposure MENU button t 1 t Ctrl dial setup t Select the desired setting Changing the function of the control dial ...

Page 122: ...he camera This is convenient when you want to perform the next operation quickly MENU button t 1 t Help Guide disp t Off You can set different time intervals for the camera to switch to power save mode Power save for the Live View LV and viewfinder modes OVF Pressing the shutter button halfway down returns the camera to the shooting mode MENU button t 1 t Power Save LV or Power Save OVF t Select t...

Page 123: ...mode after 30 minutes when the camera is connected to a TV or the drive mode is set to Remote Commander Resets the date See page 25 for details MENU button t 2 t Date Time setup t Set up the date and time MENU button t 2 t Language t Select the language Setting the date Selecting the language ...

Page 124: ... the camera with the AC PW10AM AC Adaptor sold separately the brightness of the LCD monitor is always set to the brightest setting even if you select Auto You can check the recorded image on the LCD monitor right after the shooting You can change the displayed time MENU button t 1 t Auto review t Select the desired setting Note In auto review the image will not be displayed in the vertical positio...

Page 125: ... In the default setting while looking into the viewfinder the LCD monitor is turned off to prevent the battery pack from wearing down If you want to turn on the LCD monitor while looking into the viewfinder select Off MENU button t 1 t Auto off w VF t Off Keeping the LCD monitor tuned on while looking into the viewfinder ...

Page 126: ...the version when a firmware update is released MENU button t 3 t Version Note An update can be performed only when the battery level is three remaining battery icons or more We recommend that you use a sufficient battery or the AC PW10AM AC Adaptor sold separately Displaying the version ...

Page 127: ... Single image screen with recording information Drive mode 97 Single shot adv ISO 90 AUTO Flash mode 82 Autoflash or Flash Off Metering mode 89 Multi segment Autofocus mode 78 AF A White balance 91 AWB Auto white balance Custom white balance 92 5500K D RangeOptimizer 94 Standard Creative Style 94 Standard Items Reset to Image size 116 L 14M Aspect ratio 116 3 2 Quality 117 Fine Flash compens 88 0 ...

Page 128: ...ecify Printing Date imprint 147 Off Slide show Interval 105 3 sec Slide show Repeat 105 Off PlaybackDisplay 102 Auto rotate Items Reset to LCD brightness 124 Auto Power Save LV 122 20 sec Power Save OVF 122 10 sec CTRL FOR HDMI 114 On Display Color 122 White Help Guide disp 122 On File number 118 Series Folder name 118 Standard form USB connection 130 146 Mass Storage Audio signals 122 On ...

Page 129: ...e installed Mac OS X v10 4 10 5 10 6 USB jack Provided as standard Notes on connecting your camera to a computer Operations are not guaranteed for all the recommended computer environments mentioned above If you connect two or more USB devices to a single computer at the same time some devices including your camera may not operate depending on the types of USB devices you are using Operations are ...

Page 130: ...e camera to a wall outlet wall socket with the AC Adaptor sold separately When you copy images to your computer using an insufficiently charged battery pack copying may fail or image data may become corrupted if the battery pack shuts down too soon 4 Turn on the camera and the computer 5 Check that USB connection in 3 is set to Mass Storage 6 Connect the camera and your computer The AutoPlay wizar...

Page 131: ...o view files For Windows XP Open folder to view files t OK as the wizard screen appears automatically on the desktop When the wizard screen does not appear click Computer For Windows XP My Computer t Removable Disk 2 Double click DCIM You can also import images directly using PMB 3 Double click the folder where the image files you want to copy are stored Then right click an image file to display t...

Page 132: ...ite an existing image with a new one the original file data is deleted To copy an image file to the computer without overwriting change the file name to a different name and then copy the image file However note that if you change the file name you may not be able to play back that image with your camera page 135 1 Double click the newly recognized icon t DCIM t the folder where the images you wan...

Page 133: ...ed page 140 Double click the hard disk icon t the desired image file to open the image file Perform each procedure for Windows or Macintosh listed below beforehand when Disconnecting the USB cable Removing the memory card Turning off the camera For Windows 1 Click Start t Documents If you are using Windows 2000 double click My Documents on the desktop 2 Double click the desired image file The imag...

Page 134: ...k USB Mass Storage Device t Stop Confirm the device on the confirmation window then click OK The device is disconnected x For Macintosh Drag and drop the drive icon or the icon of the memory card to the Trash icon The camera is disconnected from the computer ...

Page 135: ...ed using this camera The first three digits show the folder number BYou can create a folder in date form page 118 You cannot record play back any images in the MISC folder Image files are named as follows ssss file number stands for any number within the range of 0001 to 9999 The numerical portions of the name of a RAW data file and its corresponding JPEG file are the same JPEG files DSC0ssss JPG ...

Page 136: ...lick Rename Change the file name to DSC0ssss Enter a number from 0001 to 9999 for ssss If the overwrite confirmation message appears enter a different number An extension may be displayed depending on the computer settings The extension for images is JPG Do not change the extension 2 Copy the image file to the memory card folder in the following order 1 Right click the image file then click Copy 2...

Page 137: ... Starter Edition are not supported 2 Starter Edition is not supported CPU Memory Pentium 4 or faster is recommended RAM 1 GB or more is recommended Display 1024 768 dots or more Recommended environment for using PMB OS pre installed Microsoft Windows XP 1 SP3 Windows Vista 2 SP2 Windows 7 1 64 bit editions and Starter Edition are not supported Windows Image Mastering API IMAPI Ver 2 0 or later is ...

Page 138: ...ows Log on as Administrator Installing the software 1 Turn on your computer and insert the CD ROM supplied into the CD ROM drive The installation menu screen appears If it does not appear double click Computer For Windows XP My Computer t SONYPMB t Install exe Under Windows Vista the AutoPlay screen may appear Select Run Install exe and follow the instructions that appear on the screen to proceed ...

Page 139: ...g software is installed and shortcut icons appear on the desktop Image Data Converter SR Image Data Lightbox SR PMB PMB Launcher PMB Help 1 Turn on your Macintosh computer and insert the CD ROM supplied into the CD ROM drive 2 Double click the CD ROM icon 3 Copy the IDS_INST pkg file in the MAC folder to the hard disk icon 4 Double click the IDS_INST pkg file in the copy to folder Follow the instr...

Page 140: ...t information for the Sony Image Data Suite English only http www sony co jp ids se To start up exit Image Data Converter SR x Windows Double click the shortcut of Image Data Converter SR Ver 3 on the desktop When starting up from the Start menu click Start t All Programs t Sony Image Data Suite t Image Data Converter SR Ver 3 To exit click the button on the upper right corner of the screen x Maci...

Page 141: ...x Macintosh Double click Image Data Lightbox SR in the Sony Image Data Suite folder from the Applications folder To exit click a quit item from the Image Data Lightbox SR menu Note PMB is not compatible with Macintosh computers With PMB you can Import images shot with the camera and display them on the computer Organize images on the computer on a calendar by shooting date to view them Retouch Red...

Page 142: ...click button on the upper right corner of the screen The support information for the PMB English only http www sony co jp pmb se Note The confirmation message of the Information tool appears on the screen when starting PMB for the first time Select Start This function informs you of news such as software updates You can change the setting later ...

Page 143: ...on using the Fn button is described Notes You cannot specify DPOF on RAW data files You can specify any number up to 9 Fn button t Specify Printing t DPOF setup t All images or Cancel all t OK t OK Specifying unspecifying DPOF on selected images 1 Fn button t Specify Printing t DPOF setup t Marked images t OK 2 Select the image with b B on the control button 3 Select the number of sheets with the ...

Page 144: ...he same value will be used for all images You can date images when printing them The position of the date inside or outside the image character size etc depends on your printer Fn button t Specify Printing t Date imprint t On Note This function may not be provided depending on the printer Dating images ...

Page 145: ... do not have a computer you can print images shot using your camera by connecting the camera directly to a PictBridge compliant printer PictBridge is based on the CIPA standard CIPA Camera Imaging Products Association Stage 1 Setting the camera 1 MENU button t 3 t USB connection t PTP 2 Turn the camera off and insert the memory card that the images have been recorded on 3 Select the type of memory...

Page 146: ...press the center of the control button To cancel press the center again 2 Repeat step 1 if you want to print other images 3 Press the MENU button and set up each item For details on setting items see PictBridge menu 4 Select Print t OK in the menu then press the center of the control button The image is printed After the screen indicating that the print is completed appears press the center of the...

Page 147: ...ecified on all the selected images Paper size Date imprint Unmark all After the message appears select OK then press the center of the control button on each image is cleared after printing images When you cancel your specification without printing images select this item PictBridge menu Auto Printer setup 9 13cm 3 5 5 89 127 mm Hagaki 100 147 mm 10 15cm 10 15 cm 4 6 101 6 152 4 mm A6 4 1 5 8 105 ...

Page 148: ...ilter and image sensor shift mechanism Auto Focus System System TTL phase detection system CCD line sensors 9 points 8 lines with center cross hair sensor Sensitivity Range 0 to 18 EV at ISO 100 equivalent AF illuminator Approx 1 to 5 m 3 3 to 16 4 feet Live View Type Pentamirror tilt mechanism Image format Exclusive image sensor for Live View Metering method 1200 zone evaluative metering Metering...

Page 149: ...seconds Flash coverage Covering 18 mm lens focal length that the lens indicates Flash compensation 2 0 EV 1 3 EV step Recording media Memory Stick PRO Duo media SD memory card SDHC memory card LCD monitor LCD panel 6 7 cm 2 7 type TFT drive Total number of dots 230 400 960 240 dots Input output terminals USB miniB HDMI HDMI type C minijack Power general Used battery pack Rechargeable battery pack ...

Page 150: ...ass Approx 50 g 1 8 oz Design and specifications are subject to change without notice On focal length The picture angle of this camera is narrower than that of a 35 mm format film camera You can find the approximate equivalent of the focal length of a 35 mm format film camera and shoot with the same picture angle by increasing the focal length of your lens by half For example by using a 50 mm lens...

Page 151: ... of HDMI Licensing LLC Macintosh and Mac OS are trademarks or registered trademarks of Apple Inc PowerPC is a registered trademark of IBM Corporation in the United States The SDHC logo is a trademark MultiMediaCard is a trademark of MultiMediaCard Association Intel Intel Core MMX and Pentium are trademarks or registered trademarks of Intel Corporation Adobe is a registered trademark or a trademark...

Page 152: ...runs out too quickly This phenomenon occurs when you use the camera in an extremely hot or cold location page 165 The battery pack is discharged Install a charged battery pack page 14 The battery pack is dead page 18 Replace it with a new one Cannot turn on the camera Install the battery pack correctly page 17 The battery pack is discharged Install a charged battery pack page 14 The battery pack i...

Page 153: ... off if no operation is registered for more than 10 seconds to minimize the battery consumption The image is not clear in the viewfinder Adjust the diopter scale properly using the diopter adjustment dial page 68 No images in the viewfinder The LIVE VIEW OVF switch is set to LIVE VIEW Set it to OVF page 67 The image has not been recorded A memory card is not inserted The shutter does not release Y...

Page 154: ...ject is too close Check the minimum focal distance of the lens You are shooting in manual focus mode set the focus mode lever to AF autofocus page 75 When the focus mode switch is equipped with the lens set it to AF Ambient light is insufficient Eye Start AF does not work Set Eye Start AF to On page 67 Press the shutter button halfway down The flash does not work The flash mode is set to Autoflash...

Page 155: ...ct is too bright or too dark it is beyond the available range of the camera Adjust the setting again The image is whitish Flare Blurring of light appears on the image Ghosting The picture was taken under a strong light source and excessive light has entered the lens Attach a lens hood sold separately The corners of the picture are too dark If any filter or hood is used take it off and try shooting...

Page 156: ...recorded in Live View mode is strange In Live View mode carefully check the image displayed on the LCD monitor before shooting The camera may not be able to recognize the color of the image right after switching to the Live View mode In such cases the expected result may not be obtained Your camera cannot play back images The folder file name has been changed on your computer page 135 When an imag...

Page 157: ...Disconnect the USB cable and connect it again firmly Set USB connection to Mass Storage page 130 Disconnect all equipment other than the camera the keyboard and the mouse from the USB jacks of your computer Connect the camera directly to your computer without passing through a USB hub or other device page 129 You cannot copy images Make the USB connection by properly connecting the camera with you...

Page 158: ...ard by mistake All the data on the memory card is deleted by formatting You cannot restore it Memory Stick PRO Duo media are not recognized by a computer with a Memory Stick media slot If Memory Stick PRO Duo media are not supported on your computer s Memory Stick media slot connect the camera to the computer page 130 The computer will recognize the Memory Stick PRO Duo media Also see PictBridge c...

Page 159: ...e images shot with the camera include information on the recording date you can print images with the date superimposed if the printer or the software can recognize Exif information For compatibility with Exif information consult the manufacturer of the printer or the software When you print images at a shop images can be printed with the date if you ask them to do so For details refer to the oper...

Page 160: ...f either the camera page 147 or the printer Cannot operate the camera after canceling printing Wait for a while as the printer is carrying out the cancellation It may take some time depending on the printer The lens gets fogged Moisture condensation has occurred Turn off the camera and leave it for about an hour before using it page 165 The message Set date and time appears when you turn on the ca...

Page 161: ...is hot allow it to cool down before trying this corrective procedure If the camera does not work after doing these solutions consult your Sony dealer or local authorized Sony service facility The five bars of the SteadyShot scale flashes The SteadyShot function does not work You can continue to shoot but the SteadyShot function will not work Turn the camera off and on If the SteadyShot scale conti...

Page 162: ...l previous data in the memory card is erased It may take a some time to complete the format If the message still appears change the memory card Card error An incompatible memory card is inserted or the format has failed Reinsert Memory Stick Reinsert SD memory card The inserted memory card cannot be used in your camera The memory card is damaged The terminal section of the memory card is dirty SD ...

Page 163: ...ages with a DPOF mark Initializing USB connection A USB connection has been established Do not disconnect the USB cable Check the connected device A PictBridge connection cannot be established Disconnect the USB cable and connect it again Camera overheating Allow it to cool The camera has become hot because you have been shooting continuously Turn the power off Cool the camera and wait until the c...

Page 164: ...ate any folders if this is the case Printing canceled The print job was canceled Disconnect the USB cable or turn the camera off Unable to mark You attempted to mark RAW images on the PictBridge screen Printer error Check the printer Check if the image you want to print is corrupted Printer busy Check the printer ...

Page 165: ... Rear Lens Cap ALC R55 also On operating temperatures Your camera is designed for use under the temperatures between 0 and 40 C 32 and 104 F Shooting in extremely cold or hot places that exceed this range is not recommended On moisture condensation If the camera is brought directly from a cold to a warm location moisture may condense inside or outside the camera This moisture condensation may caus...

Page 166: ...d one time events make a trial recording to make sure that the camera is working correctly This camera is neither dust proof nor splash proof nor water proof Do not look at the sun or a strong light through a removed lens or the viewfinder This may cause irrecoverable damage to your eyes Or it may cause a malfunction of your camera Do not use the camera near a location that generates strong radio ...

Page 167: ...BULB shooting 65 C Center weighted 89 Charging battery pack 14 Cleaning mode 32 Color Space 96 Compression ratio 117 Continuous AF 78 Continuous bracket 99 Continuous shooting 97 Contrast 94 Control button 39 40 Creative Style 94 Ctrl dial setup 121 CTRL FOR HDMI 114 Custom white balance 92 D Date imprint 144 Date Time setup 25 123 DC IN terminal 36 Delete 110 Depth of field 56 Diopter adjustment ...

Page 168: ...ync 74 Histogram 87 108 I Image Data Converter SR 140 Image Data Lightbox SR 140 Image Index 104 Image quality 117 Image size 116 ISO sensitivity 90 J JPEG 117 L Landscape 51 Language 123 LCD brightness 124 LCD monitor 37 69 106 Lens 20 Live View 7 67 Long exp NR 120 M Macro 52 Manual exposure 63 Manual focus 80 Memory card switch 22 Memory Stick Duo 22 Memory Stick PRO Duo 22 Menu 41 Metering mod...

Page 169: ... 127 Rotate 103 S Saturation 94 Scene Selection 49 SD memory card 22 Select folder 119 Self timer 98 Set the clock 25 123 Sharpness 94 Shooting 47 Shoulder strap 27 Shutter speed 56 61 Shutter speed priority 61 Single shot AF 78 Slide show 105 Slow sync 82 Smart teleconverter 81 Specifications 148 Sports Action 53 Spot 89 SteadyShot function 45 Sunset 54 U USB connection 130 146 V Version 126 View...

Page 170: ...Printed using VOC Volatile Organic Compound free vegetable oil based ink Additional information on this product and answers to frequently asked questions can be found at our Customer Support Website ...

Page 171: ...amera Firmly insert the battery pack all the way while pressing the lock lever with the tip of the battery The lens 1 Remove the body cap on the camera and packaging lid on the rear of the lens Do not touch inside parts If dust enters the camera it may appear on the photo image Do not leave the camera and lens without the caps When you change the lens do it quickly in a location free from dust 2 M...

Page 172: ... yb yb yb yb yb yb yb yb yb yb yb yb yb yb yb yb yb yb yb yb yb yb yb yb yb yb yb yb yb yb yb yb yb yb yb yb yb yb yb yb yb yb yb yb yb yb yb yb yb yb yb yb yb yb yb yb yb yb yb yb yb yb y y y y y y y y y y y y y y y y y y y y y y y y y y y y y y y y y y y y y y y y y y y y y y y Check that the LIVE VIEW OVF switch is set to LIVE VIEW ˎ LIVE VIEW OVF switch 2 Check the subject on the LCD monitor H...

Page 173: ...Y Z 4 bIL Gi6 TJ c ree 1I 1 g l 1J 1 SA H 2 P I 50 V X tJ 9G 9 jljIG1 if v JX J jrcJl 1i IG LIcl 990 SONY 4 136 086 03 1 DT 18 SSmm F3 S S 6 SAM DT SS 200mm F4 S 6 SAM 3 4 2 m 6 7 2 34 OM 6 7 2009 Sony Corporation EfY m Bf I OperatingInstructions Mode d emploilManual de instrucciones m M Dr 18 55mm F3 5 5 6 SAM Dr55 200mm F4 5 6 SAM SALl855 SAL55200 2 7 YJiI 1II1 71 I cSillv JXI Lens for Digital S...

Page 174: ...e in temperature To shoot a subject at infinite distance in MF mode use the viewfinder and sel focus rn W l llUJJ 1 2 3 OQ You will find information on using each lens in this manual Precautions common to lenses such as notes on use will be found in Precautions before using on a separate sheet Be sure to read both documents before using the lens This manual is for use with several different lenses...

Page 175: ... Design and specifications are subject to change without notice a is a trademark of Sony Corporation m Specifications m 35mm j VYA 1I ilt l I ffl Jv 7 t l g i i II x ie B j 1I eJltl ffl jlfli t mm c f mm f g mm m _ _ Equivalent 35mm Minimum Maximum Dimensions Mass Name Lens groups Angle of Minimum Filter diameter maximum diameter Model name format focal elements view fOCUS 2 magnification f stop m...

Page 176: ...ended Do not use any organic solvent such as thinner or benzine to clean the lens or the camera cone SONY 4 135 235 02 1 NOTE This equipment has been tested and found to comply with the limits for a Class B digital device pursuant to Part IS of the FCC Rules These limits are designed to provide reasonable protection against harmful interference in a residential instatlation This equipment generate...

Page 177: ......

Page 178: ......

Page 179: ...t portrait lens makes it much easier to obtain the professional looking results you ve always wanted Portrc lenses As the proud owner of an ex digital SLR camera a portrait lens is probably one of the first interchangeable lenses you will want to add to your kitbag Why Because while standard zoom lenses are great for general use a purpose built portrait lens makes it much easier to obtain the prof...

Page 180: ...4 Portrait 4 Portrait ...

Page 181: ...ground blur at each selting A 1 250 2 I 30 no 1 4000 2 1 s a 11 22 0 IB10 0 150200 FINE Cl SII 225 5 With a portrait lens you can emphasize your subject and add beauty and depth to the frame Shot with portrait lens Shol with zoom kit lens When taking portrait photos you generally wont to blur distracting background details so that the main SUbject stands out naturally from the scene Portrait lense...

Page 182: ...s too they can be particularly effective when photographing active subjects like children and pets 6 Portrait Choose clean simple backgrounds to help your subjects look their best Moving around your subject to frame it from a different angle is another good way to reduce distracting background elements and create a dramatically different scene Experiment with high angle and low Jngle shots too the...

Page 183: ...ngle monllor can also be tilled up or down for stress free high position and low posilion shooting 7 A great shot with nothing to distract the viewer from the main subject A less pleasing composition wilh unnecessary clul1er in the frame Shoaling lip Fealured on many a senes SLR cameros Quick AF Uve View makes il easy 10 mainlaln sharp focus on acllva subjects while framing them on the LCD manliar...

Page 184: ...es to get the composition just right It can make the difference between a good photo and great one 8 Portrait Step forward into the scene and you can almost hear the music playing Portraits are about people so don t hesitate to step forward to obtain the tight framing that creates a more dramatic image Focus the camera on the sUbject s eyes and experiment with different positions and angles to get...

Page 185: ...l SutlJfCl b blurlllll bocksround ReprodlJcn soh skin tone TIP r KUS on oct ere for bel1 re Ulll 1 9 Standing too far away results in a rather boring composition Stepping torword and framing the subject lightly results In a more interesting composition Shoollng pi When you set the mode dial to PorIroit your ex camera wlJl automatically optimize ex posure and Image sehings to help blur the backgrou...

Page 186: ...overall making it much easier to capture rich colors and natural skin tones when shooting indoors 10 Illuminate your creativity and capture the most magical moments Portrait photography gains another dimension when you use an external flash unit Why Because instead of illuminating your sUbject only from the front the way a built in flash does It lets you bounce light off of the ceiling The result ...

Page 187: ...and IoId It clown to tum It off It s so compact you can keep It mounted an the calTllllO aa the me 11 Without flash With built In camera flash With the External Flash HVL F20AM bounce flash Illumination Shoaling liP The 01 Ughtlng System HVL f2OAM exlemolllash unit Is exceptionally sleek sIyllsh and easy to upeIate Slmply raise It up to swttch It on and IoId It clown to tum It off It s so compact ...

Page 188: ......

Page 189: ... just waiting to be captured by a lens that can reveal their miniaturized beauty in exquisite detail Macro enses Once you get a feel for digital SLR photography a macro lens is another great addition you ll probably wont to make to your camera bog Because there s on entire world af fascinating little subjects all around you just waiting to be captured by a lens that can reveal their miniaturized b...

Page 190: ...Macro 14 Macro 14 ...

Page 191: ...for cloSEHOnge shots of flowers and other small subjects Help Guide assistance Is also available 9 a With a macro lens you can discover a world of beauty in the details of daily life Shot with macro lens Shot wllh zoom kit lens Macro lenses open the door to a world of photo graphic discovery Because with a macro lens you can get much closer to your sUbject than you can with a zoom lens enabling yo...

Page 192: ...your view of the world entirely It s just one more reason why macro photography is so fascinating 16 With the right shooting angle you get a whole new perspective on the world around you Imagine how a flower looks when seen from a bumblebee s point of view Well with a macro lens it s possible to capture that view and a lot more Because at the close shooting distances of macro photography even a sl...

Page 193: ... taking advantage of the Quick AF Uve View and hltabte LCD mom tor found on mony J series cameros 17 From obove From the side From below ou can Old bock strain on low ongle macro shats by taking advantage of the Quick AF Uve View and hltabte LCD mom tor found on mony J series cameros 17 ...

Page 194: ...camera bodies are equipped with SteadyShot INSIDE image stabilization that works with any ex lens 18 Don t let blurring spoil your macro shooting creativity A macro lens can also stimulate your creativity with its remarkable ability to turn everyday subjects into works of art But because the slightest bit of camera shake can cause noticeable blurring when you re shooting at extremely close range i...

Page 195: ...behind by the sunlight outside Try It yourself with the right lens it s easier than you thinkI lO 19 SteodyShot on SteodyShot off SteadyShot INSIDE bullt n blur protection All oc senes cameras are eqUipped with SteodyShot INSIDE Image stablhzatlon to help prevent blurring caused by camera sha e The remarkable mage on the facing poge was actually qUite eosy to creote The photogropher simply pressed...

Page 196: ...eight approx 640g 1 22 5 80z Minimum fOCUSing distance 0 85m 12 811 Maximum magnification ratio 0 13 The next step up Portrait lenses DT 50mm Fl 8 SAM SAL50F18 DimenSions max diameter x length 70 x 45mm 1 2 7 8 x 1 13 16 WeIght approx 1709 1 60z MInimum focuSing dIstance O 34m 1 1 2511 Maximum magnIfication ratio 0 2 SOmm F1 4 SALSOF14 An exceptionally bnght highi rode lens wIth excellent contrast...

Page 197: ...mm 3 4 Weight approx 50Sg 1801 Minimum locusing distance a 35m 1 2lt Maximum magnificat on rallo 1 0 n DT 30mm F2 8 Macro SAM SAl30M28 Dimensions max diameter x length 70x45mm 2 7 8 x 1 13 16 Weight approx 150g 5 1 401 Minimum focusing distance 0 13m 0 42lt Maximum magnification ratio 1 0 50mm F2 8 Macro SAl50M28 A versatile high grade macro lens with smooth background defocusing and a slightly lo...

Page 198: ... approx 3409 12oz n _ GN Q slQndol d meo UfO 01 Go outpyl Ioroo mbef5 nd1Cot pawt f and gmclef ronoo The next step up Flash units External Flash HVl F20AM Guide number GN 20 Dimensions CN H D 62 94 6 24mm 2 1 2 3 3 4 x 31 32 Weight appro 98g 3 5az External Flash HVl f42AM A powerful GN42 flash unit with variable angle head Advanced funcHans include auto white balance adjustment high speed sync and...

Page 199: ...s to how large on ObjeCt WIll appear relalill8 to Its actual s e at Ihe minimum fOCUSIng distance 23 Lens Q A An acranym for Smooth Autolocus Motor on In lens dnve motor hot helps assure smooth AF response Indicates the lens s focol length which determines how WIde on area the lens can cover and how big Ihe subject will appear to be IndICates the apprOXimate distance to he subject currently n focu...

Page 200: ... ore 5tJbtecl to etx Jngo W thotJl no lCe PrInted In Thailand 2009 So I Co po c 0907GYG 4 I03 J92 J1 www sony com dslr Nol 011 tnOdO lJ oru o In 0 eounltlm tUglOOs Somo p c t 1 uSOd 11 16 C010l0Q t ICMJ been OJgltoi rel oUchod lOf IDuslrol n putp050 ea 0 h OdernolO 01 SonyCOrporotlOn M lM Vtew onotJ6 Orsgle leO monll ot GfophlC D oIoV and Help GoIQe no o crioole on all a s ert J 1 con 01 1 11 COlQ...

Page 201: ...Receive your next purchase of select accessories Receive your next purchase of select accessories ...

Page 202: ...SONY make believe Accessor es Accessoires Accesorios Acess6rios SONY make believe Accessor es Accessoires Accesorios Acess6rios ...

Page 203: ......

Page 204: ......

Page 205: ...inform o de temperatura de cor do flash Controle de rela 80 5em Ros disponlvel com DSLR A900 A850 04 HVL F58AM tlD High powermultifunctiOIlaI flash wiltl guide number58 1 05mm ISOlDO m New bounce system Quick ShiftBounce incorporated Includes optimized features for DSlR such as white balance adjustment in EN line with the flash color temperature information Wireless Ratio Control available wiltl D...

Page 206: ...dade de med de flash P ill Sincroniza aalta velocidade Flash sem Fros Vanas lU s para rebatimento 05 HVL F20AM fi1D Compact lightweight and Ish designed flash with gUide number 20 l50mm 1 OO m Impressive photos can be taken easily with simple operation Power tums on by just lifting up the flash EN Enables optimum flash control by just changing the switch to beunce direct position Flash compacta ev...

Page 207: ...essano para a Ii o de Luz Macro HVL MT24AM HVL RLAM Lent SALJOM28 SALSOF18 Facil de apUcarIremover 6 Adaptador de zapata Adaptorfor connecting wireless lIash sync system WIth hets Ioe ISO 518 Possib to transtertriggersignal EN Integrated protection dn LOt guandsIrecamera from potential high trigger voltage of extemal flash units BatteIycheck lED sI oMi rernaiCling battery _ of 1I1tegratedI nteclxx...

Page 208: ...te mas tiempo Utiliza 6pllas AA alcalinas 0NiMH no suministradas ES TIempo de recielaje mas corto 07 External Flash Flash externe HVL F42AM Multi Flash Cable Cable multiflash FA MC1AM Off Camera Shoe for Flash Sabot hors appareil pour flash FA CS1AM Off Camera Cable for Flash Cable hors appareil pour nash FA CC1AM Extension Cable for Flash Rallonge pour flash FA EC1AM Triple Connector for Flash Co...

Page 209: ......

Page 210: ...as Inclui orificio de correia para prender Correia anracolo Ciota de Correia au Correia de Mao PT 09 VG C90AM riG ri iI LllInfoLiTHIUM Ii Leis Ihe camera be held vertically for easy and convenient portrait photography Operation buttons are laid out In the same arrangement horizontally and vertically Holds two high capacity NP FM500H batteries not included for longer shooting Magnesium alloy body w...

Page 211: ...bal ACl 00 240V 10 CIPA Camera Imaging Products Association CIPA Camera Imaging Products Associalion AC PW10AM Exclusive AC Adaptor for a Camera Glotial model AClDO 240V EN AC VQ900AM d d For quick charging ot battery pack NP FM500H and NP FM55H Charges 2battery packs in sequence EN Includes LCD panel 10 indicate time to completion Includes AC Adaptor function for camera IJody Compact and lightwei...

Page 212: ...sa cm eboclJ excllIlvamenteparaaPCK LS7AM1lS6AM1LS5AM Almagem acima refere se ao modelo PCK LS4AM 11 RevetemenlAR PCK LS6AM d PCK LS4AM d 1 ARCoat PCK LS7AM PCK LS5AM II PCK LH5AM ddd PCK LH6AM d PCK LH4AMdd III II SH L2AM d SH l1AM d LCD Hoods LCD Protect Covers LCD Protect Sheets Attachable to unlor tilt shooting Biod s out unnecessary ligltl lor glare bee viewlng of LCO Retractable and detadlab...

Page 213: ... com nhas cruzadas pa a urna corn plBClS3 PersonaJizavel palo UtlllZaoor Acompanha PUlI as eeslOIO 2 Focusing Screen FDA FM1AM I FL1AM Type M focusing SCreen wllI1 SuperSphencaI Acute MatteSlJrtacelor _ identJficalJon of correct locuspoontv len USIng IensWJll1 F28 or large aperture Ell Type L Focus 1g SCreen WJII1 goo lOS for preCIse comlJOSllJon User excflangeable Come WlII1 tweezer and case Mull...

Page 214: ...entes PT Os vaiOfes loolCilm 0 nival de aJuSIe de d tria quandoape a eanexada ao visor eletrOnico 13 Eyepiece Correctors FDA ECF05IECF1OlECF15 ECF20lECF30 FDA ECN10 ECN20IECN30IECN40 Ii lI RJA ECf tarsoghlOO YISlOIl RJA ECN llIJ3fSI IhIooVISioo D ler denoted by value parentheses Values oolCilte degree of diopter adjustment wllen EN prece attached 10 the VlOWfinder DOD DOD DOD FDA ECf05 05 FDA ECf1...

Page 215: ...Protege los abletlvos de rayadas yde las particulas de paIva Protege los abletlvos de rayadas yde las particulas de paIva ...

Page 216: ...ops PT Qualidade Cart ZeISS com revestimento T Design elegante Protege as lentes de arranhOes ep6 15 VF 49CPAM 55CPAM 62CPAM 67CPAM 72CPAM 77CPAM VF 49NDAM 55NDAM 62NDAM 67NDAM 72NDAM 77NDAM VF 49MPAM 55MPAM 62MPAM 67MPAM 72MPAM 77MPAM 49mm 55mm 62mm 67mm 72mm 77mm Filter Dia mm Oiametre du filtre mm II 49mm 55mm 62mm 67mm 72mm 77mm Riter Dla mm Diametre du filtre mm 49mm 55mm 62mm 67mm 72mm 77mm ...

Page 217: ...donnes avec votre a Coordine su a con elegantes accesorios Coordene a sua a com acess6rios elegantes 16 Coordinate your a with stylish accessories Accessoires elegants coordonnes avec votre a Coordine su a con elegantes accesorios Coordene a sua a com acess6rios elegantes ...

Page 218: ...ado de vanas formas aTiracolo com presllha de Mao com correia no estOjo com O nng na presllha ca s 17 2 way deslgn aJXJws usage With Vertical Gnp and body or the body aIooe Can attach Shou1def Strap to camera body th EN Hand Strap Colored tnm and leash lor sophisucated look Length 900mm W1dth 31Jmm Im type Long enough to be v oo1 dtagooally across the chest for secure stylISh camera suppOO EN Colo...

Page 219: ... transpartar Pi Adequade para 0 t nornnal da camara epara alente de zoom SAl 75300 00 equivalente 18 LCS SC6 rm Soft Carrying Case Small size system case Ideal lor essential camera equlpmer11 Easy to cany Suitable lorstandard camera kit and SAl75300 zoom lens or equivaJeno EN LCS TI10 Medium SIZe system case Able to store body up toA700 standard zoom lens one extra lens up toSAl 75300 RoooJ lor pe...

Page 220: ...mpa para achwa Adequado para 0 kit normal da camara epara aloote de zoom SAl75300 OU eQurvalen1el 19 EN FR ES PT LCS AMSC30 rm Holds camera lens flash Ul1Its and vaoous other accessones Sac de transport souple loge l appareil l ollJectJl 1es flashs et dMlfS autres accessolfes Funda de transporte blanda Permite almacenar la camara eJ objetivo las unidades de flash yatros accesoflos Estojo de Transp...

Page 221: ...r camera and COfMlIllenl slOfage ncilxIes ben loop and D nng EN lCS AMlC4 shown above II FR ES PT 20 Poigm e Permet aI utitisateur de tenir plus fermement I apparetl Sa ccnceplion bNalenle permel de utlliser avoc poIgnee vOOteale el Ie bollierou avec Ie boitJer seul FR Permet de fixer la bandouliere au boitler de rappareil photo aI aide de la sangle STP GBl AM rJD Correa de empuiiadura leIS tha us...

Page 222: ...D nnglrevestimento de malhattecido de forro anti deslizante Matena NyIoo Base Borracha sintetttal 21 Black Nair Mu tJfonctJonaJ straP that meets the demands 01 high amateur users Neoprene expandableYone loocIllength adjustmootldetaehable RX Iock IJ nnglmesh Iinlnglnon ip lining cloth Ell Mater Ny100 Base SynthetiC robtlerJ STP SB2AM ri D Shoulder Strap Black NOlr Shoulder Strap Easy to use wide st...

Page 223: ...mm Approx size Length 610mm Width 30mm More Varieties of Shoulder Straps Large choix de bandoulieres Black Cinnabar Noir Vermilion Tame approx Longueur 420mm Largeur 50mm Tame approx Longueur 900mm Largeur 30mm STP XS1AM fi1 Approx size STP SB1AM fi1 Length 420mm Width 50mm Approx size Length 900mm Width 30mm Cinnabar Vermilion Black Cinnabar Silver NOlr Vermilion Argent Tame approx Longueur 61 Om...

Page 224: ...F SSMPAM AlC F77A VF 49MPAM VF nMPAM I 3 Front Lens Cap 4 Ca1 ZetsI Front Lens Cap 5 GFront Lens Cap r6 Me Protector 7 PL Filter 8 NO Filter Cl Cl Cl Cl Cl N N 8 gj 0 gj til 5 5l til 0 gj u u 5 5 N N 0 til 0 0 til 0 u u u U til 0 til u u u u u 5 til 5 u M 5 u M 18 til til 0 g 5l 5l 0 M 0 0 0 I til til I til til I M J J J J J J J J J J J J J J J J J J J J J J J J J til til til til til til til til t...

Page 225: ...ue consulta um mapa online Requer CD ROM pMB Picture Motion Browser fomecido com asua ex PT FR ES 24 n GPS CS3KA o Unite GPS Dispositivo de localizaci6n que graba automaticamente d6nde ycuando se toman las fotografias Simplemente relacione la informaci6n grabada para verla can el recorrido en un mapa en linea Es necesario et CO ROM pMB Picture Motion Browse suminlstrado con la ex Etonnant appareil...

Page 226: ...mentos de 1 5m e3 0m Os cabos DlC HDMl5120 HOMI tambern estao disponivelS em alguns paiseslreglQes 25 _ VMC 15MHDNMC 30MHD d d MemayStickPRO OOOTMIMemayStickPRO HG OOOTM Memory StiCkTM SONY I UIOIll SllUlPRODul _ GAT I D Ell For more Information visit www sony netlmemorystick supportalorcontactanauthorized local dealer High capacity HOMI cable for retaining HO p ture quality while transfening dala...

Page 227: ... ECN30lECN40 SH L1AM PCK LHSAM PCK LS6AM FOA EP6AM PCK LH4AM PCK LSSAM FOA EPSAM PCK LS4AM FOA EP4AM Tnple Conneclor lor Flash Off Camera Cable for Flash Extension Cable for F1astl Multi Flash Gable FA TC1AM FA CC1AM FA EC1AM FA MC1AM Ex1emal Flash HVL FSBAM External Flash External Flash HVL F42AM HoI Shoe Adaptor FA HS1AM o Sync T errmnat AOaptOf FA STlAM co External Battery Adaptor FA E81AM Off ...

Page 228: ... AMLC3 R J 1 J LCS AMLC2 _ 1 p HandSI Wrappmg Cloth Shoulder Straps STP HS1AM LCS WR1AM STP GB1AM 27 ltert w Gnp VG C90AM f d Q geiOf Ba efy Pa l BatterY Pack NP FMSOOH NP FH5OINP FH5OAM AC Adaptor Qlargrr AC V09OOAM Al Adaptor AC PW10AM tJ l 1ft afTY1 19 0 1 Cal1Y llQ Case Mt S SeOQP f Twe Bag ft carrymg cases n0 LCS SC5 LCS TTlO LCS MS10 LCS AMLC4 LCS AMLC3 R J 1 J LCS AMLC2 _ 1 p HandSI Wrappmg...

Page 229: ...sony net dslr Printed in Thailand Imprime en Tha llande 201 0 Sony Corporation 1004TYYG 4 191 009 01 SONY make believe Not all models are available in all countries re ions Some pictures used in this leaflet have been digitally retouched for illustration purposes Information contained in this leaflet is subject to change without notice Sony a InfoLiTHIUM Memory Stick PRO Duo Memory Stick PRO HG Du...

Page 230: ...SONY Lenses Objectifs Objetivos Lentes SONY Lenses Objectifs Objetivos Lentes ...

Page 231: ...o de cerca de 0 t2 0 25 enquanfo que alentes macro normalmente utilizam uma taxa de amplia ao de 1 0 Learn more about lenses f En savoir plus sur les objectifs f Mas informacion acerca de los objetivos f Saber mais sobre as lentes 0 primeiro aspecto importante sobre uma lente e a respectiva distancia focal Com distancias focais diferentes 0 campo de visao e a distancia real do motivo mudam intensi...

Page 232: ...coes mals recenles disponibllizadas durante a Impressao e sao sujeilas a alteracoes sem aviso previo Lens Specifications I Specifications de I objectifI Especificaciones de los objetivos I Especifica foes de Lentes Description I INOOfAperture I I Blade Descnptlon Nombrede _ _ _ _ _ _ _ _ _ _ e ouve Descnpct6n N de hOJas del dlafragma N dal1lmma DescrH ao de Abertura mm x m ft mm mm in g oz 18 22 5...

Page 233: ...nnar T 24 70mm F2 8 ZA SSM SAL2470Z Planar T 85mm F1 4ZA SAL85F14Z Sonnar T 135mm F1 8 ZA SAL135F18Z GLens Capture images with wonderfully sharp and detailed expressiveness Capturez de magnifiques images nettes dotees d une expression detaillee Captura imagenes con una expresividad maravillosa de los detalles y una nitidez excelente a Captura imagens com uma expressividade fabulosamente detalhada ...

Page 234: ... A900 A850 as cantos do campo ficarao escurecidos eamaquina nao assegura 0 niveldedesempenhoAEbasico a Lens Expand your power of expression with this quality lens line up lIeve la expresividad hasta el infinito con esta gamade objetivos de calidad Augmentez votre puissance d expression grace acette gamme d objectifs de qualite Aumente 0 poder da expressao com lentes de elevada qualidade 28 75mm F2...

Page 235: ...0 _ 0 0 _ r I Printed In Thailand Imprime en Thailande e 2009 Sony COrporation 0910TYYG 4 171 900 01 SONY INot all models are available In all countries regions Inlormation contained In this leallet is subject to change without notice Sony a and their respective logos are trademarks or registered trademar1 s of Sony Corporat on All other brand and producl names are trademarks or registered tradema...

Page 236: ......

Page 237: ...ect these are your exclusive remedies 2 696 103 41 11111111111111111111111111111 Printed in Thailand I DSLR Cameras and Lenses for DSLR Camera Or call the Sony Customer Information Service Center 1 800 222 S0NY 7669 Visit Sony s Web Site www sony com support Some states do not allow the exclusion or limitation of incidental or consequential damages or allow limitations on how long an implied warra...

Reviews: