background image

76

Adjusting the brightness of the image 
(Exposure, Flash compensation, 
Metering)

When shooting into the sun or by a window, the exposure may not be 
appropriate for the subject because of the big difference in lighting between 
the subject and the background. In such cases, use the light meter where the 
subject is bright enough and lock the exposure before shooting. To reduce 
the brightness of the subject, point the camera forwards a spot that is 
brighter than the subject and use the light meter to lock the exposure of the 
entire image. To make the subject brighter, point the camera forwards a 
spot that is darker than the subject and use the light meter to lock the 
exposure of the entire image.
This section describes how to shoot a brighter image of the subject using 
the  

(Spot).

Shooting with fixed brightness (AE Lock)

1

Fn button 

t

 [Metering mode] 

t


(Spot)

2

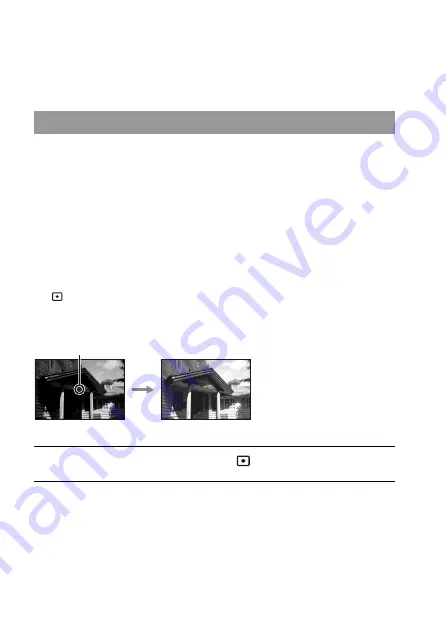
Adjust the focus on the portion you want to lock the exposure.

The exposure is set when the focus is achieved.

The spot where you 
lock the exposure.

Summary of Contents for A200 - Alpha 10.2MP Digital SLR Camera

Page 1: ... answers to frequently asked questions can be found at our Customer Support Website Digital Single Lens Reflex Camera Instruction Manual DSLR A200 3 277 950 11 1 2008 Sony Corporation Preparing the camera Before your operation Shooting images Using the shooting function Using the viewing function Changing your setup Viewing images on a computer Printing images ...

Page 2: ...uce fire or shock hazard do not expose the unit to rain or moisture WARNING For Customers in the U S A This symbol is intended to alert the user to the presence of uninsulated dangerous voltage within the product s enclosure that may be of sufficient magnitude to constitute a risk of electric shock to persons This symbol is intended to alert the user to the presence of important operating and main...

Page 3: ...penings as they may touch dangerous voltage points or short out parts that could result in a fire or electric shock Never spill liquid of any kind on the set Attachments Do not use attachments not recommended by the manufacturer as they may cause hazards Cleaning Unplug the set from the wall outlet before cleaning or polishing it Do not use liquid cleaners or aerosol cleaners Use a cloth lightly d...

Page 4: ...maged If the set does not operate normally when following the operating instructions Adjust only those controls that are specified in the operating instructions Improper adjustment of other controls may result in damage and will often require extensive work by a qualified technician to restore the set to normal operation When the set exhibits a distinct change in performance this indicates a need ...

Page 5: ...eceived including interference that may cause undesired operation This Class B digital apparatus complies with Canadian ICES 003 If you have any questions about this product you may call Sony Customer Information Services Center 1 800 222 SONY 7669 The number below is for the FCC related matters only Regulatory Information CAUTION You are cautioned that any changes or modifications not expressly a...

Page 6: ...ee www dtsc ca gov hazardouswaste perchlorate Perchlorate Material Lithium battery contains perchlorate This product has been tested and found compliant with the limits set out in the EMC Directive for using connection cables shorter than 3 meters 9 8 feet Attention The electromagnetic fields at the specific frequencies may influence the picture and sound of this unit Notice If static electricity ...

Page 7: ...tery over to the applicable collection point for the recycling of waste batteries For more detailed information about recycling of this product or battery please contact your local Civic Office your household waste disposal service or the shop where you purchased the product A moulded plug complying with BS 1363 is fitted to this equipment for your safety and convenience Should the fuse in the plu...

Page 8: ...s in any way Do not expose the camera to direct sunlight If sunlight is focused on a nearby object it may cause a fire When you must place the camera under direct sunlight attach the lens cap Images may trail across on the LCD monitor in a cold location This is not a malfunction When turning on the camera in a cold location the LCD monitor may become temporarily dark When the camera warms up the m...

Page 9: ...m 36 LCD monitor Recording information display 37 Viewfinder 40 Selecting a function setting 41 The functions selected by the Fn Function button 43 The functions selected by the Drive button 43 Functions selected by the MENU button 43 Shooting images Shooting an image without camera shake 45 Correct posture 45 Using the Super SteadyShot function 46 Using a tripod 47 Shooting with the automatic set...

Page 10: ...electing the focus method to suit the movement of the subject Autofocus mode 69 Selecting the focus area AF area 70 Adjusting the focus manually Manual focus 71 Using the flash 72 Selecting the flash mode 74 Performing wireless flash shooting 74 Adjusting the brightness of the image Exposure Flash compensation Metering 76 Shooting with fixed brightness AE Lock 76 Using brightness compensation for ...

Page 11: ... shifted WB bracket 92 Usingtheviewing function Playing back images 93 Checking the information of recorded images 98 Protecting images Protect 101 Deleting images Delete 102 Viewing images on a TV screen 104 Changing your setup Setting image size and image quality 106 Setting the method for recording on a memory card 108 Changing the noise reduction setting 110 Changing the conditions under which...

Page 12: ...12 Others Specifications 139 Troubleshooting 143 Warning messages 152 Precautions 154 Index 156 ...

Page 13: ...ber of pieces BC VM10 Battery charger 1 Power cord mains lead 1 Rechargeable battery pack NP FM500H 1 USB cable 1 Video cable 1 Shoulder strap 1 Eyepiece cover 1 Body cap 1 Attached on the camera Eyecup 1 Attached on the camera CD ROM Application Software for α camera 1 Quick Start Guide 1 Instruction Manual This manual 1 ...

Page 14: ...leted battery pack supplied at a temperature of 25 C 77 F is as follows The charging time differs depending on the remaining capacity of the battery back or charging conditions Charging the battery pack 1 Insert the battery pack on the battery charger Push the battery pack until it clicks 2 Connect the power cord mains lead Light on Charging Light off Normal charge completed One hour after the lam...

Page 15: ...r supplied with your camera Batteries other than the specified kind may leak overheat or explode if you attempt to charge them posing a risk of injury from electrocution and burns When the CHARGE lamp flashes this may indicate a battery error or that a battery pack other than the specified type have been installed Check that the battery pack is the specified type If the battery pack is the specifi...

Page 16: ... open lever open the battery cover 2 Firmly insert the battery pack all the way while pressing the lock lever with the tip of the battery Lock lever 3 Close the battery cover Turn off the camera and slide the lock lever in the direction of the arrow Be careful not to drop the battery pack Lock lever ...

Page 17: ...ccording to the operating conditions of your camera Notes The displayed level may not be correct under certain circumstances Do not expose the battery pack to water The battery pack is not water resistant Do not leave the battery pack in extremely hot places such as in a car or under direct sunlight Available battery packs Use only an NP FM500H battery pack Note that the NP FM55H NP FM50 and NP FM...

Page 18: ...life The battery life is limited Battery capacity decreases little by little as you use it more and more and as time passes If the battery operating time seems shortened considerably a probable cause is that the battery pack has reached the end of its life Buy a new battery pack The battery life varies according to how it is stored and the operating conditions and environment in which each battery...

Page 19: ...mended to prevent unnecessary light from affecting your images For attaching refer to the operating instructions supplied with the lens 1 Remove the body cap from the camera and the rear cap from the lens Rear cap 2 Mount the lens by aligning the orange index marks on the lens and camera Orange index marks 3 Turn the lens clockwise until it clicks into the locked position Body cap ...

Page 20: ...ever quickly change the lens away from dusty locations when attaching removing a lens If dust or debris lands on the image sensor Clean the image sensor using Cleaning mode in the Setup menu page 32 1 Press the lens release button all the way in and turn the lens counterclockwise until it stops When changing the lens quickly change the lens away from dusty locations so as to keep dust from getting...

Page 21: ...rt a memory card not supplied from the terminal side the terminal side has a number of small holes with its label side facing toward the LCD monitor Face side with a label For a Memory Stick Duo not supplied insert it in a Memory Stick Duo Adaptor for CompactFlash slot not supplied then insert the adaptor in the camera Face side with a label 3 Close the memory card cover ...

Page 22: ...ase supplied with it Do not expose the memory card to water Do not touch the terminal section of the memory card with your hand or a metal object On the CF card Microdrive Be sure to format the CF card Microdrive using this camera when you use it for the first time Do not remove the label of a CF card Microdrive or attach a new label over the label Do not press on the label strongly Notes on use o...

Page 23: ...G Duo with a capacity up to 8 GB have been confirmed to operate properly with this camera A Memory Stick Duo formatted with a computer is not guaranteed to operate with this camera Data read write speeds differ depending on the combination of the Memory Stick Duo and the equipment used Notes on using a Memory Stick Duo Do not press down hard when you write down on the memo area Do not attach a lab...

Page 24: ...ory Stick Duo under the following conditions High temperature locations such as the hot interior of a car parked in direct sunlight Locations exposed to direct sunlight Humid locations or locations with corrosive substances present ...

Page 25: ...the date time setup screen appears Setting up the date 1 Set the POWER switch to ON to turn the camera on To turn the camera off set it to OFF 2 Verify that OK is selected on the LCD monitor then press the center of the controller 3 Select each item with b B and set the numeric value with v V ...

Page 26: ... the center of the controller Adjusting the focus of the finder diopter adjustment Adjust the diopter adjustment dial to your eyesight until the indicators appear clearly in the viewfinder Turn the dial toward when you are far sighted toward when you are near sighted Training the camera on the light allows you to adjust the diopter easily Remove the eyecup then rotate the dial When attaching the F...

Page 27: ...cup page 26 USB cable pages 120 136 Video cable page 104 CD ROM page 128 You can prevent light from entering through the viewfinder and affecting the exposure When the shutter is released without the use of the viewfinder as in bulb exposure or shooting with the self timer attach the eyepiece cover Attaching the shoulder strap Attach the both ends of the strap on the camera You can also attach the...

Page 28: ...ing on the situation and the focus may be adjusted or the LCD monitor may continue to flash In such cases set Eye Start AF page 69 and Auto off w VF page 115 to Off 1 Carefully slide the eyecup off by pushing on each side of the eyecup 2 Slide the eyepiece cover over the viewfinder ...

Page 29: ...ts Images Image size L 10M Aspect ratio 3 2 When Aspect ratio is set to 16 9 you can record more images than the numbers shown in the table above However if it is set to RAW the number is the same as that of the 3 2 aspect ratio Once you insert a memory card into the camera and set the POWER switch to ON the number of images that can be recorded should you continue to shoot using the current setti...

Page 30: ...full capacity and in the following situation At an ambient temperature of 25 C 77 F Quality is set to Fine Focus mode is set to Automatic AF Shooting once every 30 seconds The flash strobes once every two times The power turns on and off once every ten times The measurement method is based on the CIPA standard CIPA Camera Imaging Products Association When using a Microdrive the number of images re...

Page 31: ...ially available blower If dust lands on the image sensor it may appear on the photo image Turn the camera to the cleaning mode then clean it using a blower page 32 Do not use a spray blower to clean the inside of the camera Using this may cause a malfunction Do not use a cleaning solution containing organic solvents such as thinner or benzine Clean the camera surface with a soft cloth slightly moi...

Page 32: ...attery power during cleaning can cause damage to the shutter The cleaning should be completed quickly The use of an AC Adaptor Charger not supplied is recommended Do not use a spray blower because it may scatter vapor inside the camera body Cleaning the image sensor 1 Confirm that the battery is fully charged page 17 2 Press the MENU button then select 3 with b B on the controller MENU button 3 Se...

Page 33: ...the blower brush to clean the image sensor surface and the surrounding area Do not touch the image sensor with the tip of the brush Complete the cleaning quickly Hold the camera s face downward to prevent the dust from resettling in the camera When cleaning the image sensor do not put the tip of a blower brush into the cavity beyond the lens mount 7 Attach the lens and set the POWER switch to OFF ...

Page 34: ...theses for details of operation A Shutter button 48 B Control dial 58 112 C Self timer lamp 90 D Lens contacts E Mirror F Lens mount G Built in flash 72 H Mode dial 48 I Flash pop up button 72 J Lens release button 20 K Focus mode switch 67 71 Do not directly touch these parts Front side ...

Page 35: ... Diopter adjustment dial 26 K For shooting Exposure button 78 For viewing Zoom out button 94 Index button 96 L Drive button 89 M ISO button 82 N Image sensor position mark 68 O For shooting AEL AE lock button 64 76 For viewing Zoom in button 94 P For shooting Fn Function button 41 For viewing Image rotation button 94 Q Access lamp 22 R Controller Enter Spot AF button 70 S Controller v V b B T Supe...

Page 36: ... aligning the guide of the plug on the guide of the REMOTE terminal G DC IN terminal When connecting the AC VQ900AM AC Adaptor Charger not supplied to the camera turn the camera off then plug the connector of the AC Adaptor Charger to the DC IN terminal on the camera H Battery cover 17 I Tripod receptacle Use a tripod with a screw length of less than 5 5 mm 7 32 inch You will be unable to firmly s...

Page 37: ...l 48 1 125 Shutter speed 61 F5 6 Aperture 59 2 0 Exposure 63 AE lock 76 Display Indication Flash mode 74 Red eye reduction 73 Exposure compensation 78 Metered Manual 63 Flash compensation 79 EV scale 63 91 ISO AUTO ISO sensitivity 82 Display Indication Drive mode 89 Focus mode 69 AF area 70 Metering 80 Creative Style 87 7500K G9 White balance Auto Preset Color temperature Color filter Custom 83 D ...

Page 38: ...38 D Display Indication 90 Battery remaining 17 Image quality 106 Image size 106 100 Remaining number of recordable images 29 ...

Page 39: ...ss of the LCD monitor by pressing the DISP button a little longer page 114 Press the DISP button to switch between the enlarged display and the detailed display When you rotate the camera to a vertical position the display automatically rotates to adjust to the camera position DISP button Detailed display No display Enlarged display ...

Page 40: ... Display Indication AF area 70 Spot AF area 70 Spot metering area 80 Shooting area for aspect ratio 16 9 106 Display Indication Flash compensation 79 Flash charging 74 WL Wireless flash 74 High speed sync Manual focus 71 z Focus 125 Shutter speed 61 5 6 Aperture 59 EV scale 63 91 AE lock 76 2 Shots remaining counter 29 Camera shake warning 46 Super SteadyShot scale 46 Aspect ratio 16 9 106 Display...

Page 41: ... White balance t Select the desired setting When you start the operation an operation guide of controller functions will be displayed at the bottom of the screen Please refer to the guide when operating the camera The step by step description of the above example is as follows Example When the Fn button is pressed From the menu list use the controller to move the cursor to the setting of your choi...

Page 42: ...ect White balance with v V b B on the controller then press the center z to execute Operation guide 3 Following the operation guide select and execute the desired function For example to change 5500K the current setting select 5500K with v V adjust the value of ColorTemperature with b B then press the center z to execute MENU button Returns with MENU button button button button button ...

Page 43: ... bracket page 92 The functions selected by the Fn Function button The functions selected by the Drive button Functions selected by the MENU button Recording menu 1 Image size 106 Aspect ratio 106 Quality 106 Creative Style 87 Flash control 79 Flash compens 79 2 Priority setup 111 AF illuminator 73 Long exp NR 110 High ISO NR 110 Rec mode reset 116 Custom menu 1 Eye Start AF 69 AEL button 112 Ctrl ...

Page 44: ...PlaybackDisplay 93 Slide show 97 Interval 97 Setup menu 1 LCD brightness 114 Info disp time 114 Power save 113 Video output 105 Language 113 Date Time setup 113 2 File number 108 Folder name 108 Select folder 109 New folder 109 USB connection 120 135 Audio signals 113 3 Cleaning mode 32 Reset default 117 ...

Page 45: ...era shake follow the instructions below Correct posture Stabilize your upper body and take a position that keeps the camera from moving Point 1 One hand holds the grip of the camera and the other hand supports the lens Point 2 Lightly tuck your elbows against your body When shooting in a kneeling position steady your upper body by placing your elbow on your knee Point 3 Take a secure stance with y...

Page 46: ...ake by the equivalent of approximately 2 5 to 3 5 increments of shutter speed Due to potential camera shake the Camera shake warning indicator flashes in the viewfinder In this case use the Super SteadyShot function a tripod or the flash Camera shake warning indicator Using the Super SteadyShot function Set the switch to ON The Super SteadyShot scale indicator appears Wait until the scale becomes ...

Page 47: ...ot scale indicator scale to go down and then press the shutter button down slowly In the following cases we recommend that you mount the camera on a tripod Shooting without a flash under dark conditions Shooting with slow shutter speeds which are typically used in night time shooting Shooting a close subject such as in macro shooting Shooting with a telescopic lens Shooting a moving subject Note W...

Page 48: ...Off 2 Hold the camera and look into the viewfinder The subject inside the focus area comes into focus Eye Start AF page 69 Focus area 3 Place the desired subject within the focus area If the Camera shake warning indicator flashes set the switch to ON to activate the Super SteadyShot function or use a tripod Camera shake warning indicator 4 When using a zoom lens turn the zoom ring then decide on y...

Page 49: ... are reset to the default settings 5 Press the shutter button halfway down to focus When the focus is confirmed the focus indicator z or Focus indicator lights up page 68 Focus indicator 6 Press the shutter button fully down to shoot When the switch is set to ON wait until the scale of the Super SteadyShot scale indicator becomes low then start shooting Super SteadyShot scale indicator ...

Page 50: ...e dial to Portrait To blur the background more set the lens to the telephoto position You can shoot a vivid image by focusing on the eye that is closer to the lens Use the lens hood to shoot backlit subjects Use the red eye reduction function if the eyes of your subject turn red from the flash page 73 Taking portrait photos This mode is suitable to zBlur away backgrounds and sharpen the subject zR...

Page 51: ... mode dial to Landscape To accentuate the openness of the scenery set the lens to wide angle Taking landscape photos This mode is suitable to zShoot the entire range of scenery in sharp focus with vivid colors Shooting technique ...

Page 52: ...flash to Flash Off when you shoot a subject within 1 m 3 3 feet In macro mode shooting the Super SteadyShot function will not be fully effective Use a tripod to achieve better results page 47 Taking small subject photos This mode is suitable to zShoot close subjects such as flowers insects dishes or small goods You can achieve clear and sharp focus Shooting techniques ...

Page 53: ...ile the shutter button is pressed Press and hold the shutter button halfway down until the right moment Set the ISO sensitivity higher when shooting in poor light page 82 Taking moving subject photos This mode is suitable to zShoot moving subjects outdoors or in bright places Shooting techniques ...

Page 54: ...uitable for shooting the beautiful red of the sunrise You can adjust the depth of the color by exposure compensation Shifting to the under side deepens the colors while shifting to the over side attenuates the colors Taking sunset photos This mode is suitable to zShoot the red of the sunset beautifully Shooting techniques ...

Page 55: ...not move to prevent the image from blurring The shutter speed is slower so using a tripod is recommended Note The picture may not be taken properly when shooting a wholly dark night scene Taking night view photos This mode is suitable to zShoot portraits in night scenes zShoot night scenes at a distance without losing the dark atmosphere of the surroundings Shooting techniques ...

Page 56: ...s of the image by controlling the amount of exposure the amount of light the camera takes in which is the most important factor in photo shooting Changing of picture brightness by the amount of exposure When using a faster shutter speed the camera opens the shutter for a shorter time This means less time for the camera to take in light resulting in a darker picture To take a brighter picture you c...

Page 57: ...er etc zKeep the exposure compensation measured by the camera but change the combination of shutter speed and aperture depending on the subject Program shift 1 Set the mode dial to P 2 Set the shooting functions to your desired settings pages 67 to 92 The settings will be stored until you reset the settings To fire the flash press the button 3 Adjust the focus and shoot the subject ...

Page 58: ... exposure shutter speed and aperture value determined by the camera is indicated Shutter speed 2 Rotate the control dial to select your desired combination while the focus is achieved The recording mode indicator is switched to PS Shutter speed priority program shift and the shutter speed and aperture value are changed Switch to PA Aperture priority program shift when you want to select a combinat...

Page 59: ...the subject in sharp focus and blur everything in front of and beyond the subject Opening the aperture narrows the range that is in focus Depth of field becomes shallower zShoot the depth of the scenery Narrowing down the aperture widens the range that is in focus Depth of field becomes deeper 1 Set the mode dial to A ...

Page 60: ...ol dial Smaller F number The foreground and background of the subject are blurred Larger F number The subject and its foreground and background are also focused on You cannot check the blurring of an image in the viewfinder Check the recorded image and adjust the aperture Aperture F number 3 Adjust the focus and shoot the subject The shutter speed is automatically adjusted to obtain correct exposu...

Page 61: ... This mode is suitable to zShoot a moving subject at a moment in time Use a faster shutter speed to crisply shoot an instant of the movement zTrace the movement to express the dynamism and flow Use a slower shutter speed to shoot a trailing image of the moving subject 1 Set the mode dial to S ...

Page 62: ...itivity the more outstanding the noise When the shutter speed is one second or more noise reduction Long exp NR will be done after shooting page 110 You cannot do any further shooting during the reduction 2 Select the shutter speed with the control dial Shutter speed 3 Adjust the focus and shoot the subject The aperture is automatically adjusted to obtain correct exposure When the camera judges th...

Page 63: ...ng by adjusting both the shutter speed and aperture zUse an exposure meter 1 Set the mode dial to M 2 Rotate the control dial to adjust the shutter speed and while pressing the button rotate the control dial to adjust the aperture You can assign a function to the control dial with Ctrl dial setup page 112 button Shutter speed Aperture F number ...

Page 64: ...t changing the exposure you set 3 Shoot the image after the exposure is set Check the exposure value on the EV scale Toward Images become brighter Toward Images become darker The b B arrow appears if the set exposure is beyond the range of the EV scale The arrow starts flashing if the difference becomes greater Metered Manual LCD monitor Detailed display Standard value Viewfinder Standard value Ro...

Page 65: ...mode is suitable to zShoot trails of light such as fireworks zShoot trails of stars 1 Set the mode dial to M 2 Rotate the control dial to the left until BULB is indicated BULB 3 While pressing the button rotate the control dial to adjust the aperture F number button ...

Page 66: ...turned off The longer the exposure time the more outstanding the noise on the image After shooting noise reduction Long exp NR will be done for the same amount of time that the shutter was open You cannot do any further shooting during the reduction 4 Press the shutter button halfway down to adjust the focus 5 Attach the eyepiece cover page 27 6 Press and hold the shutter button for the duration o...

Page 67: ...s 1 Set the focus mode switch to AF 2 Look into the viewfinder The subject inside the focus area comes into focus automatically Eye Start AF 3 Press the shutter button halfway down to check the focus and shoot the image When the focus is confirmed the focus indicator changes to z or page 68 The sensor used for focusing in the AF area illuminated briefly in red page 70 Focus area sensor Focus indic...

Page 68: ...er To measure the exact distance to the subject Note If the subject is closer than the minimum shooting distance of the attached lens the focus cannot be confirmed Make sure you put enough distance between the subject and the camera Focus indicator Status z lit Focus locked Ready to shoot lit Focus is confirmed Focal point moves following a moving subject Ready to shoot lit Still focusing You cann...

Page 69: ...utton t Autofocus mode t Select the desired setting Shooting with your desired composition Focus lock 1 Place the subject within the AF area and press the shutter button halfway down 2 Keep the shutter button halfway down and put the subject back in the original position to re compose the shot 3 Press the shutter button fully down to take the picture Selecting the focus method to suit the movement...

Page 70: ...d when the subject is in focus Shooting techniques Selecting the focus area AF area Select the desired AF are to suit the shooting conditions or your preference The area used for focusing is illuminated briefly Area Wide The camera determines which of the nine AF areas is used in focusing within the AF area If you press and hold the center of the controller you can adjust the focus using the spot ...

Page 71: ...nder when the focus is confirmed When the Wide AF area is used the center area is used and when the Local AF area is used the area that is selected with the controller is used The camera resets the focal length to infinity when the POWER switch is set to ON When using a tele converter etc rotation of the focusing ring may not be smooth The correct focus is not achieved if the diopter is not adjust...

Page 72: ...lash emitter 1 Press the button The flash pops up In AUTO or Scene Selection mode the flash automatically pops up if the amount of light is insufficient or the subject is backlit The built in flash does not pop up even if you press the button button 2 After the flash charging is completed shoot the subject Flashing The flash is being charged When the indicator flashes you cannot release the shutte...

Page 73: ...used To deactivate the AF illuminator MENU button t 2 t AF illuminator t Off To use the red eye reduction The red eye reduction reduces the red eye phenomenon by providing pre flash low flash light a few times before shooting when using the flash MENU button t 1 t Red eye reduc t On Aperture F2 8 F4 0 F5 6 ISO setting AUTO 1 4 8 6 m 4 6 28 feet 1 6 m 3 3 20 feet 1 4 3 m 3 3 14 feet 100 1 4 3 m 3 3...

Page 74: ...t and shadow on the subject For the actual steps of shooting refer to the operating instructions of the flash Selecting the flash mode Flash Off Does not fire even if the built in flash pops up This is not selectable when the mode dial is set to P A S or M Autoflash Fires if it is dark or against light This is not selectable when the mode dial is set to P A S or M Fill flash Fires whenever the bui...

Page 75: ...s flash mode is still active inaccurate flash exposures will result Change the channel of the external flash when another photographer is using a wireless flash nearby and his her built in flash light triggers firing of your flash To change the channel of the external flash refer to the operating instructions supplied with it The AEL button setting When using the wireless flash it is recommended t...

Page 76: ...ct point the camera forwards a spot that is brighter than the subject and use the light meter to lock the exposure of the entire image To make the subject brighter point the camera forwards a spot that is darker than the subject and use the light meter to lock the exposure of the entire image This section describes how to shoot a brighter image of the subject using the Spot Shooting with fixed bri...

Page 77: ...L button after the shooting The setting is canceled when the button is released Hold down the AEL button and place the spot metering circle on the spot where the lighting is contrasted from the subject The metering indicator displays the degree of exposure difference zero being the locked exposure Shifting to the side makes the image brighter and shifting to the side makes the image darker When th...

Page 78: ...e the entire image brighter by shifting to the side The entire image becomes darker when you shift it to the side Using brightness compensation for the entire image Exposure compensation 1 Press the button to display the exposure compensation screen button 2 Adjust the exposure with the control dial Toward over Brightens an image Toward under Darkens an image Standard exposure 3 Adjust the focus a...

Page 79: ... built in flash is pulled up When you adjust it be careful not to forget to reset the value The positive effect may not be visible due to the limited amount of flash light if the subject is at or around the maximum range for the flash If the subject is very close the negative effect may not be visible Exposure compensation and flash compensation Exposure compensation changes the shutter speed aper...

Page 80: ...a lens that is provided with a distance encoder To determine if the lens is equipped with a distance encoder refer to the operating instructions supplied with the lens Fn button t Metering mode t Select the desired mode ADI flash This method controls the lighting of the flash factoring in the focus distance information and light metering data from the pre flash This method enables an accurate flas...

Page 81: ...t metering for general shooting When shooting a subject with strong contrast in the focus area measure the light of the subject you want to shoot with the proper exposure using Spot metering then perform AE lock shooting page 76 Shooting techniques ...

Page 82: ...g is not provided in recording mode M If you change the recording mode to M with the AUTO setting it is switched to 100 Set the ISO according to your shooting conditions 1 Press the ISO button to display the ISO screen ISO button 2 Select the desired value with v V on the controller The larger the number the higher the noise level Recording mode ISO AUTO Scene Selection The range differs depending...

Page 83: ...lor tone on purpose for photographic expression Note If the only light source available is a mercury lamp or a sodium lamp the camera will not be able to acquire the accurate white balance because of the characteristics of the light source Use the flash in such cases Fn button t White balance t Select the desired setting When AWB is not selected you can finely adjust the color tone with b B on the...

Page 84: ...the color filter select the compensation direction with b B Note Since color meters are designed for film cameras the values differ under fluorescent sodium lamp mercury lamps We recommend that you use the custom white balance or do a test shooting AWB Auto WB The camera automatically detects a light source and adjusts the color tones Daylight If you select an option to suit a specific light sourc...

Page 85: ...lor Compensation filters for photography Based on using the set color temperature as the standard the color can be compensated to G Green or M Magenta Registering the color tones Custom white balance 1 Fn button t White balance t 2 Select SET with b B on the controller 3 Hold the camera so that the white area fully covers the spot metering circle and press the shutter button down The shutter click...

Page 86: ...w on the recording information display on the LCD monitor You can shoot at this point but it is recommended that you set the white balance again to get a more correct white balance value To call the custom white balance setting Fn button t White balance t Custom Note If the flash is used when the shutter button is pressed a custom white balance is registered with the flash light taken into account...

Page 87: ...nto small areas the camera analyses the contrast of light and shadow between the subject and the background producing the image with the optimal brightness and gradation Selecting your desired image processing Creative Style Standard For shooting various scenes with rich gradation and beautiful colors Vivid The saturation and contrast are heightened for shooting striking images of colorful scenes ...

Page 88: ...r management and DCF2 0 option color space Using some applications or printers that do not support them may result in or print images that do not reproduce faithful color When displaying images that were recorded with Adobe RGB on the camera or non Adobe RGB compliant devices the images are displayed with low saturation B W For shooting images in black and white monotone Adobe RGB For shooting ima...

Page 89: ...r speed is 1 250 second or faster The maximum number of continuous shots The number of continuous shooting images obtainable has an upper limit The shooting speed becomes a little slower for fourth image or later Shooting single shot Shooting continuously 1 button t Continuous adv 2 Adjust the focus and shoot the subject When you press and hold the shutter button the recording continues The number...

Page 90: ...ion Specify the value of deviation steps from the base exposure and the camera shoots while automatically shifting the exposure You can choose an image that has the brightness you like after shooting is finished Using the self timer 1 button t Self timer t Select the desired seconds The number after is the number of seconds that is currently selected 2 Adjust the focus and shoot the subject When t...

Page 91: ...not appear in flash bracket shooting When the bracket shooting starts the indexes that indicate already recorded images start to disappear one by one 1 button t Desired bracket t Desired bracket step 2 Adjust the focus and shoot the subject The base exposure is set at the first shot in the bracket Bracket Cont Shoots three images with the exposure shifted by a selected step Press and hold the shut...

Page 92: ...tural light a light bulb or a fluorescent light Based on the selected white balance and color temperature color filter three images are taken 1 The value beneath is the value currently selected 2 Mired a unit to indicate the color conversion quality in color temperature filters Shooting with white balance shifted WB bracket 1 button t WB bracket t Select the desired setting 2 Adjust the focus and ...

Page 93: ... changes as follows Note The DISP button switches the recording data display on and off in other playback modes such as on an enlarged screen To select the orientation when playing back an image recorded in the portrait position MENU button t 2 t PlaybackDisplay t Select the desired setting 1 Press the button button 2 Select an image with b B on the controller Displays previous or next images up t...

Page 94: ...s may not be rotated depending on the software An image can be enlarged for closer examination This is convenient to check the focus condition of a recorded image Rotating an image 1 Display the image you want to rotate then press the button button 2 Press the center of the controller The image is rotated counter clockwise When you want to do another rotation repeat step 2 Once you rotate the imag...

Page 95: ...e with v V b B on the controller Rotating the control dial switches the image at the same display magnification When you shoot multiple images with the same composition you can compare their focus conditions Each time you press the center of the controller the screen changes between the zoomed screen and the full screen mode button 1 Display the image you want to enlarge then press the button butt...

Page 96: ... The portion inside the red frame is enlarged Press the center of the controller to return to the previous screen To cancel the enlarged playback press the button Image size Scaling range L Approx 1 1 12 M Approx 1 1 9 1 S Approx 1 1 6 1 Switching to the display of the image list 1 Press the button The screen changes to the index screen button 2 Press the DISP button repeatedly to select the desir...

Page 97: ... pause the slide show Press the center of the controller Pressing again starts the slide show again To end in the middle of the slide show Press the MENU button To choose the interval between the images in slide show MENU button t 2 t Interval t Select the desired number of seconds 1 Select the folder bar with b B on the controller then press the center Folder bar 2 Select the desired folder with ...

Page 98: ...page 93 Basic information display Display Indication 100 0003 Folder file number 124 Protect 101 DPOF3 DPOF set 133 Image quality 106 Image size 106 Battery remaining warning 17 1 125 Shutter speed 61 F3 5 Aperture 59 ISO100 ISO sensitivity 82 2008 1 1 10 37AM Date of recording 3 7 File number total number of images ...

Page 99: ...dication Histogram 100 P A S M Mode dial 48 1 125 Shutter speed 61 F3 5 Aperture 59 ISO100 ISO sensitivity 82 0 3 EV scale 63 91 0 3 Flash compensation 79 Metering mode 80 35mm Focal length 141 Creative Style 87 AWB 1 5500K M1 White balance Auto Preset Color temperature Color filter Custom 83 D Range Optimizer 87 2008 1 1 10 37AM Date of recording 3 7 File number total number of images Display Ind...

Page 100: ... The right illustration is an example Shooting with the exposure compensation on the positive side brightens the whole picture making the entire histogram shift to the bright side right side If the exposure compensation is applied on the negative side the histogram will shift to the other side Both ends of the histogram show a high key or low key portion It is impossible to restore these area with...

Page 101: ...1 MENU button t 1 t Protect t Marked images 2 Select the image you want to protect with b B on the controller then press the center of the controller A mark appears on the selected image To cancel a selection press the center again 3 To protect other images repeat step 2 4 Press the MENU button 5 Select OK with v on the controller then press the center of the controller Protecting all the images c...

Page 102: ...yed 1 Display the image you want to delete and press the button button 2 Select Delete with v then press the center of the controller Deleting the selected images 1 MENU button t 1 t Delete t Marked images 2 Select the images you want to delete with the controller then press the center of the controller A mark appears on the selected image Total number 3 To delete other images repeat step 2 4 Pres...

Page 103: ...mory card using the camera 5 Select Delete with v on the controller then press the center of the controller Deleting all the images in the folder 1 Press the button 2 Select the folder bar with b on the controller Folder bar 3 Press the center of the controller then select the folder you want to delete with v V 4 Press the button 5 Select Delete with v then press the center of the controller Delet...

Page 104: ... See also the operating instructions supplied with the TV 3 Turn on the camera and press the button Images shot with the camera appear on the TV screen Select the desired image with b B on the controller The LCD monitor on the rear of the camera does not turned on 1 To video input jack Video cable 2 To the VIDEO OUT terminal Controller button ...

Page 105: ...era is used NTSC system Bahama Islands Bolivia Canada Central America Chile Colombia Ecuador Jamaica Japan Korea Mexico Peru Surinam Taiwan the Philippines the U S A Venezuela etc PAL system Australia Austria Belgium China Czech Republic Denmark Finland Germany Holland Hong Kong Hungary Italy Kuwait Malaysia New Zealand Norway Poland Portugal Singapore Slovak Republic Spain Sweden Switzerland Thai...

Page 106: ...e desired ratio MENU button t 1 t Quality t Select the desired setting Image size L 10M 3872 2592 pixels M 5 6M 2896 1936 pixels S 2 5M 1920 1280 pixels L 8 4M 3872 2176 pixels M 4 7M 2896 1632 pixels S 2 1M 1920 1088 pixels Aspect ratio 3 2 A normal ratio 16 9 An HDTV ratio Quality RAW File format RAW raw data This format is not achieved by digital processing Select this format to process images ...

Page 107: ... be printed using a DPOF print designated printer or a PictBridge compliant printer You cannot verify an effect of D Range Optimizer advanced even if you enlarge the image recorded in RAW format The effect is recorded on the image RAW JPEG File format RAW raw data JPEG A RAW image and a JPEG image are created at the same time This is suitable when you need two image files a JPEG for viewing and a ...

Page 108: ...oes not reset numbers and assigns numbers to files in sequence until the number reaches 9999 Reset The camera resets numbers in the following cases and assigns numbers to files from 0001 When the folder format is changed When all the images in the folder are deleted When the memory card is replaced When the memory card is formatted Selecting the folder name format Standard form The folder name for...

Page 109: ...ect folder t Select the desired folder Note You cannot select the folder when you are setting Date form Note that formatting irrevocably erases all data on a memory card including protected images MENU button t 1 t Format t OK During the format the access lamp lights up Do not eject the memory card while the lamp is lit Notes Format the memory card using the camera If you format it on a computer t...

Page 110: ...ENU button t 2 t Long exp NR t Off Note Noise reduction is not performed on continuous shooting or continuous bracketing even when it is set to On When shooting with the ISO set at 1600 or above the camera reduces the noise that becomes more noticeable when the camera sensitivity is high Select On to prioritize the image quality Select Off to prioritize the timing of shooting MENU button t 2 t Hig...

Page 111: ...der which the shutter can close To prioritize the shutter opportunity select Release so you can shoot without acquiring a sharp focus To shoot with a sharp focus select AF MENU button t 2 t Priority setup t Release Prioritizing the shutter opportunity ...

Page 112: ...exposure value is locked appears on the LCD monitor and in the viewfinder Be careful not to reset the setting The Hold and Toggle settings affect the manual shift page 64 in the manual mode When the recording mode is M Manual exposure or P Program shift you can set the camera to that the adjustable item the shutter speed or the aperture value can be selected using only the control dial It is conve...

Page 113: ...e shutter button halfway down returns the camera to the shooting mode MENU button t 1 t Power save t Select the desired time Note Regardless of the setting here the camera turns to power save mode after 30 minutes when the camera is connected to a TV MENU button t 1 t Date Time setup t Set up the date and time MENU button t 1 t Language t Select the language Setting the sound on off Setting the ti...

Page 114: ... Auto review t Select the desired setting Note In auto review the image will not be displayed in the vertical position even if you shot the image in a vertical position page 93 During shooting the recording information display appears on the LCD monitor You can change the displayed time of the display MENU button t 1 t Info disp time t Select the desired setting Setting the brightness of the LCD m...

Page 115: ...n If you want to turn on the LCD monitor while looking into the viewfinder select Off MENU button t 1 t Auto off w VF t Off Note Regardless of the setting in this menu the recording information display automatically turns off after a set duration five seconds in the default setting page 37 Keeping on the LCD monitor while looking into the viewfinder ...

Page 116: ...ti segment Autofocus mode 69 AF A Drive mode 89 Single shot adv White balance 83 AWB Auto white balance ColorTemperature Color filter 84 5500K Color filter 0 Custom white balance 85 5500K ISO 82 AUTO Image size 106 L 10M Aspect ratio 106 3 2 Quality 106 Fine D RangeOptimizer 87 Standard Creative Style 87 Standard Flash mode 74 Fill flash differs based on whether the built in flash is open or not F...

Page 117: ...ay Drive mode 89 Single shot adv White balance 83 AWB Auto white balance ColorTemperature Color filter 84 5500K Color filter 0 Custom white balance 85 5500K ISO 82 AUTO Playback display 93 Single image screen with recording data Image size 106 L 10M Aspect ratio 106 3 2 Quality 106 Fine D RangeOptimizer 87 Standard Creative Style 87 Standard Flash mode 74 Fill flash differs based on whether the bu...

Page 118: ...eye reduc 73 Off Auto review 114 2 sec Auto off w VF 115 On Items Reset to Date imprint 134 Off PlaybackDisplay 93 Auto rotate Slide show 97 3 sec Items Reset to LCD brightness 114 0 Info disp time 114 5 sec Power save 113 1 min File number 108 Series Folder name 108 Standard form USB connection 120 135 Mass Storage Audio signals 113 On ...

Page 119: ...led Mac OS X v10 1 3 or later USB jack Provided as standard Notes on connecting your camera to a computer Operations are not guaranteed for all the recommended computer environments mentioned above If you connect two or more USB devices to a single computer at the same time some devices including your camera may not operate depending on the types of USB devices you are using Operations are not gua...

Page 120: ...h the AC Adaptor charger not supplied When you copy images to your computer using insufficient battery pack copying may fail or image data may become corrupted if the battery pack shuts down too soon 3 Turn on the camera and the computer 4 Check that USB connection in 2 is set to Mass Storage 5 Connect the camera and your computer The AutoPlay wizard appears on the desktop 1 To the USB terminal US...

Page 121: ... Scanner and Camera Wizard t OK as the wizard screen appears automatically on the desktop When the wizard screen does not appear click My Computer t Removable Disk 2 Double click DCIM In that case you can also import images using Picture Motion Browser 3 Double click the folder where the image files you want to copy are stored Then right click an image file to display the menu and click Copy On th...

Page 122: ... message appears When you overwrite an existing image with a new one the original file data is deleted To copy an image file to the computer without overwriting change the file name to a different name and then copy the image file However note that if you change the file name you may not be able to play back that image with your camera page 125 1 Double click the newly recognized icon t DCIM t the...

Page 123: ...Documents For Windows Vista Documents folder Double click the hard disk icon t the desired image file to open the image file For Windows 1 Click Start t My Documents For Windows Vista Documents If you are using Windows 2000 double click My Documents on the desktop 2 Double click the desired image file The image is displayed For Macintosh ...

Page 124: ...nfirm the device on the confirmation window then click OK t OK unnecessary for Windows XP Vista The device is disconnected x For Macintosh Drag and drop the drive icon or the icon of the memory card to the Trash icon The camera is disconnected from the computer The image files recorded with your camera are grouped as folders on the memory card Deleting the USB connection Image file storage destina...

Page 125: ... folder Image files are named as follows ssss file number stands for any number within the range from 0001 to 9999 The numerical portions of the name of a RAW data file and its corresponding JPEG image file are the same JPEG files DSC0ssss JPG JPEG files Adobe RGB _DSCssss JPG RAW data file other than Adobe RGB DSC0ssss ARW RAW data file Adobe RGB _DSCssss ARW The extension may not be displayed de...

Page 126: ...sss Enter a number from 0001 to 9999 for ssss If the overwrite confirmation message appears enter a different number An extension may be displayed depending on the computer settings The extension for images is JPG Do not change the extension Step 1 is not necessary if the file name set with your camera has not been changed 2 Copy the image file to the memory card folder in the following order 1 Ri...

Page 127: ...more Hard Disk Disk space required for installation 200 MB or more Display 1024 768 dots or more High Color 16 bit color or more Recommended environment for using Image Data Converter SR Ver 2 Image Data Lightbox SR OS pre installed Microsoft Windows 2000 Professional SP4 Windows XP SP2 Windows Vista 64 bit editions and Starter Edition are not supported CPU Memory MMX Pentium III 1 GHz or faster i...

Page 128: ...your computer and insert the CD ROM supplied into the CD ROM drive The installation menu screen appears If it does not appear double click My Computer t SONYPICTUTIL t Install exe Under Windows Vista the AutoPlay screen may appear Select Run Install exe and follow the instructions that appear on the screen to proceed with the installation 2 Click Install Follow the instructions on the screen ...

Page 129: ... Suite Image Data Converter SR Image Data Lightbox SR After you install the software a shortcut icon for the customers registration website is created on the desktop Once you register on the website you can get secure and useful customer support http www sony net registration di 1 Turn on your Macintosh computer and insert the CD ROM supplied into the CD ROM drive 2 Double click the CD ROM icon 3 ...

Page 130: ...re Motion Browser click button on the upper right corner of the screen Note The confirmation message of the Information tool appears on the screen when starting Picture Motion Browser for the first time Select Start This function informs you of news such as software updates You can change the setting later Using Picture Motion Browser With Picture Motion Browser you can Import images shot with the...

Page 131: ...he Guide To start the Guide click Start t All Programs in Windows 2000 Programs t Sony Image Data Suite t Help t Image Data Converter SR Ver 2 To start up Image Data Converter SR Ver 2 0 x Windows Double click the shortcut of Image Data Converter SR Ver 2 0 on the desktop When starting up from the Start menu click Start t All Programs For Windows 2000 Programs t Sony Image Data Suite t Image Data ...

Page 132: ...mage Data Lightbox SR To start up Image Data Lightbox SR x Windows Double click Image Data Lightbox SR on the desktop When starting up from the Start menu click Start t All Programs For Windows 2000 Programs t Sony Image Data Suite t Image Data Lightbox SR To exit click the button on the upper right corner of the screen The dialogue used for saving a collection appears x Macintosh Double click Ima...

Page 133: ...les You can specify any number up to 9 If you unspecify DPOF the index print is also canceled MENU button t 1 t DPOF setup t All images or Cancel all t OK Specifying unspecifying DPOF on selected images 1 MENU button t 1 t DPOF setup t Marked images An image is displayed on the single screen 2 Select the image with b B on the controller 3 Select the number of sheets with the buttons To unspecify D...

Page 134: ... all the images in the memory card MENU button t 1 t DPOF setup t Index print t Create index Notes The number of images that can be printed on one sheet and the format depend on the printer RAW images do not print in index print The images you shoot after setting the index print are not included in the index print It is recommended that you create the index print just before printing it If you uns...

Page 135: ...om turning off partway through printing Even if you do not have a computer you can print images shot using your camera by connecting the camera directly to a PictBridge compliant printer PictBridge is based on the CIPA standard CIPA Camera Imaging Products Association Stage 1 Setting the camera 1 MENU button t 2 t USB connection t PTP 2 Turn the camera off and insert the memory card that the image...

Page 136: ...hen press the center of the controller To cancel press the center again 2 Repeat step 1 if you want to print other images 3 Press the MENU button and set up each item For details on setting items see PictBridge menu 4 Select Print t OK in the menu then press the center of the controller The image is printed After the screen indicating that the print is completed appears press the center of the con...

Page 137: ... 1 Print Prints the selected images For details see Stage 3 Printing Set print q ty You can specify the number of prints up to 20 The same number of prints is specified on all the selected images Paper size PictBridge menu Auto Printer setup 9 13cm 3 5 5 89 127 mm Hagaki 100 147 mm 10 15cm 10 15 cm 4 6 101 6 152 4 mm A6 4 1 5 8 105 148 5 mm 13 18cm 5 7 127 178 mm Letter 216 279 4 mm A4 8 3 11 7 21...

Page 138: ...l the images in a memory card After the message appears select OK then press the center of the controller Auto Printer setup 1 up Borderless Borderless 1 image sheet 1 up 1 image sheet 2 up 2 images sheet 3 up 3 images sheet 4 up 4 images sheet 8 up 8 images sheet Index Prints all the selected images as an index print Printing layout follows the printer setup Day and time Attaches the date and tim...

Page 139: ...and lens used Anti Dust System Charge protection coating on Low Pass Filter and image sensor Shift mechanism Viewfinder Type Fixed eye level system with pentamirror Focusing Screen Spherical Acute Matte Field of View 0 95 Magnification 0 83 with 50 mm lens at infinity 1 m 1 Eye Relief Approximately 17 6 mm from the eyepiece 13 5 mm from the eyepiece frame at 1 diopter 1 m 1 Dioptor Adjustment 2 5 ...

Page 140: ...240 dots Power general Used battery pack Rechargeable battery pack NP FM500H Others PictBridge Compatible Exif Print Compatible PRINT Image Matching III Compatible Dimensions Approx 130 8 98 5 71 3 mm 5 1 4 4 2 7 8 inches W H D excluding protrusions Mass Approx 532 g 1 lb 2 8 oz without batteries memory card and body accessories Operating temperature 0 to 40 C 32 to 104 F When using the Microdrive...

Page 141: ...tibility This camera conforms with DCF Design rule for Camera File system universal standard established by JEITA Japan Electronics and Information Technology Industries Association Playback of images recorded with your camera on other equipment and playback of images recorded or edited with other equipment on your camera are not guaranteed Trademarks is a trademark of Sony Corporation Memory Stic...

Page 142: ...emark of Adobe Systems Incorporated in the United States and or other countries D Range Optimizer Advanced uses technology provided by Apical Limited In addition system and product names used in this manual are in general trademarks or registered trademarks of their respective developers or manufacturers However the or marks are not used in all cases in this manual ...

Page 143: ... in an extremely hot or cold location page 154 The displayed battery remaining differs from the current one Fully discharge and then charge the battery pack to correct the display The battery pack is discharged Install a charged battery pack page 16 The battery pack is dead page 18 Replace it with new one Cannot turn on the camera Install the battery pack correctly page 16 The battery pack is disc...

Page 144: ... the diopter scale properly using the diopter adjustment dial page 26 The image has not been recorded A memory card is not inserted The shutter does not release Check the free capacity of the memory card page 29 If it is full do one of the following Delete unnecessary images page 102 Change the memory card You cannot record images while charging the built in flash page 72 The shutter cannot be rel...

Page 145: ...ight and appeared in the image This is not a malfunction The flash takes too long to recharge The flash has been fired in succession in a short period When the flash has been fired in succession the recharging process may take longer than usual to avoid overheating of the camera A picture taken with the flash is too dark If the subject is beyond the flash range the distance that the flash can reac...

Page 146: ...ot the subject within the flash range using the flash page 73 Dots appear and remain on the LCD monitor This is not a malfunction These dots are not recorded page 8 The image is blurred The picture was taken in a dark location without the flash resulting in camera shake The use of the Super SteadyShot function or a tripod is recommended The flash can be used in this situation page 46 The EV scale ...

Page 147: ...W data files You do not know if the OS of your computer is compatible with the camera Check Recommended computer environment pages 119 127 Your computer does not recognize your camera Check that the camera is turned on When the battery level is low install the charged battery pack page 16 or use the AC Adaptor charger not supplied Use the USB cable supplied page 120 Disconnect the USB cable and co...

Page 148: ...atically Make the USB connection after the computer is turned on page 120 You do not know how to operate the software supplied See the help or the guide of each software Cannot insert a memory card Insertion direction of the memory card is wrong Insert it in the correct direction page 21 Cannot record on a memory card The memory card is full Delete unnecessary images page 102 An unusable memory ca...

Page 149: ...he aspect ratio set to 16 9 the lateral end of the image may be cut off When printing images using your own printer cancel the trimming or borderless settings Consult the printer manufacturer as to whether the printer provides these functions or not When having images printed at a digital print shop ask the shop whether they can print the images without cutting off both edges Cannot print images w...

Page 150: ... the USB cable RAW data files cannot be printed Images shot using cameras other than this camera or images modified with a computer may not be printed is printed on the date inserted part of the image Images that do not have the recording data cannot be printed with the date inserted Set Date imprint to Off and print the image again page 138 Cannot print the image at the size selected Disconnect t...

Page 151: ... was set to ON When removing the battery pack make sure the POWER switch is set to OFF and the access lamp is not illuminated page 25 The camera does not work properly Turn off the camera Remove the battery pack and insert it again If an AC Adaptor charger not supplied is used disconnect the power cord If the camera is hot allow it to cool down before trying this corrective procedure If the camera...

Page 152: ...the memory card again however all previous data in the memory card is erased It may take a some time to complete the format If the message still appears change the memory card Card error An incompatible memory card is inserted or the format was failed Reinsert the card The inserted memory card cannot be used in your camera The memory card is damaged The terminal section of the memory card is dirty...

Page 153: ...it If the message appears frequently consult your Sony dealer or local authorized Sony service facility Unable to magnify Unable to rotate image Images recorded with other cameras may not be enlarged or rotated No images changed You attempted to protect images or specified DPOF without changing the specification of those images Cannot create more folders The folder with a name beginning with 999 e...

Page 154: ...g in extremely cold or hot places that exceed this range is not recommended On moisture condensation If the camera is brought directly from a cold to a warm location moisture may condense inside or outside the camera This moisture condensation may cause a malfunction of the camera How to prevent moisture condensation When bringing the camera from a cold place to a warm place seal the camera in a p...

Page 155: ...e viewfinder This may cause irrecoverable damage to your eyes Or it may cause a malfunction of your camera Do not use the camera near a location that generates strong radio waves or emits radiation The camera may not be able to record or play back properly Using the camera in sandy or dusty locations may cause malfunctions If moisture condensation occurs remove it before using the camera page 154 ...

Page 156: ... B Battery pack 16 Bracket 90 BULB shooting 65 C Center weighted 80 CF card 21 Charging battery pack 14 Cleaning mode 32 Color filter 84 Color temperature 84 Compression ratio 106 Continuous AF 69 Continuous bracket 90 Continuous shooting 89 Contrast 87 Correct exposure 60 62 Creative Style 87 Ctrl dial setup 58 112 Custom white balance 85 D Date imprint 134 Date Time setup 25 113 Delete 102 Depth...

Page 157: ...NR 110 High key portion 100 High speed sync 40 Histogram 93 99 100 I Image Data Converter SR 131 Image Data Lightbox SR 132 Image quality 106 Image size 106 Index print 134 Index screen 96 Info disp time 114 ISO sensitivity 82 J JPEG 106 L Landscape 51 LCD brightness 114 LCD monitor 37 39 98 Lens 19 Long exp NR 110 Low key portion 100 M Macro 52 Manual exposure 63 Manual focus 71 Manual shift 64 M...

Page 158: ...ye reduc 73 Reducing camera shake 45 Reset 116 Reset default 117 Rotate 94 S Saturation 87 Scene Selection 50 Self timer 90 Set the clock 25 Sharpness 87 Shooting 48 Shoulder strap 27 Shutter speed 56 61 Shutter speed priority 61 Single bracket 90 Single shot AF 69 Slide show 97 Slow sync 74 Specifications 139 Sports action 53 Spot 80 Sunset 54 Super SteadyShot function 46 U USB connection 120 136...

Reviews: