background image

A – Verify the xMac mini Server 2H is Recognized


1.

 Press the power button on the front panel of the xMac mini Server 2H 

to turn on the Mac mini. If you haven’t yet set up the computer, 
follow the onscreen directions to complete the setup process.


2.

 From the Apple menu, select About This Mac; the System Information 

application will launch.


3.

 When the About This Mac window opens, click More Info; a summary 

of specifications will appear. 


4.

 Click System Report; a full report window will appear.
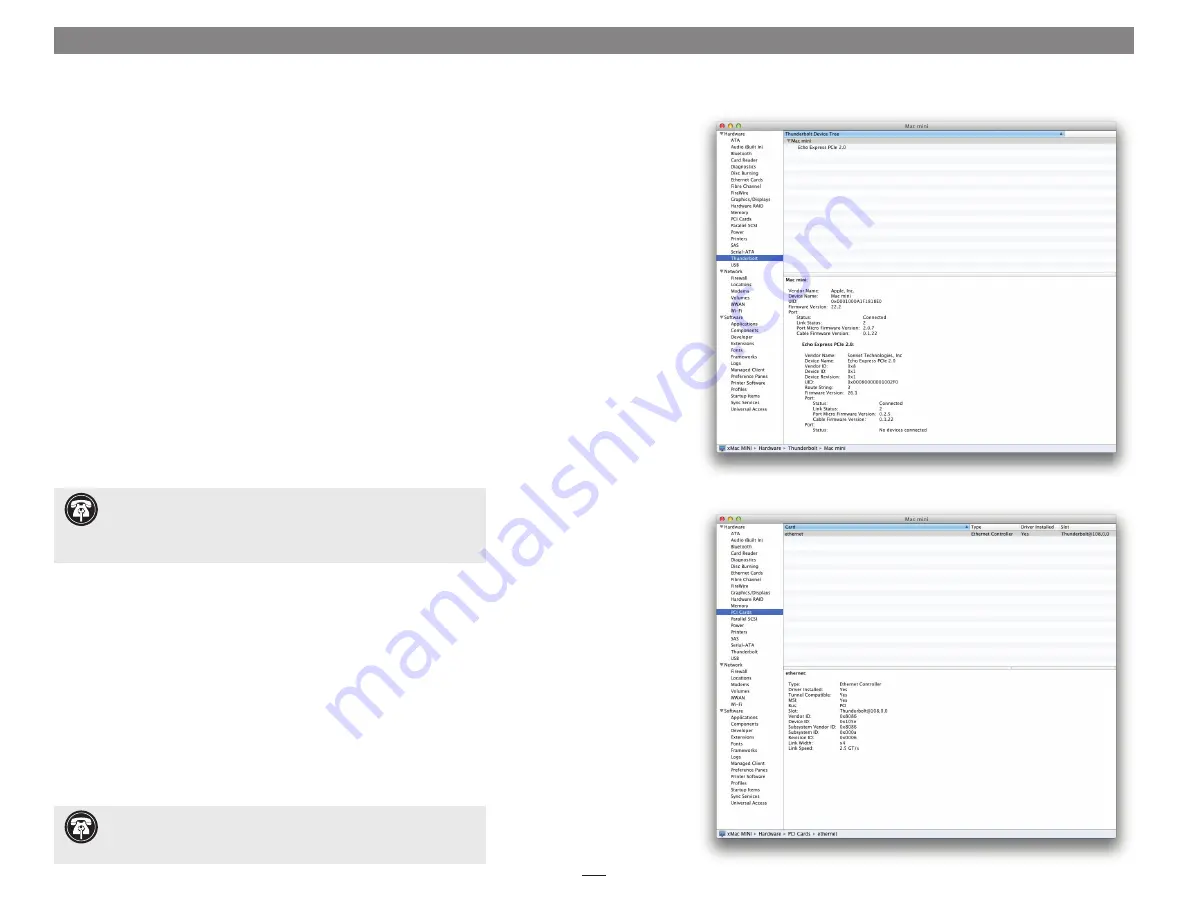
 

5.

 In the System Information window, click Thunderbolt under the 

Hardware header in the left column 

(Figure 10).


6.

 In the top right column under the Thunderbolt Device Tree header, 

you should see Mac mini, followed “Echo Express PCIe 2.0” (Echo 
Express is a sister product of the xMac mini Server 2H and uses the 
same Thunderbolt expansion system for PCIe cards 

(Figure 10). 

B – Verify Installed Cards are Recognized


1.

 When a card is installed into one of xMac mini Server 2H’s PCIe slots, 

the PCIe slot (listed as a port), the Status should appear as connected 

(Figure 10).

 2. 

Click PCI Cards under the Hardware header in the left column 

(Figure 11).

 3. 

At the top of the right column, installed cards are listed. By selecting 
a card at the top, detailed information is listed. You should see “Yes” 
next to Driver Installed and Tunnel Compatible, otherwise the card or 
driver may not be Thunderbolt compatible 

(Figure 11)

.

Chapter 4 – Verify Connections Using System Information

Figure 10

Figure 11


 Support  Note:

 If you do not see “Echo Express PCIe 2.0” listed, 

disconnect and reconnect the Thunderbolt cable between the 

computer and xMac mini Server 2H. Note that it is not necessary to shut 
down the computer before disconnecting and reconnecting the cable.


 Support  Note:

 While xMac mini Server 2H requires no drivers, 

installed cards require Thunderbolt-compatible drivers to enable 

their use with xMac mini Server 2H. 

9

Summary of Contents for xMac

Page 1: ...User s Guide for xMac mini Server 2H Thunderbolt to PCIe Expansion System and 1U Rack Enclosure for Mac mini With Thunderbolt Port ...

Page 2: ......

Page 3: ...llation Steps C xMac mini Server 2H Rackmount Installation Information 4 Verify Connections Using System Information 9 A Verify xMac mini Server 2H is Recognized B Verify Installed Cards are Recognized 5 Tips and Known Issues 10 Tips Known Issues 6 Specifications Precautions FCC Compliance and Support Information 11 Specifications Safety Precautions FCC Compliance Contacting Customer Service Visit...

Page 4: ......

Page 5: ...convenient interfacing of Gigabit Ethernet USB and HDMI cables The xMac mini Server 2H s power switch turns the computer on and off and the PCIe slots are powered on off with the Mac mini for maximum energy savings An opening in the front panel allows the Mac mini s power indicator to shine through There s a central power hub for the computer and power supply for the PCIe slots enabling you to pow...

Page 6: ...ening This hole allows the Mac mini s power indicator to shine through 8 Gigabit Ethernet Port This RJ 45 port connects to the Mac mini through a cable attached to the back panel 9 External Cable Passthrough This opening allows the connection of the included Thunderbolt cable from the computer to the left Thunderbolt port on the xMac mini Server 2H s back panel and the connection of other cables t...

Page 7: ...cal half length full height PCIe 2 0 card and is also compatible with PCIe 1 1 cards 4 Power Supply This user replaceable part provides power to the xMac mini Server 2H s PCIe slots fans and assorted printed circuit boards 5 Fan Assembly This user replaceable part provides airflow to cool the Mac mini installed PCIe cards and other components inside the enclosure A Thunderbolt Connector Lock This ...

Page 8: ...c mini remove the loose Thunderbolt cable and set it aside and then move the rest of the cables aside Figure 2 Support Note To avoid damaging components due to static electricity discharge wear an antistatic wrist strap while working inside xMac mini Server 2H Figure 1 Figure 2 4 WARNING When handling computer products take care to prevent components from being damaged by static electricity avoid ...

Page 9: ...the screw securing its port access cover and then remove the cover Figure 3 6 If you are installing a card into PCIe Slot 2 remove and set aside the screw securing its port access cover and then remove the cover Figure 4 Chapter 3 PCIe Cards Computer and xMac mini Server 2H Installation Steps Figure 3 Figure 4 5 ...

Page 10: ...lling a card into PCIe Slot 2 remove the card from its packaging handling the card by its edges and without touching any components or gold connector pins Otherwise skip to step 13 11 Turn the card components side down line up the card s connector with the slot and then gently but firmly press the card into the slot do not rock the card or force the card into the slot If you encounter excessive re...

Page 11: ...ecure the Thunderbolt cable s to the xMac mini Server 2H with the supplied Thunderbolt cable lock Figure 7 16 If desired secure the cables to the bottom of the xMac mini Server 2H with cable ties B Mac mini Installation Steps 1 Remove the Mac mini from its packaging 2 Carefully insert the Mac mini under the top edge of the enclosure push it against the gasket behind the enclosure s face plate and ...

Page 12: ...ing rack slides or a rack shelf Sonnet offers rack slide sets for purchase separately please visit the site at www sonnettech com product xmacminiserver html and click on the Accessory tab for more information 1 Install and secure the xMac mini in the equipment rack 2 Connect any necessary interface cables to the back of xMac mini Server 2H verify the cables are plugged in securely 3 Connect the s...

Page 13: ...cards Figure 10 B Verify Installed Cards are Recognized 1 When a card is installed into one of xMac mini Server 2H s PCIe slots the PCIe slot listed as a port the Status should appear as connected Figure 10 2 Click PCI Cards under the Hardware header in the left column Figure 11 3 At the top of the right column installed cards are listed By selecting a card at the top detailed information is liste...

Page 14: ...With its optimized airflow design and four temperature controlled fans providing adequate cooling at all times xMac mini Server 2H may be installed anywhere in a rack Do not block any of the vents Otherwise the Mac mini installed cards and xMac mini Server 2H s components may overheat Connecting Additional Thunderbolt Devices You may connect up to five additional Thunderbolt devices in a daisy cha...

Page 15: ...chnical updates Before you call Sonnet Customer Service please check our Website for the latest updates and online support files and check this User s Guide for helpful information When you call Sonnet Customer Service have the following information available so our customer service staff can better assist you Product name Product serial number Date and place of purchase Computer model PCIe card m...

Page 16: ...hnologies Inc Mac and Mac OS are trademarks of Apple Inc registered in the United States and other countries Thunderbolt and the Thunderbolt logo are trademarks of Intel Corporation in the U S and or other countries Other product names are trademarks of their respective owners Product specifications subject to change without notice UG XMAC MS 2H E A 060413 ...

Reviews: