Sonnet TEMPO ATA100 Quick Start Manual Download Page 5

5

Quick Start Guide for Tempo ATA100

Figure 10

Figure 11


3.

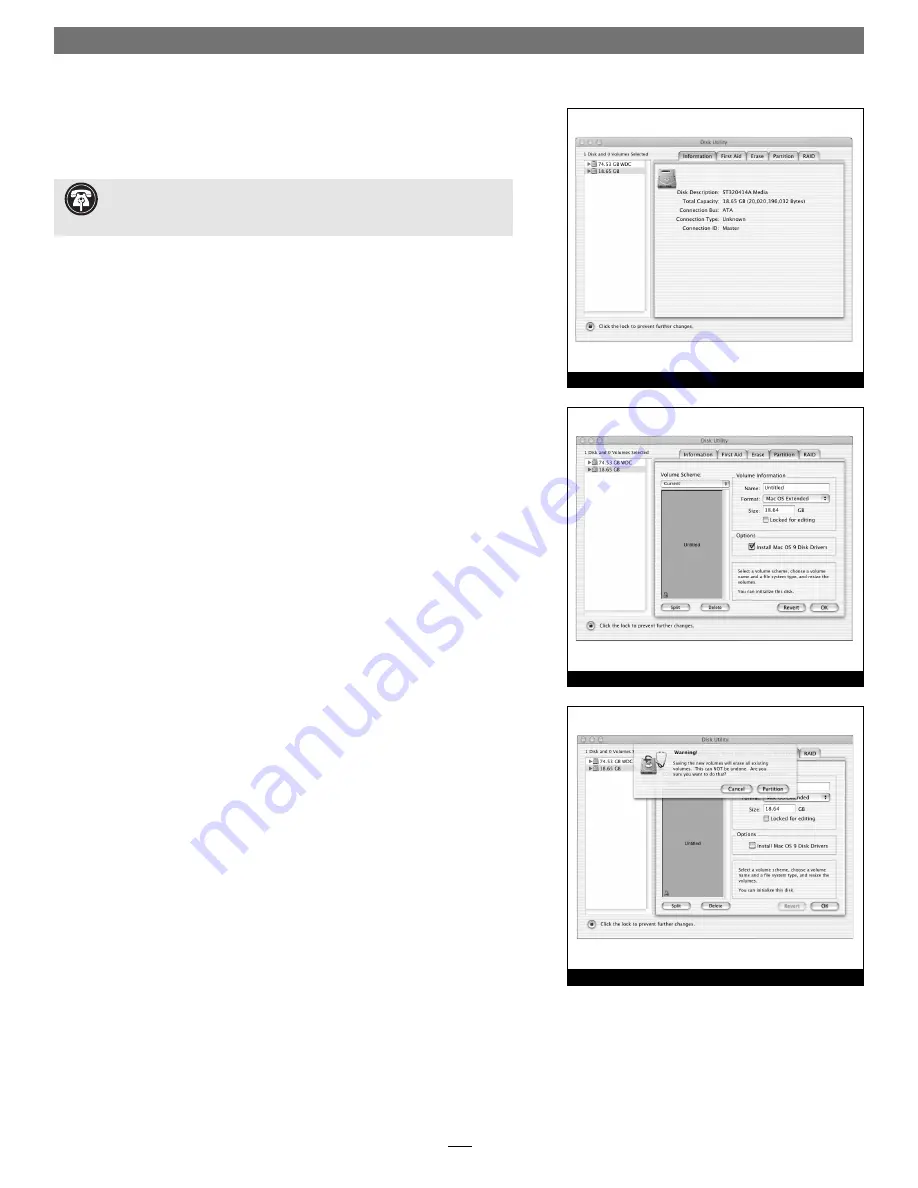
 If you have not already done so, open Disk Utility 

(Figure 10)

. Note that 

all attached drives appear in the Information window, regardless of being 
formatted or not.


4.

 Select the drive you want to format by single clicking the drive symbol or 

the “name” of the drive 

(Figure 10)

. In the Information window, the drive 

capacity and Connection ID (Master or Slave) is listed.


5.

 Click on the Partition tab 

(Figure 11)

. When the Partition window 

appears, click on the drop down menu beneath “Volume Scheme:” and 
select a number of partitions for the volume; you may optionally choose 
to partition each drive to create two or more smaller “virtual” drives to 
store and retrieve data faster and more effi ciently. For drives larger than 2 
GB, you should format them as Mac OS Extended to take full advantage 
of their storage capacity. Click OK (or Partition if you are using Mac OS X 
Version 10.2). 


6.

 Name each volume; after formatting, each will appear in the Finder 

window as a drive. Once you have made your name and partition choices, 
click OK

 (Figure 12)


7.

 When the Warning window appears, click the Partition button 

(Figure 12)

. If necessary, repeat steps 4–6 to partition other drives connect-

ed to the Tempo ATA100. When partitioning and formatting are complete, 
close the Disk Utility application; you can now use your drive(s).

Figure 12


 Support Note:

 IDE hard drives attached to the Tempo ATA100 will reg-

ister as ATA devices to the computer under Mac OS X. For example, in 

Figure 10

, the Connection Bus for a newly installed hard drive is listed as ATA.

Summary of Contents for TEMPO ATA100

Page 1: ...ectricity Before opening your computer or removing parts from their packages always ground yourself first by touching a metal part of the computer such as a port access cover and work in an area free of static electricity avoid carpeted areas Handle all electronic components only by their edges and avoid touching connector traces and component pins Remember to register your product online at http ...

Page 2: ...he master setting when not Figure 3 When connecting three or four drives to two Ultra ATA cables you must set the jumpers on two drives to the master setting and to the slave setting on the other drive s Figure 3 4 Install the hard drives into expansion bays Depending on your comput er model drive mounting brackets carriers or drive mounting sleds may be required to install your hard drives Refer ...

Page 3: ...de your computer and remove its port access cover if present from the rear of the computer 10 Install the Tempo card into the PCI slot make sure the card is firmly seated 11 Route the Ultra ATA cable s to the Tempo ATA100 card avoid the proces sor s heat sink and make sure the cables will not get crushed or pinched by any part of the case when the computer is reassembled Tempo ATA100 Macintosh PCI...

Page 4: ...es Figure 7 For drives larger than 2 GB you should format them as Mac OS Extended to take full advantage of their storage capacity 4 Name each drive or volume once it has been initialized each volume will appear on the desktop as a single virtual drive Figure 8 You can now use your drive s Drive Formatting Mac OS X This section describes the process of formatting initializing hard drives con necte...

Page 5: ...es to store and retrieve data faster and more efficiently For drives larger than 2 GB you should format them as Mac OS Extended to take full advantage of their storage capacity Click OK or Partition if you are using Mac OS X Version 10 2 6 Name each volume after formatting each will appear in the Finder window as a drive Once you have made your name and partition choices click OK Figure 12 7 When ...

Page 6: ...d to the Tempo ATA100 to better match your legacy Macintosh bus and processing limitations 1 Click on the Apple Menu Control Panels and select Tempo AV Tool the Tempo AV Tool control panel window will open Figure 13 2 Click on a radio button to make your selection then close the window Note If your initial selection does not remedy your playback issue try other settings on the list until all optio...

Reviews: