background image

4

Drive Installation and Enclosure Setup

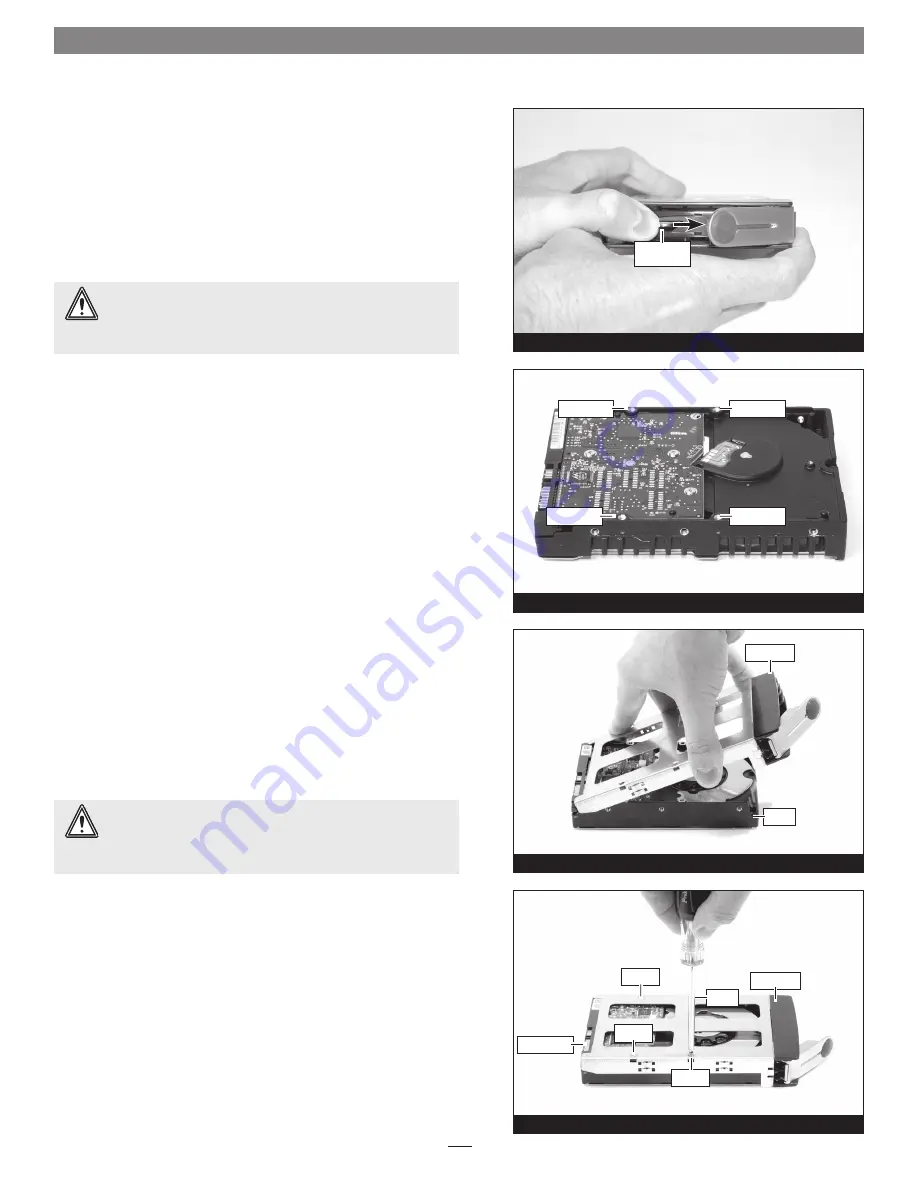
Figure 3

lever release 

button


1.

 Remove the Fusion drive enclosure and drive trays from their 

packaging, and place the enclosure near the computer to which it 
will be connected.


2.

 Take one of the drive trays and push its lever release button 

toward the right until the lever pops out. 

(Figure 3)


3.

 Remove a SATA drive from its packaging and set it in on a flat, 

level surface with the label side down. Open the supplied tube 
of threadlocker and apply a single drop to each of the four screw 
holes on the bottom of the drive 

(Figure 4)


4.

 Turn the drive tray upside down and lay it on top of the drive, 

with the back of the tray facing toward the drive’s connectors 

(Figure 5)

.


5.

 Using four of the supplied screws, secure the drive tray to the 

drive; tighten each screw to secure the tray snugly to the drive; 

do not overtighten the screws (Figure 6)

.


 WARNING:

 When handling computer products, take care to 

prevent components from being damaged by static electricity; 

avoid working in carpeted areas. Handle hard drives only by their 
edges and avoid touching connector traces and component pins. 

Figure 4

Figure 6

screw

screw

screw

drive tray

connectors

screw

Figure 5

drive

drive tray

screw hole

screw hole

screw hole

screw hole


 WARNING:

 When securing the trays to the hard drives, you 

must verify the screw heads are flush with the tray. Otherwise,

a screw may catch on the tray below and prevent you from removing 
the tray from the enclosure. 

Summary of Contents for FUSION D400RAID

Page 1: ...4 Bay Serial ATA Disk Array Storage System FUSION D400RAID Drive Enclosure User s Guide ...

Page 2: ...25 x 7 5 in 14 9 x 28 5 x 19 cm Weight 9 35 lbs 4 24 kg Warranty 2 year limited warranty Fusion D400RAID Enclosure Specs and Features Figure 1 Figure 2 Drive Tray Bay 1 Drive Tray Bay 2 Drive Tray Bay 3 Drive Tray Bay 4 Drive Presence LED Bay 1 Drive Presence LED Bay 2 Drive Presence LED Bay 3 Drive Presence LED Bay 4 Drive Activity LED Bay 1 Drive Activity LED Bay 2 Drive Activity LED Bay 3 Drive...

Page 3: ... Professional 32 and 64 bit versions or Windows Vista Enterprise or Ultimate 32 and 64 bit versions In order to create RAID volumes larger than 2TB you must do one of the following Use the software configuration tools included with the Fusion storage to create volumes up to 2TB concatenate link together in a virtual chain the volumes and then format as NTFS Use GPT formatting Note that drives and ...

Page 4: ...ive with the back of the tray facing toward the drive s connectors Figure 5 5 Using four of the supplied screws secure the drive tray to the drive tighten each screw to secure the tray snugly to the drive do not overtighten the screws Figure 6 WARNING When handling computer products take care to prevent components from being damaged by static electricity avoid working in carpeted areas Handle hard...

Page 5: ... a port on the Sonnet RAID controller card verify the connector is plugged in securely Figure 9 3 Connect the supplied power cable between the Fusion D400RAID enclosure and a grounded wall outlet or power strip verify the cable is plugged in securely 4 Push the switch on the back of the enclosure to the on position and then power on your computer 5 Format the drives installed in the Fusion enclosu...

Page 6: ...icon associated with the drive s you wish to remove to the eject icon on the dock If you remove a drive module from the Fusion D400RAID with a drive that was part of a RAID group you should power off the enclosure before reinserting the module Once the module is secured power on the enclosure again this will ensure that the RAID group will mount properly Windows and Linux do not provide hot swap s...

Reviews: