background image

- 4 - 


NOTE: 


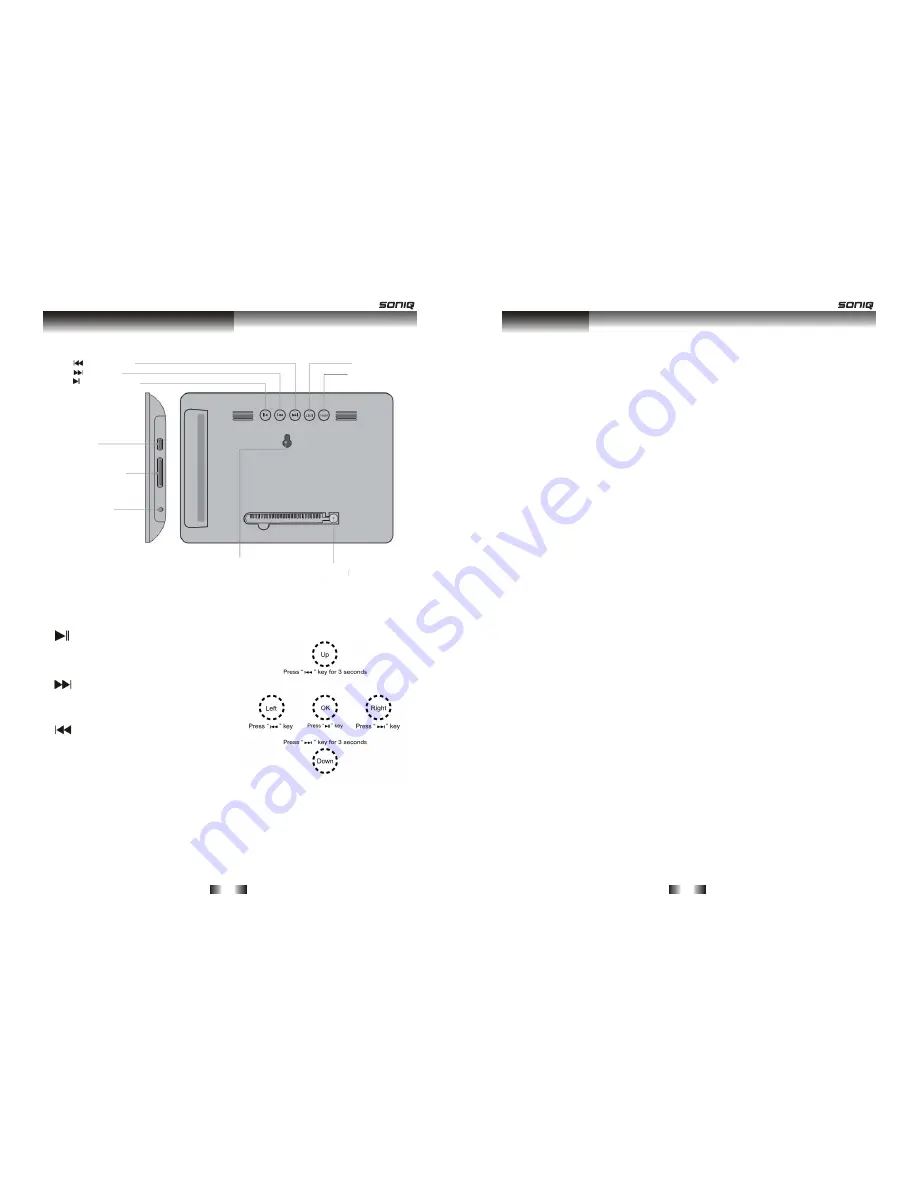
PLAY/PAUSE

 button

use to play 

and pause. Press and hold for 3 seconds   

to switch the unit ON and OFF. 

NEXT

 button (right button)

use to   

navigate Right.Press and hold for 3   

seconds to navigate down. 

PREVIOUS

 button (left button)

use to   

navigate Left.Press and hold for 3 seconds   

to navigate up. 

EXIT

Press to exit the Menu.   

MENU

Press to enter the Setup Menu.   


Your Digital Photo Frame 

PREVIOUS button 

NEXT button 

PLAY/PAUSE button

USB port 

Memory card slot 

DC IN 5V jack 

Wall mount

Table stand 

MENU button 

EXIT button 

- 13 - 


This product was designd and manufactured to meet strict quality 

and safety standards. There are, however, some operation precautions 

that you should be aware of: 


Do not attempt to operate the Digital Photo Frame with a damaged power cord/AC   

adaptor or if it is not working correctly in any way. Never adjust or modify the Digital 

Photo Frame yourself, always take it to an authorized Service Centre. 


Position the power cord/AC adaptor so that it does not cause a hazard and is not   

near any sharp surfaces. 


The AC adaptor of this Digital Photo Frame is not replaceable by the user. If the 

supply cord of the Digital Photo Frame is damaged it must be replaced by a qualified 

Service Centre. 


Do not use with an extension lead. 


If the Digital Photo Frame is not to be used for a long period remove the plug from 

the mains socket. 


Do not place in or near water, or in damp conditions. 


To avoid electrical shock, never touch the Digital Photo Frame or plug with wet 

hands. 


Do not place objects that could cause a fire hazard on top of the Digital Photo 

Frame such as candles. 


When transporting the Digital Photo Frame always use the original packaging. 


Do not place anything on top of the Digital Photo Frame, such as vases or potted 

plants. 


Do not use the Digital Photo Frame outdoors. 


Hold the plug to disconnect it from a wall socket. Do not pull the power cord. 


All servicing must be done by qualified personnel only. 


Do not expose the Digital Photo Frame, components, or batteries to excessive heat, 

sunshine, or any naked flames. 


The AC adaptor is used as the disconnect device and it shall remain readily 

operable. If a malfunction occurs, disconnect the AC adaptor from the wall outlet at 

once. 

Warnings 

Summary of Contents for F700-NZ

Page 1: ...F700 NZ ...

Page 2: ...ticular type of file format Your Digital Photo Frame can only play this type of file When you take a picture with your digital camera it will normally create a JPEG file You can tell which files are in JPEG format by looking at the file extension the end of the file name were it should say jpeg or jpg for example photo1 jpg If this is not the case they can probably be converted You can call the Cu...

Page 3: ...tal Photo Frame AC Adaptor Need something else There are a wide range of accessories and other products that can be ordered direct to your door from SONIQ For more information see www soniq com You should have ...

Page 4: ... Power 10W Operating current 1MAX 800mA Operating temperature 5 40 Power supply adapter IN 100 240V 50 60Hz AC OUT 5V 1A DC Card reader SD MMC MS card reader USB USB 2 0 File Format JPEG BMP Technical specifications 3 Your Digital Photo Frame 4 Table of Contents FAQ S 8 11 13 14 Set up 5 Advanced use Everyday use 6 Troubleshooting Warnings 12 Technical specifications ...

Page 5: ...r any sharp surfaces The AC adaptor of this Digital Photo Frame is not replaceable by the user If the supply cord of the Digital Photo Frame is damaged it must be replaced by a qualified Service Centre Do not use with an extension lead If the Digital Photo Frame is not to be used for a long period remove the plug from the mains socket Do not place in or near water or in damp conditions To avoid el...

Page 6: ...web images scanned images or photos in RAW format are not stored according to camera industry standards and therefore cannot be displayed correctly on the Digital Picture Frame Please ensure your camera is set to store pictures as JPEG files or alternatively use a computer program to convert such images before viewing them Frequently asked questions 5 Using the stand Open the package remove the pr...

Page 7: ... Clock from the main menu using the or buttons and 11 If you experience problems with your Digital Photo Frame the following guide may help you resolve the problem Problem Possible cause What to do Digital Picture Frame doesn t power on The POWER connector to the unit is not securely inserted Make sure you connect the AC adapter to the frame properly and make sure you have powered on the unit by u...

Page 8: ...n to select the system will enter the date setting menu 1 Hold the button for 3 seconds to scroll down to Set Date Press the button to set the time 2 Hold the or buttons for 3 seconds to select the year Then press the button to move to the month Repeat for the day 3 Once complete press the or buttons to move to OK and press to select If you select Display you can see a calendar view Press the and ...

Page 9: ...mediately after selecting the photo icon When Auto Play is not activated OFF the picture frame will enter either File Manager mode or Thumbnail mode according to the settings in Photo Setting Browse Advanced use 9 Display Setup Brightness This option can be used to set the screen brightness You can choose from Normal Bright and Soft Contrast This option can be used to set the screen contrast The c...

Reviews: