SONIQ E40S12A-AU Instruction Manual Download Page 20


B.DTV Manual


CHANNEL MENU

Press MENU button to enter the CHANNEL page as follows:

A. Auto Tuning 
1. Auto Tuning will be highlighted upon displaying this menu. Press “OK” button to enter.
2. Press           to select country, Press “OK” button to enter the next step.
3. Press           to select your location ,then press “OK” button to enter, and then use          to 
    choose the tuning type.
4. Press “OK” to start auto search.

1. Press         to highlight DTV Manual Tuning, Press “OK” button to enter sub-menu.
2. Users can select channel number by pressing           , and set frequency number by pressing numeric buttons.
3. Press “OK” to start.

CHANNEL

Auto Tuning

DTV Manual Tuning
ATV Manual Tuning

Channel Edit

Fine tune

Back  

Select

C

H

A

N

N

E

L

Country Selection

Please select your country

Country

Australia

NewZealand

Back  

Select

Channel Tuning

Please  choose  your  channel  tuning  mode

Scan  Channel

DTV+ATV

DTV

ATV

DTV

ATV

Back  

Select

Time Zone

Time Zone Selection

Back  

Select

New South Wales/ACT 


Victoria

         Queensland

      South Australia

    Western Australia

            Tasmania

    Northern Territory

NT

WA

SA

QLD

NSW/ACT

CHANNEL

Back  

Select

C

H

A

N

N

E

L

Digital Scan           Cht2

Frequency           226.50MHz

Start

Strength                    100


OSD Menu Operation

Scanning


Ch58

Digital channels found: 11

Radio channels found: 0

Analog channels found: 0

EENU  

SKIP

EXIT

   EXIT

CHANNEL

Auto Tuning

ATV Manual Tuning

Channel Edit

DTV Manual Tuning

Fine tune

Back  

Select

C

H

A

N

N

E

L


1. Press          to highlight ATV Manual Tuning, then press “OK” button to enter sub-menu.
2. All the items in this displayed menu can be adjusted, after all the settings being done, press          to select “Scan
    to Next” or “Scan to Pre”, then press “OK” to start.

Fine Tune: After Fine Tune was highlighted, press “OK” button to enter the submenu, then press           to adjust.

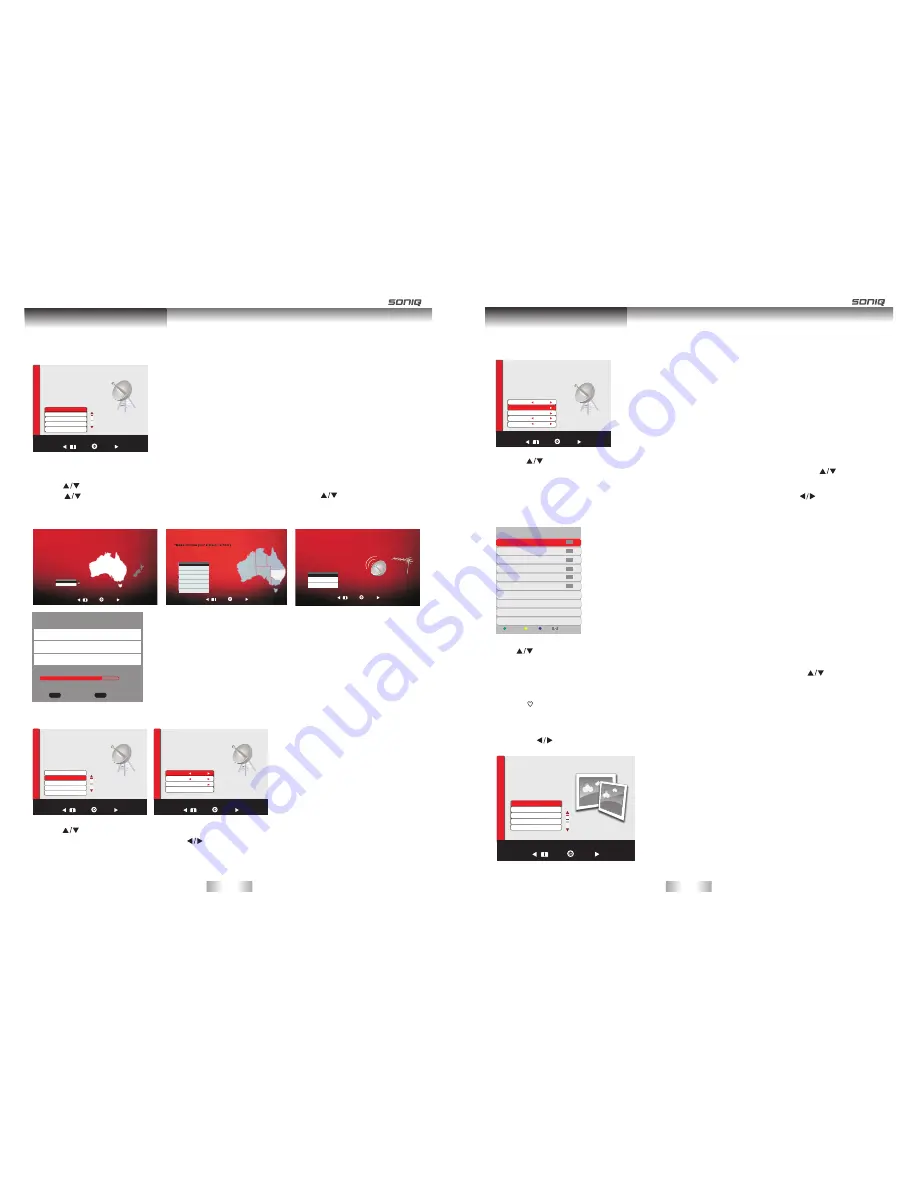
Press          to select Channel Edit, then press OK button to enter sub-menu.
1. Press green button to rename the current channel.(only available in ATV)

PICTURE MENU
Press MENU button to bring up the main menu under ordinary TV mode.
Then press          to enter PICTURE page, it will highlight the first option, press OK button to enter.

CHANNEL

Back  

Select

C

H

A

N

N

E

L

Analog Scan            200.25MHz

Scan to Prev

Color System                PAL

Sound System                 I

Scan to Next         


PICTURE

P

IC

T

U

R

E

Back  

Select

Picture mode                         User 

Noise Reduction              Medium

Energy Saving                   Middle

Aspect Ratio                            Full

Color Temperature        Standard

C.ATV Manual Tuning

OSD Menu Operation

2. Press yellow button to change program order. Selected channel can be moved by using         , then
     press “OK” for confirm.
3. Press blue button to skip the selected channel.
4. Press     on your remote control to add a channel to the favorite list.

-37-

-38-


Channel Edit

DTV

DTV

Move

Skip

Favorite

Radio

Rename

DTV

DTV

002 ABC TV Melbour

ne

020 ABC HDTV

021 ABC2

022 ABC TV

200 ABC DiG Radio

201 ABC DiG Jazz

Radio

Channel Edit

Summary of Contents for E40S12A-AU

Page 1: ...Printed in China E40S12A AU HOTLINE AUSTRALIA 1300 765 663 NEW ZEALAND 0800 100 236 40 LED LCD SmartTV Instruction Manual...

Page 2: ...oniq and third parties via the internet that You access using the Software Smart TV means the television sets produced by Soniq that are capable of connecting to and downloading content from the inter...

Page 3: ...sible for making enquiries with Your Internet Service Provider as to the costs incurred by using the Software or downloading Content via the Software 9 Software Usage 9 1 Soniq does not guarantee that...

Page 4: ...ugh you may not receive the notice unless and until You launch the Software Any such notice will be deemed delivered on the date Soniq first makes it available through the Software irrespective of whe...

Page 5: ...appliance and in the operating instructions should be adhered to 4 Follow instructions All operating instructions should be followed 5 Battery Batteries shall not be exposed to excessive heat such as...

Page 6: ...d from the AC outlet Caution Avoid exposing the main unit to direct sunlight and other sources of heat Do not position television receiver directly on other products which give off heat e g video cass...

Page 7: ...n Receives the signal from the remote control Do not put any objects in front of the window in order not to hinder the reception of signals Flashes red when the unit is powered on Press VOL to increas...

Page 8: ...the spare part SD MMC card reader slot Connect to the LINE IN of the Audio Amplifier Connect the audio output jack of AV equipment to the unit Connect USB device such as USB Disk USB Wi Fi Dongle HID...

Page 9: ...users to use a USB drive for programme such as the SONIQ CUD82 SONIQ does not supply these cables USB Usage This TV is equipped with four USB 2 0 Host interfaces which can be used for the following fu...

Page 10: ...possible input sources Navigation buttons Scrolls through menus or options OK Selects menus or options and confirms your input EXIT button Press to exit the current menu REC button Use to record a pr...

Page 11: ...can be realized by entering Settings then open the link of quick launch to do the following operations button Returns to the previous level button Press to return to the HOME menu button Press this c...

Page 12: ...rtainment including not only entertainment content but also up to the minute news weather updates photo management and more by simply using the TV s remote control without a separate PC Network Connec...

Page 13: ...dress Netmask Default Router DNS address Save Discard Smart TV Function IP Manual Setting Select if there is no DHCP server on the network or you want to set the IP address manually 8 When you are fin...

Page 14: ...Many network connection problems during set up can often be fixed by re setting the router or modem After connecting the player to the home network quickly power off and or disconnect the power cable...

Page 15: ...al storage Language keyboard About Device Smart TV Function Settings Press to check all the network setting menu or wireless network setting type menu Before operating this function please insert USB...

Page 16: ...hone calls read phone state and identity 2 16MB 2 16MB 0 00B 0 00B 7 Media This function can allow you to view the shared media from the memory storage Note Before operating Media function plug in USB...

Page 17: ...ress OK again to unselect it Press or PLAY button to play it Media Music Movie Photo 00 00 00 00 0000000000000000 AUDIO DCIM GOME LOST DIR MEDIA music 00 22 03 50 Use Navigation buttons to choose corr...

Page 18: ...roid status under ordinary TV status 2 Choose Yes to go to the next step 3 Select Yes to start network update during software downloading you may press EXIT or HOME button to exit The system has been...

Page 19: ...pdating and backing up your data Please do not cut off the power otherwise the system will breakdown and can not start up Firmware Update Local Update Home 1 1 Refresh Network Update Backup Flrmware R...

Page 20: ...CHANNEL Auto Tuning ATV Manual Tuning Channel Edit DTV Manual Tuning Fine tune Back Select CHANNEL 1 Press to highlight ATV Manual Tuning then press OK button to enter sub menu 2 All the items in thi...

Page 21: ...on 5 Color Temperature Press button to select Cool Standard Warm and User You can adjust R Gain G Gain and B Gain in User mode SOUND MENU Press MENU button to display the main menu Press to enter the...

Page 22: ...l hard disk and 32GB or less for USB flash memory 6 The recognition speed of a USB storage device may depend on each device 7 Please connect a USB storage device with the cable offered by the device m...

Page 23: ...ED RECORD Scheduled Record Group1 Frequency Monday To Fri Channel 21 ABC2 Date 2007 06 09 Start Time 2 0 3 0 Duration 0 0 3 0 Setting List Setting Is Not In Use Selected date is not weekday Use button...

Page 24: ...I 3 USB 4 Component In Y Pb Pr 2 Composite In AV 2 Digital Audio Out Optical Yes PC In D sub Yes RF In Terrestrial Cable Input 1xIEC 75omh Headphone No PC Audio In Yes Line Out Yes Card Reader SD MMC...

Page 25: ...your Wi Fi Dongle is purchased from SONIQ Make sure Wi Fi Dongle is being connected properly to the USB interface Please refer to the instruction manual from page 24 to 25 for the setting Check wheth...

Reviews: