SONIQ E22Z10A-AU Instruction Manual Download Page 25

- 25 -

REPEAT PLAYBACK

You can play a single track or an entire disc repeatedly.

Repeating a single track (CD)

You can play the same track repeatedly.

1. While the disc is playing, press the 

REPEAT 

button until the “ 

 ” indicator displays on the screen. 

The current track is played repeatedly. 

Repeating an entire disc

2. While the disc is playing, press the 

REPEAT 

button until the “ 

 ” indicator displays on the screen. 

The entire disc is played repeatedly.

To resume normal playback

3. Press the 

REPEAT 

button until the “ 

 ” indicator displays on the screen.  

Repeating a specific section (DVD) (CD)

You can play a specific section repeatedly.

1. While the disc is playing, press the 

A-B

 button at the beginning of the section ( 

 is displayed) you 

want to play repeatedly.

2. Press the 

A-B

 button again at the end of the section ( 

 is displayed) you want to play repeatedly.

3. The unit will immediately begin replaying your selection.

To resume normal playback

4. While the disc is playing, press the 

A-B

 button until the “ 

 ” indicator displays on the screen.

NOTE

•  A-B repeat can only be used within the same title. If the start and end of the section to be repeated are 

in different titles, A-B repeat is cancelled.

•  The A-B repeat function does not operate in scenes where different camera angles are recorded.
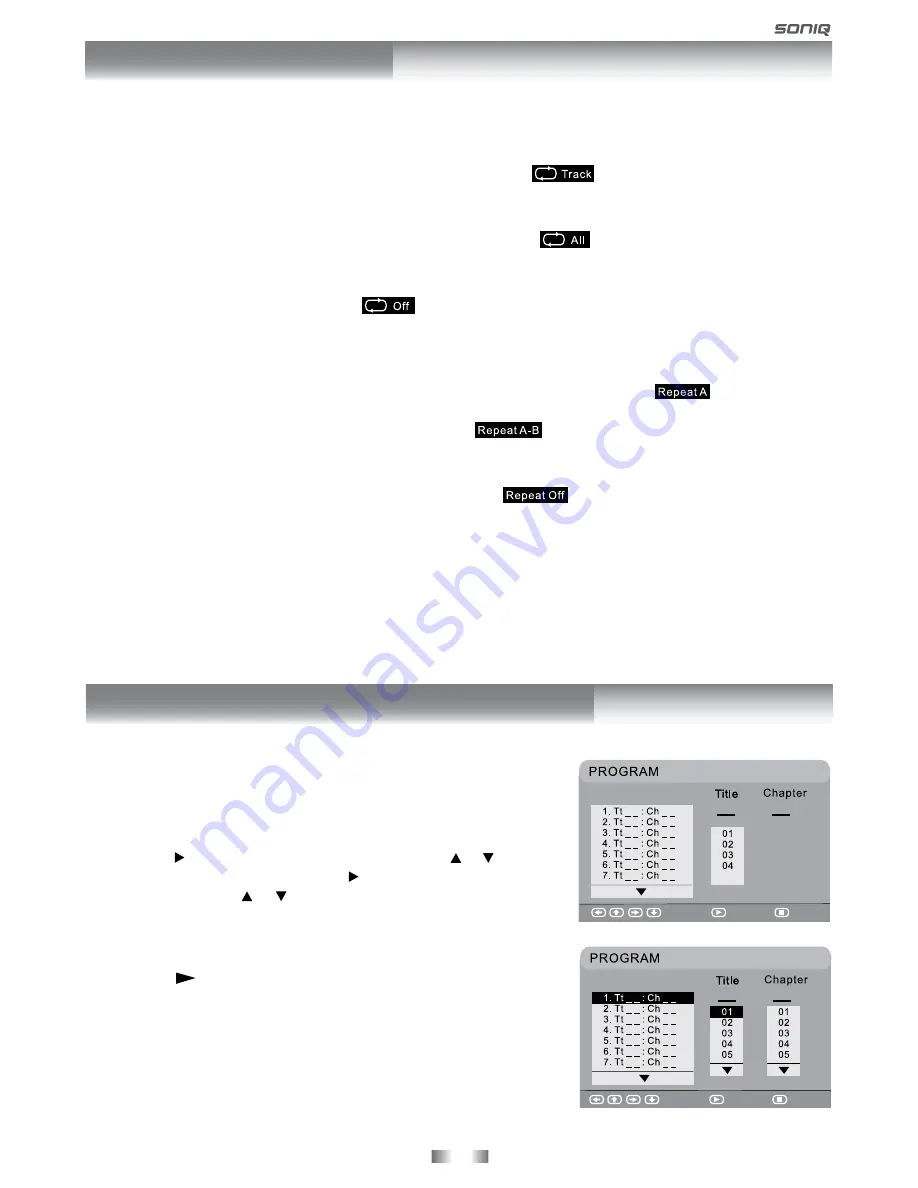
PROGRAMMABLE MEMORY

Title/Chapter programmed playback (DVD) 

1. Press the 

MEMORY

 button in PLAY mode. A screen will be shown 

as right.

2. Press the   button to highlight the Title. Press the   or   button to 

choose the desired title. Press the   button again to highlight the 

Chapter. Press the   or   button to choose the desired Chapter. 

Press  the 

ENTER•OK

  button  to  confirm. The  highlight  bar  will 

move to the next item automatically.

3. Repeat step 2 to add additional titles and chapters.
4. Press the   

PLAY

 button to start the programmed playback.

Select

Play

Clear

Select

Play

Clear

DVD PROGRAMMABLE PLAYBACK

Summary of Contents for E22Z10A-AU

Page 1: ......

Page 2: ...orward fast reverse 23 Slow motion play DVD 23 Audio selection DVD 23 Subtitle selection DVD 23 Angle selection DVD 23 SPECIAL FUNCTIONS 24 Display function 24 Locating a specific title DVD 24 Locatin...

Page 3: ...ded by the manufacturer 7 Wall or Ceiling Mounting The unit should be mounted to a wall or ceiling only as recommended by the manufacturer 8 Ventilation The unit should be well situated so that its lo...

Page 4: ...moisture Warning Do not drop or push objects into the television cabinet slots or openings Never spill any kind of liquid on the television Caution Never stand on lean on push suddenly the unit or it...

Page 5: ...AC power cord from the AC outlet Caution The panel used in this product is made of glass It can break when the unit is dropped or applied with force Individuals should execute caution when dealing wit...

Page 6: ...nit already pre install a loop through cable You simply connect outdoor antenna to DTV antenna input to receive broadcasting signals You can enjoy both analog and digital TV broadcasting now by switch...

Page 7: ...le on some discs Be sure to read the documentation provided with the DVD ICONS USED ON DVDs Sample Icons Language selections for audio Language selections for subtitles Screen aspect ratio Multiple ca...

Page 8: ...Down on the menu screen Press to select previous chapters or tracks on a disc Press to select next title chapter or track on a disc Adjust the volume level Connect to external antenna Connect composit...

Page 9: ...track on a disc 11 ANGLE button Press to switch the camera angle of the video presentation when scenes with multiple camera angles are recorded on a DVD SIZE button Press to set the letters size of te...

Page 10: ...Electronic Programme Guide EPG in DTV mode PAUSE button Press to pause playback and single frame advance INFO button Press to display the channel information in DTV mode 30 SLOW button Press to play a...

Page 11: ...ries The use of the wrong type of batteries may cause chemical leaks and or explosion Please note the following Always ensure that the batteries are inserted with the positive and negative terminals i...

Page 12: ...V devices such as a VCR video game system or camcorder Connecting to a VCR Video Game System Camcorder Connect the AUDIO VIDEO cable not included as shown Make sure you connect the cable from the oth...

Page 13: ...icensing LLC Connect the HDMI cable not included as shown Make sure you connect the cable from the device HDMI OUT to this unit HDMI IN To operate the connected device and play the source first press...

Page 14: ...let Dolby Digital for DVD Dolby Digital is a sound system developed by Dolby Laboratories Inc This unit automatically recognizes DVDs that have been recorded with Dolby Digital Not all Dolby Digital s...

Page 15: ...ave sufficient gaps around the unit as shown TURNING THE UNIT ON FOR THE FIRST TIME The first time you turn the unit on it will go straight into Auto scan mode Simply follow the screen prompts as belo...

Page 16: ...different according to the DTV programmes current date and time current channel name channel name channel no AUDIO LANGUAGE FOR DTV While watching a DTV programme you can press the button to display t...

Page 17: ...e CH PAGE button to skip to previous next page 2 Press the RED GREEN YELLOW BLUE button or the FAV button to edit the channel DELETE Press the RED button to delete the selected channel Press the TV ME...

Page 18: ...Adjust the tint of the picture Color Temperature Select the colour temperature of the picture Select Normal balanced Warm red white Cool blue white mode NOTE You can also select Picture Mode simply by...

Page 19: ...turn to the normal screen press the EXIT button OSDLanguage SelectyourpreferredOnScreenDisplay language AudioLanguage Selectyourpreferredaudiolanguage Available for digital channels if multiple audio...

Page 20: ...e setup menu and return to the normal screen press the EXIT button Lock System Select to lock or unlock the programmes Change Password If you change the password remember your password Block Programme...

Page 21: ...will be superimposed over the TV programme Press the MIX button again to return to the text page Page search whilst watching TV In Text mode press the CANCEL button Enter the page number you want usi...

Page 22: ...ton to interrupt playback and press the PLAY button to resume playback You also can use the numbered buttons to enter the image number to quickly select any image Press the ANGLE button on the remote...

Page 23: ...the example 2 Press the SUBTITLE button repeatedly to select the desired subtitle language Note If only one language is recorded the language does not change About two seconds later playback continue...

Page 24: ...Press the GOTO button twice 2 Enter the corresponding number buttons for the setting point you want 3 Press the ENTER OK button to confirm Playback starts from the selected location NOTE Some discs m...

Page 25: ...eatedly 3 The unit will immediately begin replaying your selection To resume normal playback 4 While the disc is playing press the A B button until the indicator displays on the screen Note A B repeat...

Page 26: ...Setup Mode and press the ENTER OK button Language Setup Enter Select OSD Language Audio Subtitle DVD Menu VIDEO SETUP 1 Press the SETUP button 2 Use the or button to select the Video Setup 3 Press the...

Page 27: ...egular shape discs example heart shaped octagonal etc They may cause malfunctions CLEANING THE UNIT Be sure to turn the unit off and disconnect the AC power cord before cleaning the unit Wipe the unit...

Page 28: ...Press the PAUSE button to pause press the PLAY button to resume Press the button to skip to the previous next song Press the button to begin fast reverse forward press the PLAY button to resume norma...

Page 29: ...rol to adjust the volume 4 Press the iPhone SWITCH button twice on remote control to end the video viewing and go back to the previous menu Note Make sure TV Out in iPod is set to ON when you are play...

Page 30: ...utton on remote control to pause press the PLAY button on remote control to resume Press the button on remote control to skip to the previous next photo 4 Press the iPhone SWITCH button on remote cont...

Page 31: ...OK button 2 Use the button to select from Shuffle or Repeat Press the ENTER OK button to enter the settings 3 Use the button to a setting press the ENTER OK button to confirm 4 Press the iPhone RETURN...

Page 32: ...e region number of this unit No picture The picture is not clear Clean the disc The disc is scratched The plugs and jacks are dirty Wipe them with a cloth slightly moistened with alcohol Clean the dis...

Page 33: ...sing a por table set top aerial Check the location of the antenna and adjust it if necessary Make sure the antenna cable is firmly connected Make sure all input cables are firmly connected Bad Picture...

Page 34: ......

Reviews: