

WARNING: TO PREVENT FIRE OR SHOCK HAZARD, DO NOT
EXPOSE THIS APPLIANCE TO RAIN OR MOISTURE.
CAUTION:
TO REDUCE THE RISK
OF ELECTRICAL
SHOCK, DO NOT
REMOVE THE COVER
(OR BACK) FROM THE
PRODUCT. NO USER
SERVICEABLE PARTS
INSIDE. REFER
SERVICING TO YOUR
SONIC ALERT DEALER.
The Lightning flash with arrowhead
symbol, within an equilateral
triangle, is intended to alert the
user to the presence of uninsulated
“dangerous voltage” within the
product’s enclosure that may be of
sufficient magnitude to constitute a
risk of electric shock to persons.
The exclamation point within an
equilateral triangle is intended
to alert the user to the presence
of important operating and
maintenance (servicing)
instructions in the literature
accompanying the appliance.
- This icon indicates separate disposal for electrical and electronic equipment.
Normal function may be disturbed by strong electromagnetic interference. If this is the
case, normal function can be resumed by simply resetting the unit following the procedure
in the instructions manual. If function does not resume,
try moving the unit to another location.
SONIC ALERT'S 1 YEAR LIMITED WARRANTY
Sonic Alert
Sonic Alert, Troy, MI 48083
1-888-864-2446
www.SonicAlert.com
The Sonic Boom Alarm Clock Model BD4000 is warranted against manufacturing
defects in materials and workmanship for one (1) year from the date of purchase.
Within this period Sonic Alert will repair or replace at our option the BD4000 without
charge for parts and labor. Simply contact our customer service department to obtain
an RA (return authorization number) and instructions on how to process your product
for return. Call 1-888-864-2446 or e-mail [email protected]. You'll need a copy
of your receipt to process the return authorization.
Sonic Alert Warranty Center, 1081 West Innovation Dr., Kearney, MO 64060
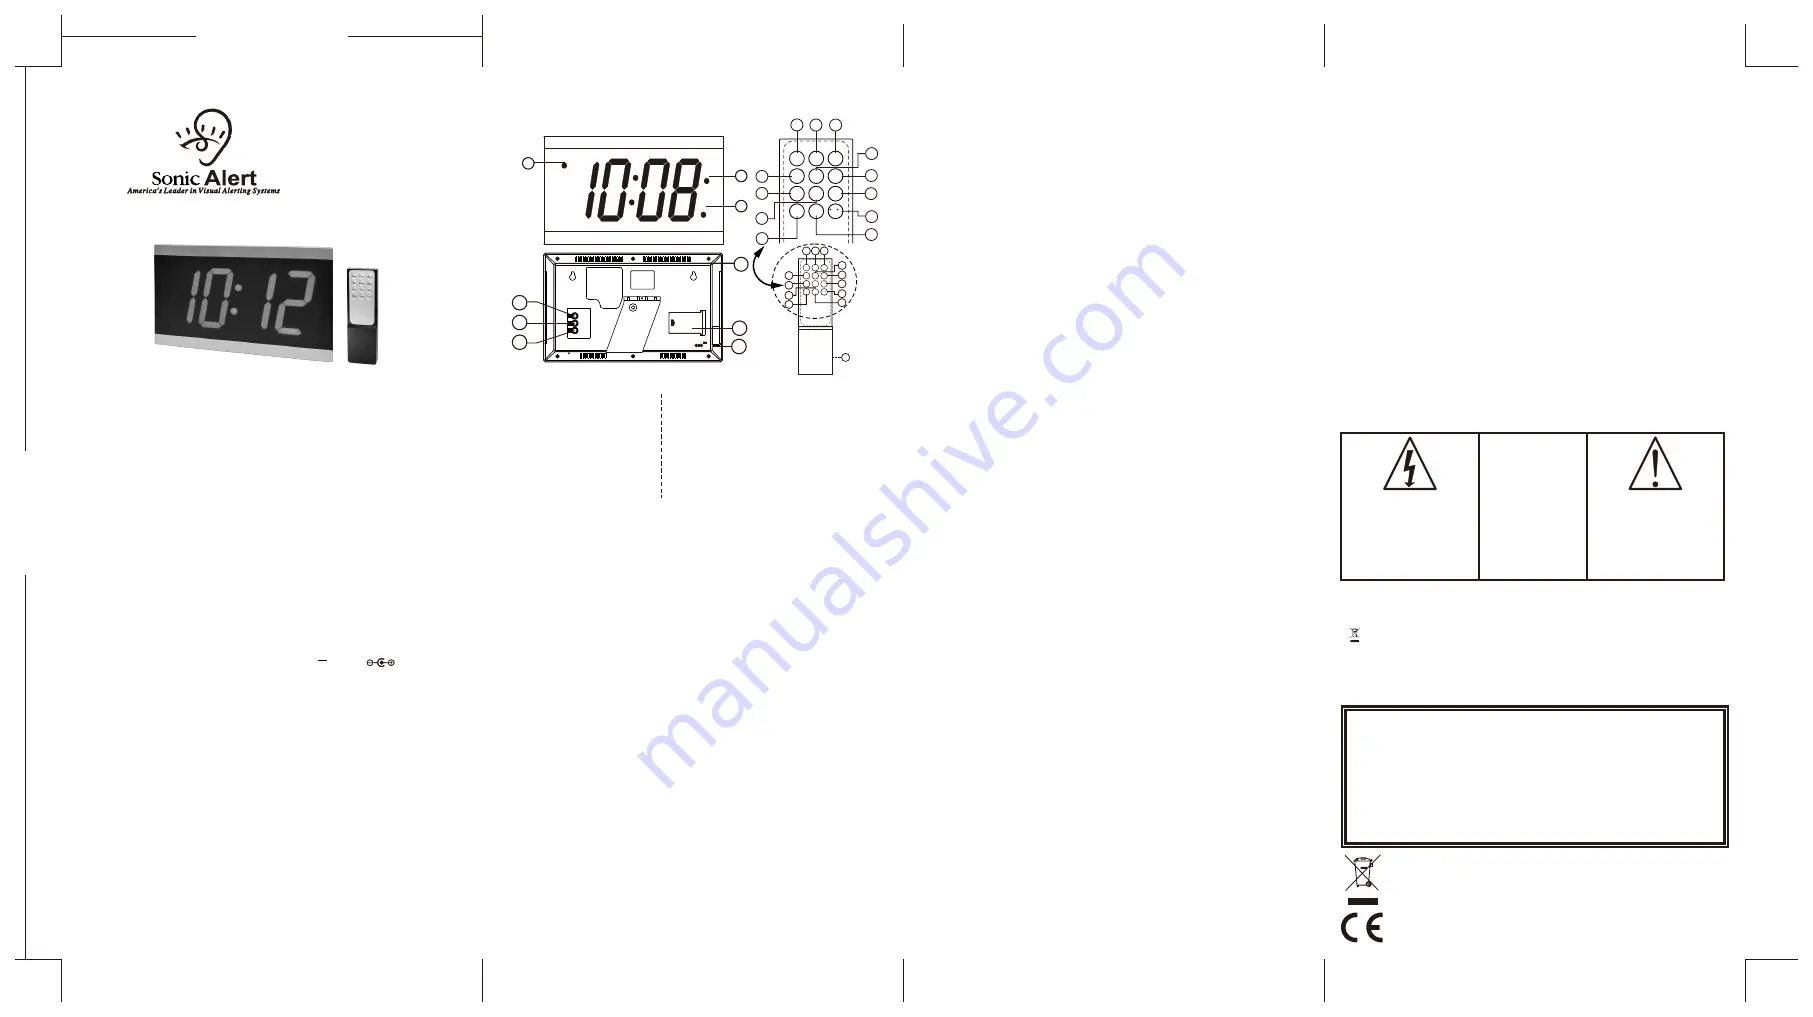
DUAL ALARM WALL CLOCK
MODEL BD4000
For Remote Handset
10. Snooze button
11. Alarm 1 Set
12. Alarm 1 ON/OFF
13. Time Set
14. Alarm 2 Set
15. Alarm 2 ON/OFF
16. DATE
17. UP
18. 12/24 hour
FEATURES
For Clock
1. PM indicator (for 12 Hr mode only)
2. Alarm 1 ON indicator
3. Alarm 2 ON indicator
4. Mode button
5. Up button
6. Down button
7. Battery compartment
8. DC Adaptor Input Socket
9. Mounting Hole
19. Display Mode
20. Down
o
o
21. Temp C / F
22. Battery Compartment
1) Installing the Clock and Remote Control
Please check the mains specification before plugging into the socket. Plug the power adaptor
into the DC input jack (8), then plug the adaptor into the wall socket. The clock digit will flash to
indicate it is working properly.
1.1) Clock DC Backup (Optional)
Insert a 4.5-Volt (3 pcs x AAA size) battery into the Battery Compartment (7). Please make
sure fresh batteries are used (Do not mix new and old batteries). This function prevents the
clock time from being lost due to power failure. (
Note:
The LED display will not show during
power failure but the battery will keep the clock IC running until the power is restored).
1.2) Remote Handset
Insert 3 Volts (2 pcs x AA size) batteries into the Battery Compartment (22). (If the remote
handset is not used for a long time, then it is advisable to remove the batteries.
Using button on the clock
2.1) Setting the Clock
2.1.1 Setting Alarm 1
a) P
ress MODE button (4) to enter the Alarm 1 setting mode. The hour digit and the AL1
indicator (2) will flash, then press UP (5) or DOWN button (6) to adjust the hour.
b) Press the MODE button (4) again to toggle to adjust the minute. The minute digit will flash,
then press UP (5) or DOWN button (6) to adjust the minute.
2.1.2
Setting Alarm 2
a) Follow from above, press MODE button (4) to enter the Alarm 2 setting mode. The hour
digit and the AL2 indicator will flash, MODE button (4), then press UP (5) or DOWN button
(6) to adjust the hour.
b) Press the MODE button (4) again to toggle to adjust the minute. The minute digit will flash,
then press UP (5) or DOWN button (6) to adjust the minute.
2.1.3
Setting Hour Format (12H or 24H)
a) Follow from above, press MODE button (4) to enter the Hour Format setting mode. The
display will show “12H” or “24H”, then press of the UP button (5) to toggle between “12H”
for 12 hour format and “24H” for 24 hour format.
2.1.4
Setting Time
a) Follow from above, press MODE button (4) to enter the TIME setting mode. The hour digit
will flash, then press UP (5) or DOWN button (6) to adjust the hour.
b) Follow from above, press MODE button (4) to enter the Minute setting mode. The minute
digit will flash, then press of the UP (5) or DOWN button (6) to adjust the minute.
2.1.5
Setting Year
a) Follow from above, press of the MODE button (4) to enter the Year setting mode. The Year
digit will flash, then press UP (5) or DOWN button (6) to adjust the Year.
2.1.6
Setting Date Format (Day-Month, or Month-Day)
a) Follow from above, press MODE button (4) to enter the Date Format setting mode. The
display will flash nn dd or dd nn, then press UP button (5) to adjust the Date Format. .
nn=month, dd=day.
2.1.7
Setting Month
a) Follow from above, press MODE button (4) to enter the Month setting mode. The month
digit will flash, then press of the UP (5) or DOWN button (6) to adjust the month.
b) Follow from above, press MODE button (4) to enter the Day setting mode. The day digit
2) Setting the Clock
NOTE: After entered into each setting mode, if no action is taken within 3 seconds
(except setting minute, no action within 60 seconds), it will exit that setting mode and
return normal time mode.
o
o
2.1.8
C or F)
Setting Temperature Unit
(
a) Follow from above, press of the
MODE button (4)
to enter the Temperature Unit setting
o
o
mode. The display will flash, then a short press of the
UP button (5)
to adjust to C or F.
Once all the above setting are completed, the display will return to the show the time.
3) Activating the alarm
There are two ways to activate the alarm, either by using the buttons on the back of the clock or
by using the remote handset.
3.1 Using Buttons on Clock
3.1.1 To turn on Alarm 1, press and hold for 2 seconds the
UP button (17)
the display and the
AL1 dot (2)
will flash to show the alarm time . Press
UP button (17)
to toggle the Alarm 1
ON or OFF. The
AL.1 dot (2)
will light up to indicate alarm 1 is ON.
3.1.2 To turn on Alarm 2, press and hold for 2 seconds the
DOWN button (20)
the display and
the
AL2 dot (3)
will flash to show the alarm time . Press
DOWN button (20)
to toggle the
Alarm 2 ON or OFF. The
AL.2 dot (3)
will light up to indicate alarm 2 is ON.
3.2 Using Remote Handset
3.2.1 To turn on Alarm 1, press and hold for 2 seconds the
AL1 ON/OFF button (12)
the display
and the
AL1 dot (2)
will flash to show the alarm time . Press
AL1 ON/OFF button (12)
to
toggle the Alarm 1 ON or OFF. The
AL.1 dot (2)
will light up to indicate alarm 1 is ON.
3.2.2 To turn on Alarm 2, press and hold for 2 seconds the
AL2 ON/OFF button (15)
the display
and the
AL2 dot (3)
will flash to show the alarm time . Press
AL2 ON/OFF button (15)
to
toggle the Alarm 2 ON or OFF. The
AL.2 dot (3)
will light up to indicate alarm 1 is ON.
NOTE:
Alarm 1 will beep 2 times every second, while Alarm 2 will beep 3 times every second.
4) Stop the Alarm
When the alarm is sounded, the corresponding alarm indicator will flash to indicate that alarm is
active. You can stop the alarm either by using the buttons on the back of the clock or by using
the remote control.
4.1 Using Buttons on clock
Press any key on the back of the clock. The alarm will be stopped permanently for the day.
Using Remote H
andset
Setting Time
2.2.1
a)
SET button (13)
to enter the TIME setting mode. The
Press and hold for 2 seconds the
T.
hour digit will flash, then press
UP (17)
or
DOWN button (20)
to adjust the hour.
b) Follow from above, press
T. SET button (13)
to enter the Minute setting mode. The minute
digit will flash, then press of the
UP (17)
or
DOWN button (20)
to adjust the minute.
2.2.2
Setting Hour Format (12H or 24H)
a)
Press and hold for 2 seconds the
12/24 button (18)
to enter the Hour Format setting mode.
The display will show “12H” or “24H”, then press of the UP button to toggle between “12H”
for 12 hour format and “24H” for 24 hour format.
2.2.3 Setting Year
a) Press and hold for 2 seconds the
DATE button (16)
to enter the Year setting mode. The
Year digit will flash, then press of the
UP (17)
or
DOWN button (20)
to adjust the Year.
2.2.5 Setting Month/ Day
a) Follow from above, press
DATE button (16)
to enter the Month setting mode. The month
digit will flash then press of the
UP (17)
or
DOWN button (20)
to adjust the month.
b) Follow from above, press
DATE button (16)
to enter the Day setting mode. The day digit
will flash then press of the
UP (17)
or
DOWN button (20)
to adjust the day.
o
o
2.2.6 Setting Temperature Unit ( C or F)
o
o
a) Press and hold for 2 seconds the
C/ F button (21)
to enter the Temperature Unit setting
mode. The current displayed temperature will flash, then press of the
UP button (16)
to
o
o
toggle between C or F.
2.2.7 Setting Alarm 1 (AL.1)
a) Press and hold for 2 seconds the
AL.1 SET button (11)
to enter the Alarm 1 setting mode.
The hour digit and the AL1 indicator will flash, then press
UP (16)
or
DOWN button (20)
to
adjust the hour.
b) Follow from above, press the
AL.1 SET button (11)
to toggle to adjust the minute. The
minute digit will flash, then press
UP (17)
or
DOWN button (20)
to adjust the minute.
2.2.8 Setting Alarm 2 (AL.2)
a) Press and hold for 2 seconds the
AL.2 SET button (14)
to enter the Alarm 1 setting mode.
The hour digit and the AL2 indicator will flash, then press
UP (16)
or
DOWN button (20)
to
adjust the hour.
b) Follow from above, press the
AL.2 SET button (14)
to toggle to adjust the minute. The
minute digit will flash, then press
UP (17)
or
DOWN button (20)
to adjust the minute.
2.2.4 Setting Date Format (Day-Month, or Month-Day)
a) Follow from above, press
DATE button (16)
to enter the Date Format setting mode. The
display will flash, nn dd or dd nn, then press
UP button (5)
to adjust the Date format.
(nn=month, dd=day).
GENERAL DATA
Adaptor Input: AC100-240V~ 50/60Hz Output: DC9.5V , 370mA
---
Clock Battery: AAA size (UM4/R03) x 3 pieces
Remote Battery: AA size (UM3/R6) x 2 pieces
English
Model BD4000
.
IMPORTANT
: Please read these instructions carefully before use and retain for future
reference. See operating instructions on back.
- Use only the supplied or recomended Sonic Alert adaptor to connect the unit.
OPERATION INSTRUCTIONS
Sonic Boom Dual Alarm Wall Clock
with Calendar and Temperature
There are two ways to which you can set the time either by the buttons on the back of the clock
or using remote handset.
will flash, then press of the UP (5) or DOWN button (6) to adjust the day.
MAINTENANCE:
Use only damp cloth to clean the lens and the frame. Do not use thinner, alcohol,
or any other cleaning agent to clean the lens or the frame, failure to do so may
results in damage to the coating on the lens or the frame.
5) Snooze
When the alarm is sounded, the corresponding alarm indicator will flash to indicate that alarm is
active. On the remote handset, press
SNOOZE button (10)
the alarm will be turned off for 8-9
minutes for extra sleep. The alarm will come back again after 8-9 minutes. You may repeat this
cycle many times.
6) Dimmer (5 Levels)
In normal Time mode, press the
SNOOZE button (10)
on the remote handset to change the
display brightness. The brightness will cycle from bright to dim then from dim to bright.
7) Display Mode <<6 is the default setting>>
There are six different display mode for the user to select from:
7.1
Press and hold for 2 seconds the
DISPLAY MODE button (19)
to enter the display mode
setting. Press the
UP button (17)
to cycle through the display mode list.
Display Mode List
1) H show just the TIME.
2) d show just the date.
3) 7E show just the temperature.
4) 6 shows the Time for 6 seconds, date for 2 seconds then Time for 6 seconds, Temperature
for 2 seconds.
5) 15 shows the Time for 15 seconds, date for 2 seconds then Time for 15 seconds,
Temperature for 2 seconds.
6) 30 shows the time for 30 seconds, date for 2 seconds then Time for 30 seconds,
Temperature for 2 seconds.
8) Batteries
It is advisable to change the clock batteries every 6 - 9 months for optimal performance. Do not
mix new and old batteries, for best results use Alkaline batteries.
If the remote handset is not used for a long time, then it is advisable to remove the batteries.
9) Wall Mount
This clock can be wall mount by using the mounting holes (9). The hole to hole distance is 200mm.
4.2 Using Remote Control
Press any key on the remote handset. The alarm will be stopped permanently for the day. If
however, when the alarm is sounded and there is no user intervention, the alarm will sound
for 5 minutes and then stopped permanently for the day.
Warning:
To prevent fire or shock hazard do not expose this appliance to rain or moisture.
Before connecting to mains/ power make sure that the requirements specified on
the apparatus corresponds to the available power supply in that country
i.e. AC100-240V~, 50/60 Hz.
- The ventilation should not be impeded by covering the ventilation openings with items
such as, newspaper, table cloth, curtains, etc;
- No naked flame sources, such as lighted candles should be placed on the apparatus.
- It shall not be exposed to dripping or splashing and that no objects filled with liquids, such
as vases, shall be placed on the apparatus.
- Do not place the product in closed bookcases or racks without proper ventilation.
- Where the mains/ power plug is used as the disconnect device, the disconnect device
shall remain readily operable.
- Attention should be drawn to the environmental aspects of battery disposal.
1
3
2
UP
DOWN
SNOOZE
AL1.SET
T.SET
12/24
DISPLAY
MODE
AL1.
ON/OFF
AL2.
ON/OFF
DATE
F/ C
AL2.SET
10 11 12
15
18
14
21
20
13
16
17
19
22
UP
DOWN
SNOOZE
AL1.SET
T.SET
12/24
DISPLAY
MODE
AL1.
ON/OFF
AL2.
ON/OFF
DATE
F/ C
AL2.SET
10
11 12
15
18
14
21
20
13
16
17
19
MODE
UP
DOWN
LR03/AAA/1.5V
LR03/AAA/1.5V
LR03/AAA/1.5V
DC 9.5V
4
5
6
8
7
9
Made in China
093-WC408E-002
06-11-2014
99.00mm
2
1
0
.0
0 m
m