


9
(2) Mudding the Panel (cont.)
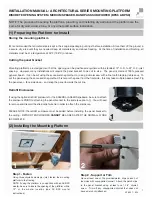
(3) Sanding
Step 1- Sand
Using a sanding pole with a 60 micron
film, sand the drywall and the opening
until the entire perimeter of the sanding
shield is exposed. It is important to use
a firm sanding tool, a sanding sponge
will cause “dishing” around the opening.
Step 2- Check
Check that there is a well defined edge
around the entire perimeter of the
sanding shield and feel the area around
the speaker opening. The sanding shield
should not be raised in comparison to
the surrounding compound. The sanding
shield and drywall compound should be
completely flush and drywall should be
smooth.
Step 3- Pull
Once the sanding is complete, push
firmly on the sanding shield to break any
adhesion to surrounding surfaces. Next,
remove the screw in the center of the
shield. Then remove the shield using a
screw and a pair of pliers or a slotted
screw driver.
Step 5- 3rd & 4th Coat Mud
Continue to build coats three and four in a similar fashion. Build
upon the previous layer and expanding the mud perimeter over
the previous layer’s perimeter. On the 4th and final coat, be sure
to completely cover the sanding shield with mud as
demonstrated above. Allow this coat to dry. This will be the last
and final coat before sanding.
4


