background image

P

reparing the c

a

mera

GB

53

Setting the date and time

When you turn on the camera for the first time or after you initialize the 
functions, the screen to set the date and time appears.

To cancel the date and time setting operation

Press the MENU button.

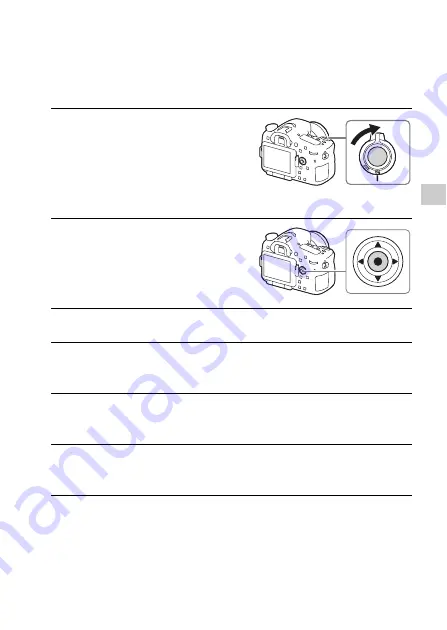
1

Set the power switch to ON to turn 
on the camera.

The screen to set the date and time 
appears.
• To turn the camera off, set the power 

switch to OFF.

2

Check that [Enter] is selected on 
the screen, then press 

z

 on the 

multi-selector.

3

Select a desired geographic location, and then press 

z

.

4

Select a setting item by using 

v

/

V

 on the multi-selector, then 

press 

z

.

5

Select a desired setting by using 

v

/

V

/

b

/

B

 on the multi-

selector, then press 

z

.

6

Repeat steps 4 and 5 to set other items, then select [Enter] and 
press 

z

.

Summary of Contents for alpha 77 ii ILCA-77M2

Page 1: ...4 536 323 11 1 ILCA 77M2 Interchangeable Lens Digital Camera Instruction Manual A mount...

Page 2: ...d below Refer to these numbers whenever you call your Sony dealer regarding this product Model No ILCA 77M2 Serial No To reduce fire or shock hazard do not expose the unit to rain or moisture IMPORTAN...

Page 3: ...Battery charger Use the nearby wall outlet wall socket when using the Charger Disconnect the Charger from the wall outlet wall socket immediately if any malfunction occurs while using the apparatus T...

Page 4: ...sed in accordance with the instructions may cause harmful interference to radio communications However there is no guarantee that interference will not occur in a particular installation If this equip...

Page 5: ...al and electronic equipment applicable in the European Union and other European countries with separate collection systems This symbol on the product the battery or on the packaging indicates that the...

Page 6: ...iled information about recycling of this product or battery please contact your local Civic Office your household waste disposal service or the shop where you purchased the product or battery For Cust...

Page 7: ...t of icons on the display panel 27 Functions list Functions that can be operated using the buttons dials 28 How to use the Quick Navi screen 29 Operating the camera 31 How to use the multi selector 31...

Page 8: ...shutter button 56 Holding the camera properly 56 Removing the Eyepiece cup 57 Shooting and viewing images Shooting still images 58 Recording movies 59 Playing back images 60 Switching between still im...

Page 9: ...Checking the number of images and recordable time of movies 77 Specifications 81 Index 88 For details on Wi Fi functions see the flyer Wi Fi Connection One touch NFC Guide This manual covers several...

Page 10: ...SO sensitivity can be adjusted between ISO 50 and ISO 25600 When you select Multi Frame NR you can select larger ISO numbers than the maximum ISO sensitivity White Balance 36 You can adjust the color...

Page 11: ...ith manual adjustments 63 You can adjust the exposure in P A S or M mode even when shooting movies Display information 38 When you look into the viewfinder the viewfinder mode is activated and when yo...

Page 12: ...r damaged content or recording failure Sony cannot compensate for failure to record or loss or damage of recorded content due to a malfunction of the camera or recording media etc Back up recommendati...

Page 13: ...viduals so you are advised to decide at your own discretion In case you may feel uncomfortable refrain from using the viewfinder until your condition recovers and consult your doctor as necessary Note...

Page 14: ...80 50p supported devices Warning on copyright Television programs films videotapes and other materials may be copyrighted Unauthorized recording of such materials may be contrary to the provisions of...

Page 15: ...he appropriate one that matches your country region Rechargeable battery pack NP FM500H 1 Micro USB cable 1 Shoulder strap 1 For how to attach the shoulder strap to the camera refer to page 20 Body ca...

Page 16: ...ount I Built in flash Press the Flash pop up button to use the flash When not using the flash press it back into the camera body J Microphone K Mode dial lock release button 58 63 L Mode dial 63 M Fla...

Page 17: ...turns to the monitor mode E Diopter adjustment dial Adjust the diopter adjustment dial according to your eyesight until the display appears clearly in the viewfinder F Monitor G Light sensor H MOVIE b...

Page 18: ...to Smartphone by pressing this button When you attach a vertical grip sold separately pressing the Image rotation button on the vertical grip displays the Send to Smartphone screen N DISP Display butt...

Page 19: ...SO button 28 H Display panel illumination button 27 I Image sensor position mark For details on compatible accessories of the Multi interface shoe visit the Sony website in your area or consult your S...

Page 20: ...Flash sync terminal D REMOTE terminal When connecting the RM L1AM Remote Commander sold separately to the camera insert the plug of the Remote Commander into the REMOTE terminal aligning the guide of...

Page 21: ...ar Field Communication is an international standard of short range wireless communication technology K Wi Fi sensor built in L Memory card insertion slot 48 M Memory card cover 48 N Battery insertion...

Page 22: ...scale H Distance index I Focal length scale J Focusing mode switch K Mounting index Do not directly touch this part The DT 16 50mm F2 8 SSM DT 18 135mm F3 5 5 6 SAM are designed for Sony A mount came...

Page 23: ...When you change the DISP Button setting and then press the DISP button the screen status will change to the For viewfinder mode You can also display the histogram by pressing the DISP button Monitor m...

Page 24: ...aining battery 49 Remaining battery warning Flash charge in progress Setting Effect OFF 39 AF Illuminator 36 NFC is activated Airplane Mode No audio recording of movies 38 Wind Noise Reduction 38 Stea...

Page 25: ...izer Auto HDR 36 3 3 3 Creative Style 36 67 Contrast Saturation Sharpness Center Lock on AF 37 Picture Effect 36 Smile detection sensitivity indicator Display Indication z Lock on AF Center Lock on AF...

Page 26: ...List of icons on the monitor GB 26 Auto HDR image warning Picture Effect error 2014 1 1 10 37PM Date of recording 3 7 File number Number of images in the view mode Display Indication...

Page 27: ...e compensation flash compensation ISO sensitivity white balance drive mode and image quality by checking the display panel on the top of the camera Shutter speed 63 Aperture 63 Exposure 36 Flash compe...

Page 28: ...ecords movies AF MF button button Switches the autofocus and manual focus temporarily Scales an image up when viewing images AEL button SLOW SYNC button button Fixes the exposure of the entire screen...

Page 29: ...e is set to For viewfinder Quick Navi 1 MENU button t Custom Settings 2 t DISP Button t Monitor t For viewfinder t Enter 2 Press the DISP button to set the screen mode to For viewfinder 3 Press the Fn...

Page 30: ...an be finely adjusted by turning the rear dial Pressing the center of the multi selector turns on the designated screen used to set up the selected item page 31 Pressing the Fn button again turns off...

Page 31: ...n you use b B on the multi selector in playback mode you can display the previous or next image Standard is assigned to z in the center of the multi selector in the default settings When you press z t...

Page 32: ...3 Select the desired item using v V b B on the multi selector The setting screen appears 4 Select the desired setting by turning the front dial then press z on the multi selector Some setting values...

Page 33: ...can be selected using the Fn button are as follows Functions that can be registered using the Fn Function button Drive Mode Flash Mode Flash Comp Focus Area Exposure Comp ISO Metering Mode White Bala...

Page 34: ...to always display the first screen of the menu when you press the MENU button MENU t Setup 2 t Tile Menu t On 1 Press MENU button to display the menu screen 2 Select the desired setting item using v V...

Page 35: ...FH 50i 17M FH 60p 28M PS 50p 28M PS 24p 24M FX 25p 24M FX 24p 17M FH 25p 17M FH 1440 1080 12M VGA 3M Drive Mode Sets the drive mode such as for continuous shooting Single Shooting Cont Shooting Self t...

Page 36: ...ed aperture and exposure 0 5EV 0 3EV ISO Sets the ISO sensitivity Multi Frame NR ISO AUTO ISO 50 to ISO 25600 Metering Mode Selects the method for measuring brightness Multi Center Spot White Balance...

Page 37: ...n Effect and the effect level On High On Mid On Low Off Auto Obj Framing Analyzes the scene when capturing faces close ups or subjects tracked by Lock on AF function and automatically trims and saves...

Page 38: ...s Off 70 to 100 100 Focus Magnif Time Sets the length of time the image will be shown in an enlarged form 2 Sec 5 Sec No Limit Grid Line Sets a grid line display to enable alignment to a structural ou...

Page 39: ...Switches AF Area Points manually to prevent the points from being set to an unwanted value Auto 61 Points Flexible Spot Points Sets whether to use all the AF Area Points or the central 15 points All...

Page 40: ...he electronic front curtain shutter function On Off Superior Auto Sets the shooting recording procedure in Superior Auto Continuous Shooting Auto Off Image Extraction Auto Off Exp comp set Sets whethe...

Page 41: ...tton Button Center Button You can assign a function to the focus hold button on the lens Dial Setup Sets the functions of the front and rear control dials when the exposure mode is set to M Dials can...

Page 42: ...w Folder View Still Folder View MP4 AVCHD View Image Index Displays multiple images at the same time 9 Images 25 Images Display Rotation Sets the playback direction of the recording image Auto Manual...

Page 43: ...er save mode 30 Min 5 Min 2 Min 1 Min 10 Sec PAL NTSC Selector By changing the TV format of the device shooting in a different movie format is possible Cleaning Mode Starts the cleaning mode to clean...

Page 44: ...nd movies Series Reset Select REC Folder Changes the selected folder for storing images New Folder Creates a new folder for storing still images and movies MP4 Folder Name Sets the folder format for s...

Page 45: ...xplanations for the currently selected menu function or setting 1 Select MENU button t Custom Settings 6 t Custom Key Settings t desired functions assigned to the button t In Camera Guide Press the ME...

Page 46: ...ery pack can be charged even when it has not been fully depleted It can also be used when it has not been fully charged The charged battery pack is discharged little by little even when you do not use...

Page 47: ...fficiently charge the battery pack outside this temperature range Connect the battery charger to the nearest wall outlet wall socket 2 Connect the battery charger to the wall outlet wall socket Light...

Page 48: ...arately 1 While sliding the battery cover open lever open the cover 2 Firmly insert the battery pack all the way while pressing the lock lever with the tip of the battery 3 Close the cover 4 While sli...

Page 49: ...y pack that has functions for exchanging information related to operating conditions with your camera The percentage of the remaining battery life is displayed according to the operating conditions of...

Page 50: ...e not compatible with exFAT Make sure that the device is compatible with exFAT before connecting it to the camera If you connect your camera to an incompatible device you may be prompted to format the...

Page 51: ...r debris from getting inside the camera When shooting remove the front lens cap from the front of the lens 2 Mount the lens by aligning the orange index marks mounting indexes on the lens and camera H...

Page 52: ...Notes on changing the lens When changing the lens if dust or debris gets inside the camera and adheres to the surface of the image sensor the part that converts the light to an electric signal it may...

Page 53: ...N to turn on the camera The screen to set the date and time appears To turn the camera off set the power switch to OFF 2 Check that Enter is selected on the screen then press z on the multi selector 3...

Page 54: ...en discharged To reset the date and time use the menu Maintaining the date and time setting This camera has an internal rechargeable battery for maintaining the date and time and other settings regard...

Page 55: ...ooting still images and shooting movies separately The default setting is On for shooting still images and Off for shooting movies MENU button t Camera Settings 8 t SteadyShot SteadyShot t Select the...

Page 56: ...o Off If you press the shutter button halfway down for a certain period of time the SteadyShot function will be stopped temporarily to save the battery life even when SteadyS w shut is set to On Stabi...

Page 57: ...DA A1AM Angle Finder sold separately is attached to the camera switch the display between the viewfinder and the screen by pressing the FINDER MONITOR button Setting Eye Start AF to Off is recommended...

Page 58: ...inder and hold the camera When using a zoom lens adjust the zoom ring to the proper size of the subject 4 Press the shutter button halfway down to focus When the image is in focus a beep sounds and th...

Page 59: ...the temperature of the camera is too high Turn the camera off and wait until the temperature of the camera decreases When you are recording continuously for a long time you may feel that the camera is...

Page 60: ...on this camera 1 Press the button 2 Select an image by pressing the b B on the multi selector To play back movies press z on the multi selector Control panel Action during movie playback N Playback X...

Page 61: ...Folder View Still and to play back movies set View Mode to Folder View MP4 or AVCHD View When you select Date View both still images and movies will be displayed on the screen sorted by date MENU but...

Page 62: ...delete the image before proceeding Notes Protected images cannot be deleted 1 While displaying the image you want to delete press the Delete button 2 Select Delete with v V on the multi selector then...

Page 63: ...ge or by defocus the background Shutter Priority Adjusts the shutter speed to show the movement of the subject Manual Exposure Allows you to shoot after manually adjusting the exposure the shutter spe...

Page 64: ...tes the function is available and a indicates the function is not available The functions you cannot use are displayed in gray on the screen When the shooting mode is set to M the exposure can be adju...

Page 65: ...unctions the number of focus points will be limited when the following lenses are attached This information is current as of the day the model was released Some of the lenses above are not available i...

Page 66: ...without interference from objects in the background and foreground The AF Range Control function is assigned to the C Custom button in the default settings You can change the button to be assigned to...

Page 67: ...13 styles and you can also adjust the contrast saturation and sharpness for each Creative Style item Creative Style 1 MENU button t Camera Settings 5 t Creative Style 2 Select the desired style using...

Page 68: ...the subject and the background and produces an image with the optimal brightness and gradation Auto HDR Shoots 3 images with different exposures and then overlays the correctly exposed image the brigh...

Page 69: ...s or reduces images Turn the rear dial to magnify or reduce an image Turn the front dial to switch to the next previous image B Image index screen You can select the number of images to be displayed M...

Page 70: ...d NFC One touch functions For details on the Wi Fi and NFC One touch functions refer to the attached document Wi Fi Connection One touch NFC Guide or to the Help Guide page 2 Saving images to a comput...

Page 71: ...the administrator of the access point To save images to a computer install the following dedicated software on your computer When using Windows PlayMemories Home www sony net pm When using Mac Wirele...

Page 72: ...tions to optimize use of the images shot with your camera Image Data Converter PlayMemories Home Remote Camera Control For details on installation see pages 73 to 76 You can find the system requiremen...

Page 73: ...a general file format You can display and compare the RAW images and JPEG images recorded by this camera You can rank images in 5 grades You can apply color labels To use Image Data Converter refer t...

Page 74: ...Online or other network services PlayMemories Online or other network services may not be available in some countries or regions Refer to the following URL for Mac software http www sony co jp imsoft...

Page 75: ...ginal image quality store your movies on a Blu ray Disc Connect the camera to your computer With Remote Camera Control you can Set up the camera or record an image from the computer Record an image di...

Page 76: ...te Camera Control Installing Remote Camera Control 1 Using the Internet browser on your computer go to the following URL Windows http www sony co jp imsoft Win Mac http www sony co jp imsoft Mac 2 Fol...

Page 77: ...he values may vary depending on the shooting conditions and the type of memory card used Image Size L 24M Aspect Ratio 3 2 Memory card formatted with this camera Units Images When Aspect Ratio is set...

Page 78: ...the following conditions CIPA Camera Imaging Products Association Focus mode S Single shot AF Shooting once every 30 seconds The power turns on and off once every ten times The number of minutes for...

Page 79: ...use the camera is equipped with VBR Variable Bit Rate which automatically adjusts image quality depending on the shooting scene When you record a fast moving subject the image is clearer but the recor...

Page 80: ...starts recording until the camera stops recording The duration of time available for movie recording varies with the temperature or condition of the camera before you start recording If you frequently...

Page 81: ...ocus system System TTL phase detection system with center F2 8 sensor 79 points 15 points cross type Sensitivity Range 2 EV to 18 EV at ISO 100 equivalent AF illuminator Approx 1 m to 5 m 3 3 ft to 16...

Page 82: ...0 seconds bulb Movies 1 8 000 second to 1 4 second 1 3 step up to 1 60 second in AUTO mode up to 1 30 second in Auto slow shutter mode Flash sync speed 1 250 second Built In Flash Flash G No GN 12 in...

Page 83: ...s Image zooming playback Scaling range Image size L Approx 1 0 18 8 M Approx 1 0 13 3 S Approx 1 0 9 4 Recording format File format JPEG DCF Ver 2 0 Exif Ver 2 3 MPF Baseline compliant RAW Sony ARW 2...

Page 84: ...PA PSK WPA2 PSK Connection method WPS Wi Fi Protected Setup Manual Access method Infrastructure mode NFC NFC Forum Type 3 Tag compliant Design and specifications are subject to change without notice B...

Page 85: ...oot a subject at infinite distance in MF mode use the viewfinder and set focus On focal length The picture angle of this camera is narrower than that of a 35 mm format camera You can find the approxim...

Page 86: ...y Laboratories The terms HDMI and HDMI High Definition Multimedia Interface and the HDMI Logo are trademarks or registered trademarks of HDMI Licensing LLC in the United States and other countries Win...

Page 87: ...arks of Facebook Inc YouTube and the YouTube logo are trademarks or registered trademarks of Google Inc Eye Fi is a trademark of Eye Fi Inc In addition system and product names used in this manual are...

Page 88: ...justment 17 DISP 38 Display panel 27 Display panel illumination button 27 Drive Mode 35 DRO Auto HDR 68 E Eye sensor 17 F File Format 35 Fn 32 33 Focal length 85 Function button 32 33 H Help Guide 2 I...

Page 89: ...Reducing camera shake 55 Remote Camera Control 75 Remote Commander 20 S Scene Selection 37 Set the clock 53 Shooting 58 Shooting mode 63 Shooting still images 58 Shoulder strap 20 Software 72 Specifi...

Page 90: ...Index GB 90...

Page 91: ...Index Index GB 91...

Page 92: ...2014 Sony Corporation Printed in Thailand Additional information on this product and answers to frequently asked questions can be found at our Customer Support Website...

Reviews: