background image

 SAR-600EH 

Easy 

Start


Chapter 3 – Configuring Your Ethernet Network Card 

3.1 

Configuring Your Ethernet Network card 


Note… 

Proceed with this section ONLY if your computer/notebook is connected to the 
Ethernet Port of your ADSL Router. 

 
The illustrated screen shots serve only as examples. For any dissimilarities, please follow the 
instructions closely as prompted on your Computer. 
 

3.1.1 

For Windows® 98 Second Edition / Windows® Me 

Proceed with the steps below. 

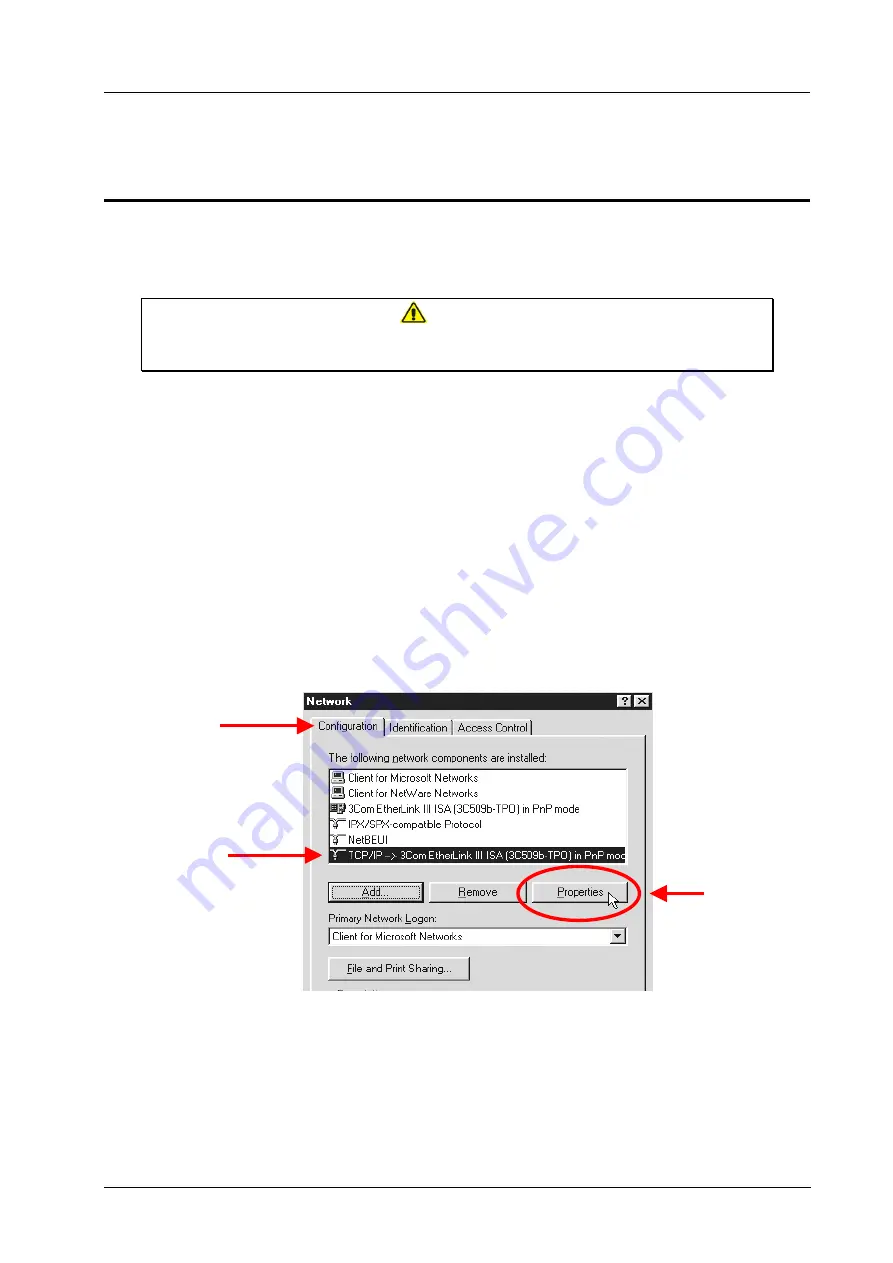
1.  From your Windows desktop, right-click on the 

Network Neighborhood

 icon. Select 

Properties

2. From the 

Configuration tab

, select 

TCP/IP->

 xxx where xxx refers to the model of your 

Ethernet Card that is connected to your ADSL Router. 

3. Click 

Properties

 as show below in 

Fig 1-8


Click 
Here

TCP/IP

Configuration

Figure 1-8 : Network settings


Easy Start 

Page 12 of 12


Summary of Contents for SAR-600EH

Page 1: ...SAR 600EH Easy Start SAR 600EH HomePlug 85Mbps Ethernet USB Combo Router Easy Start Version 1 0 Easy Start Page 1 of 1...

Page 2: ...98 Second Edition Windows Me 12 3 1 2 For Windows 2000 Windows XP 13 Chapter 4 Installing Your USB Driver 15 4 1 Installing the USB Driver for Windows 98 Second Edition 15 4 2 Installing the USB Drive...

Page 3: ...SAR 600EH Easy Start 8 4 PM or Scheduled Maintenance Tasks 27 8 5 PM Tools Test Equipment 27 Easy Start Page 3 of 3...

Page 4: ...ment Make sure equipment is properly grounded BEFORE opening Failure to observe safety precautions may result in electric shock to user CAUTION Check voltages before connecting equipment to power supp...

Page 5: ...nt and fully backward compatible with Homeplug 1 01 Specifications Easy to install and use it plugs straight in to any existing wall electrical socket while having a low power consumption it comes wit...

Page 6: ...et Network Cable 8 POTs Splitter optional Figure 1 1 ADSL HomePlug Ethernet Router Package Depending on your country of purchase your package may or may not come with a POTS Splitter The POTS Splitter...

Page 7: ...on is established Flashes when the router is trying to establish a connection with the ADSL Service Provider 7 INTERNET Lights up when PPP connection is established Lights up when power is supplied to...

Page 8: ...DI MDIX allows either cross or straight cable Ethernet jack RJ 45 to connect to your Ethernet Network card or Ethernet Hub Switch 4 RESET To reset your ADSL Router to factory default settings all cust...

Page 9: ...ok PC Turbo C IP TV Figure 1 4 Typical Router Connection Diagram Note With the Auto MDI MDIX feature both cross and straight UTP cable can be utilized Note If there is no connection link among the Hom...

Page 10: ...ecting to the Ethernet Connect your computer s notebook s to the ADSL Router as illustrated The following illustration shows the connection of a single computer See Fig 1 5 Figure 1 5 Connecting to Et...

Page 11: ...the ADSL Line and Telephone set Figure 1 7 Connection of ADSL Line Telephone set The POTS Splitter with built in Microfilter is a device that allows you to connect both your Telephone cable and Teleph...

Page 12: ...s please follow the instructions closely as prompted on your Computer 3 1 1 For Windows 98 Second Edition Windows Me Proceed with the steps below 1 From your Windows desktop right click on the Network...

Page 13: ...m your Windows desktop right click on the icon My Network Places and select Properties a b a b At the Network and Dial up Connections window right click on the Local Area Connection icon and select Pr...

Page 14: ...one 1 Select Internet Protocol TCP IP and click Properties See Fig 1 10 Ensure that the model is correct Select This Figure 1 10 Local Area Connection properties 2 Select the option Obtain an IP addr...

Page 15: ...N your computer to start the Windows Operating System 2 Insert the Installation CD into your CD ROM Drive 3 At the prompt shown in Fig 1 12 click Next Figure 1 12 Add New Hardware Wizard Prompt 4 Sele...

Page 16: ...may be prompted for your Windows CD ROM during installation At the prompt replace the Installation CD in your CD ROM Drive with your Windows CD ROM and click OK At the Copying Files dialog box enter...

Page 17: ...e Installation CD into your CD ROM Drive 3 At the following prompt select Specify the location of the driver Advanced option and click Next See Fig 1 15 Select This Click Next Figure 1 15 Specifying D...

Page 18: ...r 5 4 3 Installing the USB Driver for Windows 2000 1 Power ON your computer to start the Windows Operating System 2 Place the Installation CD into your CD ROM Drive 3 At the prompt shown in Fig 1 17 c...

Page 19: ...ur driver has a new version 8 Click Yes to proceed with the installation 9 Click Finish when prompted 10 Proceed to Chapter 5 Installing the USB Driver for Windows XP 4 4 1 Power on your computer to s...

Page 20: ...e media 5 You may be prompted with Hardware Installation dialog box This happens when Windows detects your driver as a new version 6 Click Continue Anyway to proceed with the installation See Fig 1 21...

Page 21: ...your computer notebook before 4 Click the LAN Settings button Ensure that your Proxy Server is not enabled 5 Click OK to close the dialog box 6 You may now proceed to Chapter 6 Netscape Navigator 1 Fr...

Page 22: ...92 168 1 1 or login router at the address bar and hit Enter See Fig 1 22 OR Figure 1 22 Loging In Upon successful login this page will be displayed See Fig 1 23 You need to enter the Username Password...

Page 23: ...1 50 for KC line Figure 1 23 Loging In Upon successful connection to the Internet the screen as shown in Fig 1 24 will appear This would show the connection status information Figure 1 24 Status Infor...

Page 24: ...1 26 The local HomePlug MAC address will be shown All HomePlug devices are shipped using HomePlug as a Network Password Enter the new Network Password if you want to change it and click Apply button I...

Page 25: ...This will set the Network Password of the Remote HomePlug to the currently defined Network Password Figure 1 27 Remote HomePlug Scan Network The Scan Network function displays the MAC Addresses of al...

Page 26: ...are tasks to be performed before operation or mission to ensure that the system is operationally ready Check for completeness of the system ensure all equipment and accessories are in place and in goo...

Page 27: ...f faulty cables to the higher maintenance authority for follow up Table 1 1 PM Tasks and Schedule S N FREQUENCY PROCEDURE Monthly a Inspect the equipment for any physical damage or sign of corrosion b...

Reviews: