background image

8

General Safety Instructions (Continued)

CLEANING AND MAINTENANCE


Disconnect: 

Make sure the appliance is disconnected 

from the power supply when it will not be used for a 
long time and before carrying out any cleaning  
or maintenance.


Service and repair:

 The Microwave has no  

user-serviceable parts contained inside. Do not 
attempt to disassemble, modify or conduct repairs on 
this unit. It has been built in accordance with relevant 
safety and performance standards. An electrical 
specialist must carry out all repairs. Contact our after 
sales support line for advice on service.


Clean the cavity of the oven after using with a slightly 
damp cloth.


Clean the accessories in the usual way in soapy water.


The door frame and seal and neighbouring parts  
must be cleaned carefully with a damp cloth when 
they are dirty.


Do not use harsh abrasive cleaners or sharp metal 
scrapers to clean the oven door glass since they can 
scratch the surface, which may result in shattering of 
the glass.


Cleaning Tip:

 For easier cleaning of the cavity walls 

that the food cooked can touch: Place half a lemon in 
a bowl, add 300ml (1/2 pint) water and heat on 100% 
microwave power for 10 minutes. Wipe the oven clean 
using a soft, dry cloth.

UTENSILS

CAUTION: Personal Injury Hazard


It is hazardous for anyone other than a competent person 
to carry out any service or repair operation that involves 
the removal of a cover which gives protection against 
exposure to microwave energy.

See the instructions on “Materials you can use in your 
microwave oven” or “Materials to be avoided in your 
microwave oven.” There may be certain non-metallic 
utensils that are not safe to use for microwaving. If in 
doubt, you can test the utensil in question following the 
procedure below:

Utensil Test:


Fill a microwave-safe container with 1 cup of cold 
water (250ml) along with the utensil in question.


Cook on maximum power for 1 minute.


Carefully feel the utensil. If the empty utensil is warm, 
do not use it for microwave cooking.


Do not exceed 1 minute cooking time.

Summary of Contents for GGSOMW20B

Page 1: ...E S S E N T I A L S F O R L I F E User Manual MODEL GGSOMW20B GGSOMW20W V 1 0 0920 Microwave...

Page 2: ...he following information which can be found on the rating plate and the date of purchase which can be found on your sales invoice STORE DETAILS STORE NAME ADDRESS TELEPHONE PURCHASE DATE PRODUCT DETAI...

Page 3: ...and importantly taking care of your appliance when cleaning our Support Team are here to help You can use our online Support Centre at anytime by visiting http support residentiagroup com au or you c...

Page 4: ...4 This page is intentionally left blank...

Page 5: ...ing Guide 18 Technical Specifications 19 Your Receipt 20 Warranty Information S lt recommends the use of original spare parts When contacting our customer service team please ensure that you have the...

Page 6: ...children unless they are older than 8 and supervised Children less than 8 years of age shall be kept away unless continuously supervised Keep the appliance and its cord out of reach of children less t...

Page 7: ...ing The rear surface of appliances shall be placed against a wall INSTALLATION SAFETY WARNINGS DANGER Electric Shock Hazard Touching some of the internal components can cause serious personal injury o...

Page 8: ...they can scratch the surface which may result in shattering of the glass Cleaning Tip For easier cleaning of the cavity walls that the food cooked can touch Place half a lemon in a bowl add 300ml 1 2...

Page 9: ...plattering or a wrap for steaming Plastic Microwave safe only Follow the manufacturer s instructions Should be labeled Microwave Safe Some plastic containers soften as the food inside gets hot Boiling...

Page 10: ...rowave Remove the microwave oven and all materials from the packaging and oven cavity Your microwave oven comes with the following accessories 1 Glass Tray 1 Turntable ring assembly 1 Instruction Manu...

Page 11: ...t a wall Leave a minimum clearance of 30cm above the oven a minimum clearance of 20cm is required between the oven and any adjacent walls Do not remove the legs from the bottom of the oven Blocking th...

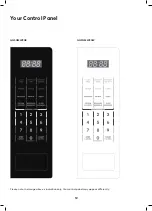
Page 12: ...12 GGSOMW20B GGSOMW20W Please note the image above is indicative only Your control panel may appear differently Your Control Panel...

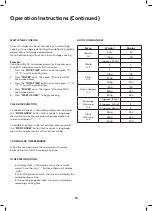
Page 13: ...ock is set the screen will display the current time Note The kitchen timer is different from 24 hour clock system the time is a Kitchen Timer During kitchen timer no programs can be set MICROWAVE COOK...

Page 14: ...r level 3 30 microwave power If you want to change the power level press POWER once and the screen will display PL 3 then press the number pad of the power level you want Press START 30 SEC to begin d...

Page 15: ...The screen will display 1 2 3 If the procedure has been set press the START 30 SEC button to use it If not continue to set the procedure Only one or two stages can be set After you finish confirming...

Page 16: ...t will sound as the unit enters child lock mode The screen will display To disable child lock in the locked state press and hold the STOP CANCEL button for 3 seconds A long beep alert will sound as th...

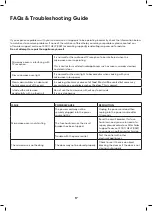
Page 17: ...of the vents In cooking steam may come out of food Most will be vented but some may accumulate on a cool place such as the door This is normal I started the microwave accidentally with no food in it...

Page 18: ...tal effect on the environment and human health if disposed of inappropriately Observe any local regulations regarding the disposal of electrical consumer goods and dispose of it appropriately for recy...

Page 19: ...19 Attach your receipt to this page...

Page 20: ...air an Appliance during the Warranty Period g Warranty Period means i where the Appliance is used for personal domestic or household use i e normal single family use as set out in the instruction manu...

Page 21: ...nce was serviced or repaired by anyone other than Residentia Group an authorised repairer or ASR 8 This warranty the contract to which it relates and the relationship between you and Residentia Group...

Page 22: ...22 This page is intentionally left blank...
Page 23: ...23 This page is intentionally left blank...
Page 24: ...T 1300 11 4357 E support residentiagroup com au E S S E N T I A L S F O R L I F E An initiative by Residentia Group www solt house...

Reviews: