


4
© 2012 Observint Technologies, Inc. All rights reserved.
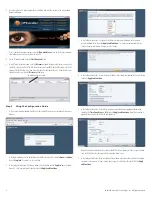
Discover method
1. After logging into the NVR as an administrator, click the
Settings
option in the header of the screen.
2. In the right pane, click the
Add New
button to open the drop down list, then click
Discover
.
3. On the following screen, click the
Start Discover
button in the page header.
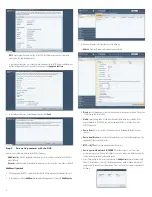
4. For each camera discovered on the network, check the select box to the left of the IP address,
then enter the appropriate information required in the configuration menu as described above.
IMPORTANT
: If the device is password protected, click the checkbox (see below), then scroll down
to enter the
username
and
password
information required.
5. For each camera discovered on the network that you want to add to the NVR system, check the select
box to the left of the IP address, then click the
Add Selected Devices
button in the lower right
corner. If an addition was successful, the following pop-up window will open and a dot will appear
under the device name as shown below. If it was not successful, an error expression will be shown.
6. After a camera is added to the NVR, it appears in the
Settings
|
Devices
|
Device Status
tab.
Verify that all
Status
indication for each is
OK
.
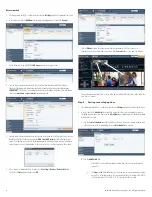
7. Click the
Video
button in the header to return to the video display. Verify that you can see a
thumbnail-sized video stream from your camera in the
Camera List
near the top of the window.
To see and expanded view of a camera, drag and drop the thumbnail for the camera into a cell in the
View frame. See above.
Step 5. Setting recording options
1. After logging into the NVR as an administrator, click the
Settings
option in the header of the screen.
2. In the left pane, click
Schedules
to establish the weekly time frame when recording can occur. In
the following example, a time frame named
My schedule
was added to pre-set schedules included
by default in the system.
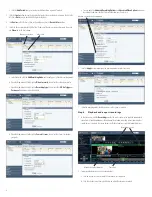
a. Click the
Create Schedule
icon at the top of the right frame, then enter a unique schedule name
in the entry field. In the example below, the name
My schedule
was entered.
b. Click the
Add Period
icon.
i.
Click In the Day entry field twice to open a drop-down list, then select the option
you prefer.
ii.
The
From
and
To
fields define the start time and end time when recording will occur
on the “Day” selected previously. The To and From fields are in the format HH:MM:SS
in 24-hour notation (00:00:00 to 23:59:59). Edit these fields as needed.


