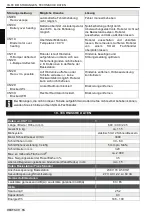
background image

START-UP 

 ENGLISH  


8. START-UP 


Preparation 

Before starting to operate the evo

CUT

 4.0, place it 

in its starting position in the defined mowing area 
(

Fig. 8 - 

3). 

Comply with the specified dimensions. 

Switching on 


Status display 
 

x

  Switch on the evo

CUT

 4.0 by pressing the [ON/ 

OFF key] (

Fig. 3 

- 7). 

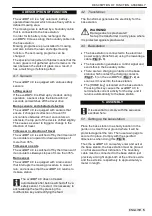
The LCD display (

Fig. 3 

1) then shows the 

illustrated information. 

Language selection 


The corresponding language only needs to be 
selected here during the initial start-up. 

x

  Use the [ arrow keys ] (

Fig. 3 

- 3) to select the 

required language. 

x

  Confirm with the [multifunction key] (

Fig. 3 

- 5). 

After confirming, the LCD display (

Fig. 3 

1) 

shows [Enter registration PIN]. 

Entering the factory-set PIN code 

The factory-set PIN code only needs to be entered 
during the initial start-up. The factory-set PIN code 
is [0000]. 


x

  Use the corresponding [arrow keys] (

Fig. 3 

- 3) 

to select the corresponding digits and confirm 
each one with the [multifunction key]  
(

Fig. 3 

- 5). 

x

  Enter the next 3 required digits in the same 

way. 

Following this, the LCD display (

Fig. 3 

1) shows 

the [Change PIN] dialogue box. 


Changing the PIN code 

Enter a new PIN and repeat. 

After this, the LCD display (

Fig. 3 

1) shows the 

[Date dialogue box]. 

Setting or changing the date 

Enter the date and time correctly, because further 
programming depends on the date and time. 


x

  Use the corresponding [arrow keys] (

Fig. 3 

- 3) 

to select the corresponding digits and confirm 
each one with the [multifunction key] (

Fig. 3 

- 5) 

After confirming, the LCD display (

Fig. 3 

1) shows 

[Time dialogue box]. 

When entering the year (YYYY), it is only 
necessary to enter the last two digits 
because the first two 20XX are preset. 

Setting or changing the time 


x

  Use the corresponding [arrow keys] (

Fig. 3 

- 3) 

to select the corresponding digits and confirm 
each one with the [multifunction key] (

Fig. 3 

- 5). 

Following this, the LCD display (

Fig. 3 

1) shows 

the [Uncalibrated] status window. 

Calibration 

For calibration, set up the evo

CUT

 4.0 accordingly 

(

Fig. 8 - 

3) 


x

  The automatic calibration procedure starts when 

the [START key] (

Fig. 3 

- 4) is pressed. 

The [Drive starting] warning flashes on the LCD 
display (

Fig. 3 

1). 

CAUTION!


The drive starts when the [START key] is 
pressed. 

Do not reach into rotating parts. 

SOLO 

EVOCUT 4.0 

Software  #  

xxxxx 

Serial number  

xxxxx 

[     Select language   ] 

* English 

   Deutsch 


Confirm 

[         Registration  

Enter PIN 

**** 


Confirm 

[     Enter the date  

DD.MM.YYYY 

01 .01. 2013 


Confirm 

[     Enter time  

24 hour format 

07:00 

Abort 


Confirm 

07.06.2013 

09:07 

! Warning ! 

Drive starts 

Charge 79% 

Summary of Contents for evoCUT 4.0

Page 1: ... Sicherheitsvorschriften Important Read this instruction manual carefully before first operation and strictly observe the safety regulations Attention Lire attentivement ce manuel avant la première mise en service et observer absolument les prescriptions de sécurité Attenzione Prima della prima messa in funzione leggere a fondo le presenti istruzioni per l uso e osservare assolutamente le norme di...

Page 2: ...Fig 1 Fig 2 ...

Page 3: ...Fig 3 Fig 4 Fig 5 ...

Page 4: ...Fig 6 Fig 7 Fig 8 ...

Page 5: ...Fig 10 Fig 9 ...

Page 6: ... zu entsorgen Im Interesse der ständigen Weiterentwicklung unserer Geräte müssen wir uns Änderungen des Lieferumfangs in Form Technik und Ausstattung vorbehalten Wir bitten auch um Verständnis dass aus Angaben und Abbildungen dieser Anleitung keine Ansprüche abgeleitet werden können Symbole Folgende Symbole werden am Gerät und in dieser Gebrauchsanweisung verwendet Vor Inbetriebnahme und vor allen...

Page 7: ...chließen 6 5 4 Basisstation öffnen 6 6 BEDIENPANEEL 7 7 PIN UND PUK CODE 7 8 INBETRIEBNAHME 8 9 ÜBERSICHT HAUPTMENÜ 9 10 WOCHENPROGRAMM EINSTELLEN 10 10 1 Mähzeiten programmieren 10 10 2 Einstiegspunkte einstellen 11 11 EINSTELLMENÜ 11 12 INFORMATIONSMENÜ 12 13 TIPPS ZUM MÄHEN 12 14 AKKU 12 15 TRANSPORT 12 16 WARTUNG 13 16 1 Reinigen 13 16 2 Chassis reinigen 13 16 3 Kontakte prüfen 13 16 4 Freilau...

Page 8: ...aues Befolgen dieser Warnhinweise kann Personen und oder Sachschäden vermeiden 1 2 Sicherheits und Schutzeinrichtungen x Sicherheitseinrichtungen dürfen nicht umgangen manipuliert oder entfernt werden Nichtbeachtung kann die eigene Gesundheit und die anderer Personen gefährden x Zur Vermeidung eines unbeabsichtigten bzw unbefugten Einschaltens ist der evoCUT 4 0 durch einen PIN Code geschützt x De...

Page 9: ...Regensensor Der evoCUT 4 0 ist mit einem Regensensor ausgestattet der bei Regen den Mähvor gang unterbricht und dafür sorgt dass der evoCUT 4 0 in die Basisstation zurück fährt Der evoCUT 4 0 läuft nach dem Abschalten durch einen Sicherheitssensor nicht automatisch wieder an Zur Wiederinbetriebnahme den Fehler durch Drücken der Multifunktionstaste quittieren und beheben 4 2 Transformator Der Trans...

Page 10: ...herum sind die Abstände wie in der Grafik Fig 8 dargestellt einzuhalten Bei einem Abstand von 0 cm zwischen den Kabeln kann das Kabel überfahren werden In den meisten Fällen die beste Lösung Ab einem Abstand von mindestens 30 cm erkennt der evoCUT 4 0 den Abstand als Weg und fährt um das Hindernis herum Bei Verlegung des Begrenzungskabels in Durchgängen Fig 8 4 sind zur einwandfreien Funktion des ...

Page 11: ...n Deaktivieren Speichern Confirm 6 Multifunktionstaste links Abbruch Zurück Menü schließen Bei der Eingabe von Werten einen Wert zurückgehen 7 Mit der ON OFF Taste wird der evoCUT 4 0 ein bzw ausgeschaltet 8 Mit der Menü Taste ist ein schnelles Zurückspringen zum Hauptmenü von jedem Untermenü aus möglich 9 Mit der HOME Taste wird der aktuelle Mähvorgang abgebrochen Der evoCUT 4 0 fährt in die Basi...

Page 12: ...erholen Danach erscheint im LCD Display Fig 3 1 das Eingabefenster Datum Datum einstellen oder ändern Datum und Uhrzeit korrekt eingeben da weitere Programmierungen davon abhängig sind x Mit entsprechenden Pfeiltasten Fig 3 3 gewünschte Ziffern anwählen und jeweils mit Multifunktionstaste Fig 3 5 bestätigen Nach dem Bestätigen wird im LCD Display Fig 3 1 das Eingabefenster Uhrzeit angezeigt Bei de...

Page 13: ...etriebnahme kann mit dem evoCUT 4 0 mit den werksseitig voreingestell ten Mähzeiten ohne weitere Programmierung ge mäht werden Folgende Mähzeiten sind werkseitig eingestellt Mo Fr 07 00 10 00 Uhr und Mo Fr 17 00 bis 19 00 Uhr x Landesspezifische Bestimmungen für die Betriebszeiten beachten 9 ÜBERSICHT HAUPTMENÜ Folgenden Menüpunkte können ausgewählt werden Hauptmenü Programme Wochenprogramm Einsti...

Page 14: ..._____________ _________________ In diesem Zeitfenster startet das Mähprogramm mit einmaligem Randmähen im Anschluss wird die Fläche gemäht In diesem Zeitfenster startet das Mähprogramm ohne Randmähen es wird direkt mit dem Flächenmähen begonnen In diesem Zeitfenster soll kein Mähprogramm aktiv sein 4 08 15 Beispiel _________ Mähprogramm startet um diese Zeit 5 09 45 Beispiel __________ Mähprogramm...

Page 15: ...riebnahme Schnitthöhe einstellen x Schnitthöhe einstellen auswählen x Schnitthöhe mit Pfeiltasten in 5 mm Schritten einstellen und mit der Multifunktionstaste rechts bestätigen x Entsprechende Auswahl mit der Menütaste bestätigen und Rükkehr ins Hauptmenü Erst wenn der evoCUT 4 0 zu mähen beginnt stellt sich der Messerteller auf die eingestellte Schnitthöhe ein Die Schnitthöhe bewegt sich im Berei...

Page 16: ...0 regelmäßig geladen x Bei Akkuladung 0 fährt der evoCUT 4 0 selbstständig in die Basisstation und lädt den Akku Eine Unterbrechung des Ladens beschädigt den Akku nicht x Die Basisstation ist mit einer Überwachungselektronik ausgestattet Diese beendet bei Erreichen von 100 Ladestatus automatisch den Ladevorgang x Der Akkustatus wird im Display angezeigt x Auf ausreichenden Kontakt der Ladekontakte...

Page 17: ...h mit einem Handbesen oder Lappen reinigen x Freien Lauf und Lenkbarkeit der Rollen Fig 9 1 prüfen Bewegen sich die Rollen nicht frei müssen diese gangbar gemacht oder ausgetauscht werden 16 5 Basisstation prüfen x Netzstecker des Transformators ziehen x Kontakte Fig 7 1 an der Basisstation auf Verschmutzung prüfen und ggf mit einem Lappen reinigen 17 REPARATUR Reparaturarbeiten dürfen nur kompete...

Page 18: ...sind möglich danach muss ein PUK Code eingegeben werden Das Mähergebnis ist ungleichmäßig Arbeitszeit des Roboters ist zu kurz Längere Arbeitszeiten programmieren Mähbereich zu groß Mähbereich verkleinern Das Verhältnis Schnitthöhe zum hohen Gras stimmt nicht Schnitthöhe höher einstellen danach zur gewünschten Höhe stufenweise absenken Die Schneidemesser sind stumpf Schneidemesser austauschen oder...

Page 19: ...ed robot Roboter hat Feld verlassen Schleifenverlegung kontrollieren Kurven Hindernisse etc CN012 Cal no loop CN015 Cal outside Fehler während Kalibrierung Roboter konnte Schleife nicht finden x Roboter senkrecht zur Schleife aufstellen Roboter muss Schleife überfahren können x Versorgung Basisstation kontrollieren x Schleife kontrollieren x Trafo aus und einstecken x Schleifenkabel gekreuzt CN018...

Page 20: ...eife verlassen keine Rückwärtsfahrt möglich Roboter kann sich nicht befreien Hindernis entfernen Hüllenauslenkung kontrollieren CN129 Blocked WL Linker Radmotor blockiert Blockierung entfernen CN130 Blocked WR Rechter Radmotor blockiert Blockierung entfernen Bei Störungen die nicht in dieser Tabelle aufgeführt sind oder die Sie nicht selbst beheben können wenden Sie sich bitte an Ihren SOLO Fachhä...

Page 21: ... Die Garantie erlischt bei x eigenmächtigen Reparaturversuchen x eigenmächtigen technischen Veränderungen x nicht bestimmungsgemäßer Verwendung Von der Garantie ausgeschlossen sind x Lackschäden die auf normale Abnutzung zurückzuführen sind x Verschleißteile wie Schneidmesser Räummesser und Messerteller Die Garantiezeit beginnt mit dem Kauf durch den ersten Endabnehmer Maßgebend ist das Datum auf ...

Page 22: ... In the best interest of continued technological progress we reserve the right to change the design and configuration of any product without prior notice For that reason no claims can be accepted with reference to text and illustrations in this manual Symbols The following symbols are used in this manual and on the product Thoroughly read these operating instructions before undertaking any mainten...

Page 23: ...the transformer 6 5 4 Opening the base station 6 6 CONTROL PANEL 7 7 PIN AND PUK CODE 7 8 START UP 8 9 OVERVIEW OF MAIN MENU 9 10 SETTING THE WEEK PROGRAM 10 10 1 Setting entry points 11 11 SETTING MENU 11 12 INFORMATION MENU 12 13 MOWING TIPS 12 14 BATTERY 12 15 TRANSPORT 12 16 MAINTENANCE 13 16 1 Cleaning 13 16 2 Checking contacts 13 16 3 Check the rollers can move freely 13 16 4 Checking the ba...

Page 24: ...RNING Following these warning instructions can help to avoid personal injuries and or damage to property 1 2 Safety and protective devices x Safety devices are not allowed to be bypassed manipulated or removed Non observance can endanger your own health and other persons x The evoCUT 4 0 is protected by a PIN code in order to prevent it from being switched on inadvertently or without authorisation...

Page 25: ...ain sensor that interrupts the mowing procedure in case of rain and ensures that the evoCUT 4 0 returns to its base station The evoCUT 4 0 does not restart automatically after being switched off by a safety sensor To restart it is necessary to acknowledge the fault by pressing the multifunction key and rectifying the fault 4 2 Transformer The transformer generates the electricity for the base stat...

Page 26: ...If there is a distance of 0 cm between the cables it is possible for the cable to be driven over In most cases the best solution When the distance is at least 30 cm the evoCUT 4 0 interprets the distance as a path and moves around the obstacle When laying the boundary cable in walkways Fig 8 4 it is necessary to maintain the minimum distances from obstacles and the minimum passage width specified ...

Page 27: ...e confirm 6 Multifunction key left Cancel Back close menu when entering values go one value back 7 The ON OFF key is used for switching the evoCUT 4 0 on or off 8 The menu key can be used for jumping back to the main menu from any submenu 9 The HOME key cancels the current mowing procedure The evoCUT 4 0 moves to its base station The evoCUT 4 0 starts on the next day with the next mowing window 7 ...

Page 28: ...the LCD display Fig 3 1 shows the Date dialogue box Setting or changing the date Enter the date and time correctly because further programming depends on the date and time x Use the corresponding arrow keys Fig 3 3 to select the corresponding digits and confirm each one with the multifunction key Fig 3 5 After confirming the LCD display Fig 3 1 shows Time dialogue box When entering the year YYYY i...

Page 29: ... battery is charged After calibration has been completed the evoCUT 4 0 can be used for mowing with the factory set mowing times without further programming The following mowing times are factory set Mon Fri 07 00 10 00 and Mon Fri 17 00 19 00 x Observe local ordinances regarding operating times 9 OVERVIEW OF MAIN MENU The following menu items can be selected Mainmenu Programs Week program Entry p...

Page 30: ... and confirm with the multifunction key right Fig 3 5 x Press the down arrow key Fig 3 3 until Change is active x Select the required menu item with the corresponding arrow key Fig 3 3 and confirm with the multifunction key right Fig 3 5 Explanation of symbols 1 Menu item All days 2 Menu item Day of week 3 Mowing window deactivated R Edge mowing The evoCUT 4 0 mows on the right along the boundary ...

Page 31: ...x Select Setting the cutting height x Select Cutting height with the arrow keys in 5 mm steps and confirm with the multifunction key right x Confirm the selection with the menu key and return to the main menu The blade plate does not move to the set cutting height until the evoCUT 4 0 starts to mow The cutting height varies in the range from 3 6 cm lawn height It can be adjusted in five steps of 5...

Page 32: ... does not damage the battery x The base station is equipped with an electronic control unit with a monitoring function This automatically terminates the charging procedure when a 100 charge status is reached x The battery status is shown on the display x Make sure the charging contacts Fig 7 1 of the base station have adequate contact with the contact surfaces Fig 7 2 on the evoCUT 4 0 x The tempe...

Page 33: ...h a hand brush or cloth x Check the rollers Fig 9 1 can move and steer freely If the rollers do not move freely they must be freed up or renewed 16 4 Checking the base station x Disconnect the mains plug on the transformer x Check the contacts Fig 7 1 on the base station for contamination and clean using a cloth if necessary 17 REPAIR Repair work is only allowed to be carried out by expert worksho...

Page 34: ...rrectly Enter correct PIN code Three attempts are allowed after which a PUK code must be entered Mowing result is uneven Working time of automatic lawnmower is too short Programme longer working times Mowing area too big Reduce mowing area Ratio of cut height to tall grass is incorrect Set cutting height taller then reduce in stages to required height Cutting blades are blunt Renew cutting blades ...

Page 35: ...ower has left field Check routing of loop curves obstacles etc CN012 Cal no loop CN015 Cal outside Fault during calibration automatic lawnmower could not find loop x Place automatic lawnmower at right angles to loop automatic lawnmower must be able to drive over loop x Check base station power supply x Check loop x Disconnect and reconnect transformer x Loop cable crossed over CN018 Cal Collision ...

Page 36: ...station Remove obstacle and acknowledge fault message CN128 Recov Im possible Obstacle encountered or outside loop reversing not possible automatic lawnmower cannot free itself Remove obstacle check cover deflection CN129 Blocked WL Left wheel motor blocked Remove blockage CN130 Blocked WR Right wheel motor blocked Remove blockage 19 TECHNICAL DATA Data evoCUT 4 0 Length width height in mm 600 490...

Page 37: ...cement parts have been used The warranty is no longer valid if x The equipment has been tampered with x Technical modifications have been made x The equipment was not used for its intended purpose The following are not covered by warranty x Paint damage due to normal wear x Wear parts like cutting blade clearer blade and blade plate The warranty period begins on the purchase by the first end user ...

Page 38: ...forme que la technologie et l équipement Les données et illustrations contenues dans les présentes instructions n ouvrent aucun droit à des prétentions quelconques merci de votre compréhension Symboles Lors de la lecture de la notice vous trouverez les symboles suivants Lire attentivement les instructions d utilisation avant la mise en service et toute opération de maintenance de montage et de net...

Page 39: ...ion de base 6 6 PANNEAU DE COMMANDE 7 7 CODES PIN ET PUK 7 8 MISE EN SERVICE 8 9 APERÇU MENU PRINCIPAL 9 10 RÉGLAGE DU PROGRAMME HEBDOMADAIRE 10 10 1 Réglage des points d entrée 11 11 MENU DE RÉGLAGE 11 12 MENU D INFORMATION 12 13 CONSEILS POUR LA TONTE 12 14 BATTERIE 12 15 TRANSPORT 12 16 ENTRETIEN 13 16 1 Nettoyage 13 16 2 Vérification des contacts 13 16 3 Vérification du bon fonctionnement des ...

Page 40: ...er à la lettre ces instructions de sécurité peut éviter les dommages corporels et ou matériel 1 2 Dispositifs de sécurité et de protection x Les dispositifs de sécurité ne peuvent être court circuités manipulés ou retirés Le nonrespect des consignes est dangereux pour votre propre santé ainsi que pour celles des autres personnes x Pour éviter une mise en service accidentelle ou non autorisée le ev...

Page 41: ...s hors service par l intermédiaire du capteur d inclinaison Capteur d inclinaison latérale En cas d inclinaison latérale de plus de 35 le evoCUT 4 0 est mis hors service par l intermédiaire du capteur d inclinaison Détecteur de pluie Le evoCUT 4 0 est équipé d un capteur de pluie qui interrompt le processus de tonte en cas de pluie et fait remonter le evoCUT 4 0 à la station de base Le evoCUT 4 0 ...

Page 42: ...cles lors de l installation du câble Si aucune distance n est prévue pour l installation du câble il existe un risque d écrasement de ce dernier La meilleure solution dans la plupart des cas Le evoCUT 4 0 détecte la distance à parcourir ainsi que les obstacles à partir d une distance minimale de 30 cm Afin de garantir un fonctionnement impeccable du evoCUT 4 0 il convient lors de l installation du...

Page 43: ... Touche multifonction de gauche Interruption Retour fermer le menu lors de la saisie de données reculer d une valeur 7 La touche ON OFF permet de mettre le evoCUT 4 0 en service ou hors service 8 A l aide de la touche menu il est possible de passer rapidement au menu principal à partir de n importe quel sous menu 9 La touche HOME permet d arrêter le processus de tonte actuel Le evoCUT 4 0 rejoint ...

Page 44: ... PIN et le répéter La fenêtre de saisie Date apparaît ensuite dans l afficheur LCD Fig 3 1 Réglage modification de la date Saisir correctement la date et l heure car les programmations ultérieures en dépendent x Sélectionner les chiffres souhaités à l aide des touches fléchées correspondantes Fig 3 3 et valider à l aide de la touche multifonction Fig 3 5 Une fois la saisie de la date confirmée la ...

Page 45: ... 0 peut tondre selon les heures de tonte préréglées en usine sans autre programmation Les heures de tonte suivantes sont réglées en usine Lun ven 07h00 10h00 et lun ven 17h00 à 19h00 x Respecter les dispositions nationales concernant les horaires d utilisation 9 APERÇU MENU PRINCIPAL Les éléments de menu suivants peuvent être sélectionnés Menu principal Programmes Programme hebdomadaire Points d e...

Page 46: ... 3 3 adaptée et valider à l aide de la touche multifonction de droite Fig 3 5 x Presser la touche fléchée Fig 3 3 vers le bas jusqu à ce que modifier soit actif x Sélectionner l élément de menu à l aide de la touche fléchée Fig 3 3 adaptée et valider à l aide de la touche multifonction de droite Fig 3 5 Légende 1 Élément de menu Tous les jours 2 Élément de menu Jour de la semaine 3 Fenêtre de tont...

Page 47: ...ts de départ sont automatiquement répartis sur la longueur de façon régulière x Les points d entrée peuvent être ajustés manuellement 11 MENU DE RÉGLAGE Voir la mise en service pour ce qui est réglage de la date de l heure de la langue ainsi que le nouvel étalonnage Réglage de la hauteur de coupe x Sélectionner Réglage de la hauteur de coupe x Régler la Hauteur de coupe à l aide des touches fléché...

Page 48: ...RIE x La batterie intégrée n est pas fournie totalement chargée En mode de fonctionnement normal la batterie du evoCUT 4 0 est rechargée régulièrement x En cas d état de chargement de la batterie à 0 le evoCUT 4 0 retourne à la station de base pour charger la batterie Le chargement peut être interrompu sans endommager la batterie x La station de base est équipée d un dispositif de surveillance éle...

Page 49: ...balayette ou d un chiffon x Vérifier que les roulettes Fig 9 1 tournent librement et contrôler leur manoeuvrabilité Si les roulettes ne tournent pas librement il convient de les décoincer ou de les remplacer 16 4 Vérification de la station de base x Retirez la prise secteur du transformateur x Contrôlez et nettoyez le cas échéant les contacts Fig 7 1 de la station de base avec un chiffon 17 RÉPARA...

Page 50: ...orrect Vous disposez de trois essais ensuite il conviendra de saisir le code PUK Le résultat de la tonte est irrégulier Le temps de travail du robot de tonte est trop court Programmer une durée de fonctionnement plus longue La zone de tonte est trop grande Réduire la zone de tonte Le rapport entre la hauteur de coupe et la hauteur de l herbe ne correspond pas Augmenter la hauteur de coupe puis la ...

Page 51: ...limitation x Débrancher et rebrancher le transformateur CN008 Loop signal weak Signal de la boucle de limitation faible x Contrôler l alimentation de la station de base x Contrôler la boucle de limitation éventuellement enterrée trop profondément x Débrancher et rebrancher le transformateur CN010 Bad position Le robot de tonte se situe hors du périmètre de tonte délimité par la boucle x Poser le r...

Page 52: ...aire de service SOLO CN099 Recov escape La résolution automatique du défaut est impossible Réparer le défaut manuellement CN104 Battery over heating Surchauffe de la batterie la température de la batterie est supérieure à 60 C déchargement impossible L arrêt d urgence est déclenché via le dispositif électronique de surveillance Ne pas poser le robot de tonte sur la station de base Mettre le robot ...

Page 53: ... notre garantie pendant la période de garantie légale pour les réclamations et nous les corrigeons à notre gré par une réparation ou une livraison de remplacement La période de garantie est déterminée selon la loi du pays où l appareil a été acheté Notre confirmation de garantie ne s appliquequ en cas de x traitement correct de l appareil x respect du mode d emploi original x utilisation de pièces...

Page 54: ...igliorare costantemente il nostro prodotto I testi e le figurre del manuale non possono essere utilizzati per eventuali reclami Simboli Sul prodotto e in questo libretto di istruzioni vengono impiegati i seguenti simboli Leggere attentamente queste istruzioni prima di mettere in funzione e prima di intraprendere qualsiasi intervento di pulizia manutenzione o montaggio AVVISO La precisa osservanza ...

Page 55: ...base 6 6 PANNELLO DI COMANDO 7 7 CODICE PIN E PUK 7 8 MESSA IN FUNZIONE 8 9 PANORAMICA MENU PRINCIPALE 9 10 IMPOSTAZIONE DEL PROGRAMMA SETTIMANALE 10 10 1 Impostazione dei punti di inizio 11 11 MENU IMPOSTAZIONI 11 12 MENU INFORMAZIONI 12 13 CONSIGLI PER LA TOSATURA 12 14 BATTERIA 12 15 TRASPORTO 13 16 MANUTENZIONE 13 16 1 Pulizia 13 16 2 Pulizia del telaio 13 16 3 Controllo dei contatti 13 16 4 C...

Page 56: ...precisa osservanza delle presenti avvertenze può impedire danni a persone e o cose 1 2 Dispositivi di sicurezza e di protezione x È vietato eludere manipolare o rimuovere i dispositivi di sicurezza Il mancato rispetto può mettere a rischio l incolumità propria e di altre persone x Per evitare l accensione involontaria o non autorizzata evoCUT 4 0 è protetto da un codice PIN x evoCUT 4 0 è equipagg...

Page 57: ...rcia In presenza di una salita o pendenza superiore al 35 evoCUT 4 0 viene disattivato dal sensore antiribaltamento Sensore antiribaltamento laterale In presenza di pendenze laterali superiori al 35 evoCUT 4 0 viene disattivato dal sensore antiribaltamento Sensore pioggia evoCUT 4 0 è provvisto di un sensore pioggia che interrompe la tosatura quando inizia a piovere e provvede a far tornare evoCUT...

Page 58: ...istanze come rappresentate nella grafica Fig 8 Se la distanza fra i cavi è di 0 cm l apparecchio può oltrepassarli Nella maggior parte dei casi è la soluzione migliore A partire da una distanza di almeno 30 cm evoCUT 4 0 la riconosce come via da percorrere e gira intorno all ostacolo Posando il cavo perimetrale in vie di transito Fig 8 4 per garantire il funzionamento impeccabile di evoCUT 4 0 è n...

Page 59: ...iva Memorizza conferma 6 Tasto multifunzione sinistro Annulla Indietro chiude menu immettendo valori torna indietro di un valore 7 Il tasto ON OFF consente di accendere o spegnere evoCUT 4 0 8 Il tasto Menu consente di tornare indietro velocemente al menu principale da ogni sottomenu 9 Il tasto HOME permette di interrompere la tosatura in corso evoCUT 4 0 rientra nella stazione base e riparte il g...

Page 60: ...odice PIN Inserire due volte il nuovo PIN Successivamente sul display LCD Fig 3 1 apparirà la finestra di inserimento Data Impostazione o modifica della data Inserire correttamente data e ora poiché le successive programmazioni dipendono da questi dati x Selezionare le cifre desiderate con i relativi tasti freccia Fig 3 3 confermando ogni inserimento con il tasto multifunzione Fig 3 5 Dopo la conf...

Page 61: ...iene caricata Una volta conclusa la messa in funzione evoCUT 4 0 sarà in grado di eseguire tosature agli orari preimpostati in fabbrica senza ulteriore programmazione Gli orari di tosatura impostati in fabbrica sono i seguenti Lun Ven 07 00 10 00 e Lun Ven 17 00 19 00 x Rispettare le norme locali sui tempi di funzionamento 9 PANORAMICA MENU PRINCIPALE Si possono selezionare le seguenti voci menu M...

Page 62: ...elativo tasto freccia Fig 3 3 e confermare con il tasto multifunzione destro Fig 3 5 x Premere il tasto Freccia giù Fig 3 3 fino ad evidenziare Modifica x Selezionare la voce menu desiderata con il relativo tasto freccia Fig 3 3 e confermare con il tasto multifunzione destro Fig 3 5 Legenda 1 Voce menu Tutti i giorni 2 Voce menu Giorno della settimana 3 Finestra tosatura disattivata R Taglio lungo...

Page 63: ...I punti di inizio possono essere adattati manualmente 11 MENU IMPOSTAZIONI Imposta data ora lingua e ricalibratura vedi Messa in funzione Impostazione dell altezza di taglio x Selezionare Impostare l altezza di taglio x Impostare Altezza di taglio con i tasti freccia Fig 3 3 nella misura di 5 mm e confermare con il tasto multifunzione destro Fig 3 5 x Confermare la selezione con il tasto menu Fig ...

Page 64: ...nzione su utensili rotanti e o taglienti indossare sempre guanti da lavoro 14 BATTERIA x La batteria integrata è parzialmente caricata al momento della consegna Nel normale esercizio la batteria di evoCUT 4 0 viene caricata regolarmente x Quando il livello di carica scende a 0 evoCUT 4 0 si reca autonomamente nella stazione base e ricarica la batteria Un interruzione della carica non danneggia la ...

Page 65: ...trollo dei contatti In presenza di sporco pulire con un panno le superfici dei contatti Fig 7 2 sul robot tosaerba 16 4 Controllo della libera rotazione delle rotelle x Una volta alla settimana pulire a fondo la zona attorno alle rotelle Fig 9 1 con una scopetta o un panno x Controllare la rotazione libera e la sterzabilità delle rotelle Fig 9 1 Se le rotelle non si muovono liberamente devono esse...

Page 66: ...a SOLO Codice PIN errato È stato inserito un codice PIN errato Inserire il codice PIN corretto Si possono fare tre tentativi poi occorre inserire un codice PUK Tosatura finale non uniforme Il robot ha lavorato per un tempo troppo breve Programmare tempi di lavoro più lunghi Area da tosare troppo ampia Ridurre l area di taglio Il rapporto tra altezza di taglio ed altezza dell erba non coincide Aume...

Page 67: ...e ostacoli ecc CN012 Cal no loop CN015 Cal outside Errore durante la calibratura il robot non ha trovato il circuito x Collocare il robot verticalmente rispetto al circuito il robot deve poter attraversare il circuito x Controllare l alimentazione della stazione base x Controllare il circuito x Disinserire e reinserire il trasformatore x Cavo del circuito incrociato CN018 Cal Collision Errore dura...

Page 68: ...il messaggio di errore CN128 Recov Impossible Urto di un ostacolo o abbandono del circuito impossibile fare marcia indietro il robot non riesce a liberarsi Rimuovere l ostacolo controllare la deviazione dell involucro CN129 Blocked WL Motore ruota sinistra bloccato Eliminare il blocco CN130 Blocked WR Motore ruota destra bloccato Eliminare il blocco 19 DATI TECNICI Dati evoCUT 4 0 Lunghezza larghe...

Page 69: ...x tentativi di riparazione sulla macchina x modifiche tecniche alla macchina x impiego non conforme alle prescrizioni Sono esclusi dalla garanzia x danni alla vernice riconducibili alla normale usura x particolari soggetti a usura come lame di taglio lama di sgombero e disco portalame Il periodo di garanzia decorre dalla acquisto da parte del primo utente finale Decisiva è la data sulla ricevuta P...

Page 70: ...ere ontwikkeling van onze apparaten zijn wijzigingen in de leveringsomvang op het vlak van vorm techniek en uitvoering voorbehouden Verder kunnen geen aanspraken worden afgeleid uit informatie en afbeeldingen in deze handleiding Symbolen Volgende symbolen worden gebruikt op de machine en in deze gebruiksaanwijzing Voor ingebruikname en voor alle onderhouds montage en reinigingswerken de handleidin...

Page 71: ...nsformator 6 5 4 Het basisstation openen 6 6 BEDIENPANEEL 7 7 PIN EN PUK CODE 7 8 INGEBRUIKNAME 8 9 OVERZICHT HOOFDMENU 9 10 HET WEEKPROGRAMMA INSTELLEN 10 10 1 Startpunten instellen 11 11 INSTELLINGENMENU 11 12 INFORMATIEMENU 12 13 TIPS BIJ HET MAAIEN 12 14 ACCU 12 15 TRANSPORT 12 16 ONDERHOUD 13 16 1 Reinigen 13 16 2 Chassis reinigen 13 16 3 Aansluitcontacten controleren 13 16 4 Wielen controler...

Page 72: ...lijk letsel of materiële schade voorkomen 1 2 Veiligheids en beveiligingsvoorzieningen x Beveiligingen mogen niet worden doorverbonden verwijderd of gemanipuleerd Bij negeren hiervan kan de eigen gezondheid of die van anderen in gevaar worden gebracht x Om het onbedoeld of onbevoegd inschakelen van de evoCUT 4 0 te voorkomen is deze beveiligd via een PIN code x De evoCUT 4 0 is uitgerust met een v...

Page 73: ...ngsensor in dwarsrichting Bij een hellingspercentage in dwarsrichting van meer dan 35 wordt de evoCUT 4 0 via de hellingsensor uitgeschakeld Regensensor De evoCUT 4 0 is uitgerust met een regensensor die bij regen de maaibeurt onderbreekt en zorgt dat de evoCUT 4 0 terugrijdt naar basisstation Als de evoCUT 4 0 is uitgeschakeld via een veiligheidssensor schakelt hij niet weer automatisch in Om ver...

Page 74: ...ng Fig 8 aangeduide afstanden worden aangehouden Bij een afstand van 0 cm tussen aangrenzende kabels kan de kabel worden overreden De beste oplossing in de meeste gevallen Vanaf een afstand van minstens 30 cm herkent de evoCUT 4 0 de afstand als weg en rijdt de robot om het obstakel heen Bij het aanleggen van de begrenzingskabel in doorgangen Fig 8 44 moeten voor een probleemloos gebruik van de ev...

Page 75: ...gen Inschakelen Uitschakelen Opslaan Bevestigen 6 Multifunctionele knop links Stoppen Terug menu sluiten bij invoeren van waarde één waarde teruggaan 7 Met de ON OFF knop wordt de evoCUT 4 0 aan of uitgezet 8 Met de Menu knop kan vanuit elk submenu snel worden teruggesprongen naar het hoofdmenu 9 Met de HOME knop wordt de huidige maaibeurt afgebroken De evoCUT 4 0 rijdt naar het basisstation De ev...

Page 76: ...gens verschijnt op het LCD display Fig 3 1 het Datuminvoervenster Datum instellen of wijzigen De datum en het tijdstip correct invoeren omdat andere programmeringen hiervan afhankelijk zijn x Met de bijbehorende Pijlknoppen Fig 3 3 de gewenste cijfers selecteren en steeds met de Multifunctionele knop Fig 3 5 bevestigen Na de bevestiging toont het LCD display Fig 3 1 het Tijdstipinvoervenster Om he...

Page 77: ...kan met de evoCUT 4 0 worden gemaaid volgens de door de fabriek ingestelde maaitijden of volgens een andere programmering Op de fabriek zijn de volgende maaitijden ingesteld Maandag vrijdag 7 00 10 00 uur en maandag vrijdag 17 00 19 00 uur x Neem de specifieke voorschriften voor de gebruikstijden in uw land in acht 9 OVERZICHT HOOFDMENU De volgende menu items kunnen worden geselecteerd Hoofdmenu P...

Page 78: ... de Multifunctionele knop rechts Fig 3 5 x De Pijlknop Fig 3 3 omlaag drukken tot Wijzigen actief wordt x Het gewenste menu item selecteren met de betreffende Pijlknop Fig 3 3 en bevestigen met de Multifunctionele knop rechts Fig 3 5 Verklaring van tekens 1 Menu item Elke dag 2 Menu item Weekdag 3 Maaibeurt uitgeschakeld R Randen maaien De evoCUT 4 0 maait met de rechterzijde langs de begrenzingsk...

Page 79: ...en aangepast 11 INSTELLINGENMENU Datum Tijdstippen Taal en Opnieuw kalibreren instellen zie onder Inbedrijfname Maaihoogte instellen x Maaihoogte instellen selecteren x Maaihoogte met de Pijlknoppen instellen in stappen van 5 mm en bevestigen met de Multifunctionele knop rechts x De betreffende selectie bevestigen met de Menuknop en teruggaan naar het hoofdmenu Pas zodra de evoCUT 4 0 begint met m...

Page 80: ...en 14 ACCU x De ingebouwde accu is bij aflevering gedeeltelijk opgeladen Bij normaal gebruik zal de accu van de evoCUT 4 0 regelmatig worden opgeladen x Bij een acculading van 0 rijdt de evoCUT 4 0 zelfstandig naar het basisstation om de accu op te laden De accu raakt niet beschadigd als het laden wordt onderbroken x Het basisstation is uitgerust met controle elektronica Deze beëindigt het opladen...

Page 81: ...en Fig 9 1 grondig reinigen met een handborstel of doek x De wielen Fig 9 1 controleren op onbelemmerd zwenken en ronddraaien Als de wielen niet vrij bewegen moeten ze gangbaar worden gemaakt of worden vervangen 16 5 Basisstation controleren x De stroomkabelstekker losmaken van de transformator x De contacten Fig 7 1 op het basisstation controleren op vervuiling en eventueel met een doek reinigen ...

Page 82: ...erd foutief ingevoerd De juiste PIN code invoeren Er zijn drie pogingen mogelijk daarna moet een PUK code worden ingevoerd Het maairesultaat is ongelijkmatig De werkduur van de robot is te kort Langere werktijden programmeren Het maaibereik is te groot Maaibereik verkleinen De maaihoogte past niet bij de grashoogte De maaihoogte hoger instellen daarna in stapjes lager instellen tot de ge wenste ho...

Page 83: ...eeft het gazon verla ten Ligging van begrenzingskabel controleren boch ten obstakels etc CN012 Kalibratie geen circuit CN015 Kalibratie buiten Storing tijdens kalibratie ro bot kon circuit niet vinden x Robot haaks opstellen ten opzichte van begrenzingskabel robot moet over begrenzings kabel heen kunnen rijden x Voeding naar basisstation controleren x Circuit begrenzingskabel controleren x Transfo...

Page 84: ...ruitrijden niet mogelijk robot kan zich niet bevrijden Obstakel verwijderen klemmen van kap controle ren CN129 Linkerwiel geblokkeerd Motor van linkerwiel geblok keerd Blokkering verwijderen CN130 Rechter wiel geblokkeerd Motor van rechterwiel geb lokkeerd Blokkering verwijderen Bij storingen die niet in deze tabel werden opgenomen of die u niet zelf kunt verhelpen richt u zich tot de betrokken kl...

Page 85: ...alt bij x pogingen tot reparatie van het apparaat x technische wijzigingen aan het apparaat x gebruik dat niet in overeenstemming is met de bestemming Uitgesloten van de garantie zijn x lakschade die is veroorzaakt door normale slijtage x slijtageonderdelen zoals mes wegruimmes en messenschijf De garantieperiode begint op de aankoop door de eerste eindgebruiker Bepalend is de datum van het ontvang...

Page 86: ......

Page 87: ......

Page 88: ...ostfach 60 01 52 D 71050 Sindelfingen Tel 07031 301 0 Fax 07031 301 130 info solo germany com SOLO P O Box 60 01 52 D 71050 Sindelfingen Germany Phone 49 7031 301 0 Fax 49 7031 301 149 export solo germany com ...

Reviews: