

R
Solmeta geotagger
Pro
8
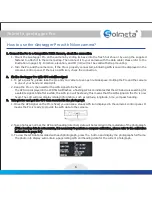
Note
In our earlier version, the Pro will be able to output the last one GPS information stored in the memory
as soon as you turn it on and before it acquires new GPS signal. However, we got feedback from our
clients that those” previous” GPS data might cause a lot of trouble and lead to incorrect locations. In
order to avoid this, Solmeta has improved the “Indoor fix” function.Only when your Pro device is keeping
on and you are into a place where is no GPS signal, the Pro is able to provide the last GPS information.
As soon as you turn off the Pro, the GPS data stored in Memory is invalid.
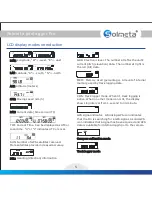
3. Local time shown on LCD setting
Select the current time shown on LCD with UTC time or local time. (UTC time is shown on the LCD by
default) With the UTC time available, please follow the procedure below to get a local time shown on
the LCD.
1. On the “Tim" display mode, short press the
button to enter the setting mode.
ENTER
2. Short press the
button again to get the change (you can see a blinking icon or
on
MENU
L
U
the left of the screen ,
is local time ,
is UTC time). On the “L” icon blinking status,
“L”
“U”
short press the
button to enter the time zone setting.
ENTER
3. Short press the
button, you can add or minus the time zone for your local time. Press
MENU
the
button to complete the setting.
ENTER
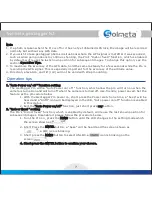
4. Backlight setting
The backlight can last one minute and meanwhile the function of long-lasting backlight is also available.
Here are the steps of how to operate.
1. On the “LON” display mode, press the
button to activate.
ENTER
2. On the “LON” display mode, press the
button again to exit.
ENTER
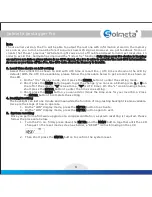
5. System resetting
Once you perform a firmware upgrade or a compass calibration, a system resetting is required. Please
follow the procedure below.
1. Turn the Pro on, firmly press down the
and the
button together until the LCD
ENTER
MENU
changes to the reset mode screen as below, a “RESET” icon is blinking on the LCD.
2. Then short press the
button to confirm the system reset.
ENTER


