background image

49

I

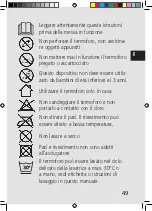
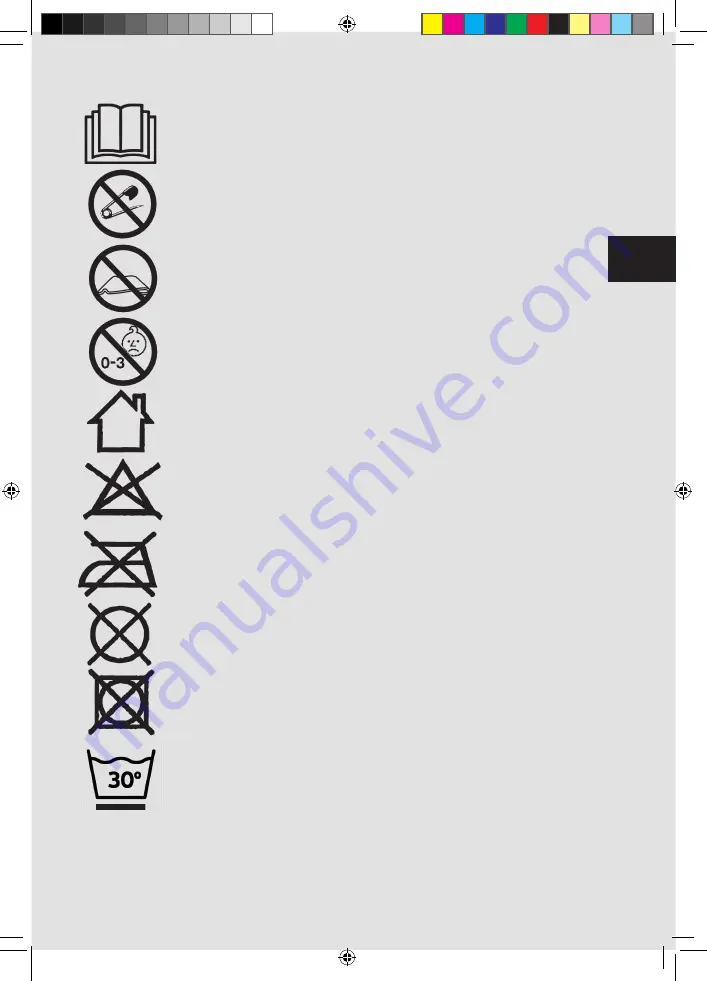
Leggere attentamente queste istruzioni 

prima della messa in funzione
Non perforare il termoforo, non avvicina-

re oggetti appuntiti
Non mettere mai in funzione il termoforo 

piegato o accartocciato

Utilizzare il termoforo solo in casa

Questo dispositivo non deve essere utiliz-

zato da bambini di età inferiore ai 3 anni.

Non candeggiare il termoforo e non 

portarlo a contatto con il cloro
Non stirare il pad. Il rivestimento può 

essere stirato a bassa temperatura.

Non lavare a secco

Pad e rivestimento non sono adatti 

all’asciugatore
Il termoforo può essere lavato nel ciclo 

delicato della lavatrice a max. 30°C o 

a mano, vedi etichetta o istruzioni di 

lavaggio in questo manuale

Summary of Contents for THERMOPAD 2260

Page 1: ...I N C E 1 9 0 8 Bedienungsanleitung Mode d emploi Istruzioni per l uso User Manual Gebruiksaanwijzing THERMOPAD Typ Type Tipo 2260 Heizkissen Coussin Chauffant Termoforo Heating Pad Verwarmingskussen...

Page 2: ......

Page 3: ...3 s DEUTSCH 04 s FRAN AIS 26 s ITALIANO 48 s ENGLISH 70 s NEDERLANDS 92...

Page 4: ...izkissen bestehend aus Heizelement und abnehmbaren Schutzbezug B Bedienelement mit Schieberegler zum Ein und Ausschalten und f r die Einstellung von 3 Temperaturstufen mit Temperaturstufen Anzeige C N...

Page 5: ...s Ger t darf nicht bei Kindern unter 3 Jahren benutzt werden Heizkissen nicht bleichen oder chloren bzw mit Chlor in Verbindung bringen Pad nicht b geln Der Bezug kann bei niedriger Temperatur geb gel...

Page 6: ...der Verwendung von elektrischen Ger ten sind zu Ihrer eigenen Sicherheit folgende Vorsichts Mass nahmen zu beachten 1 Um einen Stromschlag zu vermeiden d rfen weder das Heizkissen noch das Stromkabel...

Page 7: ...d dass sich keine Teile gel st haben 5 Um einen Stromschlag zu vermeiden verwen den Sie das Ger t nicht wenn Kabel Bedien element Netzstecker das Heizkissen selbst oder der Anschlussadapter besch digt...

Page 8: ...etzkabel tragen oder ziehen und nichts auf das Netzkabel stellen Nie am Netzka bel ziehen um das Ger t vom Netz zu trennen sondern nur am Netzstecker ziehen 8 Netzkabel nicht knicken oder einklemmen 9...

Page 9: ...wenden Fachm nnischen Rat er halten Sie bei Ihrem Elektriker 13 Nehmen Sie keine nderungen am Ger t am Bedienelement am Kabel Stecker oder An schlussadapter vor 14 Heizkissen nur mit dem mitgelieferte...

Page 10: ...d rfen das Heizkissen nicht benutzen ausser sie werden durch eine f r ihre Sicherheit zust ndige Person beaufsichtigt und von dieser genau instruiert wie das Ger t zu benutzen ist Ausserdem m ssen sie...

Page 11: ...evor Sie es bei Solis oder einer von Solis autorisierten Servicestelle auf seine Funk tionsf higkeit und Sicherheit berpr fen haben lassen 19 Heizkissen niemals so platzieren dass es ins Wasser fallen...

Page 12: ...digt werden 25 Das Heizkissen w hrend des Gebrauchs niemals falten oder knicken 26 Ger t nur wie in dieser Bedienungsanleitung beschrieben verwenden Nur mitgeliefertes Be dienelement benutzen falsche...

Page 13: ...rankung sein Heizkissen nicht auf geschwollenen entz nde ten oder verletzten Hautstellen benutzen bzw bei offenen Wunden Sollten Sie sich beim Gebrauch des Heizkissens unwohl oder krank f hlen schalte...

Page 14: ...on schieben dann Netz stecker ziehen Heizkissen in der Temperatureinstellung 2 oder 3 nicht l nger als 2 Stunden anwenden Eine l ngere Anwendung k nnte zu Hautverbrennun gen f hren oder eine berhitzun...

Page 15: ...s Das Heizkissen nicht benutzen resp bedienen soll ten Menschen mit mentalen physischen oder psy chischen Einschr nkungen die das Ger t nicht jederzeit selbstst ndig bedienen oder abschal ten k nnen K...

Page 16: ...k nnen Der komfortable und kuschlige Schutzbezug muss bei jeder Benutzung ber das Heizelement ge zogen und mit den Druckkn pfen verschlossen werden Entfalten Sie das Heizkissen und pr fen Sie ob der B...

Page 17: ...llung w hlen m chten so schieben Sie den Regler in die oberste Position so dass 3 im Display aufleuchtet Sollte das Heizkissen zu warm werden schieben Sie den Regler wieder nach unten in die Position...

Page 18: ...ollen so emp fehlen wir die Temperatur Einstellung 1 AUTOMATIK ABSCHALTUNG Nach ca 90 Minuten schaltet sich das Ger t zu Ihrer Sicherheit automatisch ab Wollen Sie das Ger t danach erneut einschalten...

Page 19: ...l ssig daf r dass die Temperatur der jeweils gew hlten Heizstufe nicht berschritten wird und verhindert somit eine berhitzung des Ger tes s LAGERUNG UND PFLEGE Heizkissen immer komplett abk hlen lasse...

Page 20: ...e dazu wie folgt vor 1 Vor dem Waschen muss der Netzstecker aus der Steckdose gezogen werden Lassen Sie das Heizkissen dann mindestens 10 Minuten abk h len 2 Ziehen Sie nun den Anschlussadapter aus de...

Page 21: ...mals knicken oder wringen Im Anschluss sp len Sie beide Teile mehrmals in lauwarmem Wasser bis alle Reste des Fein waschmittels ausgesp lt sind Danach lassen Sie beide Teile auf einem Handtuch glatt l...

Page 22: ...D s TECHNISCHE ANGABEN Modell Nr HP18303 Typ 2260 Produktbezeichnung Heizkissen Spannung Frequenz 220 240V 50 Hz Leistung 100 Watt Abmessungen 40 x 30 cm Gewicht 0 375 kg Technische nderungen vorbehal...

Page 23: ...eine Funktionsst rung auftreten rufen Sie uns an Oftmals l sst sich n mlich eine Panne mit dem richtigen Tipp od unkompliziert und einfach wieder beheben ohne dass Sie das Ger t g Reparatur einschicke...

Page 24: ...tionsst rung auftreten rufen Sie uns einfach an Oftmals l sst sich n mlich eine Panne mit dem richtigen Tipp oder Kniff unkompliziert und einfach wieder beheben ohne dass Sie das Ger t gleich zur Repa...

Page 25: ......

Page 26: ...s d un l ment chauffant et d une housse amovible B Commande avec bouton coulissant pour mett re l appareil en marche et l teindre et pour r gler les 3 niveaux de temp rature avec affichage du r glage...

Page 27: ...doit pas tre utilis par des enfants de moins de 3 ans Ne mettez jamais le coussin dans de l eau de javel et ne le mettez jamais en contact avec de l eau de javel Ne repassez pas le coussin La housse...

Page 28: ...loi au nouveau propri taire Comme pour chaque utilisation d un appareil lec trique les consignes suivantes sont respecter pour votre propre s curit 1 Afin d viter une lectrocution ni le coussin ni le...

Page 29: ...et qu aucun l ment ne s est d tach 5 Afin d viter tout risque d lectrocution n utili sez pas l appareil si le cordon la commande la prise le coussin chauffant lui m me ou l adap tateur est endommag s...

Page 30: ...objets dessus Pour d brancher l appareil ne tirez ja mais sur le cordon mais seulement sur la prise 8 Ne pliez pas le cordon et ne le coincez pas 9 Pendant l utilisation la commande ne doit pas se tro...

Page 31: ...lectricien 13 N apportez aucune modification l appareil la commande au cordon la prise ou l adap tateur de connexion 14 Mise en service du coussin chauffant unique ment avec la commande comprise dans...

Page 32: ...t ou sans avoir t instruits par cette derni re sur son fonctionnement De plus ils doivent avoir bien compris quels sont les dangers que l appareil pr sente et comment il peut tre utilis en toute s cur...

Page 33: ...e de tom ber dans de l eau p ex c t de la baignoire de la piscine du jacuzzi etc Risque d lectro cution 20 N utilisez jamais le coussin dans des pi ces hu mides p ex une salle de bains ou avec une hou...

Page 34: ...isez l appareil que comme indiqu dans ce mode d emploi Servez vous uniquement de la commande comprise dans la livraison un accessoire inappropri ou une mauvaise utili sation peut entra ner un endommag...

Page 35: ...rave maladie N utilisez pas le coussin chauffant sur une partie du corps qui est enfl e enflamm e ou pr sen tant des blessures ou sur des plaies ouvertes Si vous avez un malaise pendant l utilisation...

Page 36: ...isez pas le coussin plus de 2 heures sur le r glage de la temp rature 2 ou 3 Une dur e plus importante pourrait entra ner des br lures cutan es ou causer la surchauffe de l appareil et l endommager De...

Page 37: ...manipuler le coussin chauffant Personnes pr sentant un handicap mental phy sique ou psychique et n tant pas en mesure de manipuler et d arr ter l appareil elles m mes Enfants de moins de 8 ans Person...

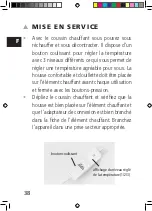
Page 38: ...r vous La housse confortable et douillette doit tre plac e sur l l ment chauffant avant chaque utilisation et ferm e avec les boutons pression D pliez le coussin chauffant et v rifiez que la housse es...

Page 39: ...a temp rature maximale faites glisser le bouton coulissant sur la position maximale pour que 3 s affiche sur l cran Si le coussin devient trop chaud diminuez la temp rature en faisant glisser le bouto...

Page 40: ...chauffant pendant une p riode prolong e nous vous recommandons de s lectionner le niveau de temp rature 1 ARRET AUTOMATIQUE L appareil s teint automatiquement au bout d environ 90 minutes pour votre...

Page 41: ...ia bilit que le niveau de temp rature s lectionn ne soit pas d pass et emp che ainsi une sur chauffe de l appareil s RANGEMENT ET ENTRETIEN Laissez toujours le coussin chauffant enti re ment refroidir...

Page 42: ...ez pour cela comme suit 1 D branchez l appareil de la prise secteur avant de le laver Laissez ensuite le coussin chauffant refroidir pendant au moins 10 minutes 2 D branchez alors l adaptateur de conn...

Page 43: ...ion Ne les pliez jamais et ne les essorez pas Rincez les ensuite plusieurs fois sous de l eau ti de jusqu limination compl te de la lessive Faites ensuite s cher la housse et l l ment chauffant plat s...

Page 44: ...ES TECHNIQUES Mod le HP18303 Type 2260 D signation du produit Coussin chauffant Voltage Fr quence 220 240V 50 Hz Puissance 100 watt Dimensions 40 x 30 cm Poids 0 375 kg Sous r serve de modifications...

Page 45: ...auftreten rufen Sie uns an Oftmals l sst sich n mlich eine Panne mit dem richtigen Tipp od unkompliziert und einfach wieder beheben ohne dass Sie das Ger t g Reparatur einschicken m ssen Wir stehen Ih...

Page 46: ...fiabilit Si un disfonctionnement devait tout de m me survenir appelez nous tout simplement Il arrive souvent qu une panne soit facile r parer sans difficult gr ce au bon conseil et la bonne astuce san...

Page 47: ......

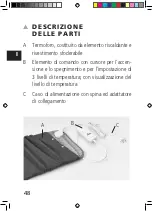
Page 48: ...o riscaldante e rivestimento sfoderabile B Elemento di comando con cursore per l accen sione e lo spegnimento e per l impostazione di 3 livelli di temperatura con visualizzazione del livello di temper...

Page 49: ...Questo dispositivo non deve essere utiliz zato da bambini di et inferiore ai 3 anni Non candeggiare il termoforo e non portarlo a contatto con il cloro Non stirare il pad Il rivestimento pu essere sti...

Page 50: ...zzano apparecchiature elettriche necessario osservare le seguenti precauzioni per la propria sicurezza 1 Per evitare scosse elettriche il termoforo il cavo di alimentazione l elemento di comando e la...

Page 51: ...nneggiati e che non vi siano parti allentate 5 Per evitare una scossa elettrica non utilizzare l apparecchio se il cavo elettrico l elemento di comando la spina il dispositivo stesso o l adattatore di...

Page 52: ...rtare l apparecchio per il cavo di alimentazione e non appoggiare nulla sul cavo di alimentazione Non tirare mai il cavo di alimentazione per scollegare l apparecchio dalla rete elettrica ma staccare...

Page 53: ...un interruttore di sicurezza con un valore nominale di corrente residua di massimo 30 mA 13 Non apportare mai modifiche all apparecchio all elemento di comando al cavo alla spina o all adattatore di c...

Page 54: ...ono utilizzare il termoforo a meno che esse abbiano potuto beneficiare at traverso l intermediazione di una persona re sponsabile della loro sicurezza di istruzioni riguardanti l uso dell apparecchio...

Page 55: ...t e sicurezza 19 Non posizionare mai il termoforo in modo che possa cadere in acqua ad esempio vicino la vasca da bagno piscina idromassaggio ecc Rischio di scossa elettrica 20 Non accendere mai il te...

Page 56: ...ecchio soltanto come descritto in queste istruzioni per l uso Utilizzarlo soltanto con l elemento di comando allegato Un acces sorio sbagliato o un uso improprio potrebbe danneggiare l apparecchio o c...

Page 57: ...re indicazioni di una seria malattia Non utilizzare il termoforo su pelle gonfia in fiammata o ferita o su ferite aperte In caso di malessere durante l utilizzo del termo foro spegnere immediatamente...

Page 58: ...collegare la spina Non utilizzare il termoforo nella regolazione della temperatura 2 o 3 per pi di 2 ore L uso prolungato potrebbe causare ustioni cutanee o causare un surriscaldamento e danneggiare i...

Page 59: ...damento dell apparecchio Il termoforo non dovrebbe essere utilizzato o azio nato da persone con restrizioni mentali fisiche o psi cologiche che non sono in grado di utilizzare o spegnere indipendentem...

Page 60: ...rivestimento protettivo deve essere tirato sopra l elemento riscaldante e chiuso con i bottoni au tomatici a pressione ogni volta che lo si utilizza Spiegare il termoforo e controllare che il rivesti...

Page 61: ...a temperatura massima spostare il cursore nella posizione pi alta in modo che sul display si illumina 3 Se il termoforo diventa troppo caldo spostare il cursore verso il basso in posizione 2 o 1 Dopo...

Page 62: ...glia l impostazione della temperatura 1 SPEGNIMENTO AUTOMATICO Per la propria sicurezza l apparecchio si spe gne automaticamente dopo circa 90 minuti Se si desidera riaccendere l unit e continuare ad...

Page 63: ...elezionata non venga superata e quindi impe disce il surriscaldamento dell apparecchio s DEPOSITO E MANUTENZIONE Lasciare sempre raffreddare completamente il termoforo Attenzione il termoforo deve ess...

Page 64: ...come segue 1 Prima del lavaggio la spina di rete deve essere rimossa dalla presa Poi lasciate raffreddare il termoforo per almeno 10 minuti 2 Ora estrarre l adattatore di collegamento dalla presa dell...

Page 65: ...re mai il ri vestimento Successivamente lavare pi volte entrambe le parti in acqua tiepida fino a quando tutti i residui del detergente delicato non sono stati risciacquati Lasciare poi entrambe le pa...

Page 66: ...66 I s DATI TECNICI Modello No HP18303 Tipo 2260 Descrizione prodotto Termoforo Tensione Frequenza 220 240V 50 Hz Potenza 100 Watt Dimensioni 40 x 30 cm Peso 0 375 kg Con riserva di modifiche tecniche...

Page 67: ...t rung auftreten rufen Sie uns an Oftmals l sst sich n mlich eine Panne mit dem richtigen Tipp od unkompliziert und einfach wieder beheben ohne dass Sie das Ger t g Reparatur einschicken m ssen Wir st...

Page 68: ...resen tarsi dei problemi di funzionamento non esiti telefonarci Spesso un guasto si risolve senza complicazioni e in modo semplice con il consiglio giusto senza dovere spedire l apparecchio per ri par...

Page 69: ......

Page 70: ...consists of heating element and removable protective cover B Control unit with sliding switch for switching the appliance on and off and for selecting one of 3 temperature levels with temperature leve...

Page 71: ...must not be used for children younger than 3 Do not chlorinate or bleach the heating pad or bring it into contact with chlorine Do not iron the pad The cover can be ironed at a low temperature Do not...

Page 72: ...you also hand these instructions to the new owner For your own safety please observe the following safety measures when using electrical appliances 1 To avoid electric shock neither the heating pad p...

Page 73: ...nd no parts have come loose 5 To prevent electric shock do not use the appli ance if the cable control unit power plug the appliance itself or the power adaptor are dam aged or if the appliance has ot...

Page 74: ...anything on the power cord Never pull on the power cord to disconnect the appliance from the power mains Only pull on the plug 8 Do not fold or clamp the power cord 9 During use the control is not al...

Page 75: ...ug or power adaptor 14 Only use the heating pad with the control and protective cover provided 15 Children are not allowed to play with the pad or use it unsupervised The pad must not be used for smal...

Page 76: ...and know how to operate it safely Cleaning and maintenance of the appliance must not be done by unsuper vised children Under no circumstances must the appliance be used by children under the age of 3...

Page 77: ...e completely dry before you switch it on 21 During thunderstorms disconnect the appliance from the mains and do not use it 22 Never use the appliance in rooms with flamma ble or explosive materials or...

Page 78: ...use at doctors surgeries or hospitals 28 People with a pacemaker should not use this appliance Observe the following when using the heating pad Should you be unsure or need advice on whether the use o...

Page 79: ...y blankets pillows or similar items Nor should you put anything on it lie down or sit on it Do not use the heating pad on an adjustable bed Make sure not to sleep on the heating pad Never switch the a...

Page 80: ...ce overheats switch it off immediately un plug it and wait until it has cooled down For your safety the heating pad is fitted with overheating protection A reliable electronic controller ensures that...

Page 81: ...mental physical or psychological restrictions who cannot use or turn off the ap pliance independently at all times Children under the age of 8 People under the influence of alcohol or drugs People wh...

Page 82: ...o you The comfortable and cuddly pro tective cover must be pulled over the heating element every time it is used and be fastened with the push buttons Unfold the heating pad and make sure that the pro...

Page 83: ...witch to the uppermost position so that 3 lights up in the display Should the heating pad get too warm push the switch back down to the 2 or 1 position The pad will noticeably cool down after a few mi...

Page 84: ...90 minutes the appliance switches off automatically for your safety If you want to switch the appliance back on afterwards to continue its use you have to push the sliding switch to the lowest positio...

Page 85: ...ected temperature level is not exceeded preventing the appliance from overheating s STORAGE AND CARE Always let the heating pad cool down com pletely Caution The heating pad has to be completely dry a...

Page 86: ...se proceed as follows 1 Before washing the power plug has to be dis connected from the power socket Let the heat ing pad cool down for at least 10 minutes 2 Now disconnect the connection adapter from...

Page 87: ...and carefully squeeze it out Caution Never crease or wring out After that rinse both items repeatedly in lukewarm water until all detergent residues are washed out Leave both parts to air dry lying fl...

Page 88: ...88 D GB s TECHNICAL INFORMATION Model No HP18303 Type 2260 Product name Heating Pad Voltage Frequency 220 240V 50 Hz Power 100 Watt Dimensions 40 x 30 cm Weight 0 375 kg Technical changes reserved...

Page 89: ...aber trotzdem einmal eine Funktionsst rung auftreten rufen Sie uns an Oftmals l sst sich n mlich eine Panne mit dem richtigen Tipp od unkompliziert und einfach wieder beheben ohne dass Sie das Ger t g...

Page 90: ...ion ever occurs simply give us a call Often a break down can be easily and quickly remedied with the right tip or technique without having to straight away send off the device for repair We will give...

Page 91: ......

Page 92: ...mingskussen bestaande uit een verwarmingselement en afneembare beschermhoes B Bedieningselement met schuif voor het in en uitschakelen en voor het instellen van 3 tem peratuurstanden met weergave van...

Page 93: ...it apparaat mag niet worden gebruikt bij kinderen jonger dan 3 jaar Het verwarmingskussen niet bleken of in contact brengen met chloor Kussen niet strijken De hoes kan op lage temperatuur gestreken wo...

Page 94: ...elektrische apparatuur moeten voor uw eigen veiligheid de volgende veiligheids maatregelen in acht worden genomen 1 Om elektrische schokken te voorkomen mogen het verwarmingskussen de stroomkabel het...

Page 95: ...digd zijn en er geen losse on derdelen zijn 5 Om elektrische schokken te voorkomen mag u het apparaat niet gebruiken als de kabel het be dieningselement de stekker het verwarmings kussen zelf of de ad...

Page 96: ...niets op de stroomkabel plaatsen Trek nooit aan de stroomkabel om het apparaat uit het stopcontact te halen maar trek aan de stekker 8 Stroomkabel niet knikken of vastklemmen 9 Het bedieningselement...

Page 97: ...en aan het apparaat het bedie ningselement de kabel de stekker of de adap ter aanbrengen 14 Het verwarmingselement alleen in gebruik ne men met het meegeleverde bedieningselement en met de beschermhoe...

Page 98: ...oezicht van een persoon die verantwoordelijk is voor hun veiligheid en hun exacte instructies geeft over het correcte gebruik van dit apparaat Bovendien moeten ze precies hebben begre pen welke gevare...

Page 99: ...vicepunt heeft laten controleren op een goede en veilige werking 19 Plaats het verwarmingskussen nooit zo dat het in het water kan vallen bijv in de buurt van een bad of een zwembad whirlpool Gevaar v...

Page 100: ...r kan het apparaat beschadigd raken 25 Het verwarmingskussen nooit tijdens het ge bruik opvouwen of kreuken 26 Gebruik het apparaat uitsluitend zoals beschre ven in deze handleiding Gebruik alleen de...

Page 101: ...uw arts Dit kunnen aanwijzingen zijn voor een ernstige ziekte Gebruik geen verwarmingskussen op gezwollen ontstoken of gewonde huid of op open wonden Als u zich onwel of ziek voelt bij het gebruik va...

Page 102: ...jd eerst helemaal omlaag naar de stand OFF en trek dan pas de stekker uit het stopcon tact Gebruik het verwarmingskussen niet langer dan 2 uur in de temperatuurstand 2 of 3 Langdurig gebruik kan leide...

Page 103: ...orkomt zo oververhitting van het apparaat De volgende personen mogen het verwarmings kussen niet gebruiken of bedienen Mensen met mentale fysieke of psychische be perkingen die niet in staat zijn het...

Page 104: ...comfortabele en zachte beschermhoes moet bij elk gebruik over het verwarmingselement worden getrokken en met de drukknopen worden gesloten Vouw het verwarmingskussen uit en controleer of de hoes over...

Page 105: ...display oplicht Als het verwarmingskussen te warm wordt drukt u de schuif weer omlaag naar stand 2 of 1 Na enkele minuten koelt het verwar mingskussen merkbaar af Als u het apparaat wilt uitschakelen...

Page 106: ...paraat na ca 90 minuten automatisch uitgeschakeld Als u het apparaat weer wilt inschakelen en nog wilt gebruiken moet u eerst de schuif in de laagste stand zetten en het apparaat uitschakelen het geta...

Page 107: ...rmingsstand niet wordt overschreden en voorkomt zo oververhitting van het apparaat s OPSLAG EN ONDERHOUD Laat het verwarmingskussen altijd volledig af koelen Let op Het verwarmingskussen moet volledig...

Page 108: ...euren Dit doet u als volgt 1 Voor het wassen moet de stekker uit het stopcon tact worden gehaald Laat het verwarmingskus sen vervolgens minstens 10 minuten afkoelen 2 Trek nu de adapter uit de aanslui...

Page 109: ...p Nooit vouwen of wringen Spoel vervolgens beide de len enkele malen met lauw water uit totdat alle resten van het milde wasmiddel zijn uitgespoeld Laat daarna beide delen aan de lucht drogen op een p...

Page 110: ...HE SPECIFICATIES Modelnr HP18303 Type 2260 Productnaam Verwarmingskussen Spanning frequentie 220 240 V 50 Hz Vermogen 100 Watt Afmetingen 40 x 30 cm Gewicht 0 375 kg Technische wijzigingen voorbehoude...

Page 111: ...reten rufen Sie uns an Oftmals l sst sich n mlich eine Panne mit dem richtigen Tipp od unkompliziert und einfach wieder beheben ohne dass Sie das Ger t g Reparatur einschicken m ssen Wir stehen Ihnen...

Page 112: ...Mocht er deson danks een storing optreden neem dan gewoon even contact op met ons Vaak is een storing met een nuttige tip in een handomdraai gemakkelijk te verhelpen zonder dat u het apparaat voor re...

Page 113: ...e Svizzera Solis Produzione SA Centro Solis Via Penate 4 CH 6850 Mendrisio Adresse f r Warenretouren abweichend siehe Adresse diff rente pour les retours de produit voir Indirizzo differente per resi...

Page 114: ......

Page 115: ...di garanzia ammonta a 12 mesi Le condizioni di garanzia det tagliate sono visionabili su www solis com SERVIZIO CLIENTI I clienti residenti in Svizzera devono inviare gli articoli da riparare direttam...

Page 116: ...F r Deutschland 0800 724 0702 F r Oesterreich 0800 22 03 92 2 YEAR GUARANTEE Only valid with a till receipt We provide a guarantee for this product if the de fect has demonstrably arisen as a result...

Reviews: