background image

D

D

13

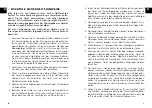
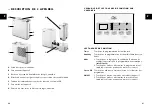
DAS LED-DISPLAY UND DIE FUNKTIONSTASTEN   
AUF DEM GERÄT

High Speed
Normal Speed
Sleep Speed
Intelli. Speed

Water Empty

Ionizer

Child Lock

Clean Mat

Timer 

Humidity

Screen Off

Clean Mat

Ionizer On/Off

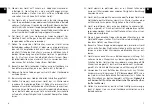
DIE FUNKTIONSTASTEN

Timer 

Taste für Timereinstellung

Humidity 

Taste zur Einstellung der gewünschten Raumluftfeuchtigkeit

Mode 

1. Taste zur Einstellung der Ventilation (3 Einstellungen  
  sind möglich) bzw. der Automatik-Funktion (Intelli. Speed
2. Taste zum Ein- oder Ausschalten der Ionen-Funktion  
  (mindestens 3 Sekunden gedrückt halten)

Screen Off  Taste zum Ein- oder Ausschalten des Displays und der  

Funktionsanzeigen 

ON/OFF 

1. Taste zum Ein- oder Ausschalten des Geräts 
2. Taste zum Ein- oder Ausschalten der Kindersicherung  
  (mindestens 3 Sekunden gedrückt halten)

12

s  

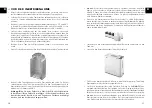
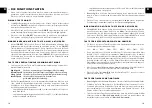
GERÄTEBESCHREIBUNG


A  Luftaustritt für feuchte Luft

B  Gerätefront

C  Wasserwanne mit inliegender Befeuchtungsmatte; abnehmbar

D  Wassertank mit Griff und Sichtfenster; abschraubbarer Tankdeckel

E  Bedienfeld mit Funktionstasten und LED-Anzeige

F  Geräterückseite

G  Lufteinlass mit Abdeckung und darunterliegendem Luftfilter; abnehmbar

C

D

A

B

C

E

D

G

F

Summary of Contents for PERFECT AIR 7219

Page 1: ...Bedienungsanleitung Mode d emploi Istruzioni per l uso User Manual Gebruiksaanwijzing PERFECT AIR Typ Type Tipo 7219 S I N C E 1 9 0 8...

Page 2: ...3 2 s DEUTSCH 04 s FRAN AIS 32 s ITALIANO 60 s ENGLISH 88 s NEDERLANDS 116...

Page 3: ...oder anderen feuchtigkeitsempfind lichen Materialien und Objekten ein und beachten Sie dass die Luft rund um das Ger t frei zirkulieren k nnen muss s WICHTIGE SICHERHEITSHINWEISE Bitte lesen Sie vor...

Page 4: ...stecker bevor Sie es heraus nehmen Nehmen Sie es nicht wieder in Betrieb bevor Sie es bei Solis oder einer von Solis autorisierten Servicestelle auf seine Funktionsf higkeit und Sicherheit berpr fen h...

Page 5: ...tzstecker ziehen nur dann ist das Ger t endg ltig ausgeschaltet 9 8 30 Ger t nicht sch tteln oder umplatzieren w hrend es in Gebrauch ist Das mit Wasser gef llte und eingeschaltete Ger t niemals verst...

Page 6: ...cher Hygrostat kann unter Umst nden einen anderen Luftfeuchtig keits Wert anzeigen 53 Bef llen Sie den Wassertank nur wie in dieser Bedienungsan leitung beschrieben Es darf nie Wasser in die Luftausla...

Page 7: ...Ein oder Ausschalten der Ionen Funktion mindestens 3 Sekunden gedr ckt halten Screen Off Taste zum Ein oder Ausschalten des Displays und der Funktionsanzeigen ON OFF 1 Taste zum Ein oder Ausschalten d...

Page 8: ...ftfeuchtigkeit an bzw w hrend des Programmierens die momentan get tigte Einstellung f r die gew nschte Raumluftfeuchtigkeit bzw des Timers blinkt nach dem Programmieren 3 Sekunden dann kehrt das Displ...

Page 9: ...16 VOR DER INBETRIEBNAHME Bevor Sie Ihren Luftbefeuchter das erste Mal benutzen entfernen Sie alle even tuell vorhandenen Werbeaufkleber mit Ausnahme des Typenschildes Sollte das Ger t bei sehr tiefen...

Page 10: ...t die mittlere Leistung Normal Speed 19 Liegt die Raumluftfeuchtigkeit zwischen 56 und 60 w hlt das Ger t die niedrige Leistung Sleep Speed Generell gilt Je h her die Ventilationsleistung desto intens...

Page 11: ...Nach dem letzten Dr cken blinkt die eingestellte Stundenzahl f r drei Sekunden dann erscheint wieder der Wert der momentanen Raumluftfeuchtigkeit aller dings leuchtet dahinter auch das h und zeigt an...

Page 12: ...ie Wasser wanne gelaufen ist damit sich die Befeuchtungsmatte vollsaugen kann das ver bessert den sofortigen Befeuchtungseffekt erheblich 1 GER T EINSCHALTEN Dr cken Sie die Taste ON OFF um das Ger t...

Page 13: ...Tauchen Sie dazu ein weiches Tuch einen weichen Schwamm in die selbe Entkalkungsmittel L sung welche Sie auch f r die Wasserwanne benutzt haben Alternativ k nnen Sie auch weissen Essig verwenden Entfe...

Page 14: ...n der R ckseite des Luftbefeuchters befindet sich unter der Lufteinlass Abdeckung ein Netzfilter Sollte sich zu viel Staub auf dem Filter ansammeln wird die Effizienz des Luftbefeuchters beeintr chtig...

Page 15: ...r Steckdose Das Warnlicht Water Empty leuchtet auf Netzstecker fest in die Steckdose stecken Schalten Sie das Ger t aus F llen Sie neues Wasser in den Wasser tank und setzen Sie das Ger t wieder in Be...

Page 16: ...ben ist es mit dem Symbol eines durchgestrichenen Abfallcontainers gekennzeichnet Solis of Switzerland AG beh lt sich das Recht vor jederzeit technische und optische Ver nderungen sowie der Produktver...

Page 17: ...l air puisse circuler autour de l ap pareil CONSEILS DE S CURIT IMPORTANTS Veuillez lire attentivement le mode d emploi avant d uti liser votre humidificateur Solis Perfect Air afin de prendre connai...

Page 18: ...fait v rifier son bon fonctionnement et sa s curit par Solis ou par un service agr par Solis 35 34 22 Ne placez jamais l appareil de mani re ce qu il risque de tom ber dans de l eau ou que sa paroi e...

Page 19: ...ssoire inappropri ou une mauvaise utilisation peut entra ner un endommagement de l appareil un incendie un court circuit ou des dommages corporels 32 Ne mettez jamais l appareil en marche au moyen d u...

Page 20: ...sup rieure de l appareil 39 LES PROGRAMMES ET AVANTAGES DE VOTRE HUMIDIFICATEUR SOLIS PERFECT AIR R servoir d eau d une capacit de 5 litres Puissance d humidification 350 ml heure Ecran LED S curit en...

Page 21: ...d sactiver le programme d ions maintenir enfonc e pendant au moins 3 secondes Screen Off Touche pour allumer ou teindre l cran et les t moins des programmes ON OFF 1 Touche pour mettre en marche ou t...

Page 22: ...ambiante souhait e ou pour la minuterie clignote apr s la programmation pendant 3 secondes puis l cran indique nouveau l humidit ambiante actuelle Les voyants Avec la touche Mode vous pouvez s lectio...

Page 23: ...les autocollants publicitaires l exception de la plaque signal tique Si l appareil a t entrepos dans un endroit o la temp rature tait tr s basse nous vous recommandons de le laisser tout d abord pend...

Page 24: ...entre 41 et 55 l appareil s lectionne la puis sance moyenne Normal Speed Si l humidit ambiante est entre 56 et 60 l appareil s lectionne la puis sance faible Sleep Speed D une mani re g n rale Plus l...

Page 25: ...en marche avec la touche ON OFF vous pouvez programmer avec la touche Timer dans combien d heures l appareil doit se mettre en marche automatiquement Appuyez plu sieurs fois sur la touche jusqu ce qu...

Page 26: ...en appuyant sur la touche Screen Off D une mani re g n rale Plus la temp rature ambiante est lev e plus l hu midification sera rapide L appareil s teint automatiquement s il n y a plus assez d eau da...

Page 27: ...icules de salet s et des microorganismes s accumulent pendant l uti lisation dans le bac c est pourquoi le bac doit tre nettoy r guli rement au minimum une fois par semaine Une fois le r servoir retir...

Page 28: ...t pas correctement install s 55 54 Attention Le r servoir et le bac ne peuvent pas tre lav s en machine D une mani re g n rale n utilisez pas de produits d entretien agressifs ou r curant ou d ponges...

Page 29: ...une fen tre ou d une porte ouverte Nettoyez la sortie et l entr e d air Remarque M me l int rieure d une seule et m me pi ce plu sieurs valeurs d humidit de l air peuvent tre mesur es La valeur indiq...

Page 30: ...ronnement et la sant et autorise la r utilisation et le recyclage des composants ainsi que des conomies d nergie et de mati res premi res significatives Afin d attirer clairement l attention sur l obl...

Page 31: ...sull umidificatore e non sedersi in alcun modo sul dispositivo NORME DI SICUREZZA IMPORTANTI Prima dell uso dell umidificatore Perfect Air si prega di leggere attentamente queste istruzioni per l uso...

Page 32: ...ivo come il cavo o la spina di alimentazione 63 62 24 Posizionare l apparecchio in modo che non sia soggetto ai raggi diretti del sole Anche le temperature estremamente basse dovrebbero essere evitate...

Page 33: ...r esterno o un telecomando 33 Non utilizzare il dispositivo su una superficie inclinata 34 L apparecchio concepito soltanto per l utilizzo domestico e non per un impiego commerciale 35 Rimuovere e eli...

Page 34: ...Serbatoio dell acqua da 5 litri Umidificazione 350 ml ora Display a LED Blocco sicurezza bambini Impostazione del timer da 1 a 12 ore con spegnimento automatico e accensione automatica Arresto automa...

Page 35: ...nere premuto per almeno 3 secondi Screen Off Tasto per attivare o disattivare il display e gli indicatori delle funzioni ON OFF 1 Tasto per accendere o spegnere il dispositivo 2 Tasto per attivare o d...

Page 36: ...a l umidit corrente della stanza o durante la program mazione l impostazione dell umidit ambiente desiderata o il timer lam peggia per 3 secondi dopo la programmazione quindi il display ritorna all um...

Page 37: ...salute 72 PRIMA DELLA MESSA IN FUNZIONE Prima di utilizzare per la prima volta il vostro umidificatore rimuovere eventuali adesivi pubblicitari ad eccezione della targhetta identificativa Se il dispo...

Page 38: ...il dispositivo sele ziona la potenza media Normal Speed 75 Se l umidit dell ambiente compresa tra il 56 e il 60 l unit seleziona la potenza bassa Sleep Speed Generalmente vale Maggiore la potenza di...

Page 39: ...secondi quindi il valore dell umidit corrente della stanza riapparir accom pagnata da h per indicare che il timer stato attivato A proposito con l accensione automatica possibile premere anche gli al...

Page 40: ...po di tempo dopo che l acqua entrata nella vaschetta dell acqua per consentire alla spugna umidificante di impregnarsi completamente il che migliora notevolmente l effetto di umidificazione 1 ACCENDER...

Page 41: ...completamente il serbatoio Ora se necessario rimuovere il calcare nel serbatoio dell acqua Per fare ci immergere un panno morbido una spugna nella stessa soluzione decalcificante usata per la vaschett...

Page 42: ...ILTRO Nella parte posteriore dell umidificatore sotto alla copertura della presa d aria si trova un filtro a rete Se si accumula troppa polvere sul filtro l efficienza dell umidificatore sar compromes...

Page 43: ...on correttamente inserita nella presa a muro La spia luminosa Water Empty si illumina Inserire bene la spina nella presa a muro Spegnere l appareccchio versare acqua fresca nel serbatoio e riaccendere...

Page 44: ...bbligo di smaltimento regolare dell apparecchio lo stesso contrassegnato con un simbolo di un contenitore di rifiuti barrato Solis of Switzerland SA si riserva il diritto di apportare in qualsiasi mom...

Page 45: ...ace anything on the air humidifier and under no cir cumstances sit down on the appliance IMPORTANT SAFETY PRECAUTIONS Please read through this user manual thoroughly before using your Solis air humidi...

Page 46: ...to contact with water resp other liquids 24 Place the appliance so that it is never exposed to direct sun light Extremely low temperatures should be avoided as well The plastic parts might otherwise c...

Page 47: ...Remove and discard all packaging materials and potential stickers or labels except for the type plate before using the appliance for the first time 36 Check your appliance before every use and make s...

Page 48: ...larm if the water tank resp water tub is drained 3 different ventilation settings and one automatic program Desired air humidity can be set between 40 and 75 or permanent operation Adjustable ion func...

Page 49: ...or deactivating the ion function press and hold for at least 3 seconds Screen Off Button for switching the display and the function lights on or off ON OFF 1 Button for switching the appliance on or o...

Page 50: ...umidity resp the current set ting for desired air humidity during programming resp the timer flashes for 3 seconds after programming before returning to indication of current room air humidity The fun...

Page 51: ...om temperature for approx 1 hour before starting to use it Only use the appliance when the room temperature lies somewhere between 5 C and 40 C The relative humidity should not exceed 80 By the way Re...

Page 52: ...oom air humidity is between 41 and 55 the appliance switches to Normal Speed If the room air humidity is between 56 and 60 the appliance switches to Sleep Speed 103 In general The higher the ventilati...

Page 53: ...en the appliance switches back to displaying the current room air humidity However the letter h is also displayed at the end to indicate that the Timer is activated Also You can press the other functi...

Page 54: ...midification mat soak through This drastically improves the immediate effects of humidification 1 SWITCHING THE APPLIANCE ON Press the ON OFF button to switch the appliance on The current room air hum...

Page 55: ...To do that dip a soft towel a soft sponge into the same descaling solution that you used for the water tub Alternatively you can use white vinegar Remove the limestone deposits in the water tank with...

Page 56: ...metal sponges for cleaning as these might damage the surface CLEANING THE FILTER Beneath the air filter cover on the back of the air humidifier there is a mesh filter Should too much dust collect on t...

Page 57: ...tion power The power plug is not connected to the socket The warning light Empty Water lights up Firmly connect the power plug to the socket Switch the appliance off Fill the water tank up with fresh...

Page 58: ...nderline the duty to dispose of this equipment separately the product is marked with a crossed out dustbin Solis of Switzerland Ltd reserves the right to carry out technical and visual changes and mod...

Page 59: ...uren gordijnen of andere vochtgevoelige materialen en voorwerpen en zorg ervoor dat de lucht vrij rond het apparaat kan circu leren BELANGRIJKE VEILIGHEIDSAANWIJZINGEN Lees voor gebruik van uw Solis l...

Page 60: ...water of een andere vloeistof te halen Gebruik het apparaat pas weer als u het door Solis of een door Solis erkend servicepunt heeft laten controleren op een goede en veilige werking 119 118 22 Plaats...

Page 61: ...at helemaal uitgeschakeld 121 120 30 Schud of verplaats het apparaat niet tijdens gebruik Verplaats het apparaat nooit als het met water is gevuld en ingeschakeld is Om het apparaat te verplaatsen moe...

Page 62: ...mogelijk dat een externe hygrostaat in bepaalde omstandigheden een andere luchtvochtigheidswaarde kan aangeven 53 Vul het waterreservoir alleen zoals beschreven in de gebruiks aanwijzing Er mag nooit...

Page 63: ...chakeling van de ionenfunctie minstens 3 seconden ingedrukt houden Screen Off knop voor in en uitschakeling van het display en de functiemeldingen ON OFF 1 knop voor in en uitschakeling van het appara...

Page 64: ...htigheid en tijdens het program meren de geselecteerde instelling voor de kamerluchtvochtigheid of de timer knippert na het programmeren 3 seconden en vervolgens verschijnt de huidige kamerluchtvochti...

Page 65: ...n uw gezondheid 128 VOOR DE INGEBRUIKNAME Voordat u uw luchtvochtiger voor de eerste keer gebruikt moet u alle reclames tickers verwijderen met uitzondering van het typeplaatje Werd het apparaat bij z...

Page 66: ...ochtigheid tussen 56 en 60 dan kiest het apparaat het laagste vermogen Sleep Speed 131 In het algemeen geldt hoe hoger het ventilatievermogen hoe intensiever de luchtbevochtiging en hoe sneller de ing...

Page 67: ...en in stappen van een uur uitvoeren Na de laatste knopdruk knippert het ingestelde aantal uren gedurende drie seconden Ver volgens verschijnt opnieuw de waarde van de huidige kamerluchtvochtigheid met...

Page 68: ...in de waterbak is gelopen zodat de bevochtigingsmat de tijd heeft om het water op te nemen Dit zorgt voor een aanzienlijke verbetering van het bevochtigingseffect 1 APPARAAT INSCHAKELEN Druk op de ON...

Page 69: ...rvoor een zachte doek spons in dezelfde ontkalkingsmiddelop lossing die u ook voor de waterbak heeft gebruikt Als alternatief kunt u ook witte azijn gebruiken Verwijder de kalkafzettingen in het water...

Page 70: ...schadigen HET FILTER REINIGEN Aan de achterzijde van de luchtbevochtiger bevindt zich een netfilter onder de afdekking van de luchtingang Te veel stof op het filter kan de effici ntie van de luchtbevo...

Page 71: ...it niet in het stopcontact Het waarschuwings lampje Water Empty licht op Steek de stroomstekker in het stopcontact Schakel het apparaat uit Vul het waterreservoir met schoon kraan water en schakel het...

Page 72: ...info nl solis com www solisonline nl Belgi Belgique Belgien Luxembourg Solis Benelux BV Stadskade 318 NL 7311 XX Apeldoorn Address for return shipment of goods differs please refer to Afwijkend adres...

Reviews: