background image

14

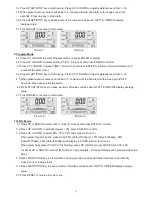
3.4 Press START/STOP key to start rowing. Press UP or DOWN to adjust resistance level from 1~16.   

3.5 When preset workout value count down to 0, console will stop and alarm with a beep sound for 8   

      seconds. Press any key to stop alarm. 

3.6 Press START/STOP key to pause workout. All values will be saved. WATT & TIME/500 display 

average value. 

3.7 Press RESET to reverse to main menu. 

Picture 7 

Picture 8

!

4. Program Mode

4.1 Press UP or DOWN to select Program mode and press ENTER to confirm.

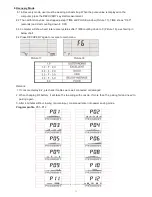
4.2 Press UP or DOWN to select profile (P1~P12, Picture 9) and press ENTER to confirm.

4.3 Press UP or DOWN to preset TIME  ( Picture 10) and press ENTER to confirm. (Time and Meters can 't

        preset at the same time.) 

4.4 Press START/STOP key to start rowing. Press UP or DOWN to adjust resistance level from 1~16. 

4.5 When preset workout value count down to 0, console will stop and alarm with a beep sound for 8 

       seconds. Press any key to stop alarm. 

4.6 Press START/STOP key to pause workout. All values will be saved. WATT & TIME/500 display average 

    value. 

4.7 Press RESET to reverse to main menu. 

Picture 9 

Picture 10


5.H.R.C. Mode

5.1 Press UP or DOWN to select H.R.C. mode (Picture 4) and press ENTER to confirm.

5.2 Press UP or DOWN to set AGE (preset = 25), press ENTER to confirm.

5.3 Press UP or DOWN to select 55%, 75%, 90% and Target (Picture 11).

When select Target H.R., the preset value 55% (default:107bpm), 75% (default:146bpm), 90%   

(default:175bpm), TAG (default:100bpm) will display in PULSE window (Picture 11). 

When select TAG, preset PULSE 100 is flashing, press UP or DOWN to set PULSE from 0-30~230. 

5.4 Press UP or DOWN to preset TIME (Picture 12) (or Meters). (Time and Meters can't preset at the s ame

     time.)   

5.5 Press START/STOP key to start workout. During exercise, system will adjust load level automatically 

based on user rowing status. 

5.6 Press START/STOP key to pause workout. All values will be saved. WATT & TIME/500 display average 

       value. 

5.7 Press RESET to reverse to main menu. 

Summary of Contents for SR500

Page 1: ...OWNER S MANUAL Model 16808535000 Please carefully read this entire manual before operating your new rowing machine ...

Page 2: ... NSTRUCTIONS SSEMBLY NSTRUCTIONS PERATION OF 9OUR EW NDOOR 2OWER XPLODED 6IEW IAGRAM 0ARTS IST 4RAINING UIDELINES Using Heart Rate Monitor Trouble Shooting ANUFACTURER Sȷ IMITED 7ARRANTY 21 ATTENTION 4 3 2 7 2 3 4 2 RESIDENTIAL USE ONLY 3 7 22 4 2 4 00 4 9 4 2 00 4 VOIDS4 3 7 22 49 43 4 2 49 1 26 27 28 ...

Page 3: ... warranty contact Dyaco Canada Inc at 1 888 707 1880 Please take a moment at this time to record below the name of the dealer their telephone number and the date of purchase for easy contact in the future We appreciate your confidence in SOLE and we will always remember that you are the reason that we are in business Please complete and mail your registration card today and enjoy your new Rower Yo...

Page 4: ...or 6 No changes must be made which might compromise the safety of the equipment 7 It is recommended to have a minimum of 2 safe clearance around the exercise equipment while in use 8 Ensure that the rail is locked properly when in storage 9 Do not allow children to use or play on the rower Keep children and pets away from this equipment at all times while exercising 10 The rower should only be use...

Page 5: ...TY CAUTION Please be careful when unpacking the carton 4 FITNESS EQUIPMENT SAFETY INSTRUCTIONS To disconnect turn all controls to the off position then remove the plug from the outlet Do not operate equipment on deeply padded plush or shag carpet Damage to both carpet and equipment may result Before beginning this or any exercise program consult a physician This is especially important for persons...

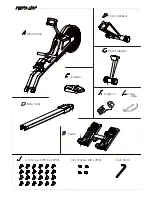
Page 6: ...2 465 56 Main frame Front stabilizer Rear stabilizer Saddle Slide track J1 Screw M8 16 x 24PCS J2 Washer M8 x 4PCS Tool 5mm Adaptor Chest strap Pedal 5 ...

Page 7: ...wer provides a convenient and simple method to begin your assault on getting your body in shape and achieving a happier and healthier lifestyle Before reading further please review the drawing below and familiarize yourself with the parts that are labeled Read this manual carefully before using the Sole SR500 Indoor Rower Although Dyaco Canada Inc constructs its products with the finest materials ...

Page 8: ...d follow each assembly step Warning 1 As the rower is heavy the poly foam is there to help support the rower until the assembly steps are completed Do not dispose of the packaging until the rower is assembled 2 Open the box as shown below Keep the carton under the rower while you are assembling the rower This will protect your floor area 7 ...

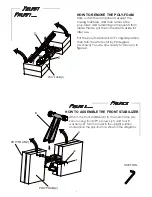
Page 9: ...e put the components aside for later use Put the poly foam back to it s original position then turn the whole unit by 90 degrees as shown You are now ready to move on to figure 2 HOW TO ASSEMBLE THE FRONT STABILIZER Attach the front stabilizer B to the main frame A Secure using four M8 16 screws J1 and four 8 washers J2 Turn the rower in the upright position and remove the poly foam as shown in th...

Page 10: ...main frame A remove the poly foam 3 4 first Step 1 Attach the saddle E on to the slide track D using four screws J1 Step 2 Attach the slide track D to the main frame A using six screws J1 Please note before using the pull rope for exercise it is necessary to take off the strap holder first If seat is not pre assembled attach the seat E to the seat bracket E1 of the slide track D Secure using four ...

Page 11: ...when you are in motion G1 G2 orange buttons pedal strap J1 G D A4 A HOW TO ASSEMBLE THE PEDAL SUPPORT TUBE Untighten the knob A4 Pull down on the knob A4 and lift the seat slide track D up while being careful not to pinch your hand with the seat Fit the pedal supporting tube G to the main frame A Secure using four M8 16 screws J1 To lower the seat slide track pull the knob A4 and lower the seat sl...

Page 12: ...pply The power supply must be plugged into the power jack located on the front of the unit near the stabilizer tube Next plug the power supply into the appropriate wall outlet When not in use it is recommended to unplug the power supply from the wall outlet If the product has been exposed to cold temperatures allow the product sit in room temperature to warm up before plugging in the power supply ...

Page 13: ...e level when rowing Ǹ Setting range 1 16 STROKES Ǹ Complete movements of rowing Ǹ Display range 0 9999 Ǹ Scan every 6 seconds with Uotal Strokes Ǹ Total strokes will be cleared after power off adaptor unplugged TIME Ǹ Total workout time display when rowing MANUAL Ǹ Manual mode workout PROGRAM Ǹ 12 Programs preset to select H R C Ǹ Target Heart Rate rowing mode RACE Ǹ User and PC rowing competition...

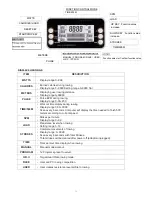
Page 14: ...nual Mode 3 1 Press START STOP key in main menu may start rowing directly in Manual mode 3 2 Press UP or DOWN to select Manual mode Picture 2 and press ENTER to confirm 3 3 Press UP or DOWN to set target value of TIME METERS CALORIES PULSE press ENTER to confirm Picture 7 Time and Meters can t preset at the same time ITEM DESCRIPTION Up Ǹ Increase function value or setting selection Down Ǹ Decreas...

Page 15: ...h a beep sound for 8 seconds Press any key to stop alarm 4 6 Press START STOP key to pause workout All values will be saved WATT TIME 500 display average value 4 7 Press RESET to reverse to main menu Picture 9 Picture 10 5 H R C Mode 5 1 Press UP or DOWN to select H R C mode Picture 4 and press ENTER to confirm 5 2 Press UP or DOWN to set AGE preset 25 press ENTER to confirm 5 3 Press UP or DOWN t...

Page 16: ...y to pause workout All values will be saved WATT TIME 500 display average Value 6 6 Press RESET to reverse to main menu Picture 13 Picture 14 7 USER Mode 7 1 Press UP or DOWN to select USER mode Picture 6 and press ENTER to confirm 7 2 Press UP or DOWN to set resistance level of each column Total column 15 press ENTER to next one Hold on pressing MODE for 2s to finish or quit setting 7 3 Press UP ...

Page 17: ...ttery it will take 15s to pairing with console If more than 15s pairing fail and need to pairing again 3 After 4 minutes without rowing or pulse input console will enter into power saving mode Program profile P01 P12 I I I I I I I I I I I I I I I I I I I I I I I I I I I I I I I I I I I I I I I I I I I In n n n n n n n n n n n n n n n n n n n n ns s s s s s s s s s s s s s s s s st t t t t t t t t ...

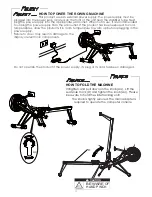
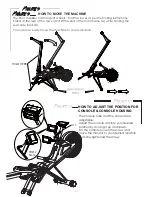
Page 18: ...n For the console loosen the screw and move the monitor to your desired location and re tightened the screw HOW TO MOVE THE MACHINE The front stabilizer has transport wheels Fold the rower as per the folding instructions Stand at the rear of the rower and lift the end of the main frame A while holding the seat slide track D You can now easily move the machine to a new location HOLD HERE 17 ...

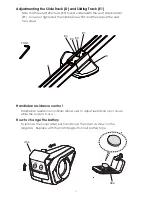
Page 19: ...he middle screw first and then adjust the next two screws Handle bar resistance controller allows user to adjust resistance up or down while the rower is in use To remove the cover A64 push and move the cover as shown in the diagram Replace with the matching button cell battery type Handlebar resistance control How to change the battery 18 A64 A64 DOWN UP LOAD CONTROL ...

Page 20: ...19 ...

Page 21: ... 75 00 187 81 6 6 187 81 6 1 75 00 7 6 5 0 38 6 5 0 7 16 21 7 6 7 0 1 7 ɾ 7 635 1 2 6 5 ɾ ɾ 7 6 5 6 5 0 3 6 6 5 0 38 3 7 3 6833257 1 78 6 5 0 3 6 5 0 3 5 5 1 3 675 3 6 5 0 3 67 87721 6 5 0 521 6833257 1 2 5 7 ɾ 6 5 0 21 5 1 3 67 3 5 1 6 5 0 7 16 21 00 2162 1 6 1625 5 ɾ 7 00 02725 1 3 ɾ 205ȹ 5 5 6 1625 5 6 5 0 1 29 5 5 6 5 ɾ 3725 67 675 3 1 29 5 6 5 0 6 5 0 6 5 0 6 5 0 6 5 29 5 2 635 1 2 6 5 0 31 6...

Page 22: ...en uptake MVo2 This is often referred to as your aerobic capacity The effort that you can exert over a prolonged period of time is limited by your ability to deliver oxygen to the working muscles Regular vigorous exercise produces a training effect that can increase your aerobic capacity by as much as 20 to 30 An increased MVO2 indicates an increased ability of the heart to pump blood of the lungs...

Page 23: ...u stop exercising or do not do your program often enough you will lose the benefits you have gained Regular workouts are the key to success Warm Up Every exercise program should start with a warm up where the body is prepared for the effort to come It should be gentle and preferably use the muscles to be involved later Stretching should be included in both your warm up and cool down and should be ...

Page 24: ...ember breathing involves the intake and distribution of oxygen which feeds the working muscles Rest Periods Once you start your exercise program you should continue through to the end Do not break off halfway through and then restart at the same place later on without going through the warm up stage again The rest period required between strength training exercises may vary from person to person T...

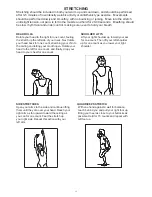
Page 25: ...m until they are over your head Reach your reach behind you and pull your right foot up right arm as far upward toward the ceiling as Bring your heel as close to your buttocks as you can for one count Feel the stretch up possible Hold for 15 counts and repeat with your right side Repeat this action with your left foot up left arm STRETCHING Stretching should be included in both your warm up and co...

Page 26: ...nts can and hold for 15 counts HAMSTRING STRETCHES CALF ACHILLES STRETCH Sit with your right leg extended Rest the sole of Lean against a wall with your left leg in front your left foot against your right inner thigh Stretch of the right and your arms forward Keep toward your toe as far as possible Hold for 15 counts your right leg straight and the left foot on the Relax and then repeat with left ...

Page 27: ...tely against bare skin assures you of proper operation If you wish you may wear the transmitter over a shirt To do so moisten the areas of the shirt that the electrodes will rest upon Note The transmitter is automatically activated when it detects activity from the user s heart Additionally it automatically deactivates when it does not receive any activity Although the transmitter is water resista...

Page 28: ...r Sending unit not connected Securely plug sending unit into the socket of monitor Sending unit not working properly Replace sending unit Monitor not working properly Replace monitor No tension Tension is no difference Belt drops off the gear of the flywheel Put the belt back on the gear of the flywheel Resistant cable is not connected to the motor Connect the resistant cable to the motor Motor is...

Page 29: ...in ordinary household use 3 Damages caused by services performed by persons other than authorized Dyaco Canada Inc service companies use of parts other than original Dyaco Canada Inc parts or external causes such as corrosion discoloration of paint or plastic alterations modifications abuse misuse accident improper maintenance inadequate power supply or acts of God 4 Products with original serial ...

Page 30: ......

Page 31: ......

Page 32: ......

Reviews: