background image

SOLA 4000 - Operation

JUE 401266

70

5 Operating Instructions

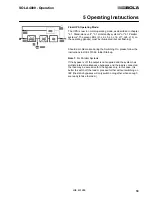
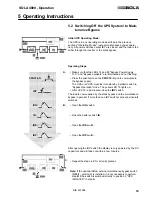
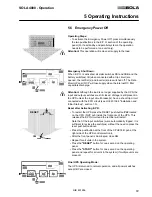
5.3 Switching On any one unit within a Sys-

tem (Parallel and Hot-standby Systems)

Initial UPS Operating Mode

The UPS module was switched off using the procedure in section
5.4, all of the power switches in this module are in the off position,
the load is supplied by the remaining unit(s) within the system.

• If this UPS module has an input supply separate to the other

units in the system, switch on the external mains supply for this
UPS module; both the rectifier input and bypass input when
separate supplies are provided.

• Open the UPS front door, or the part necessary to allow access

to the switches IRP, IRE, IUG.

WARNING: E

NSURE


THAT


THE

 IUG 

AND

 IRE 

SWITCHES


ARE


OPEN

.

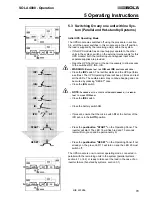
IRP:

• Close the 

IRP

 switch. The rectifier starts and the UPS performs

a self test. The UPS Operating Panel will beep 3 times and test
all the LEDs. The audible alarm may continue beeping and can
be muted by pressing "RESET" once.

IUG:

• Close the 

IUG

 switch.

NOTE: I

N


ORDER


NOT


TO


AFFECT


SYSTEM


PERFORMANCE

IT


IS


IMPOR

-

TANT


TO


CLOSE

 IUG 

NOW

.

IRE:

• Close the 

IRE

 switch.

IB:

• Close the battery switch 

IB

.

IPR:

 S1

• If present, ensure that the micro switch 

S1

 at the bottom of the

IPR pcb is in the 

AUTO

 position.

START: 

• Press the 

pushbutton "START"

 on the Operating Panel. The

inverter will start. The LED 16 will flash red and 10 seconds
later will turn green and be permanently lit.

RESET: 

• Press the 

pushbutton "RESET"

 on the Operating Panel.If not

already on, the green LED 17 will turn on and the LED 29 must
switch off.

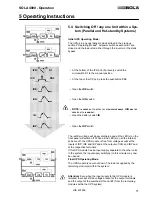
The UPS module is now in normal operating mode, connected in
parallel with the remaining units in the system (parallel systems,
section 4.1 or 4.2) or ready to take over the load in the case of an
inverter failure (hot-standby systems, section 3.1)

.

Summary of Contents for Uninterruptible Power Supply SOLA 4000

Page 1: ...JUE 401263 OPERATING MANUAL Uninterruptible Power Supply SOLA 4000 ...

Page 2: ...ITIAL START UP SECTION 3 JUE 401266 OPERATION SECTION 4 JUE 401267 OPERATING PANEL SECTION 5 JUE 401268 PCB DESCRIPTION SECTION 6 JUE 401269 TECHNICAL DATA Contents of JUE 401263 ISSUED A4 3 1 JUE 401263 04 02 97 M Porpora T Boon 04 02 97 We reserve the right to modify the contents of this document without notice BEST POWER BORRI ELETTRONICA INDUSTRIALE S r l Via 8 Marzo Soci Bibbiena AREZZO See R...

Page 3: ...any protective covers from inside the UPS cabinet This equipment must be installed and serviced by qualified person nel The unit contains Lead Acid batteries which must be disposed of correctly in compliance with the local regulations To completely isolate the equipment the switches IRP IRE IBY IUG and IB must be switched off the input supply and the battery supply must be isolated from the UPS an...

Page 4: ...g on this circuit The unit is provided with the E P O Emergency Power Off function This function is activated by pressing simultaneously the two push buttons on the bottom part of the Front Panel This function provides UPS disconnection from the load and from the battery Dangerous voltages will still be present inside the unit if a shunt trip of the input supply switch is not provided for During e...

Page 5: ...12 Pulse Rectifier Block Diagram 3 FIG 1 4 Inverter Block Diagram 4 FIG 1 5 Static Switches Block Diagram 4 FIG 1 6 Maintenance Bypass Block Diagram 6 FIG 1 6 1 Wall mounted Maintenance Bypass Block Diagram 6 FIG 1 7 Hot Standby Operation Block Diagram 6 FIG 1 8 Parallel Operation Block Diagram 7 FIG 2 1 SOLA 4000 Operating Panel 8 SOLA 4000 General System Description Contents of JUE 401264 ISSUED...

Page 6: ...t all mains distortions are filtered out Therefore all loads connected to the UPS system are protected against mains disturbances that can be present in industrial electricity supply systems This is especially important for sensitive electronic devices e g computer systems control systems medical equipment Complete Protection against Mains Failures During long term or short term ac mains supply in...

Page 7: ...is connected to the mains via the commutation chokes which reduce the mains distortion created by the rectifier The dc output of the rectifier feeds the inverter and the battery The battery is connected to the rectifier through a satura tion choke which reduces ac ripple current to the battery thus ensuring the maximum battery life time The rectifier is designed to feed both the inverter at maximu...

Page 8: ...e use of a high carrier frequency for the PWM and a dedicated ac filter circuit consisting of the transformer and capacitors ensure a very low distortion of the output voltage THD 1 on linear loads Every phase voltage of the inverter output is controlled separately thus ensuring constant and equal UPS output voltages even with highly unbalanced loads The inverter is designed specifically for the a...

Page 9: ... line and synchronisation are not met the inverter will continue to operate with reduced output voltage under overload conditions or the inverter will stop if an inverter failure occurs In this second case the system will i commutate to a second standby inverter in the case of a hot standby system ii the remaining inverters will take the load in the case of a parallel redundant system or iii the U...

Page 10: ...ce bypass network and the inverter As an option an external wall mounted no break maintenance bypass switch see FIG 1 6 1 may be supplied by SOLA This switch provides simple one step transfer to maintenance bypass version 1 without the possibility of erraneous switching and without interruption to the load For the version 2 type maintenance bypass an additional position is provided in order to com...

Page 11: ...at controls all of its functions thus ensuring perfect redundancy 1 10 Parallel Systems This is identical to the configuration in section 1 9 except that the rated load is normally equal to the rating of the UPS and there is therefore no redundant unit UPS units of different kVA ratings may be connected in parallel in this configuration proportionally sharing the load Note that the parallel config...

Page 12: ...tton 2 2 Remote Monitoring The operating panel provides an option to communicate with a computer through RS232 and RS485 interfaces The RS232 serial interface communicates with a PC or mainframe computer with a SNMP protocol SEC With the RS485 interface it is possible to transmit all necessary data up to a distance of 400m or to connect a remote monitoring panel 2 3 Emergency Power Off In case of ...

Page 13: ... Figures FIG 1 1 1 Moving the UPS 10 60kVA units 3 FIG 1 1 2 10 60kVA UPS floor space 4 FIG 1 1 3 80 120kVA UPS floor space 4 FIG 1 1 4 AC001 transformer cabinet 4 FIG 1 1 5 AC002 transformer cabinet 4 FIG 1 1 6 10 60kVA UPS room size 5 FIG 1 1 7 80 120kVA UPS room size 6 FIG 1 1 8 80 120kVA UPS room size 7 FIG 1 2 1 UPS connection diagram version 1 9 FIG 1 2 2 UPS connection diagram version 2 11 ...

Page 14: ...grated maintenance bypasses and separate bypass terminals 27 FIG 1 11 2Interconnection of parallel units with common maintenance bypass and separate bypass terminals 28 FIG 1 11 3Location of connectors on the IBYBP CP pcb 29 FIG 1 11 4Interconnection of control BUS cables between parallel units 29 FIG 1 12 1Internal battery connections 31 FIG 1 12 2B3 38 battery tray in the first level 32 FIG 1 12...

Page 15: ...eep it away from movable parts If the UPS system is already unpacked please ensure storage in a clean environment protected from dust away from heat sources Handling the UPS System The UPS can be simply lifted and moved by means of a lifting truck or a fork lifter for 80 120kVA units For 10 60kVA units remove the front side and rear side base sheets and attach two angle irons with 8MA bolts to the...

Page 16: ...ery kg Weight with Battery kg Static Load kg m 10 310 597 1277 15 310 597 1277 20 335 622 1330 30 350 637 1362 40 480 1026 60 520 1112 80 810 1176 100 840 1219 120 870 1263 TAB 1 1 1 UPS weight Floor Space Required FIG 1 1 2 10 60kVA UPS floor space FIG 1 1 3 80 120kVA UPS floor space 1 Installation ...

Page 17: ...SOLA 4000 Installation and Initial Start Up JUE 401265 17 1 Installation Room Size for 10 60 kVA UPS FIG 1 1 6 UPS 10 60kVA room size ...

Page 18: ...t Up JUE 401265 18 Room Size for 80 120 kVA UPS with auxiliary AC001 cabinet AC001 cabinets are used for SOLA 4000 units with 12 pulse chargers without galvanic separation and with THD Filters FIG 1 1 7 UPS 80 120kVA room size 1 Installation ...

Page 19: ... JUE 401265 19 Room Size for 80 120 kVA UPS with auxiliary AC002 cabinet AC002 cabinets are used for SOLA 4000 units with 12 pulse chargers with galvanic separation and with auxiliary transformers FIG 1 1 8 UPS 80 120kVA room size 1 Installation ...

Page 20: ...alled remotely from the UPS area must be fitted with the following label Isolate uninterruptible power supply UPS before working on this circuit General All electrical connections must be made in accordance with local standards and all input terminals 1 L1 1 L2 1 L3 and if existing 4 L1 4 L2 4 L3 must be protected by external fuses The tables give recommended values for fuse sizes and cable cross ...

Page 21: ...art Up JUE 401265 21 Version 1 SOLA 4000 with Common Input for Rectifier and Bypass FIG 1 2 1 UPS connection diagram version 1 Note Internal Battery only for 10 30kVA units Note Customer supplied input fuses see table 1 2 1 1 Installation ...

Page 22: ... 125 25 80 4x70 160 50 100 4x70 200 50 120 4x120 250 70 TAB 1 2 1 UPS input cables and fuses version 1 Output Battery Cables and Max Cur rent Ratings for Battery Overcurr pro tection Type SOLA 4000 Battery cables mm Output cables mm Max inv input current Vdc 320V 10 2x16 4x10 25 15 2x16 4x10 40 20 2x25 4x16 50 30 2x25 4x35 75 40 2x35 4x25 100 60 2x50 4x35 150 80 2x70 4x50 200 100 2x95 4x70 250 120...

Page 23: ... 4000 with Separate Inputs for Rectifier and Bypass FIG 1 2 2 UPS connection diagram version 2 Note Internal Battery only for 10 30kVA units Note Customer supplied rectifier input fuses see table 1 2 5 Note Customer supplied bypass input fuses see table 1 2 5 1 Installation ...

Page 24: ... 70 TAB 1 2 3 UPS input cables version 2 Input Fuses Type SOLA 4000 Rect Fuses A Bypass Fuses A 10 25 25 15 35 35 20 50 50 30 63 63 40 100 100 60 100 125 80 125 160 100 160 200 120 200 250 TAB 1 2 4 UPS input fuses version 2 Output Battery Cables Type SOLA 4000 Battery cables mm Output cables mm Max inv input current Vdc 320V 10 2x16 4x10 25 15 2x16 4x10 40 20 2x25 4x16 50 30 2x25 4x35 75 40 2x35 ...

Page 25: ...1 UPS connection diagram with input and output transformers to adapt the UPS to the on site voltage SOLA 4000 with isolation transformer of the bypass supply FIG 1 3 2 UPS connection diagram with bypass input transformer to isolate the neutral line 4 N may be connected to the supply neutral or earth or left discon nected Note Internal Battery only for 10 30kVA units 1 Installation ...

Page 26: ...SOLA 4000 Installation and Initial Start Up JUE 401265 26 SOLA 4000 with THD filters FIG 1 3 3 UPS connection diagram with THD filters Note Internal Battery only for 10 30kVA units 1 Installation ...

Page 27: ... rectifier FIG 1 3 4 Installation of 12 pulse units without galvanic isolation SOLA 4000 with 12 pulse charger rectifier and galvanic isolation of the input sup ply FIG 1 3 5 Installation of 12 pulse units with galvanic isolation Note Internal Battery only for 10 30kVA units 1 Installation ...

Page 28: ... corner of the mother board for the inverter bypass electronics IBYBP CP see figure 1 10 3 If the standard SOLA no break wall mounted maintenance bypass switch is used optional in the MB3 cabinet a normally open contact is provided For the version 2 maintenance bypass 3 position an additional contact is provided which automatically isolates the UPS system EPO when switched to the UPS ISO LATED pos...

Page 29: ...ient to feed one contact into one unit only however they may be connected in parallel at M4 of IBYBP CP Pin1 and Pin 2 for all units In this case separate terminals may be provided within the MB3 cabinet see FIG 1 9 2 and 1 10 2 Note2 The cable used must be twisted pair with a total shield This shield must be grounded at one end the cabinet of the UPS may be used 1 Installation ...

Page 30: ...ard computer connec tion The following interface cables are available see also JUE 300 599 IBM AS 400 Novell 3 COM Banyan Vines M1 a terminal block for individual configurations 1 5 2 Functions Contacts for the following alarm conditions are available Inverter Operation N CN1 pin 6 Bypass Operation B CN1 pin 8 Mains Failure MF CN1 pin 5 Battery Low BL CN1 pin 7 By means of the DIP switch SW1 the s...

Page 31: ...MOK 7 7 BOK BOK BOK BOK BOK BOK BOK 8 8 BL 9 9 0 V 10 Not Used TAB 1 5 2 2 Allocation of the pins for the output connectors CN1 and M1 for the various programming configurations of TAB 1 5 2 1 Key to table 1 5 2 2 when contact is closed with respect to pin 4 N Inverter Operation B Bypass Operation MF Mains Failure BL Battery Low MF 0V when mains failure 12V when mains OK BL 12V when battery low ot...

Page 32: ...connected in parallel at M4 of IBYBP CP Pin5 and Pin 6 for all units N O only or series for N C Note 3 To completely isolate the UPS system from all voltage with the emergency power off EPO it is necessary to install trippable circuit breaker on the input supply to terminals 1 L1 1 L2 1 L3 and 4 L1 4 L2 4 L3 and 4 N if installed The trip coil is then connected to the terminal M1 on the CPU NCP pcb...

Page 33: ... it is sufficient to feed one contact into one unit only however they may be connected in parallel at M4 Pin7 and Pin 8 for all units If it is necessary to reduce the current supplied by the diesel generator then a second voltage free contact again normally open is required and must to be connected to the connector M8 Pin 1 and Pin 2 on the rectifier electronic mother board RBPHC16 see FIG 1 7 2 F...

Page 34: ...available providing more contacts compatible with most common configurations eg AS400 Novell etc A Remote panel may also be purchased with identical functions to the front operating panel Note 2 To achieve a single common alarm for parallel or hot standby units the contacts of each unit may be interconnected in parallel normally open or series normally closed 1 9 Remote Reset The UPS system may be...

Page 35: ...installation for each unit must be performed in accordance to the installation of single units as described in the previous sections Additionally to this the outputs must be connected in parallel as shown in FIG 1 10 1 or in FIG 1 10 2 FIG 1 10 1 Interconnection of hot standby units with integrated maintenance bypasses and separate bypass terminals Note Internal Battery only for 10 30kVA units 1 I...

Page 36: ...ndby units with external maintenance bypass and separate bypass terminals Note The internal maintenance bypass IBY may or may not be installed in this con figuration Note This cable must be twisted pair total shield refer to section 1 4 Note Internal Battery only for 10 30kVA units 1 Installation ...

Page 37: ...her CN12 or CN13 on the mother board of the Inverter Bypass elec tronics IBYBP CP of the other unit s Note If the unit is to be added to one already installed stand alone unit which has not been previously tested in a hot standby configu ration the supports and mounting screws to mount the cable to the p c b are supplied with the cable They must be mounted at both sides of the selected connector i...

Page 38: ...ally to this the outputs must be connected in parallel as shown in FIG 1 11 1 or in FIG 1 11 2 Care must be taken with the installation of the bypass line and in particular that the cables from the point of common coupling of the input supply to the terminals 1 L1 1 L2 1 L3 or 4 L1 4 L2 4 L3 4 N if an optional separate bypass input is installed are of equal length Likewise the output cables from t...

Page 39: ...allation and Initial Start Up JUE 401265 39 FIG 1 11 1 Interconnection of parallel units with integrated maintenance bypasses and separate bypass terminals Note Internal Battery only for 10 30kVA units 1 Installation ...

Page 40: ...rallel units with common maintenance bypass and separate bypass terminals Note The internal maintenance bypass may or may not be installed in this configuration Note This cable must be twisted pair total shield refer to section 1 4 Note Internal Battery only for 10 30kVA units 1 Installation ...

Page 41: ... end connected to the corresponding connector of another unit In this way all units will be interconnected by two cables in a BUS Communication system Daisy chain connection Note If the unit is to be added to one already installed stand alone unit which has not been previously tested in a parallel configura tion the supports and mounting screws to mount the cable to the p c b are supplied with the...

Page 42: ...eries should be tightened with a torque wrench max 7 Nm 1 12 1 Installation of Internal batteries SOLA 4000 10 30kVA Internal Battery 24Ah Installation Place five battery blocks on the trays of the first level Place nine battery blocks on the trays of the second third and fourth level Interconnect the blocks in series see FIG 1 12 1 Warning after assembly there is a voltage of 67 5 V on the first ...

Page 43: ...meter 16 mm2 Cable 2 n 8 L 420 mm diameter 16 mm2 Cable 3 n 4 L 490 mm diameter 16 mm2 Cable 4 n 2 L 650 mm diameter 16 mm2 Support CA1 n 4 See Fig CA1 Support CA2 n 9 See Fig CA2 FIG 1 12 1 Internal Battery connections Copper bars for battery connection Two copper plates diam 0 5 mm are used 1 Installation CA2 CA1 ...

Page 44: ... 2 Place six battery blocks on the trays of the second and third levels see FIG 1 12 3 Interconnect the blocks in series block 1 negative pole block 2 positive pole Warning after assembly there is a voltage of 48 V on the first level and 72 V on the second and third levels If necessary secure with strapping against vibrations Insert the trays into the battery cabinet as shown in FIG 1 12 4 FIG 1 1...

Page 45: ...ys with the batteries on the correspond ing levels in the UPS Connect the battery blocks of the various levels to the battery switch IB and IB to the terminals as shown in FIG 1 12 5 and FIG 1 12 6 Ensure appropriate ventilation of the battery room according to the standard EN50091 1 to prevent the risk of an explosion 1 Installation ...

Page 46: ...SOLA 4000 Installation and Initial Start Up JUE 401265 46 FIG 1 12 6 B3 38 internal electrical connections 1 Installation ...

Page 47: ...tery blocks from the front and rear sides Warning after assembly there is a voltage of 192 V at the front and rear side Remount the battery switch IB and the terminals Important Open battery switch IB before connecting the cables Connect the battery blocks on the various levels to the battery switch IB and IB to the terminals as shown in FIG 1 12 8 and FIG 1 12 9 FIG 1 12 7 Battery cabinet B3 65 F...

Page 48: ...SOLA 4000 Installation and Initial Start Up JUE 401265 48 FIG 1 12 9 B3 65 internal electrical connections 1 Installation ...

Page 49: ...attery cabinet Connection of Auxiliary Contacts For the standard battery cabinet the terminals C1 C2 C3 and C4 are connected to the corresponding terminals in the UPS cabinet as in FIG 1 12 10 If a battery is installed without standard cabinet s then a voltage free auxiliary contact normally closed should be provided along with a dc shunt trip circuit for the battery circuit breaker fuse switch Th...

Page 50: ...S Check that the supply voltage at terminals 1 L1 1 L2 1 L3 is within 10 of the UPS rated voltage Close IRP Does the display on the CPHC16 R pcb for the rectifier give the indication P yes The phase rotation at the input is incorrect Open IRP switch off the external mains supply and exchange any two of the cables at input terminals 1 L1 1 L2 1 L3 Return to A no The rectifier supply voltage is o k ...

Page 51: ... inverter frequency is now free running without the internal oscillator On the SS FY pcb measure the inverter frequency on the screws Inverter R S or T with respect to neutral Check that the frequency is set at the required value 50 60 Hz 0 1 Hz It can be adjusted with P1 on the ICT 2 pcb Re move the pin from S1 The inverter now synchronises with the internal oscillator Make sure that the batterie...

Page 52: ...ce yes Check again the input supply Check that it is in accordance with the UPS rating label no The mains frequency must be within tolerance in order for the bypass to be availabe yes Continue with F F Synchronisation Check Check that the green LED LD1 on the ICT 2 pcb is permanently lit and there is no S indication on the bypass electronics On the SS FY pcb measure the voltage between the screws ...

Page 53: ...lose IRP again After 30 seconds measure the battery voltage Is the battery voltage lower than the set floating charge voltage no The rectifier is not yet in battery current limitation In order to check the battery current limitation you must discharge the batteries for a longer period Return to H yes The battery current limitation can now be checked according to the battery installed Standard sett...

Page 54: ...s no The output power interconnections are incorrect and must be reconnected correctly Switch off both units and the mains supply and recheck the connections Return to J yes Continue Close IUG of the first unit The two static bypasses SSB are now connected in parallel Close the battery switch of the first unit Start the unit by pressing START on the front operating panel when the inverter is synch...

Page 55: ... supply and recheck the connections Return to K yes Continue Close the IUG switches on all units The static bypasses SSB will now be connected in parallel for all units Close IRP of all units When the front operating panel is initialised on all units after 3 beeps close the battery switches of the respective units Press the START pushbutton on any one unit The inverter will start and when synchron...

Page 56: ... must be balanced to within 1 by finely adjusting the inverter voltage of phase S P4 on ICT 2 i e If the module is supplying more current than the system average the inverter voltage of this module must be reduced slightly Repeat for phase R currents by finely adjusting the R phase inverter voltage of this module with P3 on the ICT 2 pcb until the currents on the phase R of all modules are equal t...

Page 57: ...tenance Bypass 11 5 2 Switching Off the UPS System to Maintenance Bypass 13 5 3 Switching On any one unit within a System Parallel and Hot standby Sys tems 14 5 4 Switching Off any one unit within a System Parallel and Hot standby Sys tems 15 5 5 Emergency Power Off 16 We reserve the right to modify the contents of this document without notice BEST POWER BORRI ELETTRONICA INDUSTRIALE S r l Via 8 M...

Page 58: ...itional security a second UPS unit may be added and connected in parallel with the original unit in a hot standby configuration Therefore in the case of a failure of one inverter the second inverter will take over the load This system re quires the occurrence of 3 or 4 simultaneous failures the bypass can be also redundant before the load is interrupted Any number of units can be connected togethe...

Page 59: ...NT LED 2 RECTIFIER LED 3 BATTERY SWITCH LED 4 BATTERY DISCHARGING LED 5 BATTERY CHARGING LED 14 BYPASS POWER SUPPLY LED 15 MAINTENANCE BYPASS SWITCH LED 16 INVERTER LED 17 LOAD FED by INVERTER LED 18 LOAD FED by BYPASS POWER SUPPLY LED 19 LOAD IS SUPPLIED LED 27 BATTERY TEST LED 28 E P O LED 26 BYPASS AVAILABLE LED 29 COMMON ALARM LED 30 BOOST CHARGE 1 Operating Modes ...

Page 60: ...eeds the inverter The inverter converts this dc power to ac power used to feed the connected load 2 2 Battery Operation The Battery Operation mode is activated by a mains failure or rectifier failure The rectifier supplies no power The battery supplies the required dc power to the inverter The inverter supplies ac power to the load as described above Power will only be supplied to the load for a c...

Page 61: ...tenance or repair work In this mode the individual functional components are com pletely separated from the load Power for the load is supplied directly from the mains through the switch IBY 2 5 Standby Operation If an appropriately programmmed IPR pcb is inserted in the control electronic of the stand alone unit as an option this mode of operation is possible If the load is completely switched of...

Page 62: ...tem after a failure has occurred in one unit Mains power is present The static inverter switch of the failed unit opens automatically and the static inverter switch of an other unit is closed The rectifier of that unit converts ac power to dc power which charges the battery and feeds the inverter The inverter then converts this dc power to ac power used to feed the connected load The static bypass...

Page 63: ...g the load opens automatically after the static bypass switch SSB is closed The load is supplied directly from the mains through the static bypass If the transition to Bypass Operation was caused by a tempo rary overload the UPS system returns automatically to Normal Operation any inverter may takeover the load when the load returns to within tolerance 3 5 Maintenance Bypass Operation Maintenance ...

Page 64: ...ts respective share of the load 4 2 Partial Load Operation Single inverters that are not needed to supply the load can be switched off automatically thus saving energy and increasing system efficiency The load is supplied by the remaining inverters All rectifiers will continue to operate charging also the batteries of the units whose inverters have been switched off The system can be easily progra...

Page 65: ...s failure all units will automatically switch ON in order to extend the battery autonomy time 4 4 Operation with an Inverter Failure This operating mode is activated by a failure in one or more invert ers As long as the load is not too great for the remaining units the parallel system will stay in UPS inverter operation mode otherwise see 4 5 The static inverter switch es SSI of the defective unit...

Page 66: ...overload it will automatically switch ON and all units take over the load The operation then becomes as in paragraph 4 1 when there was an overload or as in paragraph 4 4 when an inverter failure occurred 4 6 Maintenance Bypass Operation The Maintenance Bypass Operation mode is used to supply the load directly from mains during maintenance or repair work During this mode the individual functional ...

Page 67: ...d by the maintenance by pass IRP Close the IRP switch The rectifier starts and the UPS performs a self test The UPS operating panel will beep 3 times and test all the LEDs The audible alarm may continue beeping and can be muted by pressing RESET once IUG Close the IUG switch IRE Close the IRE switch IB Close the battery switch IB Repeat A above for all units within the system Hot standby and Paral...

Page 68: ... not flashing Should a problem arise during the Switching On please follow the instructions in JUE 401066 Initial Start up Note 1 For Parallel Systems If the bypass is off the output is not supplied and the system has multiple internal maintenance bypasses and the load is connected the load may be excessive for one bypass only In this case it is better to switch off the load or proceed further wit...

Page 69: ...PS modules Hot standby parallel switch to Bypass Operation mode The yellow LED 18 lights up IBY After LED 18 is illuminated close the IBY switch The load is now supplied by the static bypass and the maintenance bypass in parallel If more than one IBY switch is present close all switches B IUG Open the IUG switch IB Open the battery switch IB IRE Open the IRE switch IRP Open the IRP switch After op...

Page 70: ...UPS performs a self test The UPS Operating Panel will beep 3 times and test all the LEDs The audible alarm may continue beeping and can be muted by pressing RESET once IUG Close the IUG switch NOTE IN ORDER NOT TO AFFECT SYSTEM PERFORMANCE IT IS IMPOR TANT TO CLOSE IUG NOW IRE Close the IRE switch IB Close the battery switch IB IPR S1 If present ensure that the micro switch S1 at the bottom of the...

Page 71: ...IS MOMENT IB Open the battery switch IB IRP Open the IRP switch The rectifier voltage will slowly discharge and all the LED s on the front panel will switch off When all the LED s on all the internal pcbs are off the UPS module is free from voltage except at the inputs of IRP IRE and IBY and at the outputs of IUG and IBY and at the respective terminals If this UPS module has an input supply separa...

Page 72: ...it breaker s have a shunt trip circuit connected with the EPO circuit see JUE 401066 Installation and Initial Start up section 1 5 Reset after Activating E P O RESET To restart the UPS press the RESET push button PL2 located on the CPU NCP pcb inside the front door of the UPS This releases the EPO circuit and the rectifier will restart Note that if the input switch es were automatically tripped it...

Page 73: ...ons on the CPU NCP pcb 16 5 REMOTE PANEL 17 5 1 General 17 5 2 Installation 17 5 3 Functions 18 5 4 DIP switch settings 19 Contents of JUE 401267 M Porpora T Boon 04 02 97 04 02 97 Figures FIG 2 1 LED Indication 5 FIG 3 1 RS232 connection cable 9 FIG 4 3 Layout of the CPU NCP pcb 16 FIG 5 1 Setting of DIP1 19 Tables TAB 4 1 Setting of SW1 UPS rating 14 TAB 4 2 Setting of SW1 14 TAB 4 3 Setting of ...

Page 74: ... The Low Battery alarm indicates that only 20 of the battery autonomy is left The colour of the LEDs for battery autonomy indication changes from green to red In addition the alarm buzzer beeps Battery Test The SOLA 4000 UPS automatically performs a battery test every 30 days Whenever the test shows that the battery is damaged or its capac ity is reduced the red LED BATTERY TEST located on the ope...

Page 75: ...alling By the UPS Alarms are signalled by the UPS using LEDs and an audible alarm Status LEDs signal an alarm by flashing The integrated buzzer signals an alarm by beeping The buzzer can be muted by pressing Alarm Reset at the operating Panel The LEDs continue flashing when the alarm condition is still active There are two different types of alarm signals The flashing LED is green and the buzzer b...

Page 76: ...ides UPS disconnection from the load and galvanically isolates the UPS from the battery In the case of parallel and hot standby configurations activating EPO on one unit automatically switches OFF the entire system when IUG is closed on that unit When E P O is activated dangerous voltages will still be present within the UPS cabinet unless the input supply circuit breaker s have a shunt trip circu...

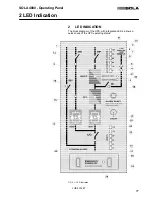
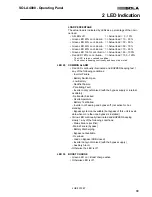
Page 77: ...JUE 401267 77 SOLA 4000 Operating Panel 2 LED INDICATION The block diagram of the UPS with integrated LEDs allows a quick check of the UPS operating status FIG 2 1 LED Indication 2 LED Indication ...

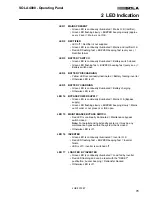
Page 78: ...NG Green LED is continually illuminated Battery charging Otherwise LED is off LED 14 BYPASS POWER SUPPLY Green LED is continually illuminated Mains O K Bypass supply Green LED flashing slowly BUZZER beeping slowly Mains out of order or not present or IRE open LED 15 MAINTENANCE BYPASS SWITCH Red LED is continually illuminated Maintenance bypass switch closed Note For parallel and hot standby syste...

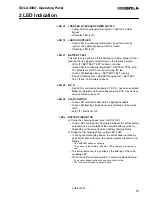
Page 79: ...n activated Note For parallel and hot standby systems EPO may be have been activated at any unit LED 26 STATIC SWITCH Green LED continually illuminated Bypass available Green LED flashing Bypass not synchronised but the mains is OK LED off Mains not OK LEDs BATTERY INDICATOR a During the charging phase green LED L5 ON Green LEDs continuously illuminated indicate the actual battery autonomy as a pe...

Page 80: ... the following conditions Inverter Failure Battery Switch Open Low Battery Rectifier Failure Paralleling Fault Inverter not synchronised with the bypass supply or internal oscillator Retransfer blocked Overtemperature Battery Test Failed Inverter not Feeding and bypass off not active for hot standby Bypass system not available but bypass of this unit is avail able when more than one bypass is inst...

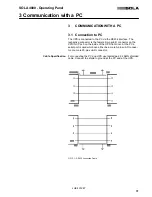
Page 81: ...n sub D connector on the CPU NCP pcb on the inside of the UPS front door At the PC a serial port is used which can either be a male 9 pin sub D connec tor or a male 25 pin sub D connector Cable Specification For connecting the PC and UPS use twisted pair 24 AWG shielded cable Connect the shield to ground at the PC and at the UPS FIG 3 1 RS232 connection Cable 3 Communication with a PC ...

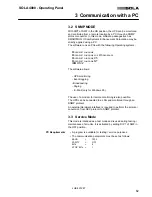
Page 82: ...oftware allows UPS monitoring Event logging Broadcasting Paging E Mail only for Windows 95 The use of a modem for remote monitoring is also possible The UPS can be connected to a LAN and monitored through an SNMP protocol An external Hardware interface is required to perform the protocol conversion from SEC protocol to SNMP protocol 3 3 Service Mode This mode is intended as a test mode and is used...

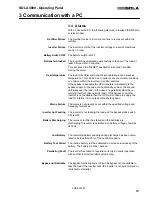
Page 83: ...llel system the re maining inverters take over the load If the bypass or another inverter is not available then the UPS will continue to supply the load for a further 10 minutes before shutting down Mains Failure The mains is not present or not within the specified voltage and frequency tolerances Inverter not Feeding The inverter is not feeding the load and the bypass static switch SSI is OFF Bat...

Page 84: ...ring failure An error has occurred within the monitoring circuit of the output switch disabled for single units Static switch failure SSI A failure has occurred within the monitoring circuit of the inverter output static switch Static switch failure SSB A failure has occurred within the monitoring circuit of the bypass static switch Missing or incorrect bypass trip signal parallel and hot standby ...

Page 85: ...rvice Bypass ON The load is supplied by any of the maintenance bypass es 3 6 Metering With a connected PC the following measurements can be realised SNMP and service modes Vout R UPS output voltage phase R Vout S UPS output voltage phase S Vout T UPS output voltage phase T Vinv Inverter output voltage average of the three phases I R UPS output current phase R I S UPS output current phase S I T UPS...

Page 86: ...Dip 2 Dip 3 Dip 4 UPS RATING KVA OFF OFF OFF OFF 10 ON OFF OFF OFF 15 OFF ON OFF OFF 20 ON ON OFF OFF 30 OFF OFF ON OFF 40 ON OFF ON OFF 60 OFF ON ON OFF 80 ON ON ON OFF 100 OFF OFF OFF ON 120 TAB 4 1 Setting of SW1 UPS rating DIP Switch SW1 Nominal Voltage DIP 7 DIP 8 Vnom OFF OFF 120 ON OFF 220 OFF ON 230 ON ON 240 TAB 4 2 Setting of SW1 TAB 4 3 Setting of SW1 Nominal Voltage DIP Switch SW1 DIP ...

Page 87: ...m ENABLED ON Autonomy alarm DISABLED Dip 3 BATTERY TEST OFF Battery test DISABLED ON Battery test ENABLED DIP 4 TIME CONSTANT OFF FAST ON NORMAL DIP 5 OFF ON DIP 6 FREQUENCY OFF 60 Hz ON 50 Hz DIP 7 REMOTE ACCESS OFF Service mode ON SNMP mode DIP 8 Forced Battery Test If DIP3 ON OFF Forced batt test OFF ON Forced batt test ON TAB 4 4 Setting of SW2 4 Panel Settings ...

Page 88: ...4 2 Location of DIP switches and pushbuttons on the CPU NCP pcb The CPU NCP pcb is located inside the front door at the UPS cubicle FIG 4 3Layout of the CPU NCP pcb PL1 Microprocessor RESET PL2 Emergency Power Off E P O RESET 4 Panel Settings ...

Page 89: ...te Panel is connected to the UPS by a shielded cable 4x0 5mm of max 400m length with 9 pole sub D connectors 9 pole male sub D connector fits in the remote panel 9 pole male sub D connector fits in the UPS local panel The Remote Panel is mounted in a box 270x160x80mm The Remote Panel is supplied by an external power supply 220 230 240 Vac 50 Hz which must be connected to the output of the UPS The ...

Page 90: ...tified by a number from 1 to 8 which is binarily pro grammed by setting the switches 6 7 and 8 of DIP1 In case of an alarm at a certain UPS the corresponding Remote Panel calls the computer and transmits a two line alarm message ASCII characters with the following structure UPS x x 1 8 identifies the UPS Alarm condition One or more of the above listed alarms Programming of phone numbers In case of...

Page 91: ...ine for five minutes Any additional alarm messages that are activated during that time will be displayed automatically at the computer display and one minute will be added to the remaining connection time The maximum connection time is however limited to ten minutes If during the connection all alarms are deactivated the Remote Panel sends the following messages UPSx followed by UPS OK and the rem...

Page 92: ... ICT 2 front view 7 FIG 1 5 IPS 500 front view 8 FIG 1 6 IPR front view 9 FIG 1 7 IF PS S front view 11 FIG 1 8 CPHC16 S front view 12 Contents of JUE 401268 ISSUED 04 02 97 A4 12 1 04 02 97 JUE 401268 M Porpora T Boon We reserve the right to modify the contents of this document without notice BEST POWER BORRI ELETTRONICA INDUSTRIALE S r l Via 8 Marzo Soci Bibbiena AREZZO See Rev Doc JSE 401440 A ...

Page 93: ...tentiometers test points and LEDs are briefly labelled A more detailed explanation is given in this chapter 1 1 Legend of symbols used LED light emitting diode GREEN normal condition RED alarm condition YELLOW warning Potentiometer For adjustment only for qualified personnel Test Point Requires a pin 2mm for measurement Test point switch Insertion of a 2mm Pin disables the described function Pushb...

Page 94: ...toring phase rotation mains failure control for parallel rectifiers with a common battery 12 pulse rectifier control Second level current limitation for diesel generators Boost charging according to DIN 41773 Thermal compensation IF PS R Front View FIG 1 1 illustrates the LEDs of the IF PS R PCB which are accessible from the front 12V analog circuits power supply OK 16V microprocessor power supply...

Page 95: ...Reset Boost Charge Alarm Reset after EPO V2 1 RS232 connector male RS485 connector female 1 UPS Control Logic DIAGNOSTICS RESET MAX Vdc RS 232 RS 485 Priority Indication Diagnostics 1 8 E PROM failure 2 2 Fuse blown 3 C Mains not OK 4 P Wrong phase rotation 5 3 Overtemperature 6 4 Overvoltage 7 Ø Pulse release missing 8 9 Rectifier failure 9 6 Fan failure 10 L Overload Boost charge when blinking H...

Page 96: ...four for parallel systems ICP Inverter control control for the inverter static switch SSI temperature monitoring inverter monitoring and protection hot standby control quartz oscillator fan monitoring inverter electronic power supply monitor ICT 2 Inverter regulation inverter output voltage regulation inverter output current limitation short circuit protection inverter soft start control inverter ...

Page 97: ...d Retransfer to inv operation is blocked after 5 attempts within 3 minutes red LED is illuminated Overtemperature within the inv section red LED is illuminated The inverter static switch has failed to switch ON OFF red LED is illuminated All conditions are in order for a retransfer of the load to the inv for hot standby units the inv is ready in case of a failure to the on line inv green LED is il...

Page 98: ...erter voltage adjustment during test operation jumpers JP1 JP2 JP3 in position 2 3 Overload on phase T red LED is illuminated Overload on phase S red LED is illuminated Overload on phase R red LED is illuminated Pulse release green LED is illuminated Synchronisation OK green LED is illuminated Synchronisation block Test point test voltage 6Vdc at full load Test point test voltage 4Vdc at full load...

Page 99: ... Jumper for test operation suppression of inverter input voltage monitoring signal Power supply OK green LED is illuminated Inv input voltage in tolerance green LED is illuminated other wise blinking Adjustment of overvoltage monitoring threshold for the inverter input voltage Adjustment of undervoltage monitoring threshold for the in verter input voltage 1 UPS Control Logic LAS Power ON DF1 Power...

Page 100: ...is unit 8Vdc nominal load current of this unit 0 8 p f System output current 8Vdc nominal load current on the sys tem 0 8 p f Redundancy current 8Vdc nominal load current on the re mainder of the system without this unit 0 8 p f Power of this unit 6Vdc nominal load power on this unit Power of the system 6Vdc nominal load power on the system Output voltage phase T Output voltage phase R S Adjust fo...

Page 101: ...ing CPHC16 S Bypass control switching control of the static bypass switch SSB interface with the inverter or multiple inverters mains frequency monitoring mains voltage and phase rotation monitoring generation of synchronisation signal interface with multiple static bypasses UPS output voltage monitoring majority control for multiple static bypasses parallel and hot standby systems synchronisation...

Page 102: ...s the LEDs of the IF PS S PCB which are accessible from the front 12V analog circuits power supply OK green LED is illumi nated 16V microprocessor power supply OK green LED is illumi nated 12V interfaces power supply OK green LED is illuminated 1 UPS Control Logic PSPA PSPP PSPA1 ...

Page 103: ... one with the higher priority is displayed 1 UPS Control Logic DIAGNOSTICS Bypass RS 232 RS 485 Priority Indication Diagnostics 1 8 E PROM failure 2 F Bypass Fuses Blown or IRE open 3 C Phase failure 4 P Incorrect phase rotation 5 l l Bypass square wave generation error 6 O Output out of tolerance 7 L Overload 8 4 Mains frequency out of tolerance 9 H Mains voltage out of tolerance 10 6 Auxiliary p...

Page 104: ...IG 2 1 Rectifier Data 3 3 BATTERY DATA 4 FIG 3 1 Battery Data 4 4 INVERTER DATA 5 FIG 4 1 Inverter Data 5 M Porpora We reserve the right to modify the contents of this document without notice BEST POWER BORRI ELETTRONICA INDUSTRIALE S r l Via 8 Marzo Soci Bibbiena AREZZO Contents of JUE 401269 See Rev Doc JSE 401440 A 20 06 97 T Boon ...

Page 105: ...r factor 1 kW 8 12 16 24 32 48 64 80 96 Efficiency 50 load 100 load 88 90 88 90 88 90 88 90 90 91 90 91 90 91 90 91 90 91 Losses at nominal load charged battery kW 0 8 1 2 1 6 2 4 3 2 4 8 6 4 8 9 6 Overload capacity Inverter Static bypass switch SSB 125 10 minutes 150 1 minute 2000 20 msec 200 1 minute 150 continuous Permissible inverter output voltage variation for bypass switching 10 Design stan...

Page 106: ...13 5 20 26 9 39 8 53 5 80 105 132 158 Maximum input current input voltage 380 V A 20 5 30 8 40 8 61 2 81 5 122 160 5 201 241 Input power factor nom load input voltage 380V 0 83 lag Output control characteristics I U characteristic boost charge possible Rated output voltage Lead Acid batteries Ni Cd batteries 432 V DC 436 V DC depending on number of cells Soft start 10 sec Floating voltage regulati...

Page 107: ...oltage Lead Acid open 2 4 V Cell VDC Ni Cd 1 54 V Cell VDC Lead Acid maintenance free no boost charge 462 462 462 462 462 462 Minimum battery voltage Lead Acid 1 69 V Cell VDC 325 325 325 Recommended charging current adjustable 10 of rated battery capacity Protection Batt protection disconnector switch Automatic shutdown of the inverter at min DC voltage Permissible DC voltage range VDC min 320V m...

Page 108: ... 36 4 48 6 73 97 4 122 146 Efficiency at 80 load 92 92 92 92 92 93 93 93 93 Load power factor range at nominal load at reduced load 0 7 0 8 ind 0 5 ind 0 5 cap Output voltage refer to system data Output voltage distortion THD refer to system data Output voltage adjustment range 10 of programmable nominal value Phase displacement balanced load 100 unbalanced load 120 1 120 1 Voltage tolerances stat...

Reviews: