background image

Mäxchen - GAME INSTRUCTIONS

e

e

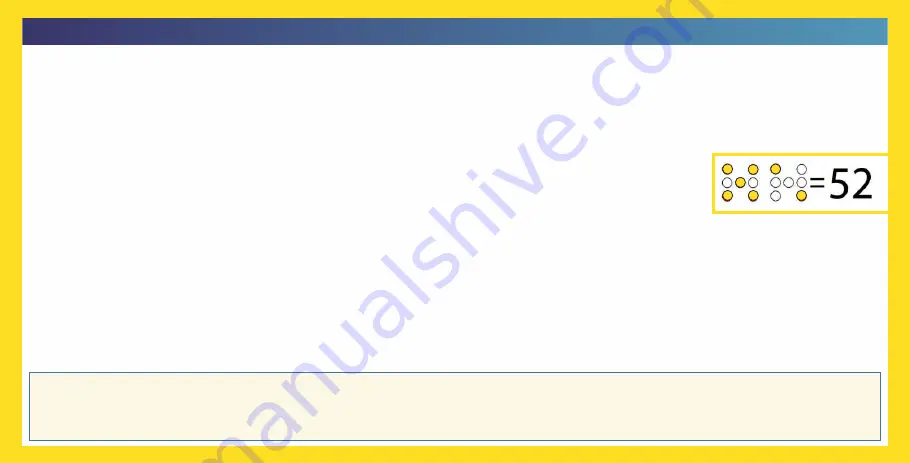
eMäxchen is a game for two or more players in this version. The objective of the game is to always have a higher number than the number 

rolled by another player before. The lowest number is 31, followed by 32, 41, 42, 43, 51, 52, 53, 54, 61, 62, 63, 64, 65, then "doubles“ 11, 22, 33, 
44, 55 and 66. The highest number is eMäxchen, 21. If you roll this, you win the round. Player 1 starts rolling by pressing and holding the "Roll" 
button as long as they like. After releasing the button the result will appear, consisting of two die number (which the player hides from the other 
players), with the left being higher or equal to the number on the right. Read the number as two digits.


 If the 

If a player does not roll 21, they must either:

or:

say the number they rolled

cheat/make up a number.

player cheats and says a different number, they can say any number except 21 not lower than the number rolled 
before (so on the first roll any number except 21). After a few seconds the LEDs will go our (only the middle two 
LEDs will flash now) and the PCB can be passed to the next player.

The next player can then


 It is now the current player's turn. The player rolls and 

believe the previous player they rolled the number called out:

tells the next player a number which must be higher or equal to the number called out before. If a lower number is rolled, the player must cheat 
or they will immediately lose the round. 


 In this case the current player will press the "Show!", button, which 

Or:

don't believe the previous player:

shows the number rolled before. If the previous player in fact cheated, the current player wins. But - if the previous player said the truth, the 
curren tplayer loses.

If no button is pressed for a few seconds, the game will automatically switch off. This extends the battery life considerably. If a battery is 
drained, remove the battery and replace it with the same type. Please take the old battery to a collection site, never throw it in the household 
rubbish. This is your active part in protecting the environment to everybody's benefit!

Summary of Contents for 76400

Page 1: ...SOL EXPERT group group 10 10 Keep the address of the company Not suitable for children under 3 years Contains small parts Soldering Kit Instructions Mäxchen The popular game as a DIY PCB version MADE IN EUROPE Item No 76400 e ...

Page 2: ...and the soldered parts become very hot Be very careful We recommend using a soldering iron holder to set the soldering iron down safely during use This kit is only intended to be battery powered Keep these instructions for future reference They contain important information Always use a soldering mat when soldering It prevents parts and the PCB from slipping SAFETY NOTES For children and youngster...

Page 3: ... also need eMäxchen soldering kit eMäxchen PCB including a microprocessor This allows you to play the popular Mäxchen game on the finished PCB The processor is preprogrammed so this kit requires no programming skills Simply solder play and if necessary cheat a bit The eMäxchen circuit board kit is perfect for soldering novices all budding electronics engineers amateur technicians and anybody who e...

Page 4: ...tip about 2 3 mm wide Now set out your tools and switch on your soldering iron Everything OK Let s get started Set out and sort all parts This will make it easier for you to later identify the individual parts you will need during the steps And it doesn t hurt to tidy up your work space so you can quickly find all parts Preparation Presorted parts ...

Page 5: ...make this easier we have designed a simple yet functional bending tool Simply place the resistors in the notch and bend the leads down straight along the wooden edge The part will now fit perfectly between the eyelets Insert resistor Bend one leg down Bend the other leg down Bent Resistor before You will need these parts 4 x resistor 470 Ohm 1 x bending tool Notch ...

Page 6: ...eads Solder on resistors After soldering trim the excess leads on the back to approx 2 mm with side cutters You will now need these parts 1 x PCB 4x 4 x bent resistors Trim here to 2 mm high Part lead Soldering point Part PCB ...

Page 7: ...lder on processor Note the polarity of the processor It has a curve which must notch be on the left EXTREMELY IMPORTANT Notch on this side B You will now need this part 1 x processor ATTINY 13A ATTENTION ...

Page 8: ...or You will now need these parts 2 x push button 1 x capacitor 22 nF then trim the excess leads After soldering trim the excess leads on the back to approx 2 mm with side cutters Trim here to 2 mm high Part lead Soldering point Part PCB ...

Page 9: ... LED LED polarity TIP When soldering on the LEDs ensure they are properly seated on the PCB Solder on LEDs and polarity indicated on the PCB be sure to note the polarity The longer leg on the LED is always POSITIVE After soldering trim excess leads ...

Page 10: ... not included E You will now need this part 1x battery holder If you push a button and no LEDs light up Check the polarity of the processor Visually inspect all soldering points If individual soldering points are not properly soldered resolder with some solder Replace the CR2032 battery you inserted or check the battery voltage with a multimeter Ic1 Troubleshooting ...

Page 11: ...irst roll any number except 21 After a few seconds the LEDs will go our only the middle two LEDs will flash now and the PCB can be passed to the next player The next player can then It is now the current player s turn The player rolls and believe the previous player they rolled the number called out tells the next player a number which must be higher or equal to the number called out before If a l...

Page 12: ... and changes reserved April 2021 Christian Repky Click here for the instructions Hier geht es zur Anleitung Cliquez ici pour les instructions Klik hier voor de instructies 4 037373 764006 Shows the time digitally Item no 76334 Keep your brain fit Item no 79300 Other great SOL EXPERT group soldering kits Binary Clock soldering kit TrainYourBrain soldering kit ...

Reviews: