background image

M

Q

R

T

6

Unpacking and using for the 

first time

Unpacking

Unpacking the product and checking for completeness. See 
also: Disposing of packaging – Page 7.

Supplied as standard

• 

Instructions for use

• 

Garden tiller

• 

Grab handles x 2 (1 Control and 1 Grab Handle)

• 

Cross plate

• 

6 wing nuts and bolts

• 

Belt Clip

• 

Cable Clip

Note:

 If a part is missing or damaged, please contact 

the vendor.

Assembling the grab handles and  

the connector

• 

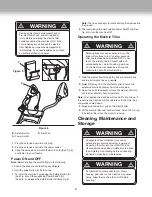
(Fig. 1) Insert the control handle (C) and the grab handle 
(A) into the holes of the cross plate (F). Make sure that the 
control handle is on the side of the cable holder guide of 
the cross plate.

• 

Insert the screw bolts in the holes at the back of the cross 
plate, and tighten them. Ensure the handles are tightened 
in the cross plate.

• 

Fix the entire unit with the wing nuts (O) to the frame (H).

• 

Fix the frame (H) with wing nuts (O) to the tiller frame (J).

Set the tilling depth

How to change the transport status to the tine status
• 

Firstly, pull the pin (Q) and disassemble the bolt (R), then 
pull out the wheel assembly (M) the direction of the arrow. 
(Fig. 2)

A

F

H

O

J

C

Figure 1

Figure 2

Transport 

status

Summary of Contents for TJ601ERM-880E

Page 1: ...in this manual before attempting to operate this machine TRAINING 1 Read understand and follow all instructions on the tiller and in the manual s before attempting to assemble and operate Save this manual for reference and ordering replacement parts 2 Never allow children under 16 years old to operate this machine Children 16 years old and over should be trained and supervised by an adult who unde...

Page 2: ...s use face or dust mask if operation is dusty 20 Use Right Appliance Do not use appliance for any job except that for which it is intended 21 Ground Fault Circuit Interrupter GFCI protection should be provided on the circuit s or outlet s to be used for the gardening appliance Receptacles are available having built in GFCI protection and may be used for this measure of safety Exception This warnin...

Page 3: ... machine or conducting inspection and maintenance 3 The motor housing remains hot for a short period after the machine is turned OFF Allow the motor housing to cool off before touching or storing near combustible material MAINTENANCE AND STORAGE 1 Maintain or replace safety and instruction labels 2 Disengage all controls stop the engine and wait until the tines come to a complete stop before clean...

Page 4: ...ting to assemble and operate WARNING Keep out of rain and away from wet areas DANGER Rotating objects may spin off and cause personal injury Keep people away from hazard area WARNING Always turn the machine OFF and disconnect the electrical power before conducting inspection cleaning and maintenance DANGER Keep electrical extension cable away from tines WARNING Rotating parts may cause serious inj...

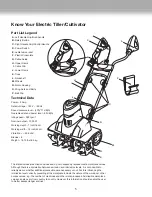
Page 5: ...also vary from country to country However this information should enable the user to better assess danger and risk Part List Legend A Left Handle Grip Grab handle B Safety Button C Right Handle Grip Control Handle D Power Switch E cable tesion relief F Plastic Crossplate G Cable Guide H Upper Frame I Cable Clip J Lower Frame K Tines L Driveshaft M Wheels N Motor Housing O Wing Nuts and Bolts P Bel...

Page 6: ...dle C and the grab handle A into the holes of the cross plate F Make sure that the control handle is on the side of the cable holder guide of the cross plate Insert the screw bolts in the holes at the back of the cross plate and tighten them Ensure the handles are tightened in the cross plate Fix the entire unit with the wing nuts O to the frame H Fix the frame H with wing nuts O to the tiller fra...

Page 7: ...st not be allowed to use the tool Do not use the tool in rain or damp surroundings The manufacturer shall not be held liable for damage arising from improper use or incorrect operation of the tiller Carelessness mishandling or error on the part of the operator may result in bodily injury e g amputation projectile impact or death The tiller must be operated according to the warnings and guidelines ...

Page 8: ...conds after the tool has been switched OFF Do not touch the rotating tines Contact with hot components i e motor housing gear box on the machine may cause burns Allow the machine to cool off before handling 1 Walk the electric tiller through the soil at a normal pace and in as straight a line as possible 2 Always till away from the electrical outlet Ensure the extension cord is kept away from the ...

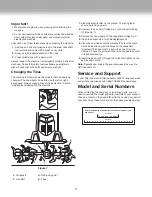
Page 9: ...ller on the ground The rating label should be facing upward 2 Unscrew the hex bolt T See Fig 7 and the self locking U See Fig 7 3 Remove the tine wheels off the driveshaft L See Fig 7 4 Clean the driveshaft L with biodegradable oil 5 Place the new tines onto the driveshaft so that the holes on the axles line up with the holes on the driveshaft Important The tines must be set in the correct turning...

Page 10: ...is warranty Parts used that are not genuine Snow Joe parts are not covered by this warranty Damages resulting from misuse alteration improper assembly improper adjustment neglect or accident which requires repair is not covered under this warranty Belts augers and tines are not covered under warranty belts augers and tines wear out and can be purchased at www snowjoe com or by calling 1 866 766 95...

Reviews: