background image

17

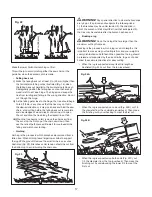
Make the lower horizontal notching cut first.

This will help to avoid pinching either the saw chain or the 

guide bar when the second notch is made.

• 

Felling back cut

i)  Make the felling back cut at least 2 in. (50 mm) higher than 

the horizontal notching cut as illustrated (Fig. 16). Keep 

the felling back cut parallel to the horizontal notching cut. 

Strategically position the felling back cut so that enough 

wood is left to act as a hinge. The hinge wood keeps the 

tree from twisting and falling in the wrong direction. Do not 

cut through the hinge.

ii)  As the felling gets close to the hinge, the tree should begin 

to fall. If there is any chance that the tree may not fall in 

the desired direction or it may rock back and bind the saw 

chain, stop cutting before the felling back cut is complete 

and use wedges of wood, plastic or aluminium to open 

the cut and drop the tree along the desired line of fall.

iii) When the tree begins to fall, remove the chain saw from 

the cut, stop the motor, put the chain saw down, then 

use the retreat path planned. Be alert for overhead limbs 

falling and watch your footing.

• 

Limbing

Limbing is the process in which branches are removed from a 

fallen tree. When limbing, leave larger lower limbs to support 

the log off the ground. Remove the small limbs in one cut as 

illustrated (Fig. 23). Branches under tension should be cut from 

the bottom up to avoid binding the chain saw.

m

WARNING! 

Pay special attention to where the branches 

are lying on the ground and recognize the following risks:  

1). the branches may be under tension; 2). the direction in 

which the branch will fall may differ from that anticipated; 3). 

the tree may be unstable after the branch has been cut.

• 

Bucking a log

m

WARNING! 

Do not buck logs that are larger than the 

maximum cutting thickness. 
Bucking is the process in which a log is cut into lengths. It is 

important to make sure your footing is firm and your weight is 

evenly distributed on both feet. When possible, the log should 

be raised and supported by the use of limbs, logs, or chocks. 

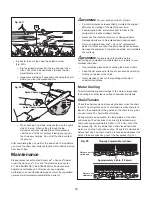
Follow these simple directions for easy cutting:

•  When the log is supported along its entire length as 

illustrated (Fig. 24A), cut from the top (overbuck).

•  When the log is supported on one end (Fig. 

24B), cut 1/3 

the diameter from the underside (underbuck). Then make 

the finishing cut by overbucking to meet the first cut.

•  When the log is supported on both ends (Fig. 

24

C), cut 

1/3 the diameter from the top (overbuck). Then make the 

finishing cut by underbucking the lower 2/3 to meet the 

first cut.

2 in. (50 mm)

2 in. (50 mm)

Fig. 22

1

2

1

Fig. 23

1

Fig. 24A

1

2

Fig. 24B

Summary of Contents for Sunjoe 20ViON-CS10-RM

Page 1: ...Joe LLC All rights reserved Original instructions SAVE THESE INSTRUCTIONS A Division of Snow Joe LLC OPERATOR S MANUAL Model 20ViON CS10 RM Form No SJ 20ViON CS10 RM 880E M V1 R CORDLESS CHAIN SAW 20...

Page 2: ...rranty relieve the manufacturer from all liabilities The user will consequently be liable for all and any damage or injury to himself herself or others General Safety mWARNING When using electric cord...

Page 3: ...safety glasses and hearing protection If you are using the chain saw every day under normal conditions you can be exposed to a noise level of 85 dB A or higher Further protective equipment for head ha...

Page 4: ...er may result in risk of fire electric shock or personal injury Unplug charger when not in use Make sure to remove battery packs from unplugged chargers mWARNING To reduce the risk of electric shock a...

Page 5: ...tric shock 4 Keep the battery charger battery pack s and the cordless tool out of the reach of children 5 Do not use the supplied battery charger to charge other cordless tools 6 During periods of hea...

Page 6: ...unexpected situations Keep solid footing and balance at all times Never try cutting through two branches at the same time Only cut one at a time Do not bury the guide bar nose or try to cut by boring...

Page 7: ...bject Tip contact may cause the guide bar to move suddenly upward and backwards which may cause serious injury to the user WEAR EYE AND HEARING PROTECTION For protection against injury wear ear defend...

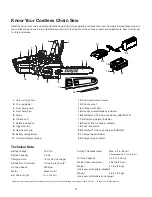
Page 8: ...ess chain saw Compare the illustration below to the cordless chain saw in order to familiarize yourself with the location of the various controls and adjustments Save this manual for future reference...

Page 9: ...y and efficiency of the machine If in doubt contact an authorized Snow Joe Sun Joe dealer or call the Snow Joe Sun Joe customer service center at 1 866 SNOWJOE 1 866 766 9563 mWARNING Unpacking and as...

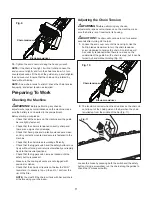
Page 10: ...the adjusting pin is in the chain tension pin hole Fig 7 7 Adjust the chain tension as needed by adjusting the chain tensioner screw with the supplied flat tip blade screwdriver Make sure to align th...

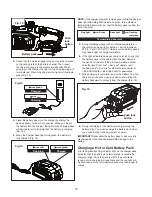
Page 11: ...trigger switch remains locked until the safety button is pressed Make sure the cooling air vents are not clogged with sawdust or debris Check that the chain s oil level is not below the MIN level mar...

Page 12: ...n as possible 1 level monitoring LED is lit Battery is flat Stop work IMMEDIATELY and charge the battery Otherwise the battery s service life will be greatly shortened NOTE If the charge level button...

Page 13: ...does not come on at all check that the battery pack is fully seated into the bay Remove the pack and reinsert If the problem persists contact an authorized Snow Joe Sun Joe dealer or call the Snow Jo...

Page 14: ...hipped toward you pull you off balance or spring back Do not use the chain saw to cut vines and or small underbrush mWARNING Do not let familiarity with this type of tool prevent you from taking all n...

Page 15: ...IMPORTANT Always remember that an incorrectly used chain saw may disturb others and have a serious impact on the environment To respect people and the environment Avoid using the machine in environmen...

Page 16: ...to control kickback forces with a saw held high Cutting Techniques Before felling or delimbing for the first time practice sawing logs on the ground or on trestles so that you can get familiar with th...

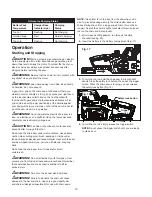
Page 17: ...n limbing leave larger lower limbs to support the log off the ground Remove the small limbs in one cut as illustrated Fig 23 Branches under tension should be cut from the bottom up to avoid binding th...

Page 18: ...e to be replaced and never repaired Only use original Snow Joe Sun Joe replacement parts Parts that are not of the same quality can seriously damage the equipment compromise safety and invalidate the...

Page 19: ...rom the cutting edge Sharpen in a forward motion a few times and repeat this on all the cutting edges facing the same way right or left To move the chain forward use a screwdriver Turn the bar over in...

Page 20: ...east five minutes for the saw to cool before servicing or storing your unit If you drop the saw carefully inspect it for damage If the guide bar is bent the housing is cracked the handle is broken or...

Page 21: ...ries in the correct polarity as indicated in the battery compartment or manual may shorten the life of the batteries or cause batteries to leak 4 Do not mix old and new batteries 5 Do not mix Alkaline...

Page 22: ...requency energy and if not installed and used in accordance with the instructions may cause harmful interference to radio communications However there is no guarantee that interference will not occur...

Page 23: ...wdriver Bar and chain oil SWJ802E TOOL SWJ OIL sold at snowjoe com or you can purchase equivalent bar and chain oil sold at your local hardware store Model Accessories Item 5 6 1 EcoSharp LITE 20 V Li...

Page 24: ...24 NOTES...

Page 25: ...25 NOTES...

Page 26: ...26 NOTES...

Page 27: ...all be construed as obligating Snow Joe Sun Joe to incorporate such design changes into previously manufactured products nor shall such changes be construed as an admission that previous designs were...

Page 28: ...sunjoe com...

Reviews: