background image

5

MOUNTING THE QBx SURROUNDS

Mounting the speaker on hollow surfaces (drywall, etc.):

1. Using the supplied mounting template, drill four holes. If the speaker wires are run

behind the wall, make a hole for them as well.

2. Insert the supplied wall fasteners through the bracket and into the wall.

3. Level the bracket and tighten the screws.

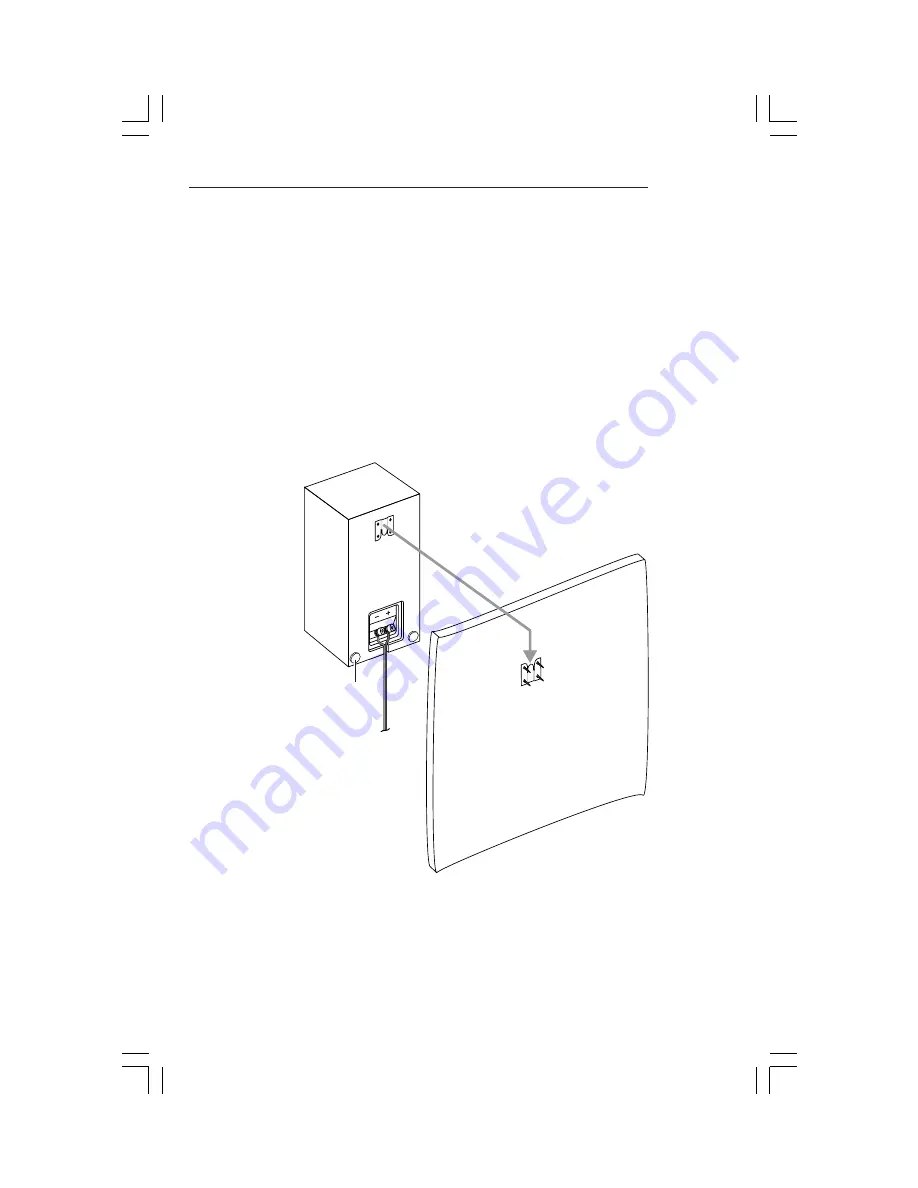
4. Remove the adhesive backing cover from the felt bumpers and press them into place on

the lower corners of the Surround cabinet as shown below. Connect the wires. If you are
running the wires along the wall, use the wire groove channel on the speaker rear panel
to ensure a neat installation.

5. Place the QBx Surround on the wall so the bracket on the back of the speaker is above

the bracket on the wall. Lower the speaker until the two brackets interlock.

Felt Bumpers

Mounting the speakers on solid surfaces:
If you are mounting the speakers on wood
or some other solid material, use the
mounting template to drill four 

3

/

32

” holes.

Insert the 2” flat head (#6) self tapping
screws through the bracket into the holes.
Follow instructions 3 through 6 above to
complete the installation.

Aftermarket Mounts

As an added feature, we have provided pre-drilled holes to use with several popular
aftermarket speaker mounts. Two such systems are the Omnimount 50 Series (or equivalent)
or the Vogel SAT 5 (or equivalent).

Summary of Contents for QBx Surround

Page 1: ...Owner s Manual QBx Surround...

Page 2: ...ss Unit video shielded 51 4 inch 130mm polymer chassis HDA cone and rubber surround Cabinet Construction 3 4 inch MDF walls Composite Baffle Construction Two layers of 5 8 inch high density fiberboard...

Page 3: ...erwise occur The contour expands and contracts around the perimeter of the tweeter creating a butterfly shape Elliptical baffle edges The grille is mounted flush into the baffle The baffle edges have...

Page 4: ...tacle Coverage Area For large areas multiple Surrounds can be used to ensure even coverage Use one pair of Surrounds for every three rows of seats approximately 10 feet between Surround speakers Place...

Page 5: ...on the speaker rear panel to ensure a neat installation 5 Place the QBx Surround on the wall so the bracket on the back of the speaker is above the bracket on the wall Lower the speaker until the two...

Page 6: ...outes all bass information typically below 100Hz to your subwoofer When not using a subwoofer Select the LARGE setting on your receiver or processor for your Surrounds This routes all bass information...

Page 7: ...ginal owner any defect in materials or workmanship that occurs in normal use of the speaker system without charge for parts and labor Your responsibilities are to use the product according to the inst...

Page 8: ...rved Specifications are subject to change without notice Covered by patents issued and or pending Part 542 1014 143 Essex Street Haverhill MA 01832 phone 978 373 6114 fax 978 373 6172 email info snell...

Reviews: