Snapmaker 3-in-1 3D Printer Quick Start Manual Download Page 26

Load Filament

Page 27

3-in-1 3D Printer Quick Start Guide

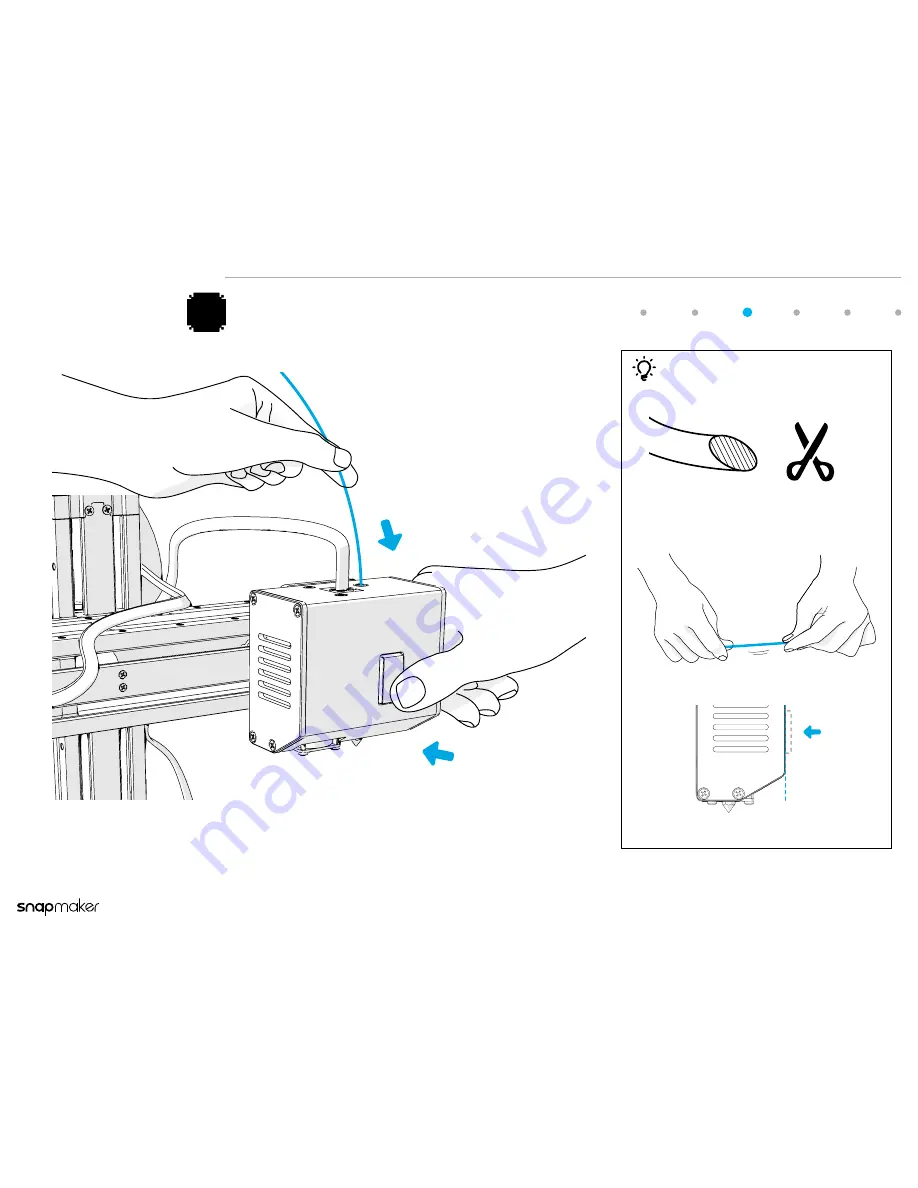
Press the button on the front of the 3D Printing Module and at the same 

time insert the filament into the hole on the top. 

Try to straighten the filament as much as you can. 

Press down the button to the illustrated level.

Tips

Use a pair of scissors or diagonal cutter to cut the 
end of the filament at a 45° angle. 

1

2

3

Insert the Filament

Summary of Contents for 3-in-1 3D Printer

Page 1: ...Quick Start Guide...

Page 2: ...Page 3 3 in 1 3D Printer Quick Start Guide Assemble the 3D Printer Before You Start Use the 3D Printer Load Filament Level the Heated Bed Start Printing Support B A C Content...

Page 3: ...ual purpose Change the blade as you need Caution Tips Notice Ignoring this type of message might result in malfunction or damage to the machine Make sure that the highlighted part is facing the right...

Page 4: ...le the 3D Printer Page 5 3 in 1 3D Printer Quick Start Guide Attach the Feet to the Base Plate Foot x 4 M4 x 8 Screw x 4 Base Plate x 1 1 Place the Base Plate so that you can read the sentence on the...

Page 5: ...rt Guide Screw for Platform x 4 Heated Bed x 1 Linear Module x 1 Attach the Heated Bed to One of the Linear Modules Y Axis Don t screw too tight otherwise the leveling will be influenced The screws in...

Page 6: ...Assemble the 3D Printer Page 7 3 in 1 3D Printer Quick Start Guide Attach the Y Axis to the Base Plate M4 x 8 Screw x 4 3...

Page 7: ...Assemble the 3D Printer Page 8 3 in 1 3D Printer Quick Start Guide M4 x 8 Screw x 4 Linear Module x 1 Attach the Z Axis to the Base Plate 4 Please place the Linear Module as illustrated...

Page 8: ...ble the 3D Printer Page 9 3 in 1 3D Printer Quick Start Guide Attach the X Axis to the Base Plate 5a The screws installing position must be the same as illustrated M4 x 8 Screw x 4 Linear Module x 1 N...

Page 9: ...vials during this process A B 3 Adjust the X axis until the bubble in Vial B is in the same position as the bubble in Vial A Tighten the screws between X axis and Z axis 1 Find a level surface and pu...

Page 10: ...3D Printer Page 11 3 in 1 3D Printer Quick Start Guide 3D Printing Module x 1 Attach the 3D Printing Module to the X Axis 6 The screws installing position must be the same as illustrated Notice M4 x...

Page 11: ...semble the 3D Printer Page 12 3 in 1 3D Printer Quick Start Guide Assemble the Screen Holder and then Slide the Touch Screen into the Screen Holder M4 x 8 Screw x 2 7 Screen Holder x 1 Touch Screen x...

Page 12: ...the 3D Printer Page 13 3 in 1 3D Printer Quick Start Guide Attach the Controller to the Z Axis Controller x 1 8 M4 x 28 Screw x 4 Caution Make sure the On Off button is switched to Off away from the P...

Page 13: ...Assemble the 3D Printer Page 14 3 in 1 3D Printer Quick Start Guide Filament Holder x 1 Attach Filament Holder to the Z Axis 9 M4 x 28 Screw x 2...

Page 14: ...Adapter x 1 The RJ25 Cable Heated Bed Cable is comparatively smaller than the RJ45 Cable Module Cable Connect the Modules to the Controller and Power On 10 Caution Do NOT connect or disconnect the ca...

Page 15: ...Page 16 3 in 1 3D Printer Quick Start Guide Use the 3D Printer Load Filament Level the Heated Bed Start Printing 1 2...

Page 16: ...Heated Bed Page 17 3 in 1 3D Printer Quick Start Guide To ensure the best quality of your print it s recommended to go through this section every 10 to 20 prints 1 Go Through this Section Every 10 to...

Page 17: ...in order These corners correspond to the numbers on the Touch Screen as shown in the next step 1 2 3 4 Level the Four Corners in Order 2 Notice The sequence must be strictly followed or the leveling w...

Page 18: ...ge 19 3 in 1 3D Printer Quick Start Guide On the Touch Screen go to Settings Z Offset It may take a few seconds after you tap Z Offset Tap 1 and the 3D Printing Module will move to the first corner Le...

Page 19: ...Level the Heated Bed Page 20 3 in 1 3D Printer Quick Start Guide Put one half of an A4 paper between the Heated Bed and the nozzle Get an A4 Paper 4...

Page 20: ...ance between the Heated Bed and the nozzle using the Up and Down button Keep adjusting until there is slight resistance on the paper from the nozzle The nozzle moves 0 1 mm every time you tap the Up o...

Page 21: ...Level the Heated Bed Page 22 3 in 1 3D Printer Quick Start Guide Pull the paper and feel the resistance while you adjust the distance Use the Paper to Adjust the Distance 6...

Page 22: ...Heated Bed Page 23 3 in 1 3D Printer Quick Start Guide Tap 2 and follow Step 5 7 to level the second corner Use the same method to level the third and fourth corners 1 2 3 4 Level the Second to Fourth...

Page 23: ...ge 24 3 in 1 3D Printer Quick Start Guide When all the corners are leveled tap Save Remember to pull out the paper when you finish leveling Tips If you have any question find your answers at www snapm...

Page 24: ...Load Filament Page 25 3 in 1 3D Printer Quick Start Guide On the Touch Screen go to Controls Change Filament Confirm 1 Get the Heated Bed Ready...

Page 25: ...e Next is not clickable before the nozzle is heated to 200 C Wait until the nozzle is heated to 200 C and tap Next Hang the filament over the Filament Holder For smoother printing the end of the filam...

Page 26: ...Printing Module and at the same time insert the filament into the hole on the top Try to straighten the filament as much as you can Press down the button to the illustrated level Tips Use a pair of s...

Page 27: ...Load Filament Page 28 3 in 1 3D Printer Quick Start Guide Keep inserting the filament until you see some filament coming out of the nozzle 4 Keep Inserting the Filament...

Page 28: ...Load Filament Page 29 3 in 1 3D Printer Quick Start Guide When you finish loading the filament tap Loaded Unloaded on the Touch Screen 5 Filament Loaded...

Page 29: ...Load Filament Page 30 3 in 1 3D Printer Quick Start Guide Use the provided Tweezer to clean the filament on the nozzle Clean the Filament 6...

Page 30: ...Start Printing Page 31 3 in 1 3D Printer Quick Start Guide Download Snapmaker3D from our official website snapmaker com download 1 Download the Software...

Page 31: ...the G code of the file you want to print using the software Tips Tips Other compatible software includes Cura Simplify 3D Slic3r For the detailed instructions please see the software guides or tutori...

Page 32: ...3D Printer Quick Start Guide Option 2 Using the microSD Card No need to connect your computer to the machine Option 1 Using the Computer The computer must be connected to the machine throughout the pr...

Page 33: ...Start Printing Page 34 3 in 1 3D Printer Quick Start Guide Connect the computer to the machine using the provided USB Cable Using the Computer 4a...

Page 34: ...ter the settings are configured on the software click Connect Preview Print The printer will finish the printing automatically Using the Computer 4a Tips If you cannot find any port to connect to plea...

Page 35: ...to save the G code file 1 2 3 Put the G code into the provided microSD Card Insert the microSD Card into the card slot on the Controller G code Tips For the detailed instructions please see the softwa...

Page 36: ...Start Printing Page 37 3 in 1 3D Printer Quick Start Guide On the Touch Screen go to Files find and select the G code file Then tap Start to start printing Using the microSD Card 4b...

Page 37: ...n 1 3D Printer Quick Start Guide If the print cannot stick to the heated bed or there is warping at the bottom of the print level the heated bed again or select Brim or Raft as the Adhesion type in th...

Page 38: ...ing assembly faq snapmaker com Share anything you want with other Snapmaker users at our forum forum snapmaker com Any news from you is good news for us If you have any question don t hesitate to cont...

Page 39: ...ison once said A minor invention every ten days and a big one every six months or so What is your first invention with the Snapmaker To use the laser engraver and CNC carver please read the correspond...

Reviews: