background image

www.smoothfitness.com

17

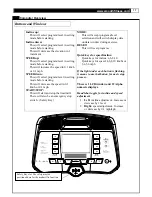
Computer Overview 

Buttons and Windows 

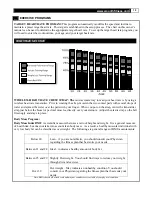
Incline up: 

This will select program/level in setting 

mode before starting 

Incline down: 

This will select program/level in setting 

mode before starting.

This will decrease the elevation in 1 

increment. 

SPEED up:

This will select program/level in setting 

mode before starting. 

This will increase the speed in 0.1 km/h 

or 0.1 mph. 

SPEED down:

This will select program/level in setting 

mode before starting. 

This will decrease the speed in 0.1 

km/h or 0.1 mph. 

START/STOP:

This will start and stop the treadmill.  

There will also be an emergency stop 

switch.  (Safety Key) 

MODE:

This will accept programs/level 

selection and will switch display data 

on data window during exercise.

RESET:

This will reset programs. 

Quick keys for speed/incline: 

Quick keys for incline: 4,6,8,10 

Quick keys for speed: 4,6,8,10 km/hr or 

3,4,5,6 mph 

If the light under each button is flashing, 

it means to use that button for next setup 

process.

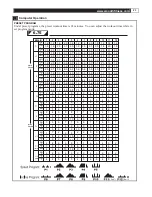
There is 1 LCD window and 12 Alpha 

numeric displays. 

Handlebar toggle for incline and speed 

adjustment

1.

Left:

incline adjustment.  Increase or 

decrease by 1 level

2.

Right:

 speed adjustment.  Increase 

or decrease by 0.1 mph/kph  

1.Insert safety key.
2.Enter program using arrows,press mode.
3.Enter level using arrows,press mode.
4.Enter time using arrows,press mode
5.Press start to begin workout.

INSTRUCTIONS

Remove safety key when not in use
and store out of reach of children.

WARNING

CAUTION

Risk of injury to person-to avoid injury,stand
on the side rails before starting treadmill.
Read owners manual before using.

Press the quick key to choose the speed
or incline after press start.

QUICK KEY

FOR SPEED/INCLINE

06

05

04

03

10

08

06

04

out

Audio

in

Audio

沖孔

沖孔

RESET

ART

OP

MODE

ST

ST

P1

SPEED

INCLINE

INCLINE-5K M

INCLINE -

10KM

SPEED

SPEED

SPEED

SPEED

INCLINE

P2

P3

P4

P5

P6

P10

P11

P12

SPEED

quick key

quickkey

INCLINE

5

km

INCLINE

INCLINE

INCLINE

P7

P8

P9

Safety Key slot. The safety must be 

positioned here for the treadmill to function 

Summary of Contents for 5.65

Page 1: ...6 75 MOTORIZED TREADMILL USER WEIGHT LIMITATION 350lbs 160kgs SERIAL NUMBER found on frame...

Page 2: ...er allow more than one person on the treadmill at a time Wear appropriate exercise clothing when using the treadmill Do not wear loose clothing that could become caught in the treadmill Athletic suppo...

Page 3: ...The manufacturer recommends a single outlet surge protector with a UL 1449 rating as a Transient Voltage Surge Suppressor TVSS with a UL suppressed voltage rating of 400V or less and an electrical ra...

Page 4: ...friend Some of the assembly steps may require heavy lifting It is recommended that you obtain the assistance of another person when assembling this product User Weight Limitation Please note that ther...

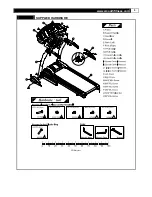
Page 5: ...www smoothfitness com 5 SUPPLIED HARDWARE Millimeters...

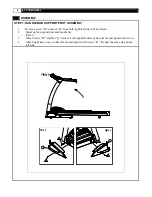
Page 6: ...Q from both right left sides of base frame 2 Stand up the support post and handle bar FIG 1 3 Attach screw M and Nut Q back to both right left sides of base frame and tighten the screws 4 Attach righ...

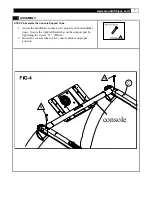
Page 7: ...onsole Support Tube 1 Adjust the handlebars so they are fit properly on the handlebar posts Secure the right left handle bar on the support post by tightening the screws N FIG 4 2 Rotate the console t...

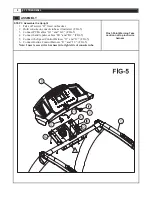
Page 8: ...illustrated FIG 5 3 Connect PCB cables G1 and G2 FIG 5 4 Connect handle pulse cables H1 and H2 FIG 5 5 Connect the Speed Control Harness l1 and l2 FIG 5 6 Connect Incline Control Harness J1 and J2 FIG...

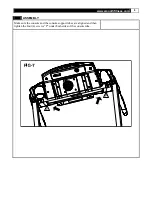
Page 9: ...www smoothfitness com 9 ASSEMBLY Make sure the console and the console support tubes are aligned and then tighten the four 4 screws P under both sides of the console tube...

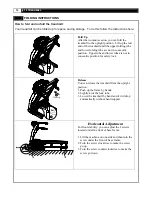
Page 10: ...pper tube and lower tube are not in concentric position for safety lock Release You can release the treadmill from the upright position 1 Push up the frame by hands 2 Lightly kick the lock tube 3 Lowe...

Page 11: ...justments of 1 4 turn at a time and follow with a test If your belt continues to walk to the right simply adjust the left belt tension bolt by turning it 1 4 turn counterclockwise and follow with a te...

Page 12: ...surfaces with a clean water dampened soft cloth to remove excess perspiration Weekly Use of a treadmill mat is recommended for ease of cleaning Dirt from your shoes contacts the belt and eventually m...

Page 13: ...nly for a few minutes in your target heart rate zone However your aerobic fitness will improve over the next six to eight weeks Don t be discouraged if it takes longer It s important to work at your o...

Page 14: ...marily lower body muscle groups These muscle groups are shown in gray color on the chart below MUSCLE GROUPS A Shoulder muscles Calf muscles G B Pectoral muscles Trapezius muscles H C Bicep muscle Tri...

Page 15: ...er Thigh Stretch Sit with the soles of your feet together with your knees pointing outward Pull your feet as close into your groin as possible Gently push your knees towards the floor Hold for 15 coun...

Page 16: ...spiration on the handlebars con troll panel running belt or other treadmill components Always stretch your muscles before exercise program Warm up slowly by walking at a slow speed Increase workout in...

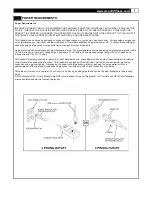
Page 17: ...eans to use that button for next setup process There is 1 LCD window and 12 Alpha numeric displays Handlebar toggle for incline and speed adjustment 1 Left incline adjustment Increase or decrease by 1...

Page 18: ...h workout segment the program will override any adjustments made to the incline The range of incline in programs P6 P10 is from levels 1 to 12 Profiles for the incline programs are shown below 3 ML 6...

Page 19: ...uscles directly over your sternum Adjust the elastic strap so the belt fits snugly and stays in place Body Mass Program Body Mass Index BMI A scientific measure that uses a ratio of height and weight...

Page 20: ...ing the button on the right side decreases the speed by 0 1 km 0 1ml Quick Buttons the display console includes buttons that immediately set the speed to3 4 5 and 6 ml h 4 6 8 and 10 km h without havi...

Page 21: ...speed for each segment by pressing on the buttons then select the desired incline for each segment by pressing on the arrows After selecting the incline and speed for the segment press the MODE button...

Page 22: ...Press mode button of Male or Female selection or press button to scroll to the or 1 selection and then press the MODE button 1 Male 0 Female Because limitations of the LCD display these selections are...

Page 23: ...5 6 6 2 5 0 5 6 6 2 5 0 5 6 6 2 5 0 5 6 6 2 3 7 4 3 5 0 2 5 3 1 3 7 1 2 1 8 2 5 1 2 1 8 2 5 2 5 3 1 3 7 3 7 4 3 5 0 4 3 5 0 5 6 4 3 5 0 5 6 3 7 4 3 5 0 3 1 3 7 4 3 2 5 3 1 3 7 1 8 2 5 3 1 1 2 1 8 2 5...

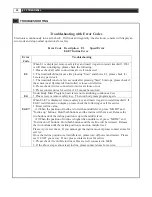
Page 24: ...not read during continuous 8 sec 1 Please reset or remove safety key Then run body mass program again E6 E7 When E6 E7 is displayed remove safety key and insert it again to restart treadmill If E6 E7...

Page 25: ...the advice is used at your sole risk Procedure for Obtaining Your Remedy Under This Warranty To obtain service on a Smooth Fitness product call Smooth Fitness In the instance that service is not avail...

Page 26: ...Smooth Fitness 780 5th Ave King of Prussia PA 19406 Toll Free Customer Service 1 888 800 1167 Website www smoothfitness com...

Reviews: