STEP BY STEP INSTALLATION INSTRUCTIONS
Wall Mount
Double Rod Set
Euro Track
Basics Hardware -
Heavy Duty
Page 1: ...STEP BY STEP INSTALLATION INSTRUCTIONS Wall Mount Double Rod Set Euro Track Basics Hardware Heavy Duty...
Page 2: ...it we want any potential returns to be a painless as possible Customer Service Hours Monday Friday 6am 6pm PT Saturday Sunday 7am 4pm PT smithandnoble com Everything You Need Table of Contents Step 1...
Page 3: ...o support the weight of the product being installed if you re not sure either give us a call or ask a professional at your local hardware store Once obtained follow the fastener manufacturer s instruc...
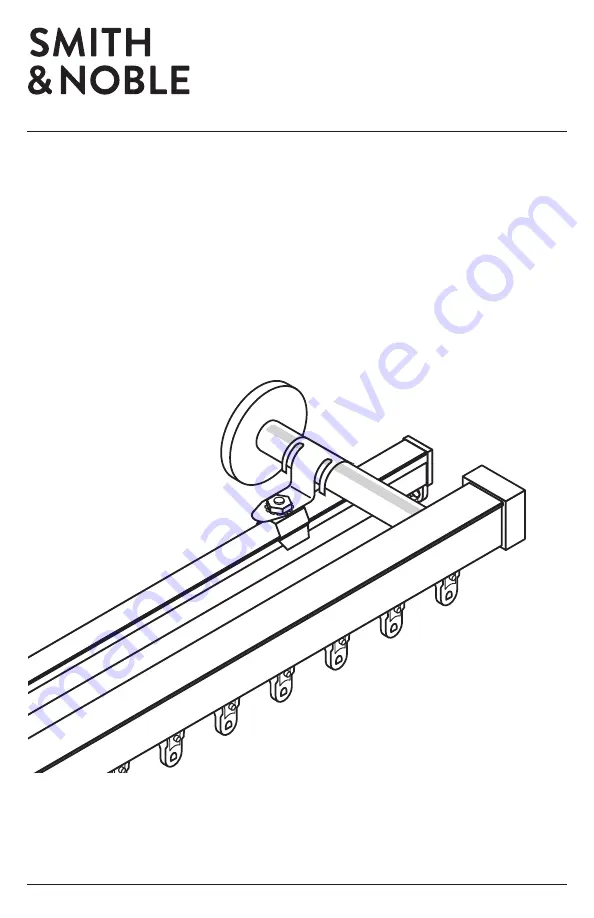
Page 4: ...s Using a pencil lightly draw a circle around the base of the bracket onto wall see Figure A Check to make sure the circles are level aligned with each other Remove back plate and center it inside of...
Page 5: ...t before the beginning of the end cap to prevent the master carrier from moving all the way to the end STEP 3 ATTACHING THE ROD CONNECTOR STEP 4 ADDING OR REMOVING CARRIERS END STOP BACK CARRIERS ONLY...
Page 6: ...cap to prevent master carriers from moving all the way to the end Back Rod Your track rod will come with all master carriers and regular carriers pre installed If you need to take add or take out som...
Page 7: ...in the back of the track Do not tighten at this time Attach End Cap Finial go to step 6 STEP 5 ATTACHING BRACKET POSTS Slide in End Cap onto rod and tighten screw END CAP FINIALS OPTIONAL BACK OF ROD...
Page 8: ...track is centered rotate the posts clockwise to tighten against the track CENTER THE ROD 1 Assemble Back Rod Clips for Outside Posts 2 Attach assembled clip to Outside Posts 3 Assemble Back Rod Clip...
Page 9: ...p Insert drapery pin hooks into carriers and master carriers Split Drapery For Split drapery start pinning from the center and go towards the ends One Way Draw Drapery For drapery opening from one sid...
Page 10: ...ing is needed to maintain the beauty of your Hardware To Vacuum Use brush or dust head attachment To Dust Use soft clean cloth CARE CLEANING Baton Wand optional Baton Wand will be pre attached to the...
Page 11: ...to the original owner requires a proof of purchase hang on to your receipt and covers defects in material or craftsmanship Hardware must have been properly installed We reserve the right to determine...