background image

Conversion Kit

4

1)

Check that the main gas supply line to the range is shut off and that the
power supply cord is disconnected. 

2)

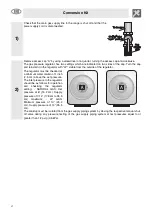
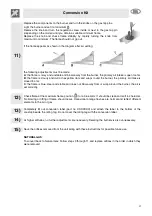
Remove access cap “A” by using a screwdriver or a quarter, turning the access cap anti-clockwise.
The gas pressure regulator has two settings which are indicated on two sides of the cap. Turn the cap
and reinstall it in the regulator with "LP" visible from the outside of the regulator. 

The regulator must be checked at
a minimum water column of 1 inch
(2.5 cm) above the set pressure.
The inlet pressure to the regulator
should be as follows for operation
and checking the regulator
setting: - NATURAL GAS: Set
pressure at 6” (15.2 cm). Supply
pressure of 7-14” (17.8 cm to 35.5
cm) maximum; - LP GAS:
Minimum pressure of 10” (25.4
cm). Supply pressure of 14” (35.5
cm). 

The cooktop must be isolated from the gas supply piping system by closing the respective manual shut-
off valve during any pressure testing of the gas supply piping system at test pressures equal to or
greater than 1/2 psig (3.5 kPa). 

Summary of Contents for PU 64-LP

Page 1: ...rds inform you on how to reduce the risk of injury and as to what can occur if the instructions are not followed IMPORTANT Observe all government codes and ordinances WARNING For your safety the information in this manual must be followed to minimize the risk of fire or explosion or to prevent property damage personal injury or death This conversion kit must be installed by a qualified service age...

Page 2: ...regulator The regulator must be checked at a minimum water column of 1 inch 2 5 cm above the set pressure The inlet pressure to the regulator should be as follows for operation and checking the regulator setting NATURAL GAS Set pressure at 6 15 2 cm Supply pressure of 7 14 17 8 cm to 35 5 cm maximum LP GAS Minimum pressure of 10 25 4 cm Supply pressure of 14 35 5 cm The cooktop must be isolated fr...

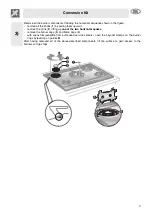
Page 3: ...rd remove the grids 2 lifting up one of the two horizontal spokes remove the burner caps 3 and flame caps 4 with wrench A available from authorized service centers open the bayonet clamps on the burner rings by levering on guides B After having removed all of the above described components lift the surface to gain access to the burners and gas taps ...

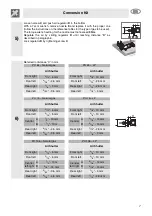
Page 4: ... Front Left 4000 0 60 1500 0 40 Central A 12000 1 30 4000 Central A 11500 0 87 4000 0 58 B 0 71 B 0 48 Rear right 5200 0 95 1800 Rear right 5400 0 67 1800 0 40 Rear left 7200 1 13 3000 Front Left 7300 0 78 3000 0 50 PU 75 Natural gas PU 75 LP Qt Injector Qr Qt Injector Qr Qr BTU Ø mm BTU BTU Ø mm BTU BTU Central right A 12000 1 30 4000 Central right A 11500 0 87 4000 0 58 B 0 71 B 0 48 Central lef...

Page 5: ... 10 mm Front left 3 16 4 5 mm Front left 1 10 2 5 mm Rear right 1 8 3 mm Rear right 1 10 2 5 mm Rear left 5 32 3 5 mm Rear left 1 8 3 mm PU 75 Natural gas PU 75 LP Air Shutter Air Shutter Front right 2 10 5 mm Front right 3 8 10 mm Front left 2 10 5 mm Front left 3 8 10 mm Central A 1 2 13 mm Central A 9 16 14 mm B 1 2 13 m B 9 16 14 mm Rear right 3 16 4 5 mm Rear right 1 10 2 5 mm Rear left 5 32 ...

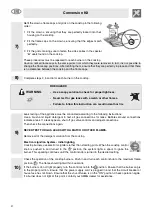
Page 6: ...o the following instructions Use a brush and liquid detergent to test all gas connections for leaks Bubbles around connections indicate a leak If a leak appears shut off gas valve controls and adjust connections Then check the connections again NEVER TEST FOR GAS LEAKS WITH A MATCH OR OTHER FLAMES Remove all of the detergent solution from the cooktop Electronic Ignition System initial lighting Coo...

Page 7: ...imary air intake is closed too far C the flame is blue clear and stable and does not blow away from or wrap around the burner the air is set correctly 12 Check flame at the maximum flame position for a blue color It should be clean and soft in character No blowing or lifting of flame should occur Occasional orange flashes are normal and reflect different elements in the air or gas 13 Completely fi...

Reviews: