background image


36 

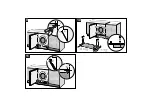
pralka została umieszczone na końcu danego ciągu mebli. 

Osłona  musi  bezwzględnie  zapobiegać  stykaniu  części 
in

stalacji  elektrycznej  pod  napięciem  i  musi  wymagać 

użycia narzędzi do jej usunięcia.


Firma  nasza  nie  ponosi  żadnej  odpowiedzialności  za 
nie

przestrzeganie powyższych norm bezpieczeństwa.


Zakładanie 
listwy


Ciągła  listwa  zestawu  mebli  kuchennych  musi  być  wyjmowana 
w  celu  umożliwienia  ewentualnego  czyszczenia  pompy 
spustowej. 
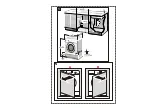
W  niektórych  przypadkach  listwa  zestawu  mebli  kuchennych 
nie  jest  ciągła,  lecz  jest  po  prostu  ograniczona  do  szerokości 
pralki. W przyp

adku takim listwa mebla może być zamocowana 

do  listwy  pralki  4  śrubami,  przestrzegając  4  punktów 
odniesienia na niej umieszczonych (

patrz rys. 9-10-11

). 

Założenie listwy mebli nie musi przewidywać eliminacji lub 
modyfikacji  listwy  pralki,  lecz  ta  ostatnia 

ze  względów 

bez

pieczeństwa  nie  może  zostać  usunięta  oraz  musi 

pozo

stać nienaruszona i zamocowana do pralki.


Summary of Contents for LBI107

Page 1: ...LAVATRICE WASHING MACHINE LAVE LINGE WASCHVOLLAUTOMAT LAVADORA LIBRETTO ISTRUZIONI IT INSTRUCTION MANUAL EN MANUEL D INSTRUCTIONS FR GEBRAUCHSANLEITUNG DE MANUAL DE INSTRUCCIONES ES ...

Page 2: ...th a line through it on the appliance or its packag ing indicates that the product must be disposed of separately from other waste at the end of its life cycle The user is thus obliged to consign scrapped appliances to the special electronic and electrotechnical waste disposal centres or return them to the dealer on purchase of a similar new appliance on a one to one basis Consignment to the appro...

Page 3: ...ldren risking their lives by locking themselves inside during play and cut the power supply lead after removing the plug from the socket The appliance must be delivered to a recycling facility Environmental protection Use the whole of the maximum recommended capacity Never exceed the maximum permitted load Do not use the prewash function for lightly or normally soiled items Follow the manufacturer...

Page 4: ...iability for uses other than those stated above The nameplate with the technical data serial number and mark is in a visi ble position in the part in view after the door has been opened The name plate must never be removed The electrical and plumbing works required to install the appliance must only be carried out by skilled staff The appliance must be connected to earth in compliance with electri...

Page 5: ...laced in the appliance Before loading garments for washing check that the pockets are empty buttons secure and zips fastened Do not wash frayed or torn garments During washing at high temperatures the glass in the door will become very hot Check that all water has been drained from the appliance before open ing the door If there is water inside pump it out before opening the door If in doubt read ...

Page 6: ...ould be discon nected from the electricity and water supplies and the door should be left ajar to prevent unpleasant smells from building up inside For Great Britain only WARNING this appliance must be earthed Fuse replacement If the mains lead of this appliance is fit ted with a BS 1363A 13amp fused plug to change a fuse in this type of plug use an A S T A approved fuse to BS 1362 type and procee...

Page 7: ... to the supply cord it has to be replaced by the manufacturer or an authorized technical service center in order to avoid any risk Important This appliance is easy to use However for the best results it is important to read this manual carefully and follow all the instructions before putting it into operation The manual provides the correct instructions for installation use and mainte nance as wel...

Page 8: ...s fixed in place for transport using the screws A on the rear of the washing machine with the relative plastic spacers B Once the screws have been removed the power supply lead can be used 1 Undo all the screws with a 10 mm spanner 2 Remove all the screws A from the rear 3 Remove all the plastic spacers B 4 Fit all the plastic plugs C provided to pre vent water splashes from getting into the appli...

Page 9: ...et if neces sary Once done fix the feet in place with the locknuts provided 3 On appliances with adjustable rear feet note that the rear of the appliance rests on skids and not on the feet Before inserting the appliance into its place between the kitchen units check that the rear feet are screwed fully in to prevent damage as the appliance is shifted into position Once the appliance is in position...

Page 10: ...er sup ply hose must not be kinked or crushed and must not be changed or cut Threaded connections must only be tightened by hand 3 When appliances are supplied with hot water the intake water tempera ture must not exceed 60 C and the hose with red screw collar must be con nected to the hot water supply tap WARNING If the connection is made to new pipelines or lines which have been out of use for a...

Page 11: ...he hose to a sink or bathtub 2 In all cases check that the end of the drain hose is securely fixed to pre vent the repulsive force of the water from pushing it out of place WARNING Avoid kinks or restrictions to ensure effective drainage Any drain hose extensions must be no more than 1 metre long must be of the same diameter and must be free from restrictions of all kinds The end of the drain hose...

Page 12: ...he appropriate type WARNING The power plug must be accessible after the appliance has been installed It is absolutely essential to connect the appliance to earth Connect the plug to a socket with an earth connection in good working order The manufacturer declines all liability for direct or indirect injury or dam age deriving from a non existent or defective earth connection Correct electrical con...

Page 13: ... off and selecting programmes Can be turned in either direction Does not turn while programmes are in pro gress Start Pause button For starting and stopping working cycles Display shows the settings spin speed cycle status child lock on off The settings can be modi fied using the buttons underneath Buttons from left to right Spin speed selection Option selection Confirm option Delay Timer Child Lo...

Page 14: ...ns such as grass fruit egg blood rust ballpoint pen etc should be dealt with before washing Depending on the type of fabric there are a large number of commercial stain removers on the market In all cases stains should be cleaned or diluted at once since the older they are the harder they are to remove Failure to comply with washing guidance symbols may result in damage to the items washed Wool On...

Page 15: ...ibuting it evenly over the drum with items opened out and not bundled together if possible large and small items should be well mixed 2 The washing machine covered by this manual can be loaded with up to 7kg of washing for each wash If this weight is exceeded the washing results will be poor and the appliance may malfunction 3 To save energy it is more economical to wash full loads of the various ...

Page 16: ...mmended dose is indicated for 4 levels of water hardness and for loads of 4 5 kg of washing with average dirt levels Request information about the water s hardness from your water supply company Water hardness Level of hardness French degrees fH German degrees dH Soft Up to 15 Up to 8 Medium 15 25 8 14 Hard 25 40 14 22 Very hard More than 40 More than 22 4 6 POWDER DETERGENT DOSES Laundry with nor...

Page 17: ...ice on selecting programmes in relation to the type of fabric refer to the Pro grammes Table supplied with this manual 4 10 SWITCHING ON THE APPLIANCE AND SELECTING THE WASHING PROGRAMME To switch on the appliance and select the programme proceed as follows 1 Turn the programmes knob in either direction This switches on the washing machine 2 Select the washing programme The time left to the end of...

Page 18: ...tion adds a rinse to the selected washing pro gramme Rapid reduces the duration of the washing cycle Suitable for small amounts of laun dry with only light dirt Buzzer sets whether or not the buzzer will sound at the end of the cycle The appli ance comes with the buzzer function on 2 To confirm the selected option simply press the Confirm options button and the LED of the option remains on 3 To de...

Page 19: ...function keep pressing the key repeatedly until the display shows 0 4 The Start Pause symbol flashes on and off until the cycle starts After the cycle starts the symbol remains constantly lit 4 13 STARTING THE WASHING PROGRAMME 1 To start the washing programme after making your personal settings press the Start Pause button 2 Once the cycle has started the display shows the time remaining before t...

Page 20: ...ress the Start Pause button again 4 15 PROGRAMME END Washing programmes are completed automatically The word END appears on the display and the Time remaining light goes out 1 Switch the appliance off by turning the programmes knob to OFF 2 Unload the laundry from the drum 3 Leave the door ajar to allow the interior of the washing machine to dry out 4 Turn off the water intake tap If during the in...

Page 21: ...ctivate the function 4 17 OPENING THE APPLIANCE IN AN EMERGENCY In the event of a power failure the door is opened using the mechanical release device activated by means of the lever in the bottom of the appliance Turn the knob to Off and disconnect the power supply plug from the sock et Drain off the water see point 5 4 Pull the lever down and open the door WARNING scolding hazard before opening ...

Page 22: ...r spray the washing machine with jets of water 5 2 CLEANING THE DRUM Remove any rust marks from the drum using a stainless steel cleaner or very fine sandpaper for particularly stubborn cases For descaling the washing machine use only brand name descalers which contain an anti corrosion agent for washing machines Always follow the producer s instructions with regard to use and dosages After descal...

Page 23: ...ose A WARNING if the hose is hot the water is hot or boil ing hot Place a shallow container on the floor and re move the plug B to drain off the water Depending on the amount of water in the appliance the container may have to be emptied several times When no more water is coming out close the hose again by pushing the plug B firmly back into place 4 Unscrew the cover of the pump D by turning it t...

Page 24: ...n water or the amount of water is insufficient To clean proceed as follows Remove the mains plug to disconnect the appliance from the electricity supply Turn off the water tap Unscrew the intake hose fitting from the tap Unscrew the intake hose fitting from the tap Clean the filter with water with the aid of a small brush When screwing the intake hose fitting back into place check that the filter ...

Page 25: ...he level of the glass in the door because new appliances use very little water to achieve the same washing and rinsing results 4 Water not pumped out Check that drain hose is not kinked drain pump not fouled 5 Water not pumped out after last rinse in deli cate fabrics and wool wash programmes It is not a malfunction pause programmed into washing pro gramme to prevent creasing of fabrics To pump ou...

Page 26: ...ergent on laundry Many phosphate free detergents contain substances with low wa ter solubility Select Rinse programme or brush the laundry 15 Washing results unsatis factory Probably too little detergent or unsuitable detergent used Difficult stains not dealt with before washing Correct temperature not set Basket overloaded ERROR DISPLAY In case of a malfunction the appliance will identify the pro...

Page 27: ...40 C Pre wash cy cle 7 1 02 78 02 18 40 1400 1200 1000 53 57 63 Cotton 60 C 7 1 11 62 01 51 55 1400 1200 1000 53 57 63 Easy care 40 C 3 5 0 62 50 01 43 40 1000 30 Detergent for colours delicates wi thout optical brighteners Mixed load 40 C 3 0 40 36 00 50 40 1200 57 Standard detergent without whi teners Wool 30 C 2 0 20 49 00 47 30 600 55 Detergent for woollens The actual values may differ from th...

Page 28: ...tomer care service in your country or refer to the website and register the product with the required codes Faults can also be resolved independently before requesting assistance by referring to the relative section in the manual Information on the performance of your washing machine or washer dryer can be found in the EU EPREL database The website can be accessed quickly using the QR code on the ...

Page 29: ...pin Max 7 Rinse and pump out only or pump out and final spin at the selected speed Pump out and spin Max 7 Pump out only or pump out and final spin at the selected speed Synthetics Items for refreshing 1000 3 5 Cold wash rinses and final spin at the selected speed Items with light dirt 30 1000 3 5 Wash at 30 C rinses and final spin at the selected speed Items with normal dirt 40 1000 3 5 Wash at 4...

Page 30: ... centrifuga Max 7 Risciacquo e solo scarico o scarico e centrifuga finale alla velocità selezionata Scarico e centrifuga Max 7 Solo scarico o scarico e centrifuga finale alla velocità selezionata Sintetici Capi da rinfrescare 1000 3 5 Lavaggio a freddo risciacqui e centrifuga finale alla velocità selezionata Capi poco sporchi 30 1000 3 5 Lavaggio a 30 C risciacqui e centrifuga finale alla velocità...

Page 31: ...Rinçage et essorage Max 7 Rinçage et vidange uniquement ou vidange et essorage final à la vitesse sélectionnée Vidange et essorage Max 7 Vidange uniquement ou vidange et essorage final à la vitesse sélectionnée Synthétiques Vêtements à rafraîchir 1000 3 5 Lavage à froid rinçages et essorage final à la vitesse sélectionnée Vêtements peu sales 30 1000 3 5 Lavage à 30 C rinçages et essorage final à l...

Page 32: ...oder Abpumpen und Endschleudern mit der eingestellten Drehzahl Abpumpen und Schleudern Max 7 Nur Abpumpen oder Abpumpen und Endschleudern mit der eingestellten Drehzahl Synthetik Wäsche die aufgefrischt werden soll 1000 3 5 Kaltwäsche Spülen und Endschleudern mit der eingestellten Drehzahl Gering verschmutzte Wäsche 30 1000 3 5 Hauptwäsche 30 C Spülen und Endschleudern mit der eingestellten Drehza...

Page 33: ...gue y centrifugado Máx 7 Enjuague y sólo descarga o descarga y centrifugado final a la velocidad seleccionada Descarga y centrifugado Máx 7 Sólo descarga o descarga y centrifugado final a la velocidad seleccionada Sintéticas Prendas a refrescar 1000 3 5 Lavado en frío enjuagues y centrifugado final a la velocidad seleccionada Prendas poco sucias 30 1000 3 5 Lavado a 30 ºC enjuagues y centrifugado ...

Page 34: ...ren Max 7 Spoelen en alleen leegpompen of leegpompen en eindcentrifuge bij geselecteerde snelheid Leegpompen en centrifugeren Max 7 Alleen leegpompen of leegpompen en eindcentrifuge bij geselecteerde snelheid Synthetische was Op te frissen was 1000 3 5 Koud wassen spoelen en eindcentrifuge bij geselecteerde snelheid Weinig vieze was 30 1000 3 5 Wassen op 30 C spoelen en eindcentrifuge bij geselect...

Page 35: ...entrifugação Máx 7 Enxaguamento e apenas descarga ou descarga e centrifugação final à velocidade seleccionada Descarga e centrifugação Máx 7 Apenas descarga ou descarga e centrifugação final à velocidade seleccionada Roupas sintéticas Roupas a refrescar 1000 3 5 Lavagem com água fria enxaguamentos e centrifugação final à velocidade seleccionada Roupas pouco sujas 30 1000 3 5 Lavagem a 30 C enxagua...

Page 36: ... tömning eller tömning och slutcentrifugering på valt centrifugeringsvarvtal Tömning och centrifugering Max 7 Endast tömning eller tömning och slutcentrifugering på valt centrifugeringsvarvtal Syntettvätt Uppfräschning av plagg 1000 3 5 Kalltvätt sköljning och slutcentrifugering på valt centrifugeringsvarvtal Lätt smutsade plagg 30 1000 3 5 Tvättning på 30 C sköljning och slutcentrifugering på val...

Page 37: ...ыбранной скорости Полоскание и отжим Макс 7 Полоскание и только слив или слив и конечный отжим на выбранной скорости Слив и отжим Макс 7 Только слив или слив и конечный отжим на выбранной скорости Синтетика Освежение одежды 1000 3 5 Холодная стирка полоскания и конечный отжим на выбранной скорости Белье с небольшим загрязнением 30 1000 3 5 Стирка при 30 C полоскания и конечный отжим на выбранной с...

Page 38: ...DE LAS LAVA DORAS INTEGRABLES ES INSTRUÇÕES DE MONTAGEM DAS MÁQUINAS DE LAVAR ROUPA INTEGRÁVEIS PT MONTAGEINSTRUCTIES VAN INTEGREERBARE WASMACHINES NL MONTERINGSANVISNING FOR INTEGRERBARE VASKEMASKINER DK MONTERINGSANVISNINGAR FÖR INBYGGNADSBA RA TVÄTTMASKINER SE ANKASTRE ÇAMAŞIR MAKİNELERİ İÇİN MONTAJ TALİMATLARI TR ИНСТРУКЦИИ ПО МОНТАЖУ ВСТРОЕННЫХ СТИРАЛЬНЫХ МАШИН RU INSTRUKCJA MONTAŻU PRALEK DO...

Page 39: ...ny uchwyt mechanizmu magnetycznego Ważne Podczas czynności związanych z zakładaniem panelu usunięcie z części przedniej wszystkich elementów zawiasów i zamykania pralka musi być bezwzględnie wyłączona z sieci zasilającej Ostrzeżenie Aby zamocować panel po prawej stronie kierunek przeciwny do kierunku otwierania drzwiczek pralki należy wymontować z przedniej części urządzenia mechanizm typu push pu...

Page 40: ...ić do panelu dwa zawiasy rys 7 4 Zamocować po stronie przeciwnej zaczep dla mechanizmu zamykania push pull lub metalową płytkę dla magnesu rys 7 5 Zamocować panel do pralki zgodnie z instrukcjami rys 8 Regulacja zawiasów Jeśli po przymocowaniu do pralki panel byłby lekko przechylony lub przesunięty względem przedniej części można to poprawić regulując ruchomą część zawiasów rys 9 Pozycjonowanie w ...

Page 41: ...ć wyjmowana w celu umożliwienia ewentualnego czyszczenia pompy spustowej W niektórych przypadkach listwa zestawu mebli kuchennych nie jest ciągła lecz jest po prostu ograniczona do szerokości pralki W przypadku takim listwa mebla może być zamocowana do listwy pralki 4 śrubami przestrzegając 4 punktów odniesienia na niej umieszczonych patrz rys 9 10 11 Założenie listwy mebli nie musi przewidywać el...

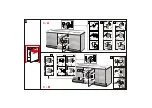
Page 42: ...ca 82kg 820mm 16mm 560mm 596mm 150mm 58mm 820mm 1 9 A B 2 82 ...

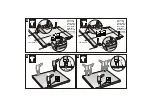
Page 43: ...2 2 2 3 3 3 12 12 12 11 11 11 7 7 7 10 10 10 8 8 8 9 9 9 2 2 2 1 1 1 3 3 3 4 4 4 6 6 6 5 5 5 4 4 5 4 1 1 1 2 2 3 3 2 3 C C 6 6 6 5 5 5 7 7 7 8 8 8 C A B A B C 9 D D 2 2 2 1 1 1 3 3 3 4 4 4 A B 3 A 3 B 3 ...

Page 44: ...3mm 13mm 592 595mm 16 21mm 592 595mm e e e e e e e e e e e e Unterkante Lower edge Côté inférieur Lato inferiore Lado inferior Onderkant Unterkante Lower edge Côté inférieur Lato inferiore Lado inferior Onderkant 9 4 5 6 Нижний край Нижний край Strona dolna Strona dolna ...

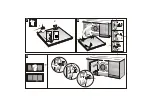
Page 45: ...1 1 1 2 2 2 3 3 3 1 1 1 2 2 2 3 3 3 1 1 1 7 8 9 2 1 2 4 3 5 6 ...

Page 46: ...9 10 11 ...

Reviews: